Choosing products for spikes
Spikes are not the same type of product. They are divided according to the following parameters:
- Material. Products are made from alloys: aluminum, steel or plastic.
- Form. There are basic shapes: round, oval, tetrahedral. In practice, there are many different forms of these products.
- Core type. There are products with a solid insert in the form of a tube, rod, and so on.
- Single and double flange studs. The latter need to be installed with an aggressive driving style.
When choosing elements for studs, consider: driving speed, driving style, tire characteristics, tread height. When re-studding, pay attention to the size of the attachment points for the fallen studs; as a rule, the sockets are slightly broken: it makes sense to use a larger diameter of the products. “Native” thorns will not stay in broken sockets.
It is not difficult to install studded elements at home; you must adhere to the following rules:
- The stud should not protrude more than 1.3 mm from the rubber. This criterion is taken into account when choosing the height of the stud elements.
- Tires should be studded 1-3 months before the onset of the winter season; during this period, the inserted stud elements will be more tightly sealed with rubber and will last longer.
- A prerequisite for the long service life of studded tires is running in the tires. It consists of driving a car (300 km) without exceeding the speed (up to 80 km/h) and without additional loads on the wheels.
We recommend watching a video about re-studding tires using repair studs:
Advantages of tire re-studding
- Smooth cornering.
- Reduced slippage during starts.
- Increased adhesion to difficult road surfaces.
- Shortening the distance when braking.
However, this method is not suitable for those who move exclusively within the city. Among the shortcomings there are:
- Reduced ride quality.
- Increased vibration and noise.
- The appearance of various vibrations and decreased comfort.
- Increased fuel consumption.
- Tire wear (when used on asphalt).
For an objective picture, it is worth saying that repeated dismantling and subsequent installation of studs on tires is still not useful; it is not recommended to perform the re-studding procedure more than twice.
What are the best spikes to choose?
Many people believe that spikes are the same type of products that do not differ from each other. Actually this is not true. Today there are many varieties of thorns and they may differ in the following characteristics.
- The body material of the “claws” can be made of aluminum alloys (marked AD), steel (SD) or plastic (MD);
- The shape of the products can be classic round, oval (OD), tetrahedral, diamond (DD) and so on. In fact, there are many more forms, these are just the main ones, the most popular;
- Spikes can be single-flange or double-flange. The latter are characterized by increased reliability, but it makes sense to install them only if you like to drive quickly along highways at high speeds;
- The type of core can be tubular, rod or other type. To put it simply, a single-flange tenon can be either round or oval, while a double-flange tenon has the shape of a “glass.”
There are no universal models of studs, so when choosing products it is important to understand three important parameters for yourself: what speed you drive, what your driving style is and what characteristics the selected tires have (tread, hardness, etc.).
Important! The stud should not protrude outward from the tire by more than 1.3 mm. Therefore, it is necessary to purchase spikes of the appropriate length.
It is worth noting the number of spikes that can be installed. In fact, there are no restrictions on the territory of the Russian Federation, but most motorists prefer to adhere to European standards, according to which the following restrictions exist:
- It is recommended to install no more than 90 pieces on 13-inch wheels;
- 14-15 inches – 110 pieces;
- 16-inch – 150 pieces.
In addition, remember 2 important rules:
- Studring must be done before the onset of the winter season. New studs need to sit for some time (preferably 2-3 months), in this case they will last longer and will stay firmly in the tire;
- Studded tires need to be broken in. To do this, the first 500 km must be driven at low speed without strong jerks or braking.
Once the equipment for studding winter tires has been prepared, you can proceed directly to the installation process itself.
When is it legal to switch to winter tires?
Let's consider paragraph 5.5 of Appendix 8 to the technical regulations of the customs union TR CU 018/2011 “On the safety of wheeled vehicles”:
5.5. It is prohibited to operate vehicles equipped with tires with anti-skid studs in the summer (June, July, August).
During the winter period (December, January, February), the operation of vehicles of categories M1 and N1 that are not equipped with winter tires that meet the requirements of paragraph 5.6.3 of this annex is prohibited. Winter tires are installed on all wheels of these vehicles.
A period different from that specified in paragraph one of this paragraph may be established by the legislation of a member state of the Eurasian Economic Union due to climatic and geographical factors characteristic of member states of the Eurasian Economic Union.
So, what can be understood from this paragraph:
- During the summer months (June, July, August) only studded tires are prohibited. This requirement applies to all vehicles.
- During the winter months (December, January, February), only winter tires are permitted. You can put both studded and non-studded tires on your car. The main thing is that they are marked “M+S”, “M&S” or “MS” and the corresponding drawing (in the picture on the left). The requirement applies only to category B (M1 cars and N1 trucks). The restriction does not apply to other vehicles from November 11, 2021.
- The terms of the ban on exploitation can only be increased by the legislative authority of any level (federal, regional) and cannot be reduced. Those. In your region, for example, the use of studded tires may be prohibited from May to September. At the same time, regional authorities cannot reduce the period of the ban, i.e. From June to August, cars in all regions must not use studs.
Thus, there are the following intervals for using car tires:
- Summer tires (without M+S marking, etc.) can be used from March to November.
- Winter studded tires (marked M+S, etc.) can be used from September to May.
- Winter studless tires (marked M+S, etc.) can be used all year round.
Let's look at a table with periods of possible tire use throughout the year:
| Summer | Winter studded | Winter studless | |
| Winter (December – February) | + | + | |
| Spring (March – May) | + | + | + |
| Summer (June – August) | + | + | |
| Autumn (September – November) | + | + | + |
Thus, if you have summer tires (without markings) and winter studded tires, then you must replace them during the fall, i.e. from September to November.
The tire replacement should be done during the spring, i.e. from March to May.
Number of studs in the contact patch
For a passenger car weighing about 1.2 tons, the weight per wheel is 300 kg. With a tire pressure of about 2 kg per cm2, the contact patch area will be approximately 150 square meters. cm. This means that the tread of a new studded tire with a width of 155 mm should have 8 studs for every 10 cm of circumference. For satisfactory grip, loss of no more than 20% of the studs is allowed. That is, 6–7 spikes may remain in the contact patch. If you have less of them left, the tire needs to be studded. Before doing this, measure the remaining tread height. A tread height of less than 4–6 mm indicates that the tires should not be studded, but replaced with new ones.
This is interesting: Clutch drives: what does it mean, why and what to do
Anti-slip stud device
All studs for serial passenger car tires consist of a body and a carbide core protruding from it. For better retention of the tread rubber, the body has 2-3 flanges. The material for their manufacture can be either steel or plastic. The flanges of the repair studs have a slightly larger diameter than regular ones. Since flanges of the same diameter will not be held by a broken hole.
Tenon mandrel design
The mandrel consists of two parts:
- A thick-walled metal tube with an internal diameter slightly larger than the diameter of the repair tenon flanges. Its length should be several centimeters greater than the width of your palm.
- A piece of steel rod that fits tightly into a tube. It is necessary that its length be equal to the length of the tube.
Choosing paint and tools
Cost-effectiveness or a professional approach are two restoration paths chosen by drivers. In an effort to ensure the long life of a part, most car enthusiasts choose materials and tools to carry out restoration and painting as good as in a car repair shop. To do this they purchase:
- liquid skin;
- paint selected for skin type;
- absorbent to effectively remove sweat stains;
- degreaser;
- finishing paint. If necessary, it can have a matte effect;
- to remove the steering wheel, you will need to stock up on a set of screwdrivers;
- for grinding, take sanding paper - sandpaper with different grain sizes;
- For matting, stock up on gray Scotch-Brite. It is used to inflict risks. That is, they perform matting of parts before applying a coat of paint;
- To paint the steering wheel and not spoil the interior, take a protective film and masking tape to secure it.
What you need to know before studding
Having chosen the appropriate studs and tires, you should once again return to the basic rules, the observance of which will ensure the durability and safety of using winter wheels studded in artisanal conditions:
- It is better to stud rubber on the eve of the winter season in order to allow the studs to “rest” for two to three months before starting use;
- An important role will be played by proper running-in of tires, in compliance with the speed limit (no more than 80-90 km/h) for at least 500 km;
- The proportions of the spikes should be observed depending on the radius. For example, for 13-inch wheels 90-95 pieces will be enough. for one cylinder. For 14, 15th radius - 100-110 pcs., for 16, 17 - 150-165 pcs.
- The cost of one stud starts on average from 10-15 rubles; some organizations offer to stud a tire at a price of 500-650 rubles, regardless of the number of studs supplied.
Which spikes are best to choose?
The main task of studs is to provide reliable grip on the road. The maximum load falls on this element of the winter tire during acceleration and braking of the car. When a vehicle moves along a highway or in a city at a uniform speed, the load decreases and increases again when performing maneuvers.
Different operating conditions of a car have their own impact on the wear of studs and tires in general, therefore, by choosing studs to suit your driving style, you can significantly increase the life of the wheels.
Spikes vary in shape, volume, weight, and composition. Each parameter corresponds to a certain behavior of the stud in road conditions.
The stud body can be made from:
- soft alloys (for example, aluminum);
- hard metals (iron);
- non-metallic elements (plastic).
Different types of tire studs
Since the studs are subject to serious stress, supporting the weight of the car, the most durable products should be used. Soft alloys of metals or other substances with an aggressive driving style will most likely lose their original shape and will no longer fulfill their intended purpose.
The shape of the working surface of the tenon is also important. The most common types are:
- oval or round;
- square or rectangular;
- multi-wounded.
It is easy to imagine that the more sharp protruding edges of the stud cut into the road surface, the better grip will be provided.
Thus, preference should be given to multi-faceted or acute-angled spikes. Their only drawback is the increase in price, depending on the number of edges.
The last thing you should pay attention to when choosing a stud is its attachment to the rubber. It also has various options, depending on which the degree of shrinkage and strength of the resulting structure vary. The most preferable would be double- or multi-flange studs, the base of which has 2 or more extensions, which ensures reliable fixation.
The more flange grooves the stud has, the more securely it sits in the tire.
There are other parameters that determine the lifespan and quality of operation of studded tires, but they are less significant than the above parameters.
Which tires to choose for tucking
Having decided to make your own studs, you should seriously approach the issue of choosing tires.
The most suitable would be rubber that has already been prepared by the factory for self-studding, i.e. it will already have technological holes for installing a tenon.
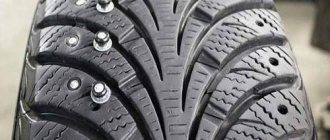
Studded tire with holes for studs
You can purchase rubber that is not prepared for studding using a homemade method. Here the main attention should be paid to the composition of the rubber mixture. As a general rule, studless winter tires have a very soft consistency in order to provide the best grip on winter surfaces. However, a self-installed stud in such a tire will not last long due to the lack of reliable fastening.
It is not recommended to use all-season tires for studs, due to the lack of proper grip at subzero temperatures. But, despite this, the composition of all-season rubber has a harder structure, so the stud in it will be fixed more firmly than in a friction winter tire.
It is strictly forbidden to stud and use summer tires not intended for this purpose in winter conditions.
It is advisable to use new tires, but if finances are limited, previously used products are also suitable. At the same time, the period of its early operation should not exceed 3 years, and the remaining tread should not be less than 4 mm.
This is interesting: DIY car polishing products
Re-studding: to do or not?
Secondary studding of winter tires involves installing new studs in holes from which a previously installed stud fell out or was removed for other reasons.
This procedure has its opponents and supporters.
Of course, the main advantage will be significant savings on the purchase of new wheels, and the level of comfort and safety of secondary studded tires will again increase. Moreover, if previously there were almost no thorns left on it.
However, there are several reasons why this procedure may not make sense.
First, you should check whether the tire can be used in the future. After all, using tires that are older than 4 years and have less than 4 mm of tread remaining is considered unsafe.
Secondly, for re-studding, serious requirements are placed on the condition of the hole itself, where it is planned to mount the tenon a second time. If there are cracks, tears, thickening of the walls of the seat, and other damage, re-studding is not allowed.
The absence of such damage is highly doubtful, since a previously installed element has already fallen out.
Re-studding of tires is strongly not recommended!
If, for some reason, a recently purchased tire is missing a few pieces, you should not buy a new tire because of this. In this case, it will be more profitable to re-stud.
How can you tell if a tire needs repair?
Let’s say right away that restoring tire studs is a completely doable operation. If the tread has sufficient depth and the rubber material itself does not show any particular signs of wear, then there is no need to purchase a new set.
The repair will allow you to completely restore the original technical characteristics of the rubber, and will also save a large sum of money.
You can determine that a product needs restoration based on the following signs:
- holes are clearly visible on the surface, which were left behind by fallen thorns;
- there is a large gap between the stud and the tread;
- metal elements have lost their initial strength of fixation; without much effort they can be sunk inside the tire or loosened;
- the height of the spikes above the rubber surface has dropped to one and a half millimeters; traces of mechanical stress, abrasion and deformation are visible on them.
When can studs be repaired?
Even with the studs completely fallen out, the winter tire remains functional. True, on ice it behaves worse and in terms of characteristics is close to the so-called friction tires, popularly called Velcro. Now there are technologies that allow you to install new ones instead of lost teeth.
First you need to inspect the wheel and assess the level of damage. The tread height must be at least 6 mm. Then the new teeth will be able to completely go into the old sockets. At the same time, the rubber should not have cracks or cuts, which indicate structural damage to the material by chemical reagents and solar radiation. In this case, its repair is already useless.
In general, three-year-old tires can be re-studded, but five-year-old tires are unlikely to do so. Even with a high tread, hardening and cracking rubber does not have the required coefficient of friction and is not able to firmly hold the metal teeth. The surface material of the tire simply “rots.”
The thorns have become dull. How the sensational sign of studded tires was introduced and abolished Read more
Tire studding tools
There are several options for performing the tucking procedure. The simplest, but at the same time time-consuming, method is the manual method. To perform this you will need the following available tools:
- a container with a soap solution and a device for applying it;
- a heavy object for driving in tenons (a regular hammer will do) or semicircular pliers and a screwdriver (for regular insertion of tenons);
- You may need pliers and a screwdriver to remove loose or old parts.
This method is very primitive, it requires a significant amount of time, and in order to evenly seat the tenons, considerable experience and skill will be required.
The simplest is the semi-automatic method. It involves the presence of a screwdriver with a special attachment, with which you can screw in the tenon to the desired depth that is the same for everyone.
Tyres can be studded using a screwdriver
The most advanced and acceptable in terms of obtaining the quality and durability of the finished product is the automatic method. It is carried out using an automatic air gun, which, under high air pressure, literally drives the spikes into the sockets, immediately giving them the desired fixation.
The cost of such equipment is very high. Its purchase is unprofitable for the sake of studding one set of wheels. However, such a tool is available in almost every tire service, so having purchased tires and studs, you can safely go to the nearest car service station for tucking.
Options and rules for tire studding
It is important to prepare the tire for studding. It is better to do the work in advance. It is advisable that the tire rest for 2-3 months before use. During the process, you should remember the following rules.
They start by removing old thorns. You can remove the spikes using a screwdriver or pliers. All remaining holes are cleared of dirt. Be sure to measure the depth of the holes. It is advisable to do this before purchasing spikes, then you can definitely choose the size.
The tire must be firmly secured during operation. Any movement may result in cleat placement errors. If the tire is not initially intended for studding, you will need to make holes using a drill, use a drill with a depth limiter.
Do not place spikes in previously used sockets.
Manual studding
You can make repairs without a gun. This is not difficult to do, but you will need to be careful. Before work, moisten the surface with soapy water.
The method consists of driving the tenon into place with a hammer. This must be done carefully so as not to damage the core.
Adding studs with a pneumatic gun
If possible, it is better to use a stud gun. This equipment will allow you to place the studs in the tread blocks much more accurately.
The work is extremely simple. We put the spikes into the air gun. We insert the legs of the device into the hole and hammer the part into place. The main thing is to ensure that the gun is positioned vertically.
Studring tires yourself is not a difficult task. Even a novice car enthusiast can cope with it. Knowing how the work is done, you can save on preparing your car for the winter season.
Studring tires with your own hands using a screwdriver
There are three ways to add additional studs to winter tires in your garage:
- manual;
- automatic;
- semi-automatic.
The screwdriver is used in semi-automatic installation. The hole is pre-prepared, then the spikes are driven there using a screwdriver. The speed of operation is increased compared to manual installation.
Important! When working with a screwdriver, it is important to monitor the position of the tenon and not screw it too deeply, so as not to damage the cylinder.
The easiest way to do studding is with a pneumatic gun. This ensures reliable fixation. But this method has a disadvantage - the equipment and devices are expensive. This option is most often available in workshops; for restudying tires for personal needs, this option will not bring savings.
Before installation into rubber begins, it is treated with a soap solution. This is necessary so that the spikes fit easily into the holes. They are carefully screwed in with a screwdriver. At the end of the work, you need to leave the tire for some time, this is required for the soap solution to dry. This way the studs will be securely fixed in the rubber.
Please note! During break-in, part of the component may jump out of the hole. Drivers try to install a new one in this place, but this is not worth doing. The hole has already become too wide; the spike will not stay in it anyway.
There are drivers who are trying to make homemade studs for car wheels. Experts recommend purchasing factory-made devices. A special alloy is used for their manufacture. If it is of poor quality, the spikes will quickly fly apart.
Important! In order for the spikes to fit well in the holes, they must correspond to standard sizes. It is almost impossible to achieve this at home.
Screwdriver as a working tool
Installation of spikes
Before installing the studs, you must first fix the tire. It must remain stationary, otherwise the work may go down the drain. Next, moisten the surface of the tire with soap suds to make the stud fit into the hole of the tire more easily.
After this, you need to take an air gun with spikes poured into it, and fix it so that the paws are in the hole for the spike and stretch it a little. The gun itself should be positioned relative to the hole at this time. Make sure there are no distortions. After the tenon has been installed, it is necessary to check how securely it “sits.” If it is installed in a skewed state, then it is better to get rid of such defects, since there will be no benefit from it in any case.
This is interesting: Symptoms of a malfunctioning throttle position sensor and how to check
Advice! If the tenon protrudes too much, just drive it a little deeper. To do this, use a hammer and a steel sheet.
If for one reason or another you installed the “claw” incorrectly, you can easily pull it out before the previously applied foam dries.
If the installation went smoothly, you should not immediately get behind the wheel and take the updated tires for a test drive. Tires need to be given time to “adapt” to the studs, since the stretch and load in this case changes slightly. In addition, the soap foam must dry completely and finally “grab” the thorns and firmly fix them.
You can install tires on the car 2-3 days after the manipulations have been performed.
Healthy! If during the running-in process some of the studs have fallen out, it is better not to insert them back, since when they fly out the holes are deformed and re-installing the products in them is a useless exercise.
If you decide to stud rubber without the corresponding holes, you will have to make them yourself. This is a labor-intensive job, during which you can accidentally damage the rubber. In this case, in addition to an air gun, you will need a special tubular drill.
Preparing for tire studding
Before treating tires, you need to purchase rubber. Tires suitable for studding must:
- Correspond to the operating season, that is, you need to choose winter tires;
- Be made of hard material, since hard rubber holds the studs better;
- Be with a “non-worn out” tread pattern, so it’s better if these are new tires.
Only friction tire models or tires with special holes for studs meet these requirements. Such models cost an order of magnitude higher, but if you stud yourself, you will be confident in the quality of the “claws” and that the technology for their installation was fully followed. Thus, the service life of retreaded tires can be no less than that of new ones.
In addition, you will need a special air gun for studding winter tires and a set of studs, which we will talk about in more detail.
Do-it-yourself studding of winter tires
To stud tires yourself without a pneumatic gun, you must use the instructions below.
- If the tire does not have pre-prepared technological holes, then you should make them yourself. Some car owners use an awl for this. In this case, it is extremely difficult to control the depth. There is a risk of damaging the cord or piercing the rubber through.
It is preferable to use a drill with a depth lock. The drill should have a smaller diameter compared to the base of the tenon. The drilling depth must correspond to the length of the fastening.
- If the holes were made with an awl or drill without a depth lock, then it is necessary to measure the resulting seats. It is recommended to use a caliper for this.
- The working surface should be treated with soapy water. The rubber must remain damp throughout the entire studding process.
- The spike must enter the technological hole strictly at a right angle. To do this, you can use a hammer. The spikes are driven into the seats one by one. It is important to ensure that the working edges are not damaged.
An alternative method is to use pliers and a screwdriver. The seat is first expanded and a tenon is inserted into it using a screwdriver.
When using a screwdriver, you will need a special attachment for tenons. The tool should be positioned strictly at right angles to the tire.
- Check the strength and protrusion height of the spikes.
- Dry the tires and store them. It is prohibited to install and operate tires immediately after studding, as this will lead to the studs falling out.
Signs of a well-executed repair stud
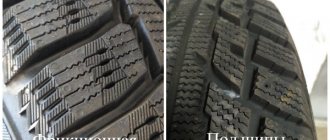
The result of re-studding winter tires is influenced by four factors: remaining tread, quality of studs, tool used and work technology.
With the tread depth, everything is simple - it should be sufficient to hold the stud, that is, no less than the height of the body of the shortest model of the cleat - 7mm. It is ideal if the tread is deeper than this value, so it is better to control the wear of the “standard” studs in advance.
Spikes
It is logical that the studs used when working with worn tires should be different from those installed in new tires. The reason is simple: the seat in the rubber is already deformed and will not hold a standard stud. The repair option consists of three elements: a body, an insert and a special polymer bushing.
Repair tenon design
The metal (there are aluminum and steel models) stud body has an oversized flange. Its task is to securely fix the stud in the tread.
The wear-resistant insert is made of VK8 tungsten carbide, just like the “standard” studs. This is the main working part of the stud, which provides the tire with anti-slip properties. In non-original products, instead of an expensive alloy, which makes up about a third of the price, there may be a less resistant substitute.
The most interesting and unusual element of the repair stud is the polymer bushing. It performs two tasks: it correctly orients the stud in relation to the road surface and fixes it, filling the enlarged seat in the tread.
In addition, as it runs in, by reliably sealing the hole, it prevents road abrasives - stones, sand - from entering the stud body, which would wear it out.
The special polymer used has a high coefficient of wear resistance to abrasion, is not afraid of aggressive deicing agents used in winter, and is not subject to corrosion.
Tool
To install repair studs, the technician must use a pneumatic stud gun specially designed for this purpose. Such equipment uses sponges to push the edges of the seat apart and install a stud without damaging the tread. The instrument is supplied with air at a pressure of about 10 bar. Accordingly, you will also need a compressor.
Re-studding using a pneumatic gun
Technology
The inventor of the design of repair spikes (patent No. 132039) and the developer of the technology for carrying out the work is. The whole process consists of several stages and can be performed either on special supports or directly on disks, without the need for disassembly:
- First you need to measure the depth of the seats from which the spikes fell out. This is necessary for the correct selection of the length of the repair spikes. They can be of three sizes: 8, 9 and 10 mm.
The depth of the seats should be at least 7 mm, ideally from 8 mm.
- Then the holes for the spikes need to be cleared of small debris and stones. To do this, the master will need a simple narrow slotted screwdriver. At the same time, you should remove the spikes that are already loose and do not hold well. After this, blow out the seats with compressed air.
- At the next stage, they need to be lubricated to make it easier to fit the repair studs and not damage the rubber. To do this, use a regular soap solution and a spray bottle.
- Now all that remains is to install the Tecom repair spikes using a pneumatic gun.
The tires are installed in such a way that only part of the wear-resistant insert protrudes above the tread surface by no more than 0.5 mm.
The technology for installing repair studs can be found in the video below:
Tire retreading
Installing studs on winter tires with your own hands is used for re-studding and re-studding tires. The tucking process makes it possible to equip winter tires to suit the individual operating conditions of the vehicle. Restudding extends the service life of tires and makes it possible to restore them.
Tires that have worn out or fallen off studs are suitable for carrying out the above work. To replace missing or worn stud elements, special products are used. They have an enlarged head, so they can be installed in broken mounting sockets. The sequence of repair work when re-studding tires does not differ much from the methods of primary studding of rubber. It has only one difference: before installing new studs, you need to clean the sockets from particles of dirt, dust, and remnants of old stud elements.
Sources
- https://scart-avto.ru/remont/oshipovka-zimnih-shin-svoimi-rukami-bez-pnevmopistoleta/
- https://avto-idea.ru/remont/kak-pravilno-shipovat-zimnyuyu-rezinu-shipuem-zimnyuyu-rezinu/
- https://autolirika.ru/remont/doshipovka-shin-svoimi-rukami.html
- https://avtoskill.ru/remont-obsluzhivaniye/oshipovka-shin-svoimi-rukami-instruktsiya-s-foto-i-video.html
- https://tires1.ru/oshipovka-zimnih-shin/
[collapse]