Good afternoon dear friends. We recently looked at ways to preserve and add the factory shine to tires using tire ink. In this article we will deal restoration of winter tires by installing repair studs. Winter is just around the corner, so this issue will become relevant for many motorists using studded winter tires.
Before learning how to stud rubber with studs yourself, I suggest you understand the question: is it worth restoring lost studs? Let's look at the pros and cons of using repair spikes and what tools are required to do this yourself. I will provide step-by-step instructions with pictures and videos on how to install repair spikes yourself.
Types of thorns
Let's first figure out what they are like in order to decide which ones are best to install on the tire. They come in three types depending on the shape of the tire mounting:
- Single-flange - installed on cheap options. Their disadvantage is that they quickly loosen the seat and fly out during sudden starts, braking, or aggressive driving.
- Double flanged
- Tri-flange
The last two types are considered the most reliable. They have several flanges, securely clinging to the rubber. Single-flange ones have one shoulder, so the reliability of fit in the seat is low. Over time, it becomes larger, the thorn becomes loose and falls out of it. After a season, the wheel may become completely “bald”.
It is worth noting that the length of the protruding part of the single-flange should not exceed 1.2 mm . Otherwise, its tilt when driving increases and the likelihood of losing it is greater. For other types, the length of the outer part can vary from 1.4 to 1.6 mm. Because its size does not greatly affect the reliability of the fastening.
Experts express the opinion that the more uniform the protrusion of the outer parts, the higher the traction properties of the tire. Because the angle of inclination is smaller, which means the working surface “bites” more into the road surface. This will be useful to know if you install repair studs yourself.
According to the shape of the protruding part of the spike
- Round
- Oval
- tetrahedral
- Thorn Diamond
The first type is used on tires up to diameter 14. The oval shape is installed on wheels with a diameter of 15 or more; Nokian uses tetrahedral studs on its tires - a patented proprietary technology.
The fourth type is a new development and has the shape of a diamond. It works better in the transverse direction, increasing the traction properties of the tire. As it wears, the outer part wears away, taking on an oval shape. In this way, the “diamond” spike is transformed from one type to another. This increases the service life, since the oval ones simply wore out and were thrown away, but the diamond continues to serve.
How to install repair spikes yourself
For self-installation, you can use special tools for studding rubber or improvised means - a screwdriver or pliers. The minimum tread thickness for installing repair studs is 4 mm . If it is less, then they will not “sit” securely in the rubber, and the outer part will stick out more, which will affect the grip properties for the worse. According to traffic regulations, it is prohibited to use winter tires with a tread depth less than the designated value.
Installation using special tools
For these purposes, a special pistol is used. We put a spike into its body, rest it against the tire, and the nose is recessed into the seat. We press the trigger, the shot is fired - the spike is installed in its place.
Important! When installing repair spikes, you need to choose them with a larger diameter than the hole for them. Because as the rubber wears out, its diameter increases.
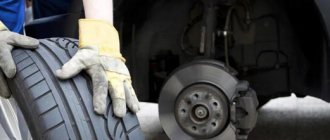
At a tire shop, the installation process is quick. Due to the high pressure, the stud cuts into the tire and is securely fixed in it. It takes just a few minutes to stud the wheel.
Preparatory stages
1. Washing the tire and stud seat. Dirt may accumulate in it. It is advisable to soap it so that the tenon “slides” in it - this will make installation easier.
2. Measure the depth of the mounting hole. The height of the repair option should slightly exceed this value; the width was discussed above.
Step-by-step instruction
For the mechanical method:
- Wash the wheel to remove dirt from inside the grooves.
- Inflate the tire to the desired pressure.
- Install the tenon into the special groove on the air gun.
- Press the tool as tightly as possible against the mounting hole.
- Click on the gun button.
Thus, the spike will fit into the socket under high pressure and be firmly fixed in it.
Do-it-yourself tire tucking
For the manual method, you need to do the following:
- As in the previous method, wash the wheel thoroughly to remove all dirt.
- To make the studs enter easier, moisten the tread areas with holes well with water.
- Also wash the spike itself with the prepared soap solution.
- Expand the socket a little with a screwdriver.
- Drive the tenon into the groove with a hammer or push it into the socket using pliers.
How to stud rubber with repair studs using improvised methods yourself
Option one - screwdriver and pliers
- To do this, use a screwdriver and pliers (pliers for removing circlips).
- We take the repair option and expand the socket using a screwdriver.
- Use pliers to press it into place.
Once you get the hang of it, this process will take no more time than at a tire fitting.
Important! The protruding part must be positioned strictly vertically relative to the tread surface. The stud should not wobble after its installation; everything should fit tightly. Otherwise, the service life will be shortened and the adhesion properties will deteriorate.
Video on how to install repair studs using a screwdriver:
The second option is using a drill
To simplify self-installation, use an electric drill. A nozzle is made from a copper tube, its end is flared to the diameter of the repair spike so that it moves freely in it. You can buy similar attachments, they are not expensive.
- If necessary, remove the old studs if they are worn off
- We install the nozzle into the drill, the spike into it
- We apply it at an angle of 45 degrees relative to the tire so that the mounting part of the stud looks into the mounting socket
- Press down on the tool and at low speeds “screw” the repair option into the tire
Since the spike “moves” freely in the nozzle, it can be easily pulled out of the rubber. This method is easier and faster than using a screwdriver. In the first case, there is a chance to spend a lot of time on one tire and rub a callus on your hand.
Stud the tires with your own hands
If you want to ride a bicycle safely in winter (and not only), then you need to take care of good wheel grip on snow, mud, sand, and ice. You can buy studded tires, or you can make studded tires for your bicycle with your own hands.
In this article, let's look at a more accessible and cheaper option on how to do this.
How to stud tires on a bicycle
Option #1: Tire modification (large tread)
You will need:
- deep tread tire
- Small flat screws (packaging), in this case short wood screws work well
1. Purchase a package of self-tapping screws from a hardware store.
2. Take a drill and a 2-3 mm drill bit. Drill holes in the places where you are going to install the spikes.
3. Try to screw in the self-tapping screw at a perpendicular angle (90 degrees) to the tire; it should not stick out to the side.
- Drill the hole and screw in the screw immediately. When you first screw in the holes and then screw in the screws, finding the holes will take you a lot of time.
4. After these works, glue the inner surface of the tire with reinforced electrical tape (2 layers are possible). You can also use special anti-puncture tire tapes, which are sold at a bike shop, instead of tape. They will help protect the camera from damage from screw heads.
5. Place the tire on the rim of the bike. Be careful during installation - you may injure your hands.
How to make studded tires for a bicycle
Option No. 2: Tire modification (small tread)
You will need:
- fine tread bicycle tires
- Packing of short bolts and a set of nuts corresponding to the thread. The bolts should be short, not massive, the nuts should not be more than 1 cm in height.
Why you need to restore winter studded tires
This is due to the fact that on tires in the middle price segment, manufacturers use harder “grades” of rubber for studded tires. If we compare friction tires and “bald” studded tires, the former will have higher grip properties, since the latter was designed taking into account the operation of studs. Therefore, it is better to completely stud winter tires, if possible, than to drive with empty holes.
Repairing a self-studded tire restores its performance by more than 80 percent. Thanks to this, you can ride it for several more seasons, if the tread depth allows.
Disadvantages of this option
Repair spikes are sold only in round versions. Remember, at the beginning of the article I voiced their disadvantages? There are no other options on sale. If your tire is from a more expensive segment, then you will get a “hodgepodge”, some of them are branded oval or diamonds, some are round. The traction properties will be worse than that of a new wheel, but it is still better than driving with empty sockets.
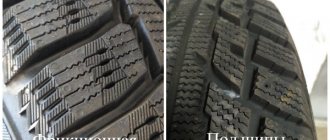
The height of the protruding upper part of the tenon is less than that of the original. For such options, grip on slippery surfaces deteriorates by up to 15%.
Conclusion
If you drive on studded winter tires and climatic conditions require it, then it is better to monitor the condition and presence of studs on the tire. In this case, it is advisable to restore them if you don’t have the money to change a set of wheels every season. Moreover, their wear may not be uniform, and they don’t sell one piece, for example.
Installing repair options extends the life of tires without significantly reducing the properties specified by the manufacturer. Therefore, it is recommended to stud your own wheels.
Removing studs from winter tires -
A device for removing spikes is made from a flat screwdriver.
TechZone► https://www.youtube.com/channel/UCpb7cGnv0loLXzh20sKbbMg We learned that in many countries around the world low-quality
Is it possible to drive on studded tires in which all the studs have fallen out? How does it work then, is it similar to Velcro and what to do with such a tire. Constant pissing
How to repair a wheel yourself using improvised means. For example, using a self-tapping screw. —– Good afternoon, dear car enthusiasts. Do you like to fix your car?
The wheel was covered, but there was a bunch of different tires on the rims in the garage. The truth is everywhere, sometimes one thing is torn, sometimes there’s a hernia, sometimes there’s some other problem. In general, there was no set. And in a dream
Test drive: studded tires Issue dated December 16, 2013 Auto expert “Mornings of Russia” Ivan Zenkevich talks about dangerous situations on a winter road and the advantages
https://bit.ly/2ycdZs1 – Xbet website Channel 1xbet – https://goo.gl/pz6TmJ Starter chargers https://roypow.ru/ 10% discount with promo code “Garage54 Ice”
Thanks Continental for the tires! IceContact 2 stud model ContiVikingContact 6 Continental Velcro model in social networks https://vk.com/continentalru https://www.
You can help the shelter here: https://goo.gl/8wa7eC We compare different methods of blackening tires: a specialized product, WD-40, Coca-Cola and glycerin, water and glycerin
In this video we will try to talk about buying used tires. What to pay attention to. How to inspect a wheel and where to look. Support us by liking, write com
Screw-in studs, independently installed and removed on tires of trucks, special equipment, tractors, cars, motorcycles, snowmobiles, sports
We will try to help you decide on inexpensive winter tires for the fall-winter season 2021 - 2021. Our expert briefly talks about the main advantages and
Is it possible to insert spikes to replace the ones that flew out? Step-by-step instruction.
Often we change winter tires not because they are worn out, but because all the studs have fallen out of them and they can no longer effectively cling to the icy surface, and accordingly, handling deteriorates. Sometimes it happens that even a completely new tire suffers in warm weather, when you drive onto, say, a curb, give a little gas and goodbye studs, my friend had about 10 of them fly off a wheel that had been in use for six months, and he then collected them back. So what to do? Can they be put back in? Let's find out...
CONTENTS OF THE ARTICLE
I want to dive into history a little.
In Soviet times, there were no studded tires - to be honest, it was generally “shitty” with any tires (that’s why the so-called welded tires flourished then), and therefore many people moved around on whatever they got. Summer tires were often used, and therefore overcoming even a small ice hill turned into a test. People who were richer and had “connections” got themselves “all-season” tires, but even less often they got winter tires (snowflake tires were popular) and drove them in winter. Because all-season tires were, to put it mildly, unsuitable for summer.
How can you tell if a tire needs repair?
Let’s say right away that restoring tire studs is a completely doable operation. If the tread has sufficient depth and the rubber material itself does not show any particular signs of wear, then there is no need to purchase a new set.
The repair will allow you to completely restore the original technical characteristics of the rubber, and will also save a large sum of money.
You can determine that a product needs restoration based on the following signs:
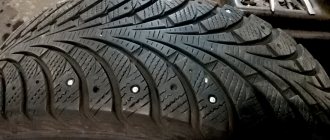
- holes are clearly visible on the surface, which were left behind by fallen thorns;
- there is a large gap between the stud and the tread;
- metal elements have lost their initial strength of fixation; without much effort they can be sunk inside the tire or loosened;
- the height of the spikes above the rubber surface has dropped to one and a half millimeters; traces of mechanical stress, abrasion and deformation are visible on them.
Soviet winter tire and stud
As I already said, one of the most popular, and perhaps almost the only, winter tire was the so-called “snowflake”. This tire effectively dealt with snow drifts, but on ice it was practically useless.
Oh, if you remember those years, it sends chills down your spine! It was very difficult to get to areas covered with snow and polished with ice - you had to push the car several times! These are not modern wheels, be they studded or Velcro. This would simply seem fantastic to those drivers!
Well, okay, in general, people began to think about how to improve this “snowflake”, how to make it effectively fight ice?
To be honest, I don’t remember where the studs came from, maybe it was the “genius of Soviet thought,” but the rubber gradually began to be “studded”!
Personally, as a child, several times I was able to experience various technologies for installing studs and they can be conditionally divided into more and less perfect.
1) The tenon is like a self-tapping screw, or screw. By the way, they are still used on some motorcycles. Here, a metal spike was simply made, on one side it had a part that clung to the ice, and the other part had a thread - it was simply screwed into rubber. These studded options could hardly be called ideal, the tire suffered greatly, and they flew out after just a few thousand kilometers. However, now I use it with a wider step and lower height. Let's watch the video.
2) Rubber through and through. And this was the case, because previously all rubber was tube-type, and therefore they often simply drilled right through the tire and installed a metal spike, often similar to a nail or “dowel”, and this option was very firmly fixed to the rubber (riveted or threaded), it was very difficult to tear it out difficult.
Can I put it back myself?
Of course you can, what's the problem? Previously, people used a drill to create miracles in the garage. And here there is already a hole.
1) First you need to clean the hole where the tenon was. Rinse, clean dry so that there is no dirt or water in it.
2) Sometimes, if the nest is already “broken,” you can pour a little glue, preferably for gluing rubber.
3) Take pliers and forcefully insert into the hole. The tenon will fail and excess glue will come out.
4) Thus, I myself, together with a friend, repaired the “gaps” on the tire. And you know, it can be noted that many are still holding on! They don't fly out, only the upper part wears off over time. However, adhesion properties have been restored.
However, this is if you still have relatives who flew out! If there are no such ones left, you will have to buy kits with “repair spikes”. But that's a completely different story.
Where to buy spikes?
It often happens that relatives who were standing and then took off lost speed. To insert, you need new “repair” ones, but where can you get them? You know, oddly enough, you can buy them at the same tire shops; they often provide services for restoring the “studs” of wheels, so they have entire universal sets for any wheel (different widths and depths).
Tire shops also come to the rescue; they rarely have them, but they do happen.
Of course, the Internet - here you can find anything, even screw ones! We just order, pay and everything comes to you by mail.
Well, then you just need to insert it yourself. I gave you a tip on how to do this.
Now let's watch a short video.
That's all, the main thing is to understand that you can put the ones that have fallen out back into place - and it's not that difficult.
Read our AUTOBLOG, subscribe to updates on social networks.
( 10 votes, average: 4.10 out of 5)
Which tires to choose for tucking
Having decided to make your own studs, you should seriously approach the issue of choosing tires.
The most suitable would be rubber that has already been prepared by the factory for self-studding, i.e. it will already have technological holes for installing a tenon.
Studded tire with holes for studs
You can purchase rubber that is not prepared for studding using a homemade method. Here the main attention should be paid to the composition of the rubber mixture. As a general rule, studless winter tires have a very soft consistency in order to provide the best grip on winter surfaces. However, a self-installed stud in such a tire will not last long due to the lack of reliable fastening.
It is not recommended to use all-season tires for studded tires due to the lack of proper grip at sub-zero temperatures. But, despite this, the composition of all-season rubber has a harder structure, so the stud in it will be fixed more firmly than in a friction winter tire.
It is strictly forbidden to stud and use summer tires not intended for this purpose in winter conditions.
It is advisable to use new tires, but if finances are limited, previously used products are also suitable. At the same time, the period of its early operation should not exceed 3 years, and the remaining tread should not be less than 4 mm.
What tires can be retreaded?
Replacing studs is relevant and justified if the following conditions are met:
- The tire was equipped with studs at the factory, that is, it has all the necessary mounting holes, the location of which is strictly thought out and optimized.
- The rubber is no more than five years old. After this period, the material begins to age and its properties change.
- The tread has a sufficient depth of at least 7 millimeters.
- No serious mechanical defects or other damage that can be determined during a visual inspection.
Spikes: design features and principles of selection
Visually, the spike is a very simple metal element, consisting of a body and a core protruding from it to a certain length. The body is formed by a fairly soft metal, while the core is as hard as possible, which reduces the intensity of mechanical wear.
To achieve maximum fixation strength, the body is equipped with 2-3 flanges. In order for do-it-yourself repairs and additional studs to give the desired result, when selecting studs you should be guided by several simple principles:
1. Ideally, you should use a rebuild kit recommended directly by the manufacturer. Many companies produce such kits; the metal elements fully correspond to the factory originals, which ensures ease of installation, as well as complete restoration of the original technical parameters of the rubber.
Important! If you can’t find such a set on sale, then you can also purchase studs from a third-party brand, but pay attention that in terms of their configuration, production material and other main indicators, they fully correspond to the originals.
2. If you operate your vehicle mainly in the city, drive on asphalt, and rarely drive on ice and other difficult surfaces, then you can opt for simple studs with one flange.
3. For regular trips on ice and country roads, which are rarely cleared of run-up and compressed snow, it is better to install more powerful and reliable metal elements with several flanges.
Watch a video about the pros and cons of repair studs:
Mechanized methods
Installation can be done entirely manually or using a special tool. Let's start the analysis with the second option.
The most reliable, fastest and most effective tool is an air gun. Yes, it is not cheap, so buying it for one procedure is not the most rational decision.
Ask your friends, try to negotiate a rental with a car service - in this case, the savings will be impressive.
Using the gun is quite simple, just follow the following procedure:
- tire inflation;
- installing a spike in a specially equipped groove on the gun;
- the working part of the tool is pressed tightly against the mounting hole;
- the trigger is pulled, under great pressure the element literally “flies” into the socket and is fixed.
Important! The main point is control over the position of the gun; it must be strictly perpendicular to the hole.
An alternative option is a screwdriver (drill with the ability to operate at low speeds), on which a special attachment is installed; you can purchase it in automobile stores.
This video shows how to stud tires yourself in a garage using a drill:
Manual technique
You can install repair studs for winter tires using the simplest tool. In the process you will need the following:
- pliers;
- hammer;
- a screwdriver with a diameter corresponding to the mounting hole for the tenon;
- warm soapy water.
First of all, the tire must be thoroughly washed to remove dirt. Next, the entire tread surface is wetted with water so that the studs fit into the holes more easily.
Immediately before installing the metal element, the seat is slightly expanded with a screwdriver, and the tenon is also washed with soapy water.
Important! The use of oil as a lubricant is unacceptable, since it is a chemically active substance that can cause destruction of the rubber material.
To ensure that the tenon is at the required depth, it is driven into the socket with a hammer or pliers.
If the diameter of the mounting hole is too large, it is worn out and therefore does not provide reliable fixation, a simple and quick repair can be made using a special glue. For example, there is a good glue called Loctite 480.
Watch the video showing the easiest way to stud tires using a screwdriver:
Video test - which glue is best to use for installing studs:
Interesting video, review of a manual tenoning device:
Operating Tips
For tire repair at home to be truly effective, at first you need to follow some operating rules.
- The main requirement is that the tire must lie in the garage for several days so that the soap solution is completely absorbed into the material and the studs are firmly fixed in the structure of the product.
- On your first trips, you don’t need to accelerate faster than 60 kilometers per hour. This speed limit is observed for approximately 300 kilometers. This is enough for the metal elements to be fixed, “grind in” to the material and achieve maximum strength.
- In the future, you can use the tires in exactly the same way as immediately after purchase, since their original characteristics have been restored.
Which spikes are best to choose?
The main task of studs is to provide reliable grip on the road. The maximum load falls on this element of the winter tire during acceleration and braking of the car. When a vehicle moves along a highway or in a city at a uniform speed, the load decreases and increases again when performing maneuvers.
Different operating conditions of a car have their own impact on the wear of studs and tires in general, therefore, by choosing studs to suit your driving style, you can significantly increase the life of the wheels.
Spikes vary in shape, volume, weight, and composition. Each parameter corresponds to a certain behavior of the stud in road conditions.
The stud body can be made from:
- soft alloys (for example, aluminum);
- hard metals (iron);
- non-metallic elements (plastic).
Different types of tire studs
Since the studs are subject to serious stress, supporting the weight of the car, the most durable products should be used. Soft alloys of metals or other substances with an aggressive driving style will most likely lose their original shape and will no longer fulfill their intended purpose.
The shape of the working surface of the tenon is also important. The most common types are:
- oval or round;
- square or rectangular;
- multi-wounded.
Tire stud shapes
It is easy to imagine that the more sharp protruding edges of the stud cut into the road surface, the better grip will be provided.
Thus, preference should be given to multi-faceted or acute-angled spikes . Their only drawback is the increase in price, depending on the number of edges.
What to do if the thorns partially fall out?
In each specific case, the answer to this question will be individual. It is necessary to take into account in percentage terms how many studs the tire has lost, and depending on this, decide on the advisability of using such winter tires.
If the tire has lost about 10% of its studs, then no significant deterioration in handling performance on ice is observed. Ten percent loss of studs is an acceptable error, which is not even considered a warranty case and is allowed by all tire manufacturers. Such winter tires are suitable for use in icy conditions and in the winter season. Quite often, such a 10% loss of studs is observed after the first year of using winter tires. This does not indicate the mediocre quality of the tires, but the car owner will subsequently need to monitor the condition of the tires, and if the tire quickly loses the remaining studs, it will need to be replaced.
With a twenty percent loss of studs, the tires are considered worn out, but the existing 80% of the original studs provide high-quality grip on ice, so the use of such tires is completely safe in the winter season.
When 30-40% of the studs fall out, the winter tire is considered worn out and its grip properties are deteriorating. However, the existing characteristics and traction indicators even for such worn tires are sufficient for using tires on the driven and driven axles of the car.
At 60 percent wear, tires can be used exclusively on the driven and unloaded axle in a vehicle.
If 70 percent or more of the studs are lost, the tires do not provide adequate grip on icy roads and driving on such tires becomes dangerous. Such tires have no grip characteristics, and it becomes impossible to classify them as winter tires. With such wheels, the braking distance on an icy and snowy road can increase by 7 times, that is, in fact, the car is operated on slippery summer tires.
What you need to know before studding
Having chosen the appropriate studs and tires, you should once again return to the basic rules, the observance of which will ensure the durability and safety of using winter wheels studded in artisanal conditions:
- It is better to stud rubber on the eve of the winter season in order to allow the studs to “rest” for two to three months before starting use; An important role will be played by proper running-in of tires, in compliance with the speed limit (no more than 80-90 km/h) for at least 500 km; The proportions of the spikes should be observed depending on the radius. For example, for 13-inch wheels 90-95 pieces will be enough. for one cylinder. For 14, 15th radius - 100-110 pcs., for 16, 17 - 150-165 pcs. The cost of one stud starts on average from 10-15 rubles; some organizations offer to stud a tire at a price of 500-650 rubles, regardless of the number of studs supplied.
Features of inserting spikes that you need to know before removing them
Studs installed in winter tires usually look like thick and short nails with a bottom and a flat head. They also have a tungsten pin on the top. They are inserted with the flat head down, precisely into those holes that were distributed on the tread surface in advance during the manufacture of the tire itself.
Appearance of the spikes
How does the insertion take place? The widened fingers of the air gun are inserted into pre-prepared holes, then they insert pins into them and remove them. This action allows the tread rubber to return to its original state and also shrink around the stud cavity. During this process, the stud is held securely in the rubber surface. Let us remind you that depending on the tread pattern and tire size, each tire contains about 70-100 studs.
Tire studding tools
There are several options for performing the tucking procedure. The simplest, but at the same time time-consuming, method is the manual method. To perform this you will need the following available tools:
- a container with a soap solution and a device for applying it;
- a heavy object for driving in tenons (a regular hammer will do) or semicircular pliers and a screwdriver (for regular insertion of tenons);
- You may need pliers and a screwdriver to remove loose or old parts.
This method is very primitive, it requires a significant amount of time, and in order to evenly seat the tenons, considerable experience and skill will be required.
The simplest is the semi-automatic method. It involves the presence of a screwdriver with a special attachment , with which you can screw in the tenon to the desired depth that is the same for everyone.
Tyres can be studded using a screwdriver
The most advanced and acceptable in terms of obtaining the quality and durability of the finished product is the automatic method. It is carried out using an automatic air gun , which, under high air pressure, literally drives the spikes into the sockets, immediately giving them the desired fixation.
The cost of such equipment is very high. Its purchase is unprofitable for the sake of studding one set of wheels. However, such a tool is available in almost every tire service, so having purchased tires and studs, you can safely go to the nearest car service station for tucking.
The fourth method is the most effective and safest
In order to remove the spikes in the fastest and most effective way, you will need the most ordinary pliers and a special lubricant that was previously used when attaching tires.
The principle of operation for this operation is as follows - you need to lubricate the studs with this lubricant, having first inflated the tires well, reaching the optimal pressure, then you need to grab the stud with pliers by the upper surface and pull it up. In this case, it is imperative to ensure that the spike comes out of the rubber surface straight up, otherwise damage to the rubber may occur during work.
In this case, lubrication is necessary so that the tenon slides out well when it is removed from the hole. When unstudding, it is also necessary to pay attention to what the remaining tread depth is. If this value is slightly more than 5 millimeters, then such an operation is the most optimal measure for removing thorns. In this case, you can guarantee that the jointing will be done quickly and with the highest quality.
If the residual tread depth is less than 5.5 millimeters, then such an operation also takes place, but it must be carried out with extreme caution.
Video materials
Before you begin the operation of removing studs from winter tires, it is best to watch videos containing a detailed description of this process, and these videos will describe exactly the last method of removing studs from winter tires.
In these videos, the masters clearly demonstrate the removal technique and will also recommend the best lubricant for processing the studs. Also, if possible, it is better to use video directly during unstitching. This way you can most accurately understand this process and repeat all the necessary manipulations.
First of all, pay attention to how exactly the tenon is captured, since this is the most important element when unstudding. Remember also that you should not overdo it with lubricant, otherwise it may complicate the process of removing the studs. Try to do everything exactly as the mechanics do in the video - and then you can guarantee success in the planned operation!
Do-it-yourself tire studding without a pneumatic gun
As stated above, the manual method involves shrinking the tenons using a screwdriver and an attachment for it, as well as without using this tool. In any case, the initial stage will look approximately identical.
If the tires do not have technological holes, they must be made using an awl (not recommended) or using a drill with a depth lock. The drill needs to be selected with a diameter slightly smaller than the base of the tenon. All holes must be the same in depth and match the length of the studs. For example, if the spikes are 9 mm long, then the depth of the hole should be 8-9 mm. If necessary, it is recommended to take measurements with a caliper.
Drilling holes in tires before studding
The procedure for drilling rubber should be carried out very carefully, since there is a high probability of ruining the rubber by making a through hole .
After this, the following manipulations are carried out:
- The tire is firmly fixed in a vertical position.
Installing the tire on a special rack
Removing spikes from rubber using pliers
Measuring the depth of the studs using a caliper
Wetting rubber with soapy water
Studring tires using semicircular pliers and a screwdriver
Studring tires using a screwdriver
After completing the procedure, the rubber should be dried and then stored. Under no circumstances should you immediately start testing it, this will lead to the spikes falling out and will negate all the efforts made.
You can also watch several useful videos about studding tires with your own hands without a pneumatic gun:
Removing studs manually
As a rule, for such work a flat screwdriver is used, which is available to every motorist. It is enough to pry the spike at the base with a screwdriver and remove it.
If you can’t pry off a tenon using a regular flat-head screwdriver, you can grind a small hole the size of the tenon in the base of the screwdriver.
Then the adhesion of the screwdriver surface to the tenon surface will become much better. This operation is quite labor-intensive, since about a hundred spikes are attached to each wheel, and the whole job will take at least an hour.
Now you know how to remove studs from winter tires
, but there are other important features.
When working with a screwdriver, you should exercise some caution - one wrong move and you can damage the rubber. If you have a spare unnecessary wheel, it is better to practice on it in advance.
After this, it doesn’t hurt to check each wheel for damage by immersing it under water and seeing if the tire is leaking air (by the presence of bubbles).
If you are still wondering how to remove studs from winter tires
, try one more way. You can also use pliers and special lubricant.
Before using pliers, you need to lubricate the area around each spike to make it easier to remove. In order for the operation to be as efficient and successful as possible, the spikes must be oriented vertically upward during extraction.
Do-it-yourself tire studding with a pneumatic gun
At the initial stage of preparing a tire for studding, there are no differences with the above method. All the specifics lie only in the correct use of the pistol:
- A spike is inserted into the tool.
Installing a spike in an air gun
Studring a tire with a pneumatic gun
Having completed this action, the shrinkage height is measured, and the angle of inclination of the tenon is also checked. If a defect is detected, it is removed and the procedure is repeated.
You can also watch several video instructions on how to stud rubber with a pneumatic gun: