03/30/2021 2,093 Lighting and sound devices
Author: Ivan Baranov
High-quality lighting of the road surface largely ensures the safety of driving a car at night. The main requirement for the operation of optics is the quality of lighting, and to adjust the light beam, car owners must use a headlight range control. You can learn more about what this device is and what its operating principle is from this material.
[Hide]
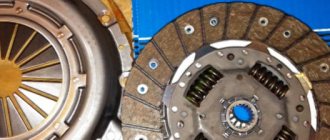
Replacing headlight hydraulic corrector for VAZ 21214 Niva
Do-it-yourself repair of the headlight hydraulic corrector on a VAZ 2110. Important points
- The master cylinder is located behind the dashboard;
- Working cylinders. They can be seen on the headlights;
- Pipelines, they connect the main cylinder with the workers;
- Special liquid.
- First the preparation is done. All clamps securing the tube to the body are removed. It is also advisable to remove the radiator expansion tank. This will make access to the headlight easier. In the cabin, the control knob is removed; to do this, you simply pull it towards you;
- Next you need to get the cylinder. To do this, grab the switch on the panel and pull it off. In most cases it can be easily removed. After this, the cylinder is unscrewed from the switch. This is done using a 22mm head. Afterwards the cylinder is pulled out by the tube under the torpedo. As a result, he should hang on the hoses;
- The actuator cylinders are disconnected from the headlamp. They are dragged into the salon. This completes the dismantling of the corrector.
- Metal ball;
- Plastic clip;
- Bobbins;
- Limiting groove on the headlight housing;
- Return spring.
- The battery turns off;
- Next, the hydraulic corrector is dismantled;
- A new seal is installed;
- Remove the corrector adjustment knob and connect a new electrical device to it. To do this, use the key 22;
- Connect the positive wire to the mounting block, you need to connect to socket 20, block Ш2;
- The minus is attached to the nearest body stud;
- A new actuator is installed in the headlight unit;
- The wires can be pulled along the location of the old tube;
- The pads are connected to the main mechanism. The operation of the device is checked.
AutoFlit.ru
Repair of headlight adjustment VAZ 2110
How to make a manual headlight leveler
- The body of an old working corrector.
- M8 bolt, length 6-7-10cm.
- Two nuts with slightly ground edges to secure the bolt in the body.
- Lock-nut.
xn--2111-43da1a8c.xn--p1ai
Installation of electric headlight corrector on a VAZ 2110
- Hydraulic (adjustment of headlights due to pistons and fluid pressure)
- Electromechanical (adjustment of headlights using electricity)
- Automatic correctors (automatic adjustment of headlights depending on vehicle load). For example, auto-corrector of headlights for VAZ 2110 “Silich-Zenit”.
- Standard electric corrector for VAZ 2110 (EMKF-41)
- Electrical corrector from another car brand (for example, from GAZ)
Installation of a standard electric headlight corrector on a VAZ 2110
- Dismantle the hydraulic corrector of the VAZ 2110
- Install the electric corrector for the VAZ 2110 in standard places
- Conduct wiring instead of hydraulic corrector tubes
- Connect the electric corrector VAZ 2110
xn--2111-43da1a8c.xn--p1ai
Headlight hydraulic corrector device
What to do if the screen on your phone is cracked.
What to do if your laptop screen is broken It’s easy to guess that the operating principle of this device is based on the use of partial pressure of a liquid. Modern cars use several hydraulic mechanisms, the operating principles of which are approximately the same. An example is the braking system. And yet, each of these mechanisms has certain design features. The classic headlight hydrocorrector consists of the following components:
- main cylinder mounted in the dashboard area;
- piping systems;
- actuators installed directly on the headlights.
A special frost-resistant liquid is used as a working agent. Unlike electric ones, hydraulic correctors are made non-separable - this makes it easier to ensure their perfect tightness. Therefore, at the official level (that is, at service stations, car services, dealerships) it is stated that these devices are not repairable, and if they fail, they must be completely replaced. Considering that the cost of hydrocorrectors is relatively low, in most cases buying a new device really seems worthwhile. But this is how a person is designed, that if there is an opportunity to carry out repairs on his own, he will most likely take this step. In the case of a hydraulic headlight leveler, such a possibility really exists, despite assurances to the contrary.
True, it is really unrealistic to perform many operations with your own hands - for example, blowing out the system if air gets in or changing the working fluid. By the way, many drivers, when asked what is poured into the headlight hydraulic corrector, answer that it is brake fluid. This, of course, is not true - antifreeze or a composition similar to it is used here. In operating condition, the device line is always under sufficiently high pressure. If you twist the lever down, the pressure decreases and the rod forces the headlight bulb to turn down. Constant high pressure does not have a very favorable effect on the service life of the corrector, especially if low-quality materials and components were used during its assembly.
In particular, this applies to rubber seals - in winter, when the temperature drops well below zero, they can begin to collapse, which leads to depressurization of the system and leakage of fluid. As a result, the pistons jam, and this may not happen simultaneously on the left or right headlights. As a result, it becomes impossible to change the angle, and the head optics can shine in different directions, one headlight is higher, the other is lower. On all VAZ cars equipped with hydraulic correctors, these devices are assembled according to an almost identical scheme, although, of course, there are minor design differences related to the geometry of the car itself, its layout - the dimensions of the hydraulic corrector depend on this, as well as the features of the layout of the pipelines and the cylinders themselves. We present to your attention the compatibility table of the Civil Code for specific AvtoVAZ models/families:
| Hydrocorrector article number | What models is it compatible with? |
| 2105-3718010 | 2105–2107 (“classic”) |
| 2108-3718010 | 2108—21099 (Samara family) |
| 2110-3718010 | 2110—2112 (family 110) |
| 2114-3718010 | 2113—2115 (Samara 2) |
| 21213-3718010 | 21213 "Niva" |
Hydrocorrector malfunctions
Among the most likely causes of a non-working headlight hydrocorrector is depressurization of the joints of tubes and sealing cuffs. The consequence of loose connections is loss of working fluid and air being sucked into the system. For the working pistons to move properly, the system must be completely filled with liquid. The manufacturer does not suggest repairing the hydraulic corrector, so if the system fails, the assembly is replaced. Nevertheless, the article “Repairing a hydraulic corrector” shows that the system can be troubleshooted and restored.
This is interesting: The VAZ 2106 engine is troubled - we are studying the problem: can it be fixed with our own hands?
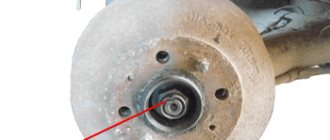
Where is the lamp hydraulic corrector located? Each headlight unit has an actuator that acts on a reflector, from which 2 tubes go into the cabin. Through a technological hole in the engine shield, the tubes go to the master cylinder and the switch on the dashboard.
Reasons for failure of the hydraulic regulator
If, when turning the headlight adjustment knob, the light beam does not change direction, this indicates a failure of the hydraulic corrector. There are several reasons for the malfunction:
- One of the working cylinders is jammed. In this case, the corresponding reflector will not rotate.
- The connecting tubes were damaged and the system depressurized.
- Failure of sealing due to damage or wear of seals.
If the system is depressurized, it is impossible to regulate both lamps. Most often, they lower and take a lower position, as a result, the headlights only illuminate the road next to the car. At night, this increases the risk of an emergency. You can try adjusting the hydraulic device rod.
Manufacturers of hydraulic correctors did not provide for the repair of the closed system as a whole and individual elements. Therefore, if the device fails, it is necessary to either install a new hydraulic regulator or replace the hydraulic device with an electric one.
Some car enthusiasts try to repair the regulator, but this does not bring long-term results. For example, they replace the working rod with a self-tapping screw of a suitable diameter with the sharp end removed. This makes it possible to fix the reflectors in a certain position. It will be impossible to make adjustments from the interior.
If, during a visual inspection of the hydraulic regulator, cracks are found in the connecting tubes, the repair will consist of eliminating them. The cause of cracks is temperature changes in the engine compartment of the car. If the crack is close to the main or working cylinder, cut off the cracked end. The tube damaged in the middle is completely replaced by pumping with antifreeze.
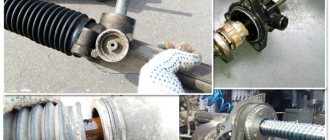
Removal and installation of headlight hydraulic corrector Niva 2121, Niva 2131
What to do if the Renault Logan stove does not work. A little about the air conditioning system of the Renault Logan car - watch the video
We disconnect the hydraulic corrector from the headlights and instrument panel when removing these components. We completely dismantle it for replacement. To disconnect the working cylinder of the Niva 2131 hydraulic corrector from the headlight...
...press the lock, turn it counterclockwise...
...and remove the hydraulic corrector working cylinder from the headlight.
Having removed the rubber plug from the mudguard (see Removing and disassembling a VAZ 2131 headlight, replacing the lamp),…
...we bring the working cylinder into the engine compartment.
Similarly, we remove and remove the working cylinder of the other headlight. To remove the hydraulic corrector master cylinder in the passenger compartment of a VAZ 2121,…
... by pulling it towards you, we remove the control handle.
Using a 21mm socket, unscrew the nut securing the master cylinder to the instrument panel.
We remove the main cylinder of the hydraulic corrector from under the instrument panel.
Having removed the plug from the front panel, we bring both working cylinders into the passenger compartment through the resulting hole. We install the headlight hydraulic corrector Niva 2121 in the reverse order.
Lighting VAZ 2121, Niva 2131
| Headlight diagram and lighting Niva 2121, Niva 2131 |
| Disassembly and assembly of headlights Niva 2121, Niva 2131 |
Adjusting headlights Niva 2121, Niva 2131 |
| Removal and installation of headlight hydraulic corrector Niva 2121, Niva 2131 |
| Brake and reverse lamps, interior and trunk lighting Niva 2121, Niva 2131 |
| Removal and installation of the front lamp Niva 2121, Niva 2131 |
| Removal and installation of the side direction indicator Niva 2121, Niva 2131 |
| Removal and installation of the rear light Niva 2121, Niva 2131 |
| Replacing the reverse light switch Niva 2121, Niva 2131 |
| Removal and installation of license plate lamps Niva 2121, Niva 2131 |
| Removal and installation of lampshades and interior lighting switches Niva 2121, Niva 2131 |
Direction indicator diagram Niva 2121, Niva 2131 |
| Replacing the turn signal and hazard warning switch relay Niva 2121, Niva 2131 |
| Removing and installing the hazard warning switch Niva 2121, Niva 2131 |
Units and diagrams of electrical equipment VAZ 2121, VAZ 2131
Diagnostics of electrical circuits of the Niva 2121 car. Instructions for repairing electrical equipment: generator, starter. Niva 2131 car diagram.
A few words about adjusting the light on the stand
All vehicle operating instructions recommend making such adjustments on a special stand. However, in some cases this operation can be easily performed independently. In cases where body repairs were carried out to restore the geometry of the body, it is best to contact a service center and perform this procedure using a special stand.
The photo shows one of these stands. It is a stand that rotates freely in any direction. laser centering of the light beam, a glass lens with a lux meter, and a mirror for precise positioning are placed on it
For clarity, watch the video.
The principle of operation of the headlight range control and options for its implementation
All about sedansMoreover on the topicComments
In its simplest form, the principle or description of the work will be as follows: the car has the ability to adjust the light directly from the interior. If the loading of the car has changed, for example, additional passengers have boarded, or the trunk is loaded, then the light will be shifted upward, which will lead to blinding oncoming drivers. To avoid this, it is possible to configure its direction, which allows you to move the light beam down or up to return normal lighting.
The described principle, which forms the basis of the corrector’s operation, is implemented using different methods. Today the adjustment could be:
forced action or automatic, in two versions, when used:
Forced adjustment
With this approach, the light flux is controlled manually, which is why a special switch is used in the car interior. Changing its position leads to a change in the position of the lighting fixtures.
The work of the Silich-Zenit autocorrector on a Hyundai Solaris
with installed alternative optics with lenses.
Depending on the type of drive used in such a device, there are:
- electromechanical headlight range control;
- mechanical headlight range control;
- hydraulic;
- pneumatic, etc.
As an example of how any of the devices mentioned works, consider an electric headlight range control unit. It would be more correct to call it not electrical, but electromechanical. It includes:
- position switch;
- electric gear motor located on each headlight;
- connecting wires.
The principle by which such a device works is quite simple. When the position of the switch in the car is changed, an electrical signal (voltage) is supplied to the gearmotor. Its rod, one end of which is located on the headlight reflector, moves. This movement of the rod leads to a change in the position of the associated reflector and, ultimately, in the luminous flux.
Automatic luminous flux correction
When an automatic headlight leveler is installed on a car, the driver does not need to do anything additional; in this case, the automation works for him.
It includes:
- device control unit;
- ride height sensors;
- actuators.
As already mentioned, its operation can occur in static and dynamic mode. In static mode, the automation controls the vehicle's ground clearance, and when it changes, due to additional loading of the vehicle, the control unit sends an electrical signal to the actuators to adjust the position of the lighting fixtures.
However, this mode of operation, with the beginning of the use of xenon lamps, turned out to be insufficient. The light flux they generate is so powerful that even its short-term exposure can blind oncoming drivers. Therefore, to prevent such a phenomenon, a dynamic corrector appeared.
Its main difference is speed. The operation of such a corrector is capable of changing the direction of the light flux in a fraction of a second. This allows you to keep the luminous flux within specified limits when accelerating the car, braking it, cornering and on uneven roads. Thanks to this, when adjusted correctly, even bright headlights do not blind oncoming drivers when making maneuvers.
Headlight range control has become a mandatory element of car design. Its use improves driving safety at night by ensuring constant illumination of the road surface and reducing the possibility of dazzling other drivers.
Types of correctors
Car owners often wonder what a headlight range control is and whether they can install it themselves. Depending on the device, there are several types of systems:
- electromechanical;
- hydromechanical;
- mechanical;
- automatic.
Automatic technology is the most expensive and effective. Such a system reads the body position data and independently adjusts the light beam. Other types are controlled manually using a washer or wheel located in the cabin.
All configurations with gas-discharge lamps are necessarily equipped with a system for automatically adjusting low-beam headlights and high-pressure washer nozzles.
Electromechanical
The electric headlight corrector allows you to adjust the angle of light from the interior. The driver independently selects the position of the washer depending on the load on the car.
The system does not have additional sensors on the vehicle's levers, so if the angle is chosen incorrectly, the light may be adjusted incorrectly. In this case, the low beam lamps will dazzle another vehicle when driving in the dark.
In the electric corrector, the motors change the position of the rod depending on the selected key indication in the cabin.
Components:
- electrical control element;
- tilt angle regulator;
- motors.
Most often, this type of adjustment is used on modern cars with halogen lamps. The system is very reliable and has been working properly for decades.
Hydromechanical
Hydrocorrector headlights are rare nowadays. A handle is installed in the cabin, which is directly connected to lines filled with liquid. When the lever is turned, pressure appears and is transmitted to the hydraulic pistons. Next, the force is transmitted to the rod, and parts of the reflector body are set in motion.
The system is fully controlled by the driver from inside the cabin. In winter, the liquid freezes and becomes noticeably thicker. It takes more effort to control the rod that affects the angle of the light.
The lines are constantly under pressure and eventually fail. The channels begin to leak, and the system does not gain the required traction when turning the knob.
This is interesting: Instructions for replacing spark plugs on a car
If you choose the wrong angle, you may be exposed to light and dazzle other road users.
Mechanical
A mechanical corrector with cables that move the rod to adjust the angle of the reflector in the headlight was installed only on older cars. The system turned out to be unreliable and often failed after water got into the cable jacket. This effect leads to souring of the device.
A manual mechanical corrector should be used at least 2-3 times a month and the system should be periodically lubricated with oil. In winter, the system often soured and did not allow adjusting the headlight beam angle. Full lubrication of the cables helped restore functionality.
The corrector consists of the following components:
- power cables;
- control handle;
- gearbox with rod.
Currently, this type of corrector, which requires constant attention, is not used due to the expensive maintenance of the system.
Auto
Auto-corrector of headlights is most accurate in selecting the angle of light. The option is installed only in cars with xenon lamps and provides the best visibility at night.
There are no additional adjustment keys installed in the cabin; the system does everything independently in automatic mode.
The service life of the option is 10-15 years depending on operating conditions. Only the headlight range control sensor, which is installed on the car's arm and transmits a signal to the unit, may require repair.
Also among the components that require special attention is the chassis position linkage. Load control parts are installed from 1 to 3 depending on the complexity of the chassis. Over time, the moving balls sour and break off under load. To prevent breakdowns, it is necessary to lubricate the ball joints with copper grease every 40-50 thousand kilometers. This is not regulated in the vehicle operating literature, but it will help preserve the corrector components and avoid unpleasant incidents.
Incorrect adjustment of optics due to hydraulic corrector failure
It is often necessary to adjust the light beam, especially when the trunk of a car is very loaded, when the light is directed into the eyes of drivers traveling to a meeting. If the reflector has fallen off and the adjustment does not work, you can simply repair the VAZ 2110 headlight range control yourself. An example of the repair procedure is presented on Kirzhach optics.
- We remove the headlights.
- We disassemble them: remove the glass and iron clips (there are 6 of them).
- Use a knife to cut off the sealant.
- We cut off the U-shaped convex profile on the glass.
- Unscrew the 3 screws on the reverse side.
- Remove the reflector from the paper.
- Near the hydraulic corrector hole inside the illuminator there is a spring that needs to be removed.
- We perform the same actions with 2 plastic rosettes from 2 “twists” holding the reflector.
We assemble the headlight in the reverse order, cleaning the old sealant and applying a new one.
There is another method for repairing a hydraulic corrector:
- We cut M3 threads on the adjusting screws.
- We screw them into the illuminator and put on the washers.
- Pull out the plastic fasteners.
- We put on the bar with high and low beam modules.
- We put on top: a washer, a spring, another washer. It is advisable to use a lock nut. We tighten everything up.
- We fix the structure with anaerobic sealant.
Eliminating headlight shake
Some owners of the domestic VAZ 2110 noticed that the light trembles when driving. This problem appears more often in Kirzhach headlights, but in this part from Bosch this phenomenon occurs quite rarely. Reason: rattling of the reflector itself.
To eliminate light jitter you need to check:
- Is the reflector in place in the latch?
- Is the adjusting bolt rod in place?
- Does the hydraulic corrector rod rest against the seat;
- Is the thread slack (we swap the high and low beam lamps)
- Is the tube in the hydraulic corrector frayed?
Among the most successful ways to troubleshoot the problem:
- Replacing the hydraulic corrector with an electric corrector.
- Increasing the length of the hydraulic corrector rod, which will help tension the spring.
This popular method allows you to get rid of the twitching of the light by placing a cap on the hydraulic corrector rod.
Use as a cap:
- plastic dowel 8mm long,
- brake fitting cap,
- another plastic cap.
The operating procedure is simple:
We take out the hydrocorrector from the illuminator. We tightly place the cap on its stem. If you decide to repair the stove on a VAZ 2110 with your own hands, then you should study possible malfunctions of this unit, and
It is important that it does not jump inside.
We insert the hydraulic corrector into the seat.
Replacing optics for VAZ 2110
Sometimes the VAZ 2110 headlight needs to be completely replaced. Replacing the headlight hydraulic corrector on a VAZ 2110, from the headlight corrector itself, REPAIRING a VAZ 2110. Construction and repair of VAZ cars The principle of operation of the heater heater on a VAZ 2110 2111 2112. The work should not cause any particular difficulties.
1. Disconnect the wire from the “–” terminal of the battery.
2. Remove the radiator trim.
3. Disconnect the block with wires.
4. Press the latch of the hydraulic corrector cylinder and turn it clockwise 90° until it stops.
5. Remove it from the socket without disconnecting it from the hoses.
6. Replacing and repairing the headlight hydraulic corrector on a VAZ 2110. Unscrew the three mounting bolts and move the headlight unit back.
7. We move the trim to the center of the car by about 4 cm so that its hook comes out of engagement with the wing.
8. In order to move the pad, loosen the bolts securing the buffer from above to push it forward.
9. Press on the bottom of the lining so that the flange can easily disengage, and remove the lining.
10. Unscrew the nut of the lower fastening of the illuminator.
11. Disconnect the block from the turn signal, pull the light towards you and remove it.
12. Unscrew the fastening screws to disassemble the illuminator.
13. Disconnect the headlight and turn signal.
14. We remove two hooks on the pointer body from engagement with the body of the optics part.
15. Reassemble and install the headlight in the reverse order.
How to use concealer
The corrector has knob A on the dashboard of the VAZ 2107 to the right of the steering wheel, next to knob B for adjusting the brightness of the dashboard lighting. If you rotate knob B counterclockwise, the brightness of the light decreases.
As they say, the control knob of the device has an “intuitive interface.” To change the direction of the light flow, with the trunk loaded and the headlights on low beam, you need to align the mark shown on the regulator with one of the marks marked on the unit body so that the beam of light does not blind oncoming drivers.
The VAZ 2107 hydraulic corrector has four switching options (in order from large point to small point):
If not
it turns out to adjust
the headlights
on
NIVA
2121,21213,21214 then watch this video to the end.
I - minimum load, the front of the car is slightly lowered: one driver, or there is a passenger in front;
II - driver and four passengers, the body sags evenly downwards;
III - the same as II, with an additional load of up to 75 kg in the trunk:
IV - driver and maximum trunk load: the “nose up” the most.
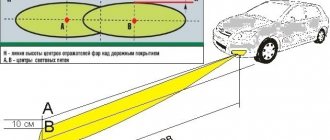
In order to see how the angle of inclination of the light beam changes during operation of the corrector, it is better to place the car perpendicular to the wall. Let us recall the standard requirements for the location of the low beam.
A short guide on how to adjust the light of a Niva car
Properly adjusted headlights on a vehicle are a prerequisite for safe driving at night.
It is not very pleasant, and even unsafe, to move along the road at night, when oncoming traffic blinds you to the point of darkness. But it may happen that your car also causes inconvenience for other road users.
Poor visibility for the driver while driving may also be a reason to check the adjustment. Light problems can make it difficult to pass annual technical inspections. Therefore, such a check should become a rule for all drivers.
How to properly adjust GF
For various reasons, during prolonged operation, the device settings “move away” from the original factory settings, which requires manual adjustment of the headlight hydraulic corrector during scheduled maintenance. That is, the device is working properly, but it is no longer possible to set the position of the head optics in the correct direction only with the help of a switch. This usually occurs due to the lack of good engagement between the rod and the lever (we are talking about the head cylinder). This situation arises due to the imperfect design of the hydraulic corrector. It is easy to fix - just return the lever to its seat. Another thing is that this is unlikely to prevent the possibility of a reoccurrence of damage, so it is worth thinking about how to strengthen the connection without compromising its mobility. The problem is partially solved by unscrewing the adjusting screw, since it is this that often causes the lever to jump out if it is screwed in completely. But here you need to take into account the fact that the screw is set in such a way that the headlights lower/raise, ensuring the correct angle of illumination set on the stand.
The most common problems with headlight range control
Quite often, various troubles and problems arise with such mechanisms. Let's look at why a car headlight range control may not work.
Sensors are considered the most vulnerable point of any modern electronics. This is also inherent in such a device as a headlight range control. Here the sensor, based on the ground clearance, adjusts the headlight range. Car enthusiasts often complain that the headlight range control malfunction indicator lights up on the car’s dashboard. Typically, this occurs due to a break in the bracket that holds the sensor. As a result, the sensor sends incorrect information, and an error appears in the operation of the corrector itself.
Sometimes the problem may lie in the contact connection. Due to frequent souring of contacts, their conductivity also decreases. As a result, similar troubles appear when the corrector stops working normally.
Another problem may also arise that is directly related to the configuration mechanism itself. But this is not some kind of malfunction, but simply the specifics of its operation on individual cars. For example, Kalina's headlight corrector (the downside of which is considered to be a small adjustment angle) works in such a way that the beam of light from the low-beam headlights is excessively lowered down, and this noticeably reduces the lighting efficiency of conventional lamps.
This is interesting: Reasons why the machine twitches while driving
Correct operation of the headlight range control has a positive effect on your safety and the safety of other road users. Therefore, take all problems with this device very seriously.
Trouble-shooting
Repairing a corrector yourself is not an easy task. In the case of an automatic device, the instrument panel will display an error, which can be considered a scanner and can be used to detect a breakdown.
Repairing the headlight hydraulic corrector will require replacing the fluid tubes that are connected to the handle on the control panel. If, when adjusting the position of the rod, only one headlight changes the angle, then diagnostics and replacement of one of the pistons transmitting force is required.
If the electrically controlled headlight range control does not work, the instrument panel will also show an error, reading which you can understand the reason.
To avoid causing damage to equipment and units, diagnostics should be carried out only with a certified device.
Replacing the VAZ-2114 headlight hydraulic corrector, sequence of actions
The case described above is the only malfunction that can be eliminated. In other cases, you will have to change the hydraulic corrector. There is nothing complicated here either. The first thing to do is remove the faulty device. To do this, unscrew the screws with which the pipeline clamps are attached to the brackets.
Next, remove the handle from the main cylinder, and also unscrew the nut that secures it to the dashboard. After that we move on to the headlights. Here you need to disconnect the main cylinders and insert them along with the tubes into the car interior. This should be done carefully so as not to damage the electrical wiring of your car. Half of the work has already been done, that is, the first stage of work has been completed.
Now you should install a working device. There is nothing complicated here either. We take a new hydraulic corrector and install it in place of the old one. All actions here are carried out in reverse order. It should also be noted that many owners of “fourteeners”, faced with such a problem, make certain improvements to the design.
In particular, instead of a hydraulic one, they install an electric headlight range control. The latter is more reliable and durable, but it also costs more. The best option for the VAZ-2114 is an electrical corrector of the Silich Zenit type. The thing is that it fits perfectly into its regular place. Accordingly, no problems or difficulties will arise here.
The procedure for installing it is somewhat different from installing a hydraulic corrector. First of all, you should disconnect the negative terminal from the battery. Next, turn the main cylinder counterclockwise and remove it. After this, the O-ring should be replaced. The next stage is the installation of an electrical corrector. It is installed in place of the master cylinder.
Next you need to remove the adjusting lever. It, as mentioned above, is located in the cabin. After this, the negative terminal of the device must be fixed on one of the body studs located under the dashboard, and the positive terminal must be connected to the block socket number 20. The wiring of the electrical corrector is laid along the power supply harness. However, it is just right to run it instead of hydraulic corrector pipelines. You can choose any option at your discretion. That's basically it. All that remains is to connect the negative terminal back to the battery and check the functionality of the installed device.
https://www.youtube.com/watch?v=Laf5GeHh6X4
Is it possible to repair a hydraulic corrector?
Manufacturers of correctors for the Lada Granta did not provide for the possibility of restoring the device. It is assumed that the driver should make a change. However, it is possible to repair the hydraulic corrector yourself, although it eliminates the problem only for a while. It is impossible to achieve full functionality, however, the lampshades are installed in the working position and secured in it.
This is interesting: Why does error P0134 appear and how to eliminate it on VAZ cars?
The choice between an electric corrector or a hydraulic regulator is based on several parameters:
- cost – hydraulics will cost much less than an electric corrector;
- operating conditions - when the car often finds itself in situations with sudden temperature changes, it is worth paying more, but getting a reliable adjustment system;
- car model - not all cars allow you to connect an electric corrector, however, it is possible to install one on a Lada.
Barbaric repair method
Many drivers do not burden themselves with either repair or replacement of the hydraulic corrector. When the headlights begin to shine downwards, they simply screw in screws from the back of the working cylinder. Adjustment of the position of the rod and the level of tilt of the headlights is carried out by screwing in and unscrewing the screws.
After such a repair, the concept of a headlight range control is no longer applicable to the system, since the possibility of quickly adjusting the angle of the headlight reflector from the passenger compartment disappears. But such repairs have a right to life if the malfunction caught you on the road and there is simply no other way to raise the headlights.
Recovery without removal
- Pull the actuators out of the headlight assembly.
- Remove the tubes from their seats, and then secure the tubes so that the remaining working fluid does not leak out of them. It is better to preheat the landing site, but you can simply cut the tubes at the edge of the landing sites. Check the stroke of the actuator cylinders by moving them by the rod using pliers. The pistons should move without jamming.
- Each actuator has a plug for bleeding the system, which must first be pulled out.
- Turn the switch on the dashboard to position O. Fill the tubes with antifreeze so that a small drop remains on top, then put them on the fittings of the actuators.
- Position the slave cylinder bodies so that the bleeder hole is the highest point.
- Holding the rod in the maximum retracted position, fill the working cylinder with liquid until a small “hill” forms above the bleeder hole.
- Close the plug.
The system should work, but since the seals of the connections at the main cylinder, the regulator at the dashboard and the seals of the working cylinders were not checked, one cannot be sure of the long service life of the hydraulic corrector after such repairs. This restoration method will not work if the system is airy at the master cylinder in the cabin.
Restoration of headlight hydraulic corrector
You need to know where the headlight hydraulic corrector is located and how to remove it, since for a complete troubleshooting you will need to dismantle the working cylinders and the main adjustment mechanism. Take 2 small pieces of tube to connect the working cylinders to the main mechanism after removal, fill the system with water. If the device is operational, set the switch to the maximum headlight raise mode and leave the mechanisms in this position for several hours. If no leaks have appeared during this time, the system can be filled with antifreeze and installed on the car. If the leak does not appear in the pipe connections, it is better to replace the hydraulic corrector with a new one or install an electric corrector instead.
This is interesting: The most important element of the fuel system is the VAZ 2106 fuel pump
Only new coolant should be used so that dirt particles do not interfere with the normal movement of the pistons. Remember that the system must be completely filled with working fluid. To restore, you will need a syringe and a blunt needle so as not to damage the cylinder seals. Do-it-yourself repairs, the assembly and disassembly process are perfectly shown in the video.