Types of fastenings
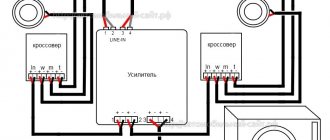
Different manufacturers of car radios use different types of mounting the device to the car dashboard:
In the first case, the radio is secured through a frame inserted into a niche. There are depressions on the side walls of the head unit housing, and opposite them on the frame there are tabs that are bent and folded with keys. This method of fastening has a disadvantage - the frame is susceptible to deformation. Because of this, fixing the radio in the niche may become less reliable or the head unit may get stuck. If handled carelessly, the latches and tabs may break off.
The second fastening method is more reliable, since latches made of elastic metal are used. They are most often located on the side and top walls of the car player body and engage with grooves on the frame. Other radios can also be inserted directly into a niche on the car's dashboard.
Manufacturers of branded head unit most often use screw mounting to brackets on the car. All fasteners are hidden under decorative overlays. All types of fastening do not allow attackers to quickly remove the radio from the car. Protection of the device from theft is also provided by other fastening elements hidden under decorative overlays, which must be found before removing the standard radio from the car.
To increase the reliability of fastening, a pin is used, screwed at one end into a special hole on the rear wall of the car radio, and at the other end into the inner wall of the car’s dashboard. Thanks to this, the player’s protection against theft is increased, since the device cannot be removed even after deforming the frame or bending the latches using improvised means.
Types of radio mounts
To choose a method for removing a car player, you need to understand how it is fixed inside the panel. The following types of fastenings exist:
- on 2 side clamps;
- on 4 latches located on the side and top of the case;
- fastened with self-tapping screws or screws to the brackets.
Example of mounting a standard head unit
Note. The last method of fixation is typical for standard devices that are supplied to the car by the manufacturer.
Latch on mounting frame
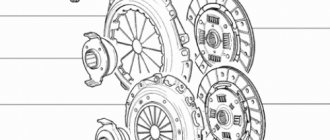
The principle of fastening with latches (clamps) is that the body of the radio is enclosed in a metal mounting frame, and is not directly built into the panel niche. This intermediate part, which has special petals with protrusions or grooves (depending on the brand and model of the device), is securely fixed in the niche. The player body is equipped with mating latches that engage when the player is inserted into the socket.
The counterpart of the latch on the body
To unlock the latches and remove the car radio, keys of various shapes are used, supplied by the manufacturer complete with music for the car. They are lost over the years of car operation, since they are used extremely rarely. As a rule, the key is a shaped strip of metal or a handle inserted into 2 pairs of holes located on the front panel of the device.
This is what most car radio removal keys look like
The mountings of standard radios are most often made with bolts, screwed to brackets and hidden under the front plastic panel. Here you cannot do without a minimum set of tools to dismantle this panel and unscrew the mounting screws or bolts.
Handle key for unlocking 4 latches
Reference. All of the listed intricacies with hidden latches and special keys were invented by manufacturers with one goal: to make it as difficult as possible for thieves to steal the car radio when the car is broken into.
Location of key holes
What kinds of mounts are there for radio tape recorders?
Different manufacturers use different types of fasteners:
With clamps, a frame is used that is inserted into the “shaft”. The side walls of the car radio have special recesses, and there are tongues on the frame.
To dismantle the head unit you need keys. With them you can easily straighten the tabs or bend them. But this type of fastening has a drawback - the frame can become deformed.
The second type of fastening is more reliable - it involves the use of elastic latches. They can be seen on the side and top walls. These latches fit into special seats in the frame, the simplest and most reliable way to mount the radio.
In some car models, in order to ensure reliable fastening of the multimedia system and to eliminate the risk of failure due to vibrations, installation is carried out to the dashboard, or rather to the power elements. The dashboard is held on the pipe using metal corners. Such fasteners are used in premium cars Mazda and Toyota.
The option of installing a radio in this way is considered additional, but car audio installers often remove the corners, and installation is carried out without fixing elements. This option is not reliable.
Single- or double-din radios are mounted in the dashboard tunnel without any additional fixation. It is customary to mount the device on the center console.
The media system is latched with ordinary plastic latches. This is a screwless fitting - you can see this even on the Lacetti.
With this installation, the radio simply hangs and is not able to withstand even minor shock loads. There are holes on the sides of the device, but most motorists do not know what they are for.
It turns out that these holes are made for reliable installation of the device to the dashboard using corners.
This is a factory fastener that complements the standard fastener.
When is it necessary to disassemble the standard radio?
The reason that the device has failed may be the dust that collects inside it. This causes the radio components to overheat. They are responsible for playing music. In this state, this function is broken and they freeze.
Another fairly common problem is related to the power supply of the device. If it is not performed correctly, the radio will not turn on or its functions will be disrupted. For example, there is no sound, etc.
The microcircuit may also burn out. This is caused by incorrect connection of wires. Thus, one of the amplifiers fails.
To deal with these and other problems, you need to remove the device from the car. Then carry out its diagnostics, based on the results of which the breakdown is accurately determined. You can do this either independently or contact specialists. The latter have the necessary equipment, tools, etc. to carry out this work. They will fix any breakdown quickly and efficiently.
But, as experience shows, this service will require financial costs. If you want to save money, you can do this work yourself. To disassemble the radio, you do not need special knowledge or skills, just know how to do it.
What you need to remove
The tool needed to remove the player from the vehicle is included with this unit. The key for removing the radio is a steel strip 5 to 10 cm long with special slots. There are protrusions on one end that you can grab with your fingers. Using this tool, the tabs on the frame are bent and bent or the elastic clamps are pressed out.
If the branded car radio is bolted to the brackets, then you will need 2 screwdrivers. One will allow you to unscrew the fastener, and with the help of the second you can remove the decorative trim under which it is hidden. Removal of the radio, fixed with elastic latches, is carried out with special U-shaped removal keys, which are inserted into the holes on the front panel.
Removing the radio without keys
Sometimes it happens that for some reason there are no keys. They can get lost, and in particularly difficult cases they are simply not included in the delivery package. In such a situation, you will have to use improvised materials.
Required Tools
- 2 pieces of steel strip (length 30 cm, width 1 cm, thickness 0.5 cm).
- Protective gloves.
- Knife.
Sequence of removing a car radio without keys
- The front panel is manually removed from the device, and, if necessary, the decorative frame (sometimes you have to carefully pry it off with a knife).
- Sections of steel strip are inserted into the key holes until they stop.
- The ends of the strips remaining outside are carefully bent at right angles (this will allow you to grasp them more reliably, in addition, the strips bent in this way will not slip out of the holes).
- The radio is carefully removed from the niche.
Video: removing the radio using two steel strips
How to remove without keys
If the keys for removing the radio are lost, you need to make replacements from scrap materials. The following devices can replace keys:
Let's look at the features of removing the radio using some of the listed devices.
Instead of keys, you can use strips of thin metal, stationery knives, or elements of disassembled frame wipers. You will need as many metal blanks as the technological holes provided on the radio (usually 2 or 4).
Not original keys
Instead of original keys, you can use keys of a suitable size from other car radios. To do this, non-original keys are inserted into the grooves until they stop, then they are moved apart in different directions and at the same time the radio is removed from the shaft. Nothing should prevent her from leaving the nest freely.
Rods or thin screwdrivers
Knitting needles, thin screwdrivers or ballpoint pen refills are inserted into the holes in the corners of the radio. The first rod is installed in the upper right corner, the second in the lower left, and the rest in random order. Screwdrivers are not inserted into the gap between the radio and the shaft, but into special holes on which latches are installed. The screwdrivers deactivate the latches and the radio comes out of the socket.
Dismantling a standard music center
Often, standard head units (aka radios) are removed using the method described above, since they are attached to 2 or 4 clips. For example, the factory player on a Lada Priora car is held on by two latches, and to unlock them, thin steel strips must be inserted between pairs of radio channel switching buttons “2” - “3” and “5” - “6”.
Advice. Before you start disassembling the factory radio, find out about the method of its fastening, so as not to poke the pieces of hardware at random if you do not find technological openings.
In Priora, stripes must be inserted between the buttons
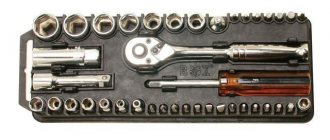
To remove car radios that are fastened with screws, you need to prepare a simple set of tools:
- thin flat screwdriver or knife;
- Phillips screwdriver;
- set of small sockets (from 6 to 10 mm).
With this mounting option, the factory turntable must be unscrewed using the heads
On different brands of cars, standard players can be mounted in different ways, but the principle is approximately the same: the device is screwed to brackets that are covered from the outside with a plastic lining. As an example, we propose to consider removing the radio on a Korean Hyundai Solaris car, performed in the following order:
- Use a flat-head screwdriver or knife to pry up the lower corner of the plastic decorative panel framing the stereo. Pull the edge and grab it with your hand.
- Gently pull it towards you and release the first latch, and then move around and unlock the rest.
- Holding the panel with both hands, remove it and, if necessary, disconnect the connectors located at the bottom.
- Unscrew the 4 mounting screws with a Phillips screwdriver and pull out the radio.
Factory car radio Hyundai Solaris
Advice. When dismantling any player, do not rush to disconnect the battery from the on-board network, since the device will power down in 10-15 minutes. It may be blocked and the next time you turn it on, it will require you to enter a security code that you do not have.
Stationery knives
Instead of keys, you can use strips of thin metal, stationery knives, or elements of disassembled frame wipers. You will need as many metal blanks as the technological holes provided on the radio (usually 2 or 4).
Stationery knives or metal plates are sequentially inserted into the grooves and pull the radio towards you. After this, both knives are brought to the center of the radio and at the same time the device is pulled out of the shaft. If the knife slips out of the puzzle, the procedure is repeated again.
Not original keys
Instead of original keys, you can use keys of a suitable size from other car radios. To do this, non-original keys are inserted into the grooves until they stop, then they are moved apart in different directions and at the same time the radio is removed from the shaft. Nothing should prevent her from leaving the nest freely.
Rods or thin screwdrivers
Knitting needles, thin screwdrivers or ballpoint pen refills are inserted into the holes in the corners of the radio. The first rod is installed in the upper right corner, the second in the lower left, and the rest in random order. Screwdrivers are not inserted into the gap between the radio and the shaft, but into special holes on which latches are installed. The screwdrivers deactivate the latches and the radio comes out of the socket.
Mounting tape
To use this method, you need to cut two strips of 0.8x10 cm in size and no more than 1 mm thick from the mounting tape. The tapes are inserted into the flat holes until they stop and carefully pulled apart in different directions.
At this moment, the fastening clamps are released and the radio tape recorder comes out of the socket. The radio must be held with your hands so that the spring mechanism does not pull it back into the shaft.
Removal according to instructions with keys
Before removing the car player, you will need to remove the radio panel and the decorative frame under which the technological openings are hidden. If this cannot be done manually, then you need to disconnect this element with a thin screwdriver, prying one by one the teeth attached to the body of the head unit. Be careful not to use excessive force to avoid breaking the frame. If the car radio does not have a protection mechanism, you should disconnect the battery from the car to increase safety.
The next stage of removal is to insert the keys into the slot near the frame located in front of the device. This must be done carefully and gradually until the tool enters the opening between the side wall of the car radio and the frame tongue. At this point, a slight resistance will be felt.
To bend the tabs towards the frame, disengaging them from the grooves on the head unit, you should slowly lift the key, rocking it from side to side.
Removing a device secured with elastic latches is best done with an assistant: one inserts the keys into the holes and gently presses them, the other carefully removes the car radio, pulling it towards himself. As soon as the latches become visible, the tool is removed from the openings and the device is removed from the niche.
If the radio is not removed, then it could be screwed on with an additional pin or jammed due to damage to the frame. In this case, you will need to remove the car's dashboard so that you can approach the player from the back. Then the outer nut securing the stud is unscrewed, and the radio is removed from the niche. To release the head unit, bend the tabs that secure the frame to the dashboard niche. After this, all the deformed elements are unbent and the frame is removed from the player.
When removing the radio, it should be disconnected from the on-board network. This operation is best performed with an assistant: one holds the head unit, and the other disconnects the connectors or removes the insulating tape and unscrews the wires if the connection was made using a twist. In the latter case, the ends of the wires going to the on-board network must be insulated.
Removing the radio using standard keys
Before moving on to the process, we will list what is needed for this.
Required Tools
- A standard set of keys supplied with the radio (there can be either 2 or 4 keys, depending on the device model).
- Knife (if you have to pry off the frame).
Sequence of removing the car radio from the niche
- The front panel of the car radio is removed, and if necessary, the decorative frame located under the panel is also removed (on older radios this frame usually blocks the key slots; on more modern devices this is not a problem).
- Provides access to key holes. They are located on the side walls of the radio.
- Standard keys are inserted into the holes until they click. Sometimes this will require significant force, or slightly rocking the key left and right while pressing it into the hole.
- After the keys are installed, the device is carefully pulled out of the niche.
Video: removing the car radio using standard keys
Instructions for removing the device
Before replacing an installed car radio with a new one, you must first remove the old device.
Removing the device from the car
To remove it, you need to prepare a small set of tools and materials:
It is important to remove the device correctly so as not to disturb the wiring (the author of the video is Kirill Zbruenko).
Preparation
Before removing the radio from the car, you need to do the following preparatory work:
Car radios differ in design and mounting. There are usually two rectangular and four round mounts.
If there are standard keys, then dismantling should be done with their help.
Keys for removal
Basic algorithm of actions
Removing the radio consists of the following steps:
1. Holes and screws for removal 2. Removing the device using keys 3. Plugs after disconnecting Once the device has been removed, the radio is either replaced or repaired if it does not work. If you do not know how to disassemble the device, it is better to entrust the repair to a specialist. If you are confident in your abilities, you need to disassemble the radio, fix the problem and put it back.
Installation of a new product is carried out according to the instructions that came with it. It is important to remember that if you install the radio in your car incorrectly, it will sound bad and may cause a short circuit or even a fire. Therefore, you need to connect the device only according to the instructions.
Removing the device using standard keys according to the instructions
So, there is a radio and standard keys. But that's not all, you will need an additional tool in the process.
Required Tools
To work you will need:
- Keys for dismantling. Depending on the specific model and key manufacturer, there may be 2 or 4;
- Knife.
Sequence of removing the car radio from the niche
First of all, remove the front panel, and if necessary, then the decorative parts. On older models, this frame covers the key connectors. This is no longer the case with the new ones.
Then the holes for the keys become visible and easy access to them is provided. The holes can be seen on the side walls of the head unit.
Then the keys are inserted into special grooves - they need to be inserted until they click. In some cases, it may be necessary to force or rock the fixture from side to side. If a click occurs. You can safely pull the radio out of the mine.
If the head unit cannot be removed, it can be screwed to the panel with an additional pin. In this case, it is necessary to remove the dashboard to access the device from the back side.
Preparation
Before removing the radio from the car, you need to do the following preparatory work:
- Before starting work, you need to turn off the engine and de-energize the car by disconnecting the negative terminal from the battery.
- When removing the plugs from the connectors, do not pull them so as not to break them. All wires from the sockets in the rear should be disconnected as carefully as possible.
- If during dismantling there will be a lot of wires, you should prepare electrical tape and a pencil to then deal with the wiring. Wires must be insulated and labeled.
- Next, you need to prepare the keys for the radio. Each manufacturer uses hidden mounts for their devices. You should understand what fastening material is used and select the appropriate tool. Typically, keys are included with the standard car radio.
- When dismantling, it should be taken into account that some models have slides that help remove the device from its seat.
Car radios differ in design and mounting. There are usually two rectangular and four round mounts.
If there are standard keys, then dismantling should be done with their help.
Keys for removal
Basic algorithm of actions
Removing the radio consists of the following steps:
- Before removing the car radio, it is necessary to dismantle the front panel, which protects the internal parts from mechanical damage. It must be removed carefully so as not to damage or scratch the casing.
- The next step is to unscrew the screws that secure the device to the housing. To do this, use a Phillips screwdriver. We put all the bolts and screws in a prepared box so as not to lose them.
- Now the device can be removed from the socket where it is located by pulling it towards you. On some cars, dismantling takes place without problems, but there are models on which it is difficult to remove the device.
- After removing the car radio from its seat, you need to disconnect all connectors. To do this, pull up the blue stoppers, then you need to press the released petal and you can disconnect the power connector. We simply remove the antenna from the socket.
1. Holes and screws for removal
2. Removing the device using keys
3. Plugs after disconnecting
After you have managed to pull out the device, you either replace the radio or repair it if it does not work. If you do not know how to disassemble the device, it is better to entrust the repair to a specialist. If you are confident in your abilities, you need to disassemble the radio, fix the problem and put it back.
Installation of a new product is carried out according to the instructions that came with it. It is important to remember that if you install the radio in your car incorrectly, it will sound bad and may cause a short circuit or even a fire. Therefore, you need to connect the device only according to the instructions.
How to get out without keys
The next stage of removing the radio without special keys is selecting a tool suitable for the technological opening. To do this, you need to carefully push it into the gap until it fits freely there.
The selected tool is inserted alternately into both technological openings, and the tabs on the frame are bent in the same way as when using factory keys. To remove a keyless radio attached with elastic clamps from the panel, you need to insert the tools into the holes, pressing them one by one. When the latches are released, the radio is pulled out of its seat at the same time as the homemade keys.
If the head unit has code protection, then you should not disconnect the car battery from the on-board network before removing the radio without keys, so as not to interfere with the functioning of the device. When removing the radio from the socket with or without keys, care must be taken not to damage the connectors and not to damage or break the wiring to avoid short circuits and fire.
Removing the device according to the instructions
The method of removing the radio if you have the keys is simple to the point of outrage. It is worth looking at it in order to understand how to act if they are lost. The order is as follows:
- Remove the front panel of the player and the decorative plastic frame, prying it up as necessary with a flat-head screwdriver.
- Insert the first key into the gap between the housing and the mounting frame, located at the end. With all this, you should feel a slight resistance when the tool bends the latch.
- Repeat the same action with the second key.
- Take the radio with your hands by the protruding parts along the edges of the case and carefully remove it from the niche.
To remove the radio, 2 keys are used
Advice. There is no need to put in a lot of effort; the device should be removed quite easily. At the end, act carefully so as not to pull the wires again and break the contact.
Special keys must be inserted into the side openings
When the radio is equipped with 4 latches, access to them is through 2 pairs of round holes. You need to insert 2 U-shaped keys into them and pull them out by the body, as described above.
How to get a radio without keys
It turned out that taking out the radio
from the nest, easier than usual. The main thing is to find what you can use to do this.
Quickly and easily remove the radio from the car.
This video shows how to remove the radio
from the standard mount of the VAZ Kalina 2 car. From the standard one.
Using keys, the music center is simply removed
Decoding problems
Some car radios have a built-in protection mechanism that is triggered 10-15 minutes after being disconnected from the on-board network. This measure further protects the device from unauthorized use after theft. The next time you turn on the radio, you will be asked to enter a password to unlock it. If a card with a security code is attached to the player or it is written in the instructions, then it is entered by pressing the function buttons with numbers or by rotating and pressing the volume control, depending on the model.
How to Remove a Pioneer Radio without Keys
Content
It's true to remove the radio without special keys
Many car enthusiasts face the problem of removing the radio in their car. Some are unable to remove the standard factory installed unit, others inherit the music with the machine, while others routinely lose their special keys. The circumstances of dismantling are also sufficient. from repairing electrical wiring to purchasing the latest stereo system. Hence the demand for information on how and with what help you can gently pull the receiver without damaging the plastic of the front panel. And although the operation is primitively ordinary and relaxed with the help of improvised means, it has pitfalls, which
Types of radio installation
To choose how to remove the player, you need to understand how it is secured inside the panel. The following types of fastenings exist:
- on 2 side clamps;
- on 4 latches located on the side and top of the case;
- Screws or screws into brackets.
Example of installing a standard head unit
The note. The latter mounting method is typical of the standard devices with which the vehicle is equipped by the manufacturer.
Latch on mounting frame
The principle of snap-on (latched) mounting is that the radio housing is enclosed in an iron mounting frame and is not built directly into a panel recess. This intermediate part, which has special petals with projections or grooves (depending on the brand and model of the device), is securely fixed in the recess. The player body has rear latches that lock into place when the player is inserted into the slot.
Rear part of the latch on the body
To unlock the latches and remove the receiver, keys of various shapes are used, supplied by the manufacturer, complete with music for the car. They are lost over the years of use of the car, as they are used very rarely. Typically, the key is a metal strip or handle inserted into 2 pairs of holes located on the front panel of the device.
This is what most car radios look like
In most cases, fastening is carried out using bolts screwed to the brackets and hidden under the front plastic panel. There is no need for a small tool kit to disassemble this panel and loosen the mounting screws or bolts.
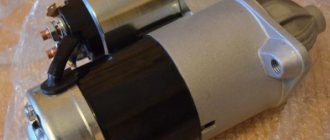
READ How to Remove the Starter on a Gazelle 406 Engine
key in the form of a handle to unlock 4 latches
For reference. All this wisdom with hidden locks and special keys invented by manufacturers for one purpose: stealing a car radio is very difficult when the thief crashes into the car.
Key Hole Locations
Removing the device according to the instructions
Removing the radio using keys is just annoying. You have to see this to understand how to deal with a loss. The order is as follows:
- Remove the front of the turntable and the decorative plastic panel, using a flat-blade screwdriver to secure it together if necessary.
- Insert the first key into the slot between the housing and the mounting frame at the end. You should feel a slight resistance as the tool bends the latch.
- Repeat with the second key.
- Grasp the radio from the protruding parts along the edges of the case and carefully remove it from its niche.
There are 2 keys to remove the radio
Advice. No great effort is required, the device is easy to remove. Finally, be careful not to pull the wires again and break the contact.
Special keys must be glued to the side holes
When the radio is equipped with 4 latches, access is through 2 pairs of round holes. You need to glue 2 U-shaped keys on them and pull out the housing as described above.
How to get a radio without a key
It turned out to take out the radio
out of the socket easier than usual. Main. find out how this can be done.
Remove the radio from your car quickly and easily.
This video shows you how to remove a radio
from a standard car VAZ Kalina 2 mount. From a standard one.
Use the music center just pulled out
How to delete a video player lesson
how to remove the radio without keys?
If the standard keys are lost, you'll need to do a DIY job focusing on the shape of the cracks. To see them, remove the removable cover and plastic frame. Here is a list of tools that different car owners can use to unlock their locks:
- thin iron strips 6-15 mm wide;
- stationery knives;
- plastic clamps for wiring;
- clove and flat wire. for round holes;
- thin screwdrivers and other similar items suitable for cracks.
These iron strips can be used instead of keys.
For reference. Almost all recorders have mounting cutouts that are visible from the outside, so you don't have to remove the front panel and plastic frame.
READ How to Remove Heater Fan Kia Rio 3
First, the front of the radio is removed
To remove the car radio, use the same method:
- First, insert one narrow strip of metal (or a utility knife, narrow screwdriver) into the technological hole. Feel that any latch is unlocked.
- If the player is using 4 clips, insert four tools.
- Slowly pull the radio out of the niche immediately using the hand keys.
Glue the strips to the side grooves.
Advice. When using iron strips to open latches, be sure to wear cloth gloves to avoid cutting your hands around the sharp edges.
Music center removed with groups
Removing a car radio without a key video
Disassembling the music center of a typical day
Often standard head units (they are also tape recorders) are removed as described above because they are attached to 2 or 4 clips. For example, the factory player on a Priora rests on 2 latches and, to unlock and tilt, you need to insert a steel strip "3" and "5". "6".
Advice. Before you start disassembling the factory radio, find out how to attach it to the factory radio so that in this case you do not accidentally push iron shards unless you find holes in the technology.
In Priority you have to insert bars between the keys
In order to remove a wound radio, you need to prepare a standard set of tools:
- narrow flat screwdriver or knife;
- Phillips screwdriver
- set of small heads (from 6 to 10 mm).
In this case, the factory player must be unscrewed
On cars of different brands, conventional players can be installed in different ways, but the principle is approximately the same: the device is attached to brackets that are covered with a plastic cover. As an example, it is proposed to consider the possibility of removing the radio on a Korean Hyundai Solaris car in the following order:
- Using a flathead screwdriver or knife, glue down the bottom corner of the plastic trim panel surrounding the stereo. Pull the edge and grab it with your hand.
- Gently pull it towards you and release the first latch, then move around and unlock the rest.
- Hold the panel with both hands, remove the panel and, if necessary, disconnect the connectors located below.
- Remove the 4 Phillips screws and remove the radio.
Factory radio Hyundai Solaris
Advice. When removing any player, do not rush to disconnect the battery from the on-board network, as the device will be gone in 10-15 minutes. it may be blocked and upon further activation will require you to enter a security code that you do not have.
READ Replacement Brake Discs Nissan X Trail T31
Removal of standard device included in Hyundai Solaris. Photo
Problems with decryption
The main problem with this procedure is the security code built into the memory of most recording devices. The fact is that disconnecting the music center from the external power source for 10-15 minutes will lead to the fact that the next time you turn on the radio you will need to enter a security code (usually a four-digit code) without which it will not work.
Advice. Removing the device to replace it with a new one will not hurt if you do not plan to use the old player on another computer. In any case, try not to disconnect the battery for a long time.
The device requests a code after connecting to the on-board network
If the code card is lost or missing, there are several ways to solve the problem:
- when it comes to a standard device, they will help you find the code for a fee from the dealer who sells your brand of cars;
- there are offices and individual specialists who specialize in these issues;
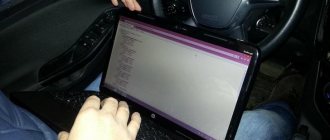
- The free way is to search for the code using various programs.
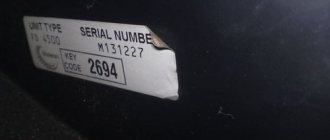
Serial number placement
Whichever method you choose, you must turn off the radio to see the serial number. It is applied along with the barcode to a tag attached to the side or top of the case. When you take out your device, write down these numbers and then try to calculate their pin code using various online calculators on the Internet. If you are unable to find a suitable code this way, remove the stereo and take it to a specialist in the field and be prepared to pay for their services.
Fundamental point. If you don't know your radio PIN, don't enter the number more than 3 times when searching for yourself! Otherwise, the device will be locked, and in this state, decrypting it will be much more expensive.
The issue of unplugging the car radio from the socket is not very complicated and takes a lot of time. But the consequences may be unexpected for an unprepared motorist. One last tip: before turning off and unplugging your player, you can find your lost PIN to save your time and hassle.
Removing and installing the standard radio on a Priora
Of course, one of the most recognizable models of domestic cars today is the Lada Priora. Its reliability and reasonable price attract the attention of many future and current car owners.
Most drivers prefer to create their own style inside the vehicle. Like any other car, Priora has some design features that are recommended to be studied before creating this very “own style”.
One of these features is related to the radio. Owners of this car model often ask the question “How to remove the standard radio on a Priora?” Dismantling the radio takes place in several stages:
Stage one: panel removal
The first step is to get rid of the interference in the form of a panel. To do this, you need to know how to remove the radio panel on a Priora. It is removed as follows:
After the above steps, you should easily pull the panel towards you.
With the panel removed, you can begin the second step: clicking.
For the second stage, we will need two special hooks (their price is 25 rubles / piece, sold in almost any car store). They need to be inserted into the holes that are located under the “Scan” and “TA” buttons. When the click sounds, it will mean that half of the work is already done.
Stage three: mixing
The click means that the hooks have caught on the radio mounts that are located in the case. Now, the hooks need to be slightly brought together and pulled towards you. If it doesn't work out the first time, you need to try again.
Step Four: Removing the Latch
When the hooks are brought together to a sufficient distance, a second click will sound, which means the latch is released.
After this, the radio can be easily removed with bare hands.
Many also ask the question: “How to install a radio in Priora?” To install it, you need to carry out all the steps in reverse order.
One important note in dismantling is that you should not pull the radio too sharply, as there is a risk of breaking the thin wires and damaging the connector. If there is a need to remove the USB connector, you may need to remove the glove compartment lid.
One of the options for improving comfort in the car interior is to connect a Priora radio. After this, the car will be updated and driving it will become much more pleasant.
The information presented above provides a complete answer to the question “How to remove the Priora radio?” With the help of this article, you can safely and easily dismantle your car music player.
Source
How to disassemble a Pioneer radio?
If you decide to perform this procedure yourself, then you will need a screwdriver, tweezers and a napkin. If they are present, you can safely proceed to disassembling the radio, which consists of the following steps:
- Disconnecting wires. This is the first place to start;
- Removing the CD drive, which is located in the player itself. Then carefully wipe it off with a napkin. Since optics do not like pollution. Therefore, even banal dust will have a detrimental effect on it;
- Disconnecting the board. It is attached to the lid using optical sensors. Despite its small size, its function is important. It is responsible for identifying the disk in the drive. At the same time, other elements are connected to it. They are infrared LEDs. All together, they make up an open type optical pair. It can be unfastened using a screwdriver or tweezers. At the same time, this work is carried out as carefully as possible, since its latches are fragile;
- Removing the top cover. It is secured to the device with small screws. They need to be unscrewed, but there is no need to remove the cover right away. Since there is another element attached to the lid. Sudden movements can damage it. Nim is a laser type optical unit. It promotes balancing and prevents vibration phenomena during drive operation;
- Freeing the block. To do this, remove the mounting springs with tweezers. Next you need to gain access to the lens itself. Tweezers will help with this. They need to remove the attached clamping bar. It ensures that the disc is locked when the radio is operating.
After completing these works, you will be able to work with a spindle-type drive and an optical unit. They are located under the lid on top. To remove it, just throw it away.
If you follow these instructions, you can disassemble the Pioneer radio. Then carry out the necessary manipulations with it. For example, to remove dust or repair damage. The assembly follows a similar pattern. In this case, you should work carefully so as not to damage the device. If you are not confident in your abilities, then it is not worth the risk. Since if its elements are deformed, the entire device will need to be replaced. After all, not all breakdowns can be repaired.
Disassemble the radio connector
Some are faced with a situation where it is not necessary to disassemble the entire radio because there are problems with the connector. In this case, it is necessary to work with this element of the device. The process of disassembling it is simple. It consists of several interrelated steps that are carried out in a certain sequence.
Let's look at the example of a radio in a Mazda 3. There is a plug in the connector, as shown in the photo. It can be seen on the side of the device. It goes through the entire connector. This plug is used to block contacts. With the help of a sharp object it can be moved and pulled out. Thus, the contacts, which are equipped with special antennae, will open. You can carry out various manipulations with them. For example, doing push-ups.
After disassembly, it is necessary to assemble the device and check its functionality. To do this, turn on the radio, both with the ignition off and on. It should work efficiently and without failures. Otherwise, the failure has not been repaired or has not been correctly identified. Also, the reason that the radio does not work may be that it is not assembled correctly.
How to remove a radio from a car using improvised means - a collection of the best tips
Author:
Maxim Markov
Let's say you are wondering how to remove the radio from the panel with your own hands. You may think that this will be difficult. But we have a refutation. The reasons for dismantling may vary: from the loss of keys and breakdown of the existing radio to a simple desire to update the car.
What you need to remove
Before that, we'll tell you how to remove the stock radio, here's a list of what you'll need:
About a construction hairdryer - separately: if the car is used and the previous owner did not know how to properly remove the car radio and fixed the broken fasteners with glue, you will need it to re-extract the front panel. If you warm up the lining well, you can easily separate it from the glue.
In case of such a problem, after removing the device, you will have to carefully clean it from any glue residue.
Removing the original radio
Before you begin dismantling the head unit, you need to prepare the following items:
- set of keys for audio system;
- operating instructions for the radio;
- cotton gloves;
- construction hairdryer
To begin with, remove the negative terminal from the battery and study the operating instructions for the radio, which describes step by step how to remove the device without unnecessary problems. After this, sequentially remove the front panel of the audio system, remove the radio and disconnect it from the wires.
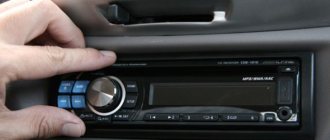
To gain access to the audio system, you need to remove its front panel. To do this, just take one of the pre-prepared keys and carefully pry the panel off on one side. The fastening elements will separate and the cover will be easily removed from the radio.
Removal using keys
First, remove the negative terminal from the battery. If your turntable does not have a protection mechanism, it may be best to disconnect the battery from the machine. At the same time, if the device is protected by a code, it is not recommended to disconnect the power source from the on-board network.
Before removing the radio frame and panel, read the instruction manual. Usually the process of disassembling it is described step by step. If you fail to remove it manually, you can use pre-prepared keys from the kit, or a thin screwdriver to pry off the teeth one by one, connecting the panel to the main part of the device.
It is important to be careful and monitor the force applied, otherwise you may break the turntable frame.
After removing the radio plug, we immediately begin to remove the radio itself. You need to remove all the screws that hold the frame, as well as the adapter screws (for 1-din devices). Then the key is carefully inserted between the wall of the device and the tongue of the frame. Be prepared to feel a little resistance, this is how it should be.
Lift the key, swinging it sideways, so you bend the tabs and disengage them from the recesses of the device. At the end, disconnect all the wires with which the device was connected and hook it to something so that they do not fall back into the shaft, it can be very difficult to get them out of there.
How to get out without keys
If your keys are lost, don’t worry; a number of available tools will work instead. Such as:
Stationery knives
As well as thin steel strips or parts of frame wipers, which will have to be disassembled for this. Prepare them according to the number of technical holes in the radio (usually 2, sometimes 4). Insert the metal plates into the grooves and pull the radio towards you. Then bring both tools towards the middle of the device and remove it from the niche.
If the knife slips out of the groove, repeat the procedure again. Also, if you use this option, be sure to wear protective gloves first, you may get hurt.
Keys for other radios
If the size is correct, you can use other keys. Insert them into the grooves until they stop, and then move them apart. At the same time, remove the radio. Make sure that nothing interferes with extraction.
Thin screwdrivers/rods
Knitting needles may also work. Insert one at the top right, the second at the bottom left, the rest - whatever you like. Remember that they need to be inserted not between the body and the frame, but into the holes with latches. The latches are deactivated and the device will come out of the niche.
Mounting tape
Cut two strips of 0.8x10 cm from the tape. Make sure that the thickness does not exceed 1 mm. Insert them into the flat openings until they stop and carefully move them apart. Once the clamps are released, the player will come out of the socket. You need to hold it with your hands so that the spring mechanism does not tighten it back.
That's all. As you can see, removing the car radio is not so difficult, regardless of the presence of keys. When starting to install a previously disabled device, do not forget to rewrite its PIN code first so as not to waste money and time on unlocking.
Although this operation is very simple and can be performed with what is at hand, there are some nuances in its implementation that you need to know about in order to do everything carefully and without damage.
How to remove a radio without keys
A popular option for dismantling standard radios is keys to other devices. You can also remove using plates, rods, mounting tape.
What tools will you need?
To work, you will need two pieces of steel strip 30 cm long and 1 cm wide. You should also use protective gloves. You may need a knife.
Removal process
In case of using steel plates, the steps will be as follows:
- First of all, insert the first plate into the key slot on the radio;
- Next, insert the second plate;
- Two plates are brought towards the center of the device and pull the car radio towards you.
It often happens that an inexperienced car owner cannot pick up the latches the first time. If it doesn’t work, then the procedure should be repeated.
Another popular method is removal with incomplete keys from other devices.
This is done as follows:
- They take keys from other devices;
- Push it into the hole until it stops;
- Move the keys in different directions;
- Calmly take out the device.
If you couldn’t find the plates or keys, you can use fountain pen refills—you need four refills.
This method is well suited for foreign cars:
- Look for four ballpoint pen refills;
- They are inserted around the perimeter of the head unit;
- After this manipulation, the radio can be pulled out.
The rods are installed one by one, but the most important thing is that the rods need to be inserted not into the gaps between the dashboard and the device, but into special holes.
It is in these holes that there are latches that will work when you insert any object into them.
You can try the original technology. This method is more applicable for radios with navigators:
- Two strips are cut from the mounting tape - width 8 mm, length 10 mm. Tape thickness – no more than 1 mm;
- The strips are inserted into the holes until they stop;
- Carefully move apart and release the fastening clips;
- They take out the radio from their mine, but they can’t let it go.
Important points
Any actions, especially with the use of steel strips and other non-standard tools, should be carried out as carefully as possible.
If the radio is encoded, then there is no need to disconnect the battery terminals before work. When removing a device, it is important not only to get it out, but also not to damage the connectors.
Video
In the video, the author shows popular methods for removing radio tape recorders without special tools. You can see in detail how this is done.
Types of fastenings
Depending on the manufacturer, the ways of attaching the radio to the car panel may differ. Basically, there are three most common approaches:
Each of them has its pros and cons, let's go through the list a little and analyze them.
Fasteners
In this case, the player is not built directly into the shaft; it is secured through a frame that is inserted into the niche for the radio. There are depressions on the side walls of the main device housing, opposite which the frame tongues are located. The tabs are bent and unbent using the keys that come with the player.
Typically, the key is a specially shaped metal handle or strip that fits into four holes on the front of the device. One of the advantages is versatility. The downside is that the frame is subject to deformation. As a result, the player may not sit firmly in the connector, or even get stuck. Also, if you handle it without due care, the locking elements and tabs may break.
Latches
This method is more reliable, since the metal used in the latches is more elastic. They are usually located on the walls of the radio on the top or side and hook into grooves on the inside of the frame. Some radios of this type can also be inserted directly into a niche on the dashboard.
Bolts/brackets
Most often used by car manufacturers in default installed radios as the best way to protect them from theft if the vehicle is broken into by intruders.
The point is that the device is attached to the car's brackets with bolts. Moreover, they are hidden behind the panel and covers, which a potential attacker will also have to find and dismantle in order to remove your jvc radio from the car. And for this he will need at least a basic set of tools. The bad news is that removing the radio will be no less labor-intensive for you.
By the way, speaking of protection from intruders: if you want to increase the reliability of the mount, you can use a pin, one end of which is screwed into the hole located behind the player, and the other end into the inner surface of the dashboard. In this case, it will be impossible to remove the device either after deforming the frame or unbending the fixing parts with what is at hand.
Source
How to remove the radio?
You must try to perform all actions with maximum calm and accuracy. Take your time, don't worry. Do everything very slowly so as not to break anything. Then everything will work out for you.
Regardless of which radio is installed, they all have standard mounts. To dismantle, simply insert our homemade keys into the technological holes around the perimeter of the device. If you were unable to make the keys, then try to pry off the plugs using a plastic card.
Then swing the keys to the sides with light movements. You can do this with each one in turn. With this simple action you open the latch. You should start from the top, near the air ducts. If you do everything correctly, then the panel will simply move out of its socket.
If the radio does not want to leave its place, then you can help it with a screwdriver or a card. But work carefully. The device gets scratched very easily.
Now that the panel is removed, unscrew the four mounting bolts. They may vary depending on the radio model. And again - extreme care and accuracy! These bolts can easily fall inside, and it is almost impossible to get them out.
To dismantle the upper gearbox superstructure, it is better to start from the armrest side. It is recommended to turn off the heated seats before dismantling. Locate the latches that hold the add-on in place and pry them open with a screwdriver. As a result, the reverse gear guides will be disabled. Remove the leather pads. And note that the latches are very secure. Here you can work more confidently. You won't break them. Remove the bolts holding the ashtray. Be sure to keep in mind that there are models that are secured not with bolts, but with latches. Next you need to very carefully remove the device from the compartment. Don't rush, don't pull - the cord is not long enough. Disconnect the connectors. You also need to remove the radio antenna.
That's all. Now you know how to remove the radio on a Ford. It's quite difficult. The whole process takes about 20 minutes. The main thing is accuracy and slowness.