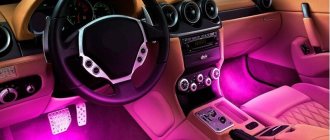
How to make interior lighting yourself
The lighting of the lower part under the feet of the driver and passenger can be made neon, and the ceiling can be illuminated with LED lamps.
Neon lighting installation
First you need to install special emitters, for which you will need the following materials:
- nylon clamps;
- aluminum corner;
- neon emitters;
- self-tapping screws
Dismantling the lower part of the dashboard
You need to saw off a corner to fit the size of the emitter and screw it with self-tapping screws under the dashboard. The light should fall down directly under your feet. After this, you need to fix the emitter with clamps to the corner.
The same operation must be performed with all passenger seats in the car. On the rear seats, screw the corner with the edge up, protecting the emitter from mechanical damage.
Carefully lay all the wires under the floor and pull them out to the dashboard on the driver's side. If necessary, they must be extended and insulated at the connection points.
When connecting, the wires should be connected to the door opening sensor and the interior lighting switch so that when the door is opened and the lights are turned on, our additional lighting comes on.
Installing LED lighting
LED foot lighting in a car can be done according to a standard scheme, which is the same for all cars. To work you will need:
- heat-shrink tubing;
- wire cross-section 4x0.5 mm;
- LED strip and single diodes (you can take a ready-made factory-assembled strip like SMD 5050, but it costs more, so you can buy an RGB strip sold by the meter).
LED lighting kit
The backlight can be installed on the instrument panel, in the places of interior lamps and in those places where standard lighting elements are installed. You can replace all this with LEDs. Single LEDs have the same base as standard lamps, so if necessary, you can easily replace everything.
After this, you can determine where to install the backlight. Traditionally, it is installed in the foot area and along the perimeter of the roof along the racks. First you need to measure the required length of the tape and cut it to the required size.
The tape should only be cut in special places where solder contacts are located. The wire should be measured so that it is enough to reach the ignition switch (always allow some margin).
Cut, strip the ends and solder to the tape, and then stretch the heat-shrink tube and heat it with a regular household hair dryer or lighter until it shrinks.
Video:
The same should be done with other pieces of tape. After this, you need to remove the protective film from the back of the tape and glue the tape in the right place. All wires must be hidden under the pillar covers and brought under the dashboard on the driver's side.
Connection options:
- connect the container via RGB block;
- connection in the same way as neon lamps.
We described the second option above, but we will add that when connecting, you must be careful not to confuse the polarity indicated on the tape at the soldering points. When the do-it-yourself interior lighting is ready, you need to turn it on and check its functionality
When the DIY interior lighting is ready, you need to turn it on and check its functionality.
DIY car interior lighting
Restoring a car interior with your own hands
Under the feet of the driver and passenger, the lighting can be made neon, and the ceiling can be illuminated with LED lamps.
Installation of neon lighting. First of all, it is necessary to install special emitters, for which you will need:
- Nylon clamps;
- Aluminum corner;
- Neon emitters;
- Self-tapping screws;
We saw off a corner to fit the size of the emitter and light it with self-tapping screws under the dashboard. The light should fall down directly under your feet. After this, we fix the emitter with clamps to the corner.
We do the same with passenger seats. In the rear seats, we screw it with the edge up, which will protect the emitter from mechanical damage.
We carefully lay all the wires under the floor and pull them out to the dashboard on the driver’s side. If necessary, the wires at the connection points can be extended and insulated.
When connecting, the wires should be connected to the door opening sensor and the interior lighting switch so that when the door is opened and the lights are turned on, our additional lighting comes on.
Installation of LED lighting. Installation of LED lighting for the feet is carried out according to a standard scheme, which is almost the same for all cars.
But for work we need;
- Heat-shrink tubing;
- Wires (section 4x0.5 mm);
- LED strip and single diodes (you can take a ready-made factory-assembled strip like SMD 5050, but it costs more, so you can buy an RGB strip sold by the meter);
You can install backlighting on the instrument panel, in places for interior lamps, with standard lighting elements. All this can be replaced with LEDs. Single LEDs have the same base as standard lamps, and therefore, if necessary, they can be easily replaced.
Next, we decide on the location for installing the backlight. Traditionally, it is installed in the foot area and along the perimeter of the roof along the racks. First you need to measure the required length of the tape, then cut it to the required size. In this case, the mode is only in places with contacts for soldering.
The wire must be measured in such a way that it is enough to reach the ignition switch, but it is also recommended to provide some margin.
We cut off, strip the ends and solder to the tape, after which we stretch the heat-shrink tube and, using a household hair dryer or lighter, heat it until it shrinks. We should do exactly the same thing with other pieces of tape.
Next, we need to remove the protective film from the back side of the tape and glue it in the right place. We hide all the wires under the strut covers and place them under the dashboard on the driver’s side.
Connection options:
- connect the container via RGB block;
- connection in the same way as neon lamps.
Option No. 1. Multi-color lighting, powered by a cigarette lighter.
The method of generating electricity from a regular car cigarette lighter is the simplest. With this option, you do not have to interfere with the electrical circuit of your car.
The video shows what the car's LED lighting looks like:
What you will need for this type of connection:
- RGB LED strip 4 pins;
- a controller of such a tape with a control panel, it is with the help of these devices that you can control the color in the cabin;
- 4-color wire, stranded, about 5 meters long. It is better that the wiring in it have the same color as on the controller;
- 4 connectors (terminal clamps);
- soldering iron and soldering material, such as solder and rosin;
- transparent silicone sealant.
Before you buy everything you need for installation, you need to carefully measure the places where the LED strip will be attached, as well as the entire perimeter along which the wires will pass. First, we measure the distance under the dashboard, on the driver and passenger sides, where the tape will be attached, then the distance under the front seats. Then we measure the perimeter along which the stranded wire will pass, starting from the glove compartment, then through the right passenger seat from the driver's seat and, finally, to the car pedals. We leave a little in reserve.
The result should be 4 pieces of tape and 7 pieces of wire. The lighting connection diagram on both the left and right sides, starting from the glove compartment, will look like this: tape - wire - connector - wire - connector - wire - tape. Such a circuit is connected to each other by a wire passing between the upper connectors. The upper pair of terminal clamps is located under the instrument panel, the lower - under the seats.
The video shows multi-colored LED interior lighting:
When buying a diode strip, you need to remember that you can cut it into pieces only in certain places, strictly along the line running between the metal flat contacts. You also need to remember that the controller can withstand no more than 12 watts, so you must first calculate the total power of all the bulbs in the strip and, if necessary, reduce its length.
When everything you need has been purchased:
- we cut the tape and wire into the pieces we need;
- We clear the pieces of wire from both sides of the plastic by about 1 cm;
- We solder the required segment to the tape, each wire of a specific contact;
- then we insulate the soldering areas with silicone glue so that the wires do not break or collide.
We fasten the tape with wires into place using double-sided tape or other material. We start in the place under the glove compartment. We pass the wires through the terminal clamp, attach the controller to it, and make sure that each wire matches the color on the controller. We are finishing the installation of lighting under the car pedals.
We try to hide all the wires under the trim, panels and seats. All that remains is to connect the controller to the cigarette lighter. We use a regular car charger for a mobile phone. We disassemble it and run the wires along the road, bypassing the voltage stabilizer, this is necessary in order to raise the charging voltage from 4 to 12 watts. We solder one of its wires to the fuse, the other to the leg of the right metal ear, bypassing the stabilizer, i.e. to the “minus”. We assemble the charger and plug its plug into the controller, and the charger into the cigarette lighter. Having learned how to connect the LED, all that remains is to master the remote control and enjoy the light and music.
LED car trunk lighting
When using this option for connecting light in the cabin, you need to remember that the backlight will only light when the ignition key is turned or when the car is running.
Principles of approach to solving the problem
DIY car interior decoration
Before starting installation, it is worth understanding the task at hand:
choose a color scheme for the system that is harmonious in style; decide on the areas of space that you plan to attract attention to with the help of lighting; familiarize yourself with the interior diagram from the specifications for the car, and then clarify all the details directly on site; solve the issue with the principle of connecting the power supply.
Most often, the luminous line is attached to the dashboard, the lower contour of the seats, and on the doors. The entire path where the LED line is planned to be laid, namely: air ducts, armrest cavities, glove compartment, etc., must be examined, checked and cleaned of dirt, rust, and the like.
The laying plan is largely determined by the design of a particular car interior. The most popular LED backlight triggering schemes are:
The advantage of the first and second options is automation. The disadvantage is that there is no need for lighting during the day.
The LED line is powered by a line running under the floor and through the fuse box.
Neon is easy to install
How to dry clean a car interior with your own hands
Installing neon in a car is quite simple. Probably, this simplicity makes neon lighting much more popular than the LED version. They install neon almost anywhere in the car, and handymen do it even in places where it is impossible to imagine. For example, in the wheel arches or air intake, engine compartment, etc. Still, the most common place is the bottom of the car, where the lighting looks much better.
The video shows how to install neon car wheel lights:
The basic rule for installing neon lighting is the following: the farther the lighting is from the road surface, the better.
By placing the neon component under the bottom, you also get practical help. The road will be illuminated directly under the car. Needless to say, the connected neon lighting located on the bottom of the car will create an amazing appearance that is comparable to a car flying at speed. An even greater effect is achieved when racing along a snowy road.
In addition, neon electric lighting can also be used to transform the interior of a car, since the sizes of tubes on the market today vary widely.
The backlight is turned on directly from the network or through a switch. Some car neon samples are equipped with a special plug that can be easily connected to the cigarette lighter socket. This option is not always convenient, but it makes it possible to connect the backlight without interfering with the complex wiring of the car.
Experts and craftsmen recommend connecting neon lighting through the electrical supply system of the car, and installing the switch where it is most convenient.
The video shows what neon car headlights look like:
Install long tubes of neon lighting under the bottom of the car along the entire body, and short tubes under the edges of the rear and front bumpers.
As for multi-color backlights, they are always sold together with a special block. It also controls the modes, and also makes it possible to alternate different backlight colors or turn on the blinking mode. The most expensive models are also equipped with a special vibration sensor. It responds to vibrations from the car body and sound waves from the car's audio system. In this case, the strongest sounds will be given off by a stronger glow.
As for the backlight kit, you can assemble it either yourself, or by asking a specialist for help.
In addition to the usual neon lighting, there is also flexible neon, consisting of a flexible thin transparent tube with a diameter of two to five millimeters. It is customary to install such a pendant between interior panels, recreating a rather beautiful and cheerful design.
Having learned how to make neon lighting with your own hands, you can completely transform the appearance of your “iron horse”. This will no longer be just a car, but a work of art that will be a pleasure to drive.
Neon is power, brightness and strength
Let's try to understand what neon variation is and how it differs from other types of lighting design. If we recall the famous Hollywood film “The Fast and the Furious,” then neon was used in its shots on cars. A gas-discharge lamp is used as a luminous element of the neon illumination system. It is placed in a special tube that protects the backlighting device from damage and various external influences, including moisture, dust, dirt and much more.
Thus, the neon component can give an unusual and incredibly bright glow. As for the diffuser, for neon options it is customary to use regular foil or a mirror, which do this job perfectly. Why is foil or a mirror used instead of a diffuser? Everything is very simple. This need arises due to the fact that a neon lamp shines in all directions, and most of it (if a diffuser is not used) will go nowhere.
Neon is usually used to illuminate the underside of a car. Neon electric illumination of the bottom can turn a car rushing along the road at night into something incredible and fabulous. Such a car can be compared to a bright, high-speed meteor.
In addition to neon, LEDs can also be used to illuminate the bottom. They will be discussed in detail below. Now I would just like to note that LEDs have their advantages and, compared to neon, they have strengths. In particular, this concerns the high strength and service life of LED structures.
Neon components have their advantages and disadvantages. We will return to the advantages later, but the disadvantage of such lamps concerns not only the mandatory installation of a diffuser, but also the inability to shine in different colors. In other words, for neon lighting, only one single color is selected, which becomes the main one. But it can be changed and it shines with attractive power.
Rules for installing LEDs
The first thing you need to immediately understand is that an LED is not a lamp. You must be careful and careful during the replacement procedure. Repairing the electrical part of a car due to incorrect actions is not a pleasant thing. However, there is nothing complicated in such a replacement; LEDs for a car, the tuning of which you have already thought about, can be installed yourself.
Voltage and current are two fundamental characteristics. In the car's on-board electrical network, the voltage is usually 12-13 V when the engine is off, and when the engine is running - 13-14.5 V. The supply voltage for our lamps ranges from 2-3.8 V depending on the color (to be confirmed with the manufacturer). The current value for a low-power lamp is limited to 20 mA, high-power LEDs reach 350 mA.
It is also necessary to take into account that not all LEDs can illuminate the space around them. When buying new lamps, pay attention to the type of lens, which indicates the dispersion angle. For example, narrow-beam light bulbs have a small lens.
Ready-made kits for car underbody lighting
A lighting kit can be assembled independently from individual elements, but it is more convenient, faster and easier to use ready-made industrial kits - they have almost everything you need, in addition, many of the models offered are highly functional and have many different modes. For example, a device with an RGB remote control with 252 LEDs illuminates the car in seven colors, is controlled from a distance of up to fifty meters, and provides up to 15 operating modes. This set consists of components:
- four flexible LED strips (2x90 and 2x120 cm);
- control unit;
- remote control;
- wiring for installation.
For RGB to work, a power supply of 12-15 Volts is required; the circuit implements such effects as running light, fading lights, variable and constant glow.
Installing LED car lighting
To tune the interior or trunk of a car, in addition to the LED strip, you will need plastic clamps. You can, of course, find a tape with adhesive on one side or attach it with double-sided tape, but this method of fastening is not the most reliable.
LED car interior lighting
Fastening with plastic ties is a bit of a mess, but more reliable. Connect the wires from the attached LED tubes to the power source. When connecting several LED strips, the main thing is not to confuse the polarity. To prevent this from happening, use wires of different colors for “+” and “-”.
The power source can be a car battery. Then the wires are routed under the hood. They are connected through a fuse, which is located next to the battery. A switch is usually built into the circuit. Place it where it is most convenient for you.
LED car underbody lighting
A good option for connecting LED lighting for a car’s interior may be to connect it to standard lighting. Then it will turn on/off along with the light in the cabin. LED lighting of car doors is done in a similar way.
Installing LED underbody lighting is practically no different from installing neon. You also need to attach corners or a profile to the bottom, lay an LED cord in it, and lead the wires from it to the power source. Just before the power source, a control unit is often installed that controls the intensity of the glow.
Vehicle underbody lighting control unit
For LED illumination of car wheels, the tape can be attached to the brake disc protective cover. The casing must be thoroughly cleaned, including rust. Then the surface needs to be degreased and then, after removing the protective strip, glue the LED strip. For reliability, you can drill the casing and pull clamps through the holes to secure the tape. But some wheel designs do not provide this opportunity. In this case, you need to make a frame from aluminum tape, which should preferably be placed behind the brake disc. Attach the ribbon to this frame. The junction of the tape and wires must be carefully sealed. It is advisable to use several types of insulation: first, heat-shrinkable tubing, then fill it with sealant, and wrap it all again with insulating tape.
LED illumination of car wheels
It is better to place the wires in a plastic corrugated hose, which is attached to the suspension arms next to the brake hoses with the same plastic clamps (do not pinch the hoses!). The power connection options are no different from connecting the interior lighting.
When using modern materials or ready-made kits, DIY car LED lighting should not cause any difficulties. You only need basic skills when working in electrical work, which every motorist with more or less decent experience has.
The video shows how you can modify the rear lights of a Kia Sportage 3 using LEDs.
https://youtube.com/watch?v=Cy8CinlJWNA
Future lighting project
Any work to improve a car should start with a project. Naturally, at this stage we need to decide where we will install the backlight and we can say exactly how many wires, LED strips and connectors we will need for this. We make a rough plan of the location of objects inside your car and mark the places where we will carry out the wiring. This is quite simple, since most of the wiring can be hidden either under the trim or placed under the bottom of the car. However, in this case, you should definitely purchase and use a corrugated tube to insulate the wire. Let's look at the wiring diagram for the car interior lighting and use its example to understand the process.
Now it’s worth inspecting your car in those places where you will attach the LED strip itself. The ideal option for LED backlighting is when the light source is not visible and only the bright backlight of the car is visible. What's more, if you install the light in a hard-to-reach area, the strip is less likely to be damaged while driving or transporting people. Accurate measurements and cutting of LED strip
If you have not yet armed yourself with a tape measure and have not accurately measured the length of the objects to which the LED strip will be attached, now is the time to do so. After this, we take the tape in our hands and cut it, but we do it very carefully. The fact is that the LED strip cannot be cut anywhere. There are special places for this, located every 3 LEDs. And remember that it is better to make the tape a little shorter than necessary, because if the tape is not fixed evenly, but with sagging, the illumination intensity will be uneven, and this should not be allowed.
Soldering and testing
We arm ourselves with a soldering iron and solder the ends of a four-core wire to the places where the LED strip is cut. Try to observe the color of the wires at all connection points to make it easier for you to navigate when making repairs or if errors are detected. We recommend that before insulating the soldering area, check the glow as shown in the figure. If everything is in order, you can repeat this operation for the remaining sections of the LED strip. Prepare the required number of connectors in order to easily connect the resulting LED strips at the installation site and also observe the color of the wires.
We isolate the soldering points
If you are sure that the pieces of LED strip work as they should and you haven’t made a mistake anywhere, it’s time to pick up regular silicone glue or a gun that melts silicone and fill the soldering areas with it. This will not only protect the LED strip from moisture or accidental shorting of contacts at the soldering points, but will also help you seal the joint. This is quite enough for reliable fixation, so you can refuse to use insulating tape.
Gluing the LED strip
Everything is ready to install and connect the lighting in the interior of your car. To the surface you have chosen. You can either use a few drops of silicone glue or attach the tape with plastic ties - it doesn't really matter. Both options are quite reliable and durable.
If it is impossible to glue the backlight, as is often the case when installing the backlight on disks, you should use a hanging frame made of a thin profile, on which we will place the tape using plastic ties, but more on that a little later.
We connect the backlight through connectors
While accurately observing the color of the wires and connecting the wiring according to our plan, you should pay attention to how you will hide the wires. If you have the opportunity to run them under the interior trim, try to do it as discreetly as possible so that the wire does not stick out. And in the event that you will run wiring under the bottom of the car, first put insulating corrugated tubes on the wires, the ends of which should either be filled with silicone or wrapped with electrical tape. It is best to hide the connectors in the same place where the LED strip itself is located, because in this case you will have access to them at any time.
After all the lighting elements of your car are connected and you have hidden the wiring, we connect the wires according to the diagram with the controller and you can proceed to organizing the power supply for the lighting.
Do-it-yourself interior lighting algorithm of actions
The sequence of work consists of the following stages.
1. Cut the LED strip into pieces.
Produced with scissors in accordance with the intended length of sections (according to plan or location). The system cannot be divided everywhere, but only in certain areas. The landmarks of such areas are the yellow-brown rounded elements of the LEDs.
2. Strip the ends of the audio cable and irradiate each of the contacts on the red (“+”) and black (“-”) wires.
3. Connect the positive charge indicated on the light conductor tape to the red wire of the audio cable. Drizzle a mixture of liquefied rosin and tin on top. Do the same with the contacts of the black segment. After a few minutes of waiting, you need to check the strength of the connection.
When working, you need to be careful and watch to avoid errors like:
- polarities were reversed during installation;
- the edge of the spreading solder connected the “+” and “-” wires into a single whole.
4. At this stage of the work, a structure has been created, one end of which is a connection between a wire and an LED strip, and the other two are in a free state.
Next, connect the terminal block to the unused edge of the audio cable line in the traditional way.
5. Tear off the backing from the LED strip and stick it on a previously degreased area intended for installation. Make sure that the direction of the light flux is as planned.
To ensure secure fastening, apply a thin layer of “Moment” to the reverse side of the conductor line.
6. Observing polarity, use terminals to connect pieces of wires of the same color on the audio cable from different parts of the cabin.
7. Mark the installation location of the toggle switch (usually next to the control element for the alarm) and drill a hole.
To connect the button to the on-board power supply, select the necessary wires from the alarm system. Each of them is checked with a multimeter equipped with a sound signal function. Find two of them that trigger the buzzer. The stripped and tinned end of the red wire coming from the button is connected to a thick contact using pliers and then crimped with pliers.
The unused black wire is connected to the fuse box. From the electrical circuit located in the specifications for the car, pads that are not occupied by other devices are found. It is to them that the positively charged wire from the LED system is connected. The second option is to connect 2 wires to 1 contact (a current of 7.5 A is required).
8. Ground the system using the black wire and the round lug attached to it. The corresponding terminal is located next to the device for raising the car hood.
These are the main stages preceding the time when the interior lighting starts working normally.
Connection
There are LED panels (clusters) on sale that are powered by 12 V. You can immediately connect them to the mains and enjoy the wonderful lights. But as the engine speed changes, the brightness of their glow will change. In fact, they will normally glow at a voltage of about 12.5 V; low voltage will cause the clusters to glow dimly.
Each cluster consists of LEDs and a resistor. There is one resistor for three lamps, which is needed to dampen excess voltage. The LED strip is designed in a similar way, and if you need a piece, you can cut it at a specific location.
Serial connection
Our lamps can be switched on in series, thereby making a homemade cluster. To do this, you need to connect them to each other, and connect the remaining two terminals to the on-board electrical network. For example, for a voltage of 12-14 V you will need three white LEDs. As you know, LEDs of different colors have different supply voltages. Thus, in this example we get the following supply voltage: 3.5x3 = 10.5 V.
For an LED, one terminal is considered “plus” (cathode), and the second is considered “minus” (anode). A serial connection means that the “plus” of one terminal is connected to the “minus” of the next and so on until the end. But they still cannot be connected directly to the network. We connect a quenching resistor (resistance) of 100-150 Ohms with a power of 0.5 W in series with the resulting chain.
This circuit also depends on the voltage of the on-board network. However, using it, you can connect any number of LEDs in chains of 3 pieces in parallel with a resistor. A parallel connection means collecting several identical chains, where the plus of one chain is connected to the plus of another chain, and the minus to the minus. The nominal resistance is calculated according to Ohm's law.
Remember, if you just take and connect an LED to the car’s electrical network, you are guaranteed to burn it out.
Neon lights and the law
Let us immediately make a reservation that Russian legislation has a very ambiguous interpretation of this issue. According to the Appendix to the Traffic Regulations, among the vehicle malfunctions for which its operation is prohibited, clause 3.1 is indicated. “The number, type, color, location and mode of operation of external lighting devices does not meet the design requirements of the vehicle.”
You can get a fine for changing the design of a car without the appropriate documents.
However, GOST R 51709-2001 does not indicate “underbody lighting” or something similar among the types of external lighting devices. You can receive a fine for changing the design of a car without the appropriate documents. Since you are unlikely to be able to obtain permission for such innovations, in this case you are violating Art. 12.5 part 1 of the Administrative Code. As a punishment, a warning or a fine of 500 rubles is possible. and equipment seizure.
ADVICE! Follow two simple rules, and it will be more difficult for traffic police inspectors to issue you tickets:
- Do not direct the light under the bottom to the sides, only down.
- Do not install blue and red lights in the radiator grille and bumper, or white neon in the rear. The red and white colors of the illumination should not extend beyond the front and back of the vehicle, respectively.
Direct the light under the bottom only downwards
Naturally, it will be much more difficult for the valiant law enforcement officers to find fault with the neon interior lighting.
Is underbody lighting allowed, fines in 2017
Fans of external tuning are concerned about whether underbody lighting is allowed on a car, and what the punishment will be if the rules are violated. In practice, traffic police inspectors quite often fine for homemade lighting, but their actions are not always lawful, and besides, the legislation does not clearly state what changes in the design of a car are offenses. Although LED or neon underbody lighting is not included in the standard lighting fixtures of a vehicle, nowhere in the traffic regulations is it stated that its use is prohibited
It is important here how lighting fixtures of different colors are located, since it is not allowed to install:
- in front - optical devices of any color except white, yellow and orange, and retroreflective elements should only be white;
- at the rear - any lights except yellow, red and orange; retroreflective elements here can only be red.
To illuminate the license plate, it is permissible to use only white lamps; in 2021, a fine for incorrect placement of light elements on the car body can be replaced by deprivation of the right to drive a car for up to 1.5 years. Many drivers know well where they cannot install light elements, so they place them according to the rules, but traffic police officers still find violations, because here they can interpret another article, for example, about unauthorized changes in the design of a car that are not registered with the traffic police.
As a rule, drivers get off with a warning or a fine of 500 rubles for installing underbody lighting. Much depends on the region, the pickiness of the traffic cops; in some places, inspectors do not pay attention to additional lighting elements.
When installing underbody lighting, the car owner should remember the important traffic regulations:
- lighting should not look like a signal given by a special service vehicle, for example, do not switch from blue to red;
- the light can only be located under the car itself, it is necessary that it does not extend beyond the dimensions of the car;
- Light rays must not be reflected from the road, and if they are reflected, they must match the acceptable colors in front and behind the vehicle.
As such, there is no fine in the rules for illuminating the underbody; however, drivers are often charged 500 rubles. for driving a vehicle that does not comply with GOST 8769-75.
What are the dangers of incorrectly installing the backlight?
Interior lighting has virtually no effect on the traffic situation - in most cases it is used only in parking lots, and contour lighting is not so bright as to disturb the driver or dazzle oncoming cars. Therefore, such registration is usually not a violation for traffic police officers.
Important! A different attitude to the installation of external lighting devices - illumination of the underbody, wheel arches, etc. In these cases, one must be guided by the requirements of the Rules, which define the composition of the vehicle's light alarm system.
If the underbody lighting is directed under the car and does not extend beyond its limits, and the nature of the glow does not irritate the eye and does not attract attention, distracting from the situation on the road, then the traffic police officer may not pay attention to its presence. However, being overly enthusiastic about car design can result in deprivation of your license for six months or a year. It is important to remember that only white, yellow and orange lamps are allowed in the front, and red, yellow or orange in the rear.
Execution technique
The whole process is quite simple, you only need some materials and school knowledge in electrical engineering:
- Purchase a plastic mounting box used for electrical wiring. At a radio equipment store, buy LEDs based on taste and color, and also purchase a 700-800 Ohm resistor. You can also purchase ready-made neon pipes.
- Mark the location points of the LEDs on the box (the best option would be a distance of about 5 centimeters). Connect the resistor, and do not forget to check the bulbs for functionality by first connecting them to the battery.
- Place the LEDs along the holes and connect them in parallel. Shorten the top part of the LEDs (otherwise you will see not a stream of uniform light, but luminous points), and also seal the edges of the box with sealant.
- Secure the box to the bottom using clamps, which must be attached to the body using self-tapping screws. You can avoid using a clamp by securing the box directly to the bottom. Be sure to install a transformer block under the hood of the car to which you want to connect the leads from the LEDs.
- In the car interior, install a separate switch responsible for the backlight operation. Install it in any convenient and easily accessible place. Connect the toggle switch to the transformer wires, and connect the finished circuit to the vehicle's power supply system.
This is just one way to illuminate the floor of a car. There are others, no less original and not expensive.
Instrument panel lighting
The instrument panel is equipped with lighting, but for those who like to install additional lighting elements in the car interior, this is not enough. Owners increase the brightness of the backlight, change the color of each device, make the speedometer area in the high-value zone red, etc. There is a lot of room for imagination in this matter, especially since the installation of lamps does not pose any problems. You just need to purchase a set of 40 multi-colored LED lamps that have the same base as the stock bulbs. The user is only required to replace the “original” devices with diode lamps, selecting a color for each element to his liking. The procedure is extremely simple and does not require the use of a soldering iron or other tools. You just need to check the functionality of the LEDs before installation.