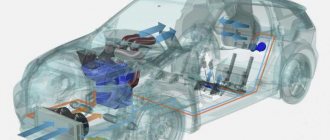
Those drivers who spend a lot of time driving at night often think about improving the interior lighting of their car. But not every one of them has the time or desire to go to a car service. Especially considering that you can get beautiful salon lighting yourself. Do-it-yourself car interior lighting can be quite at the level of service options.
First of all, you need to choose the place where the neon car interior lighting will be placed. In this regard, you need to know where exactly, since aesthetics in a car plays an important role. It is best to opt for the classic version with floor lighting located below the front seats and dashboard. Next, choose the power supply method for the planned lighting.
There are various options for obtaining electrical power. It can be provided by a battery, or maybe a cigarette lighter. In addition, it is worth deciding on the type of light - monochromatic or multi-colored, with the ability to change the color design using a special control panel. It is worth considering the main methods separately.
Why do you need additional lighting?
The feeling of comfort inside a car largely depends on the quality of interior lighting. The need for a soft, non-irritating backlight is especially important when traveling at night, when you need to check a map, write something in a notebook, remove important small items from the glove compartment, or find objects that have fallen on the floor.
Additional lighting is of great aesthetic importance. It creates a unique design for the interior of the car and makes it stand out among similar vehicles. Such lighting can be synchronized with a subwoofer, as a result of which the LEDs will pulsate and change colors to the beat of the music. Despite the important role played by car interior lighting, the standard lighting system in some car models leaves much to be desired, so you have to redo it yourself.
How does a cigarette lighter and its structure work?
The device circuit is simple. The cigarette lighter in a car consists of several parts:
The cigarette lighter is designed in such a way that when the car owner presses the button, the contacts are closed, to which alternating current is supplied. As a result, the element begins to heat up. When the maximum temperature is reached, the built-in thermal relay gives the command to snap off the device. If used correctly, the car cigarette lighter will work for a long time. However, there are reasons why the device fails earlier.
This is the connection of several powerful devices to one socket. The maximum permissible current value increases and the cigarette lighter fails. Therefore, car owners tend to install an additional device in their car.
Backlight options
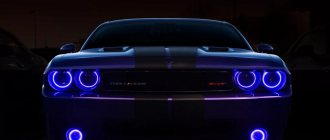
The modern car accessories market offers two lighting options: neon and LED. These lighting options are installed either separately or combined with each other, illuminating part of the interior with neon and part with LEDs.
Neon lighting is found in the form of lamps or flexible cord. The lamps emit bright, even light, but are susceptible to mechanical damage and often burn out with intensive use. Flexible tape is more practical, it is easily installed in the car, is suitable for illuminating uneven and embossed surfaces, does not break and consumes little electricity.
LED backlighting is becoming increasingly popular, which has the following advantages:
- flexible design;
- compact dimensions;
- ease of installation;
- convenient form of purchase (by footage);
- low sensitivity to mechanical damage;
- increased service life;
- the ability to change the color of the light flux (in RGB strips).
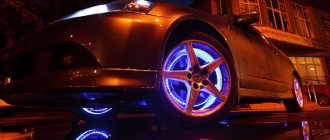
Thanks to its compact size, the LED strip can be glued to small interior elements: handles, cigarette lighter, steering wheel trim. With its help, you can get interesting lighting effects, ranging from smooth switching on and off of the backlight, ending with transitions between several colors.
IMPORTANT! The color of the lighting should be in harmony with the color of the interior. The result and quality of the glow depend on the correct choice of color.
Installation locations
You can illuminate anything in the car interior. Most often, additional lighting sources are installed on the following elements:
- in the glove compartment;
- under the seats;
- on the doors;
- on faithful hands;
- under the driver's dashboard;
- under the glove compartment there is a glove compartment;
- at the ignition switch;
- in the trunk.
To tune small elements (ignition switch, door handles), single diodes are used; diode strips are glued to larger surfaces.
Tools and materials
Before purchasing the necessary tools and materials, you need to decide on the location for installing the backlight and take the appropriate measurements. To install you will need:
- single diodes for spot illumination;
- LED strip (if you plan to illuminate the ceiling, instrument panels, and the space under your feet);
- set of wires (3-5 m);
- heat-shrink tubing;
- any degreaser;
- insulating tape;
- glue "Moment";
- soldering iron;
- scissors;
- Dimmer;
- Screwdriver Set;
- tools that are listed in the instructions for the backlight.
LED strip is sold by the meter. It can be purchased at the automobile market or at a specialized spare parts store. Experts recommend not skimping on the quality of the tape and purchasing good LEDs.
ATTENTION! It is better to purchase a small supply of tape than to discover at the last moment that there is not enough of it.
If you don’t want to go through the hassle of measuring, soldering and insulating wires, you can look for ready-to-connect kits. They include LED strips with wires soldered around the edges. Such strips are fixed in the right place and connected to power.
How to make floor lighting in a car
The implementation process is very simple: you need to place the LEDs on small printed circuit boards with a 1 kOhm resistor.
LED strip for car floor lighting
In the driver's seat, this board is connected to a blank for the computer slot, which at the same time is connected to the front panel under the steering casing. In the passenger seat, the board is glued with sealant under the glove compartment. The LEDs need to be positioned so that they are not visible. We connect the terminals of the boards in parallel, taking into account the polarity, and connect them either to a separate button or to the “dimensions” switch.
Installing different lighting options
Point diodes
A resistor is soldered to one of the legs of the diode. Next, solder the wires and wrap the exposed wiring with electrical tape. A terminal connection is made at a distance of about 20 cm. LEDs are ready for installation.
Now the installation site is being prepared. If we are talking about interior handles, then you will need to remove the trim and make a small hole at the installation site. The hole should be of such a diameter that the diode fits quite tightly in it. If desired, you can glue the diode with Moment glue.
The wiring is pulled under the trim into the interior so that it can be connected later. In the same way, point diodes are installed anywhere in the cabin.
LED Strip Light
Installing LED lighting in the car interior is not difficult. The location of the intended installation is measured and the tape is cut to the appropriate length. Incisions are made using scissors along special membranes.
ATTENTION! If you take more tape than necessary, it will not fasten well and will sag in the future. Therefore, it is better to cut a little less tape than planned.
Wiring is soldered to the edges of the prepared sections, the functionality of the structure is checked by connecting it to power, and then proceed to installation. For the best adhesion of the tape to the plastic surface, the place where the tape is attached is degreased. To do this, apply the degreaser to a rag, wipe the desired area and leave it for 3-5 minutes until completely dry. After this, remove the protective film from the LED strip and glue the strip in the right place. If the tape does not have a protective film and a sticky surface, then “Moment” glue is required for its installation.
The algorithm described above is suitable for installing lighting on straight surfaces. If you need to install the backlight in an area with a bend, you will have to tinker. The fact is that it is not advisable to bend the LED strip even at an angle of 90 degrees. Therefore, you will need to cut two pieces of the required length, clean the edges and solder them at the folds. Place a heat-shrinkable tube over the soldering area and heat it up. Wiring is soldered to the outer edge of the LED strip, they are insulated and the strip is installed in the right place.
Neon lamps
Neon lamps should be installed in places where the risk of mechanical damage is reduced to zero. For example, to illuminate the engine compartment. For installation you will need the following tools and materials:
- neon lamps;
- aluminum corner;
- nylon clamps for fastening;
- self-tapping screws
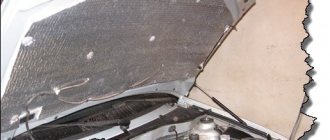
If the lamp has a connector for connecting to the cigarette lighter, cut it off and clean the contacts. A piece is cut off from the aluminum corner, which matches the length of the lamp. The corner is screwed under the dashboard, and neon lamps are attached to it using clamps. In the same way, the lamps are mounted under the glove compartment and under the rear seats. The wiring is hidden under the car's skin and pulled to the dashboard.
Step by step replacement
1. Remove the cigarette lighter cylinder.
2. The cigarette lighter core is held in place by a metal retainer. The latch is marked in the photo below.
3. Using tweezers, bend the core clamp inward.
4. We pick up the edge of the core with a flat screwdriver and pull it up.
5. Disconnect the cigarette lighter power connector.
6. Now there are two ways. If your cigarette lighter rim was illuminated, then you don’t have to change it. Simply connect the new core and install it in place.
Connecting the backlight
There are different options for connecting the backlight. Most often, a cigarette lighter or interior light is used for this purpose.
If the backlight is connected to the cigarette lighter, then “+” is connected to the “+” of the cigarette lighter, and “-” is connected to any place on the car body. To connect the backlight to the interior lighting, you will need to remove the lampshade and connect the “+” to the white wire, and the “-” to the red. For the effect of smoothly switching on and off the backlight, a dimmer is additionally connected to the system.
As for the neon lighting, it is powered through a specially installed transformer from the battery. You need to connect a switch to the battery, and then put a fuse on the entire backlight. The maximum distance from the fuse to the positive terminal of the battery is 45 cm.
It is best to pull the wire through a hole in the housing, between the engine or the passenger compartment. To prevent sharp edges from cutting the cable, they are neutralized using soft rubber rings of suitable diameter.
Now connect the second wire to the corresponding battery terminal. It is either pulled along the same route as the first one, or simply connected to the body of the machine. Then they turn on the system and check its performance.
This completes the DIY installation of car interior lighting. It does not require any special skills. The main thing is to stock up on the necessary materials, tools and show a little perseverance and patience.
Lada 2106 Calypso-Zhuchka › Logbook › Cigarette lighter and additional interior lighting
My cigarette lighter doesn't work. At all. As soon as I got behind the wheel, it was like that. I tried to solve this problem a year ago by checking the fuses (I replaced all of them), and then installing a new cigarette lighter - it, too, unfortunately, did not work successfully. Since the cigarette lighter in a car is a very useful thing (I have a vacuum cleaner and a compressor, a phone charger would also be nice), I decided to deal with it anyway (I got tired of connecting the wires directly from the battery to the compressor/vacuum cleaner). I would really like to get help or at least advice in this matter from Drayvovites. I’m also thinking about interior lighting (standard lampshades, even with LEDs, are critically lacking) - maybe I could add an additional strip somewhere? How can this be done so that it looks normal (in the eyes, so that it doesn’t catch the eye)?