Many modifications are made to a car to attract the attention of others. Most often these are cosmetic changes, but there is one functional upgrade that is popular among car tuning enthusiasts. It allows the driver not only to express himself to others, but also to improve the power characteristics of the car. We are talking about installing a direct-flow muffler, which is commonly called a direct-flow muffler. In this article, we will look at how to install direct flow on a car, as well as what pros and cons it brings.
How to make a forward flow with your own hands
A good direct-flow system produced by sports car manufacturers costs serious money, and the desire to make a direct-flow system yourself is quite understandable. If you look at such accessories in detail, you will notice that they are a standard exhaust outlet with a modified design - smoothed bends and a small number of welds. Due to this structure of the exhaust system, it becomes easier for the car to cope with the emission of exhaust gases into the atmosphere.
Making a forward flow with your own hands is not as difficult as installing it on a car, but you should understand that such interference in the design of the car has its own effect on different models. Most often, a homemade direct-flow system is installed on “weekend cars” that were purchased in order to conduct various experiments on them.
To make a direct flow yourself, you will need: a metal pipe with a wall thickness of at least 3 millimeters, a welding machine, a drill, a grinder (for cutting metal), stainless steel (metal sponges for washing dishes are most often used - about 50 pieces).
The process of self-production of direct flow is as follows:
- It is necessary to remove the installed muffler from the car and open the resonator. To do this, take a grinder and make a hole along the entire length of the resonator, and then spread the metal sheets to the sides, as if opening a tin can;
- After this, you will see all the insides of the resonator, which consists of two parts of a pipe and several stiffeners. All this has to be cut out of the resonator “to zero” so that its metal shell remains directly. The most convenient way to cut is with a grinder, but be prepared for the fact that it will take a lot of time. When removing pieces of pipes, leave 3-4 centimeters on each side to make it easier to weld modified exhaust options later;
Attention: some sponges may come with improvised “hooks” made of paper, plastic or fabric. Such elements must be removed from the metal before placing it in the resonator.
- Next, close the resonator and weld the lid securely;
- At this point, creating a direct flow with your own hands can be considered complete. All that remains is to install the car muffler in place.
It is important to note that this method is only one of many options for independently creating a direct-flow pipe from an existing muffler. Some car enthusiasts assemble direct flow from scratch, which is much more expensive and more labor-intensive. This modification is simple, and even a driver without experience can perform it.
Instructions for making a direct-flow muffler
A classic muffler consists of several chambers connected by pipes. The gas flow passes through the compartments and expands and cools many times, which helps reduce noise. But due to the large number of compartments, exhaust resistance increases, which leads to a loss of engine power. Some car owners strive to get a sharp “sporty” exhaust sound and an increase in horsepower by installing a direct-flow muffler. Noise reduction is achieved due to the resonance effect, so the device should be assembled taking into account the engine model.
Tools and materials
The minimum set of equipment and materials includes:
- semiautomatic welding machine with a head that allows carbon dioxide to be supplied to the welding zone;
- electric angle grinder with a set of discs for cutting and polishing;
- electric drill or drilling machine with a vice for fixing workpieces;
- welder's protective suit, incl. a mask and shoes to prevent burns from drops of molten metal;
- a metal pipe for making the outer shell of the muffler;
- water pipes with a diameter of 50-60 mm for internal structural elements;
- steel pipes for attaching to the exhaust system and venting gases into the atmosphere;
- steel sheet 2 mm thick for the manufacture of end caps and partitions;
- mineral wool or steel sponges to fill the muffler chambers.
To make a homemade direct-flow muffler, carbon steel is used; the blanks have a wall thickness of at least 2 mm, which allows the service life to be increased to 2-3 years. If the master does not have the skills to work with a semi-automatic machine, then it is recommended to practice on pipe fragments and scraps of steel sheet. To improve the appearance, you can put a stainless steel nozzle on the outlet tip, selected according to the diameter of the pipe.
Manufacturing process
General algorithm for making a homemade direct-flow muffler for a car:
- It is necessary to make a blank for the body, which should fit in the standard place for the muffler. The casing should not be lowered or moved to the sides, as the product may reduce ground clearance, touch suspension components, or damage the fuel tank located under the bottom of the vehicle.
- Mark points on the water pipe for holes with a diameter of 5-8 mm, located in rows every 10-15 mm. The distance between the channels should be about 15-20 mm; high precision when marking is not required. The holes should be located only inside the muffler body; it is necessary to provide a monolithic section of the pipe for welding the end covers.
- Drill the channels with a drill or machine, and then clear them of burrs with an abrasive tool.
- Cut out end caps from sheet steel that match the diameter of the body of the future muffler.
- Drill holes in the covers for installation on a perforated pipe.
- Place the flanges on the pipe, adjust them according to the length of the body and weld along the inner circumference.
- Wrap the surface with mineral wool with a high fiberglass content or cover it with metal jaws fixed with steel wire.
- Carefully insert the structure into the body blank and weld the end caps around the perimeter.
- Drill a hole with a diameter of 2-3 mm in the lower part of the muffler to drain the condensate. There is no need to make a channel, but at low ambient temperatures ice may form, preventing exhaust gases from escaping into the atmosphere.
- Install a flange on the inlet pipe to allow the product to be attached to the exhaust system.
- Design the outlet pipe and, if necessary, install a decorative nozzle.
- Weld brackets made of steel rod to the outer part of the body or end covers, intended for attaching the muffler under the bottom of the car. The durability of the unit depends on the quality of welding work. The seam must have a uniform width; slag or dirt entering the molten metal leads to a decrease in the strength of the structure.
- Clean the seams and degrease the surface of the product, and then apply a paint coating. For the muffler, you can use enamels for brake calipers, which are resistant to high temperatures. Standard paints and primers should not be used, since the protective layer will burn off after a few hours of engine operation.
- Install the structure on the car and test run the power unit. If extraneous rattling or gas leakage through a defective weld is detected, the muffler should be modified.
Pros and cons of installing direct flow on a car
Installing a direct-flow system has both pros and cons. Each motorist decides for himself how appropriate it is to modify the car muffler in favor of direct flow.
Pros of direct flow:
- If a pipe with a slightly larger diameter than originally installed is welded on, it is possible to increase the exhaust gas throughput. An increase in airflow leads to an increase in engine power, up to 15%;
- Increasing the service life of the muffler. Most often, the muffler “from the factory” is not made from the best materials, but with such a modification, the motorist can use good pipes, even titanium options. If you want to increase the “lifetime of the pipes,” then after welding the resonator, you need to remove the end of the muffler with a grinder and solder a new pipe in its place, having thoroughly cleaned and primed it in advance.
Disadvantages of forward flow:
- Increased noise. Many car enthusiasts consider this parameter a plus and install the direct flow with their own hands solely for the purpose of increasing the “rumble” of the car when driving;
- Reducing the vehicle's ground clearance if pipes of larger diameter are welded onto the muffler;
- Problems during maintenance. Increased noise and the absence of a catalyst will lead to problems during maintenance;
The method of installing a direct flow with your own hands, described in this article, can be called “collective farm”. In professional racing cars, the direct-flow system is much more complex and is designed primarily to improve engine performance. At the same time, such a forward flow is unlikely to bring much benefit, only changing the sound of the car, which, in most cases, is the goal of independent tuning.
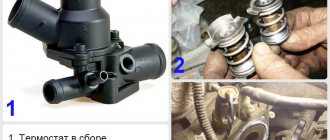
About direct flow or PG
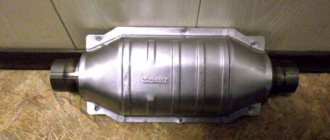
A direct-flow muffler (PG) is an improved alternative to a stock exhaust, which is not capable of ensuring a quick and timely release of gases from the engine system (ICE). The standard exhaust system especially suffers (chokes) after installing a sports camshaft or after boring the cylinder head cylinders (in other words, on a forced engine).
A straight-through muffler is designed to improve the exhaust system
The GHG is designed to modernize the exhaust system, which increases gas emissions. In addition, a correctly installed PG will provide an increase in internal combustion engine power by 10–15 hp. However, you need to be prepared for drastic changes: everything will need to be replaced, from the catalyst to the tip.
Increasing the power of a power unit using a PG, unfortunately, also has a “other side of the coin”, associated primarily with a loud sound attack of about 120 dB. This is the norm for sports cars, but hardly for civilian ones. And this explains the mass of cases of fines issued by law enforcement inspectors to the owners of such cars.
To minimize this modernization flaw, craftsmen use various methods to reduce sound. Installing a flute muffler, oval or round resonator are all types of methods to improve the performance of a forward flow muffler. “Form and content” can make it quiet.
For example, craftsmen say that a square resonator installed in the middle of the path (the path for gases to escape into the aircraft) reduces noise much better than an oval or round one. And in general, it’s better not to use a round one, but to use an oval one as a last resort, since it has a larger volume of cans and, accordingly, a quieter sound.
Oval resonators from Volvo S60R and Saab have proven themselves to be quite good.
Before thoroughly understanding what GHG is, you should remember the functioning of the vehicle exhaust system. Many motorists do not even suspect how many tasks it performs, although it does not seem so at first glance.
The forward flow kit is a ready-made option for tuning
Of course, the main task of the exhaust is to remove gases. But an equally important function is to ensure timely and high-quality ventilation of the internal combustion engine cylinders.
Ventilation of the cylinders is carried out as follows. When the valves of one cylinder of the internal combustion engine are closed, a vacuum is created in the exhaust manifold. It moves through the system at high speed, and, having been reflected from obstacles, returns to the collector. At the moment the gases leave the cylinder, a reduced pressure is created here, which promotes better ventilation and purge.
Among other things, the exhaust system (ES) is designed to combat noise. This is what the muffler is designed for.
Compared to a conventional standard muffler, the PG does not have many separate sections inside. Accordingly, it has a more simplified design. It is this fact that allows craftsmen to make it at home or in the garage.
But is it even worth it for an ordinary motorist to change the standard muffler to a PG one? Certainly not. If he does not prefer active driving, does not intend to use the car for sporting purposes, does not have complexes about a “gray” car that does not stand out from the general traffic flow, then he should not carry out modernization.
On the contrary, if the bassy and thoroughbred roar of the engine resonates in the soul of the car enthusiast, then the installation of direct flow must be carried out. Moreover, this gives many advantages of the following nature:
As for the disadvantages of modernization, these are:
Do not confuse forward flow with a muffler. The fact is that the entire exhaust system is called direct flow, and in most cases only part of it is subject to modernization - the muffler.
How to reduce the sound of a muffler in a car with your own hands
There are fans of direct-flow exhaust, when a loud roar of the engine is heard. But there are also those who think about how to reduce the sound of the muffler. If you make a quiet muffler with your own hands, then the ride will be more comfortable, because the cabin will be quieter. Especially on domestic cars like the VAZ 2109, the question of how to make a silent muffler is relevant. If you can make a quiet muffler on the nine, then the car will bring more joy to its owner.
We make a muffler with our own hands - three options for making a homemade exhaust
You can implement the idea of how to make a muffler for a car yourself using several schemes, sometimes using unexpected materials. But you need to adhere to the design of the standard part.
Exhaust units rust, burn out, and break on rocks. Repairing and replacing the exhaust system costs a lot of money. If you are wondering how to make a muffler for a car yourself, you are familiar with this problem. You can solve it with ingenuity and basic plumbing experience.
Ways to muffle the exhaust sound
Before tuning the exhaust system, you need to understand the reasons why the sound of the engine becomes louder over time. The operation of the engine itself is a fairly loud process, but the muffler and other components of the exhaust system perfectly suppress this loud noise. Without a muffler, the engine noise is very loud.
The noise occurs because the fuel mixture explodes in the combustion chamber, releasing gases that then exit into the exhaust pipe. We will not talk in detail about the operation of the engine, you can read about this in another article, but here we will talk specifically about how to muffle the exhaust sound.
The explosion releases energy that pushes the piston, and when the piston has moved the required distance, the exhaust valve opens, through which the exhaust gases exit and go further through the exhaust system. To effectively absorb noise, thick metal parts are used. So, the thicker the metal used in the exhaust system, the quieter the car will drive due to the fact that there will be less vibration.
The exhaust manifold is the first one to absorb the noise, which is why it is made so large and thick, so it best dampens the noise that comes from the cylinder block. Even if you compare the exhaust pipe of any more or less normal foreign car with the exhaust pipe of a domestic car, you can see that in foreign cars the pipe is heavier and thicker, which is why such a car runs quieter.
This is why when you drive an old VAZ 2114, the noise is such that you can’t hear what the passengers in the rear seats are saying, which is why you start thinking about how to muffle the exhaust sound.
The exhaust system also has a resonator, which is needed to reduce the speed of gases through the exhaust pipe. And after the resonator comes a muffler. When exhaust gases pass through the resonator, they lose some energy and continue to flow more slowly.
Gases lose the largest share of their energy in the muffler. If we consider a good muffler, then it contains several separate housings, after passing through which little remains of the noise.
How else can you reduce exhaust system noise?
The standard exhaust system is calculated taking into account the requirements of the standards of the country in which the car will be sold. It is impossible to independently modify the muffler and resonator; any intervention in the design can have a negative impact on the operation of the power unit. The main way to combat extraneous sounds inside the cabin is to install sound insulation sheets, which are glued to the floor and ceiling of the body, the engine shield and the inside of the doors.
To reduce the noise effect, a factory or homemade flute is installed in sports mufflers. The unit consists of an end bushing that reduces the flow area of the exhaust channel and a welded perforated pipe with a welded end part. The internal volume of the pipe is filled with metal gimp. The product is selected according to the muffler model and inserted into the outlet pipe. When starting the engine, the flute works as an additional element, reducing the pressure and speed of exhaust gases, increasing acoustic comfort.
The car owner needs to monitor the condition of the exhaust system elements and promptly replace or repair them. For example, on many cars there is a corrugated section between the manifold and the resonator bank, which prevents the transfer of vibrations to the exhaust system. When cracks form, an extraneous sound appears, but as the engine warms up, the noise returns to normal. The owner will need to contact the service center and install a new corrugation (original or universal), which will restore normal operation of the exhaust system.
How to make the quietest muffler for a car yourself?
When the issue with noise during car operation has gone too far, and you have decided to make the quietest muffler for the car, then you need to start by preparing the tool. We will need:
- welding machine, an inverter or semi-automatic will do;
- angle grinder and discs for it;
- workbench with a vice.
The surest and most inexpensive way to make a muffler quieter is to weld in an additional resonator. This can be done in a garage yourself.
An additional resonator can be placed between the standard resonator and the muffler. You can install a ready-made resonator; you just need to weld it into the desired place in the pipe. Or you can assemble the resonator yourself. For those who doubt whether the exhaust will become quieter if an additional resonator is welded in, the answer is clear - the exhaust will become quieter. If everything is done correctly.
Homemade muffler
Choosing the right material is very important when creating a quality part. You need to decide on a budget, then decide which segments to purchase. There are several options for self-assembling a muffler at home.
- Modification of the standard system
- System assembly from standard steel
- Stainless steel component assembly.
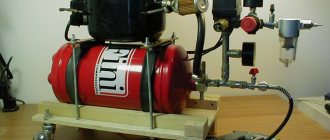
- Fire extinguisher. Empty and used will do.
- Two pipes with an approximate diameter of 32 millimeters, the exact length is determined by the car
- Electric welding machine
- Grinder, you also need a cutting wheel.
We do not recommend using very old mufflers. As a result of repeated heating and cooling, the metal loses its desired properties. Used parts that have worked for quite a long time have burnout spots and actively rusting places. Such material can only be recycled and cannot be reused. From a financial standpoint, upgrading a conventional muffler costs the same as any standard steel system. The more expensive method is a stainless steel system. This option can live up to 10 years.
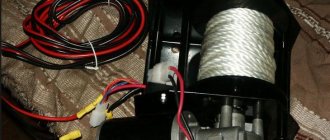
How to make an additional muffler resonator with your own hands
Making a muffler resonator with your own hands is quite simple; now we will discuss each step in detail. First you need to make an outer casing, it can be made from any steel pipe with thin walls: which looks like this:
The end part looks like this:
Then you need to take perforated iron with a thickness of 4.5 mm. This is enough to insert it into the end part, as in the photo below:
Next, you need to fill the resonator with something; ordinary tin sponges are perfect for this purpose.
Then you need to pull the resonator body onto these washcloths, as in the photo:
Then you need to take rivets and rivet the entire structure, so you don’t even need to weld it, like this:
For those who like to cook, you can also brew the end parts to the central part.
When everything is ready, you need to process the seams and you can paint them with heat-resistant paint, and after that the quietest muffler on your car is ready.
Powder fire extinguisher muffler
Modification of a standard muffler is possible on the basis of a powder fire extinguisher whose service life has expired.
Necessary materials
Additionally, you should prepare:
- welding electrodes 1.5 - 2.5 mm;
- electric welding machine;
- compact grinder with cutting wheels for metal;
- parts of the old muffler;
- two pieces of steel pipe with an internal diameter of two inches.
Stage-by-stage execution of work
The manufacturing process is as follows.
- Prepare a pipe of a suitable size with a diameter of 30 - 52 mm. It is unlikely that you will be able to find thin-walled factory-type pipe, so just use tap pipe.
- Unscrew the cap from the fire extinguisher and get rid of the remaining powder.
- Enlarge the hole until the pipe you prepared fits snugly into it.
- A similar hole must be made on the other side of the cylinder, but it should be slightly shifted towards the wall of the fire extinguisher.
- Use a grinder to create perforations on the end sections located inside the pipes (12 - 15 cm).
- Insert the pipes into the cylinder, calculating the opposite arrangement of the perforated sections opposite each other. The ends should be inserted 60% into the balloon.
- Weld the joints on both sides of the cylinder in a circular direction. Be careful not to burn the metal of the fire extinguisher.
- Remove the fasteners from the old fire extinguisher and weld them onto the resulting homemade structure. Please note that the water pipe is heavier than the factory car pipe, so provide reinforcement for the fastening. On the other hand, the heavier the pipe, the quieter the muffler.
- To reduce noise levels and increase the service life of the structure by two years, insert a flexible corrugation into place after the exhaust manifold. The housing can be filled with glass wool to further reduce noise.
- If you are making a muffler from stainless steel, provide for the possibility of disassembling the structure. It can be partially dismountable, and you will have the opportunity to periodically clean the cavities and make repairs if necessary.
- Be sure to check the tightness and reliability of the welds by plugging one of the pipes and filling it with water upside down. There should not be even a slight leak.
- Drain the water and use a compressor to blow out the product and remove any remaining moisture.
- The design is ready for installation on a car.
Possible inconveniences associated with a quiet muffler
The car will now be quieter, which is what we wanted to achieve, but there may be some disadvantages - an increase in the overall weight of the exhaust system. Therefore, it is necessary to hang stronger brackets so that the exhaust pipe does not come off on rough roads. There are also cases when rubber shock absorbers are hung. But in fact, a homemade resonator will weigh about 2-3 kg.
It is also necessary to test in action how the exhaust system works so that gases exit normally through the exhaust pipe. Therefore, it is necessary to check at higher speeds, then it will be possible to draw the right conclusions. But as a rule, gases will escape through such a resonator without difficulty.
And then in the video there is another way to reduce the sound of the muffler, making a really very quiet exhaust system:
Thermal tape for the muffler. Why do you need to wrap?
Not long ago I wrote an article about “SPIDER 4-2-1 and 4-1” , namely why it is needed at all, and whether it can really add 10% power (it’s an interesting read). But in this article they started writing comments to me that I forgot to mention such an important thing as “thermal tape” that with proper tuning it is necessary to wrap it around the muffler, in particular the exhaust manifold. So let's look at it - why this needs to be done and whether it really gives an increase in power of several “horses”...
As I wrote in that article - MIRACLES DO NOT HAPPEN, it is impossible to simply install a SPIDER and get an increase of as much as 10 horsepower! You need to completely re-equip the entire exhaust system, starting from the exhaust manifold itself, removing the catalyst , installing sports resonators, and even calculating a certain pipe diameter. Only then can you really achieve + 10% of the nominal power. BUT now another topic is starting to be discussed, that it is enough to wrap “thermal tape” on the improved SPIDER and then plus another 5% of power. Let's figure it out.
How does a car exhaust pipe work?
Modern pipe systems that remove exhaust gases from the engine, simultaneously converting them, consist of several sequential functional elements:
- Corrugated pipes extending directly from the exhaust manifold. These elements do not have the rigid structure necessary to ensure that engine vibration is minimally transmitted to the entire pipe structure.
- A catalyst where the most environmentally and hygienically dangerous compounds formed as a result of the combustion of hydrocarbons are deactivated.
- A resonator, which is a special expansion along the path of gases passing through the exhaust system. Here the primary inhibition of gases occurs, where the pulsating flow turns into a slower and smoother one. The standard resonator is designed to dampen exhaust pulsations of a certain frequency characteristic of this engine.
- The muffler, where the exhaust finally loses speed and temperature due to dispersion. This formation has a rather complex design, designed to disperse the gas flow as much as possible and absorb sound vibrations.
What is thermal tape for a muffler?
It should be noted that she came to us from the construction industry. Previously, it was heat-resistant asbestos fabric that could withstand temperatures of 1100 - 1500 degrees. However, as studies have shown, asbestos is very harmful to the environment and people nearby. Therefore, such fabrics are practically not used now (unless you order from China).
Now “tapes” for tuning are mainly made using silica threads or other silicon (graphite) compounds. Other manufacturers say that they make them almost from pulverized lava (LR technology), which melts and settles in the fibers, making the fabric very strong and stable. All options, just like asbestos, can withstand high temperatures, without any harm to the environment and humans.
Usually the thermal tape is about 5 centimeters wide and has a black color if you run your hands over it, but your hands will be black as if from graphite.
Why do you need to wrap?
There are several theories here, and all of them appeal to tuning enthusiasts.
- Exhaust sound . If you are redoing an exhaust pipe, then you often install homemade systems (for example, the same SPIDERS or resonators). If you do something not according to the rules (it’s trivial not to calculate it), then the exhaust sound, instead of deep bass, will be “ringing”. To remove this effect, they often wrap the pipe with thermal tape, then the ringing actually decreases, often turning into bass. It’s like if you throw a ball into a metal basin, there will be a ringing sound, but if you lay a rubber mat (or fabric) the sound will be absorbed
- Adding power . As we already know, the exhaust system inhibits exhaust gases (diameter, catalyst, resonators). And if we move them faster and easier, then the motor will not need any effort to push them through the entire pipe. Exhaust gases exit and collide with the cold pipe of the exhaust manifold , thereby cooling and compressing them - their ability to pass through decreases. And as we know from the 8th grade physics course, at high temperatures, the volume of gas is greater for the same mass. It follows from this that heated (not cooled) gas will move faster through the exhaust system. And the faster it is retracted, the power increases slightly.
- Engine compartment temperature . Another “killed hare” by thermal tape is the low temperature in the engine compartment. A really big plus for many plastic parts in the summer, also for the battery.
BUT it should be noted that TUNERS are mainly concerned with the FAST REMOVEMENT of the exhaust gas flow in order to increase power, that’s all.
How to wrap it with your own hands
Now I take the option - when you already have a pumped exhaust system (with SPIDERS) and you want to improve it even more.
- It is worth buying thermal tape from well-known manufacturers (as practice has shown, those purchased on ALI can be of poor quality, and contain asbestos).
- You need to take a thickness of about 40 - 50 mm - this is the best option. If you take it narrower than 30 mm or wider at 60 - 80 mm, it’s just more difficult to wind
- The collector MUST be treated with corrosion-resistant and heat-resistant paint - THIS IS MANDATORY, this way it will last much longer
- Before winding, the tape needs to be thoroughly wetted, in plain water for about an hour or two. This is done so that the thermal tape does not “walk” along the pipe in the future, but is wound as needed
- At each stage, you need to fix the winding parts with metal clamps. As well as the structure itself later, otherwise securing this layer will be impossible
Usually only the exhaust manifold is treated (in our case it is an improved SPIDER). There is no point in treating the entire muffler, because the gases still lose temperature. However, if you want, you can!
GAZ 31 PatroN › Logbook › Making a muffler from... a fire extinguisher?!
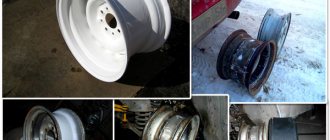
Hello my subscribers and simply visitors to the Drive2.ru website. Today I present for your consideration a description of the technology for manufacturing a homemade muffler. About two years ago, while removing an old muffler that had burnt out and was already rusty in places, I thought how nice it would be if the muffler was stronger in terms of wear and tear, set it and forget it style. On the Internet, visiting motorist forums, looking through a bunch of information, I came to the conclusion: build a muffler from thicker steel or stainless steel. Since with stainless steel there is more steaming during the manufacturing process, it was decided to build from steel and the choice fell on the body of the used OP-4 powder fire extinguisher, the size was just right in terms of dimensions.
We take a used fire extinguisher, press the lever, thereby checking the absence of pressure or bleed off the residual pressure, unscrew the valve from the fire extinguisher body and rinse the inside of the body thoroughly with water. Work must be carried out strictly outdoors, as the powder inside is finely dispersed and chemically active. Cleaning work must be done strictly with rubber gloves and safety glasses (safety precautions have not yet been canceled). Then we take two sections of a steel water pipe with a diameter of about 40 mm and the length of a fire extinguisher body, and stepping back 100 mm from the edge of the pipe, using a drill of about 10 mm in a checkerboard pattern, we drill rows of holes, thereby turning a regular pipe into a perforated pipe. After our blanks are ready, in the center of the fire extinguisher, where the threaded connection from the valve remains, we mark a circle with a diameter equal to the diameter of our perforated pipe and with an ordinary drill of about 5-6 mm, we drill holes around the perimeter of the circle and thereby “drill out” the required diameter for the pipe. We insert one piece of pipe into this hole to a depth such that the end of the pipe remains outside, from which 100 mm were retreated when the perforation was made and this end protruded about 70 mm and we welded it. From the other end of the fire extinguisher, we move away from the center about 50 mm and also drill a hole with a diameter of 40 mm, insert another piece of pipe and, by analogy, mount and weld.
Next, we cut off the section of pipe from the old silencer where it connects to the exhaust line and weld this type of adapter onto one of the ends of our pipe. We try on our muffler in place and weld to it the mount for hanging the muffler to the car body, having previously cut off this mount from the old muffler. We weld any round or profile pipe to the other end of the pipe (for example, like mine) and, in principle, our improvised muffler is ready. We fix it, start the car and enjoy the new exhaust. It is advisable to paint everything with heat-resistant paint (I will also paint it later). Let's like who liked this article.
Disadvantages of processing
Of course, there are disadvantages and you need to think before wrapping:
- Volume of gases. As I already said, if you do not lower the exhaust temperature, the volume of gases remains large with the same mass. On the one hand, this is good - they leave faster. On the other hand, the pressure goes not only in one direction (the muffler), but also in the other - the exhaust valves, for them this can be fraught and they can burn out faster!
- Metal. The outlet is located either in front or almost under the car; this is moisture, salt, dirt, etc., which in any case will be packed into this thermal tape. All this will cause corrosion and premature failure of the outlet.
- And of course the price. Often, a high-quality option is not cheap, from 1500 to 2500 rubles per 10 meters
Well, are you ready to endure all these disadvantages, but is there any effect?
Car emission calculation
You can use many available materials for the can: it is important that the engine does not lose power and fuel consumption does not increase. Such “surprises” are not uncommon after intervention in a stock design, although the effect may be the opposite.
It's all about calculating the parameters of a car muffler: the length of the exhaust tract, the internal and external diameters of the pipes, perforation. Dimensions are verified at factories using exact formulas for each specific car model. This is why exhaust systems are different on trucks and passenger vehicles, and on cars with different engine sizes.
When the exhaust valves of the cylinders open, the exhaust gases are thrown into the exhaust system with a sharp jolt and rush through it at great speed. The flow is accompanied by a sound wave and captures other gases along the way. At this moment, the cylinders are released and a fresh portion of the air-fuel mixture enters them.
The formulas take into account: cylinder volume, opening degrees of exhaust valves, engine speed, and other indicators. You can take the data in the car manual, substitute it into formulas and use it to tune the system. But is it worth it when everything has already been calculated at the car plant, and you only need to comply with the stock dimensions of the pipes, no matter what you make the new part from. Decision is on you.
Source
Adding power
The power here is in the form of an error, namely you can count on +3+4% (maximum). Of course, if you have a properly tuned exhaust + install this tape, then it won’t be bad, plus the sound will be deep.
BUT you shouldn’t hope that the increase will be +5+10%; I’ll emphasize once again - as practice shows, the MAXIMUM is 3 percent (I assume 4, no more)
If you just installed the SPIDER and wrapped it with this thermoelement (did not remove the catalyst and did not replace the resonators), then the increase may not be noticeable at all.
Now we are watching the video version.
This is where I end, I think my article was useful and interesting to you. Subscribe to our channel and website, there will be many more useful articles and videos.
( 19 votes, average: 3.84 out of 5)