Many car owners have recently mastered an interesting method of improving wheels - unwelding. This method involves increasing the width of the wheel rim in order to make it possible to use wider tires. This is done to give the car a stylish look, as well as to improve traction with the road surface, which has a positive effect on the driving performance of the car.
This method is applicable to any car models. But most often it is customary to install welding on VAZ - this is the brand that, as a rule, lends itself to this type of wheel tuning. In order to make wheels of this type, a LADA of almost any model and R13, R14 and even R15 wheels are suitable.
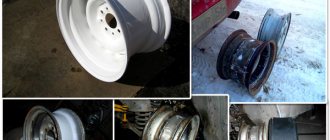
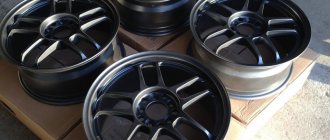
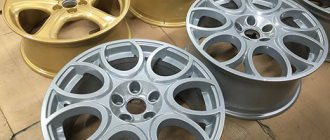
Unwelding on a VAZ
Read more about unwelding and their advantages
So, as mentioned above, a dewelding is a wheel with an increased rim width. On LADA cars, the wheel width ranges from 5J to 6.5J, depending on the type. If you make welds from standard products of 13, 14 or 15 inches, you can achieve a width of 7J, 8J and even 10J. You could argue that we will be limited by the fender arches, but they can be rolled out or trimmed - car enthusiasts know that this is not a problem.
Unwelding can be done in 2 ways, namely:
- welding a steel strip into the middle of the rim;
- welding 2 halves of cut rims.
Obviously, only stamped products are used to make welding joints - they allow the use of welding. Alloy wheels cannot withstand thermal stress and are therefore not suitable for this purpose.
Among the advantages of unwelding, owners of LADA cars name:
- modernized stylish appearance;
- improving wheel-road adhesion;
- low cost;
- the opportunity to make them yourself;
- Both 13 and 14 inch wheels are suitable for manufacturing.
It is logical that the low cost of welding is one of the main arguments in their favor. LADA cars belong to the budget range, and many owners are not ready to spend large sums on improving their car.
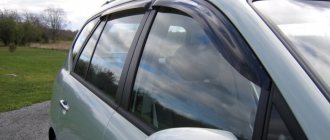
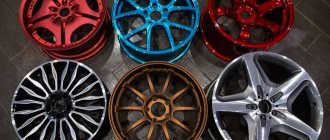
Methods for tuning wheels
There are many ways to diversify the appearance of your wheels. All of them, to one degree or another, require DIY skills, and some require special equipment.
The easiest way to change something in the wheels is to install new plugs. They will create some zest in appearance, while simultaneously covering up unattractive parts of the structure.
Putting new plugs on the wheels is the easiest way to tune wheels
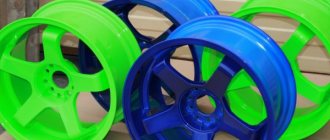
Painting wheels is very popular. You can choose any color you like. Sports car owners often choose bright neon shades of yellow, red, orange, purple and green.
Sports car owners love painting rims in bright colors.
Others paint the car completely black, not forgetting about the wheels. Such vehicles look incredibly stylish and mysterious. However, most motorists opt for classic chrome plating, which creates a metallic, almost mirror-like coating.
Chrome plating gives the wheels the appearance of a glass surface
In large cities you can find cars whose rims seem to be strewn with precious stones. In fact, everything is practically like this: this is an inlay technique that uses Swarovski crystals. Such wheels will certainly attract the attention of everyone around. Of course, it is almost impossible to perform this type of tuning in a garage. Even if you try, the appearance will not be identical to what the professionals can achieve. In addition, the raw materials used will cost you a very large amount.
If you want to inlay discs with stones, then contact a special workshop
Many motorists resort to a tuning method such as welding. It increases the width of the parts, making them more similar to the elements of large jeeps.
Wider wheels give the car a more powerful look
Another popular method is installing backlighting. Such cars look very impressive in the dark. And the variety of color combinations allows your imagination to run wild.
Illuminated rims are a fun way to highlight your car.
Of course, not all of the listed tuning methods can be done with your own hands. Therefore, we will focus on the most popular types, and also tell you how to cope without the help of auto repair shops.
Communities › Kulibin Club › Blog › Unwelding machine
Hi all! In the future, I decided to make a removable device for welding for my polishing machine. I did everything in the garage on my knees without any drawings. The main thing is tape measure, grinder and welding. Don’t knock me too hard about welding work; I’m just learning how to cook. The only thing I noticed is that you still need a clamp on the grinder, but in general everything works well, no shatters - everything is exactly like on a lathe, the main thing is that the discs are even. I bought: Square pipe 20x20 2m, Hairpin 16mm 1m, Nuts 4 pcs. Washers 2 pcs. Price: 100500 Peace to all. Let's look at the photo. We criticize, we like.
The first method for making boiled discs
Boiling means that two identical “stampings” are connected to each other. First you need to prepare your tools.
First, we need to prepare the metal “stamping” disks themselves. It’s good if they are new or have a smooth surface. But usually it is for unwelding that they take used disks.
It is necessary to evaluate the “stampings” and their condition. You need to look through and check their surface to understand how smooth it is and suitable for welding. There are some tips for those who have dealt with this problem. We clamp the car hub in a vice, on which we will subsequently install the welded “stampings”. The disc rotates after being installed on this hub. This allows you to record a certain beat. You can also put a “stamping” on the drive axle of the car if you cannot find a separate hub.
It’s easy to assess the runout in this case, just turn on first gear, and if you need a higher disk speed, you can switch to other gears of the box. It is important to install bricks under the wheels, and special supports under the car itself, for safety reasons.
There are only two ways to evaluate runout. If you simply press on the gas, then the very fact of the presence of a beat is assessed. A ruler is also used for this. It must be applied both in the vertical and horizontal planes to obtain the required value. Disc runout is considered normal if it is within 1-2 millimeters. If in any of the planes the indicator is more than 2 millimeters, the “stamping” must be corrected using special equipment for repairing disks.
If there is a more even “stamping”, then it plays the role of a basis for welding. To avoid confusion later, it is better to note it right away. Then the second “stamping” will become the rim for us.
Then you can move on to the second stage of work. From the second “stamping” the outer rim is cut off, this is done using a grinder and cutting wheels. As for the main disk, we need to cut it in the area of the outer rim until we find the inner part. It's better to stop as close to the middle as possible. The rim can then be easily removed and thrown away. We definitely won't need this part anymore. Only the inner rim remains from the second “stamping”; on the base it will become the outer one.
Apply joint sealant to the center of the boiled disc. This is done before the paint needs to be applied to the surface. After the composition has dried, use sandpaper to remove excess materials. An ordinary chisel is also suitable for this. Only at the last stage do we carry out painting.
Unwelding with spacer
The second method does not require so many disks, one set is enough. But in terms of execution it is more difficult.
Let's consider it using the example of the VAZ-1111 Oka car.
The peculiarity of this car is that it uses wheels with a diameter of 12 inches.
The method described below boils down to using a spacer. Of the tools, in addition to those described above, you will also need a rolling machine and 4 even strips of sheet metal 3 mm thick, 50-60 mm wide and at least 1.5 m long.
Unwelding using this method is done like this:
Video on how to do welding yourself
There are two main ways to boil and increase the width of the disk.
Is it necessary to redo the body in this case?
This question arises for many, because not everyone understands whether new versions of extended disks will be able to fit inside standard recesses. In most cases, you can do without any changes to the body at all. Although the owner of boiled discs will have to take care to get rid of the rubbing elements. Trimming the inner edges also sometimes becomes a necessary action, although not always. Tuning of this kind in some situations requires the installation of special expanders.
You can save a lot of money if you do the welding of the disks yourself, with your own hands. Buying branded products is an expensive pleasure that is not accessible to everyone. It is better to save money so that you can later purchase tires with the necessary characteristics. This is an ideal deal that suits many car enthusiasts.
Who is suitable for welding discs with their own hands and when is it needed?
The first method of welding disks
Essentially, boiling is the joining of two identical stamping discs to each other.
tools for work
- Drill with drills.
- Seam sealant.
- Welding.
- Grinder and replacement attachments for it.
First step
First, the “stampings” must be prepared. It is desirable that they are initially even, or even better, new. However, as a rule, unweldings are made from used disks.
Work begins with evaluating the disks. They are carefully inspected visually and checked for perfect evenness. There is a special way for this. The vehicle hub, on which the welded “stampings” will be mounted, is clamped in a vice, a disk is mounted on it and rotated. This is how the beat is recorded. If it is not possible to find a separate hub, place the disc on the drive axle of the machine, engage first gear and evaluate the runout. However, do not forget to place bricks under the wheels and supports under the car.
Runout is assessed using two methods. You can do it by eye, but in this case you can only assess the fact of the presence of a beat. The amount of runout is measured using a ruler. To do this, the ruler is applied both vertically and horizontally. If the runout does not exceed one or two millimeters, it is considered normal. But if the runout exceeds two millimeters in any plane, the disc is corrected using special equipment.
The most even “stamping” is taken as a basis. It is recommended to mark it immediately to avoid confusion in the future. The second “stamping” will be the rim.
second phase
Let's move on to the second stage of work. From the second “stamping”, the outer rim is cut off using a grinder. The main disk is cut to the inside in the area of the outer rim, preferably closer to the middle. The rim is then dismantled and thrown away. There is no longer a need for it. The result is the following picture: all that remains of the second disk is the inner rim, which then becomes the outer rim on the base disk.
The base disc is placed on the rear axle hub and secured with nuts. Next, they put on what is left of the second “stamping”. The second rim is aligned with the first and the runout is eliminated. Then they are welded in several places - where the cuts were made.
Now you need to take the joint sealant and apply it. Of course, this is done before painting. When the sealant has hardened, remove excess using sandpaper or a chisel. Then comes painting.