Do-it-yourself illumination of car rims as a stylish type of tuning
Car tuning has long been a popular way to change the appearance of a vehicle. Modernizing the bumper and adding designs to the car body is no longer something unusual. The newest and most popular among car enthusiasts is car lighting tuning, and one of its widely known types is illumination of vehicle wheels.
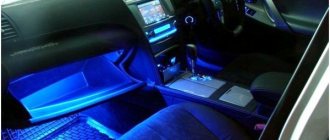
If you are unhappy with the appearance of your car, then there is an option to embellish it a little and have the wheels illuminated
Today, the automotive market offers a number of special lighting devices for illuminating wheels, however, such pleasure is not cheap. In this article, we will look at the technology for installing car rim lights with your own hands.
Do-it-yourself wheel lighting for a car
There are many ways to individualize your car - various designs and stickers on the body, additional body kit, but for the dark time of day the most effective option is the so-called. light tuning. The most common type of such car modification is the illumination of wheel rims.
The modern market offers car owners a huge number of ready-made options that only need proper installation. However, if you want to get a truly unique look without spending a lot of money, it would be best to make your own car rim lights yourself.
Options for installing lighting on wheels with your own hands
There are several ways to install lighting elements on vehicle wheels with your own hands. Most often, tuning enthusiasts use neon or LED lighting fixtures.
Neon lighting is effective when the discs have a small number of gaps. Then it’s important to install each light bulb individually.
Most car owners prefer LED lighting, as they are more resistant to the environment, mechanical damage, have a long service life and economical energy consumption. LED strips are also easier to install. They can be installed in three ways: to the protective casing, using thin plates or a special stand.
Installing the LED strip on the disk casing
When purchasing an LED strip, pay attention to its width; it should match the width of the edge of the casing as much as possible. The approximate consumption per wheel is about thirty centimeters, but it is better to take it with a reserve
The LED strip is glued along the contour of the casing and is additionally secured with clamps for reliability - approximately every ten centimeters. To do this, you will need to drill about 10 holes per rim. The junction of the LED strip and the power wire must be carefully insulated to avoid moisture and dirt, which can lead to oxidation of the metal and short circuiting of the wiring.
Installing lighting elements using thin plates
If the vehicle's disks are not equipped with casings, then it is necessary to construct a similar structure from thin metal plates. It can be secured using rivets or small bolts. Further work is carried out similarly to the previous option.
Illumination of discs using a special stand
The option of mounting lighting fixtures on wheels using a special stand is the most expensive and most reliable. Initially, you need to make a steel stand with three legs, with the help of which it will then be attached to the rim from the inside. The uniqueness of this method is the internal glow of the diodes, which is not characteristic of the first two options. A tape is attached to the round element of the stand in the same way as the previous methods.
Connecting the backlight
To connect lighting fixtures, it is necessary to stretch wires from all four wheels of the vehicle to the front of the car
It is important to securely fasten the wires by first insulating all joints and placing them in corrugation. This will maximally protect electrical wires from moisture and mechanical damage, which guarantees safe operation of lighting materials
Four corrugated tubes with electrical wires from the wheels of the car must be brought to the battery and secured near it. The wires enter the cabin through a hole in the bottom of the car and are connected first to the vehicle stabilizers, and then to the radiator.
The power can be output to a separate toggle switch or connected to the headlights at your discretion.
Let there be light
If you are wondering how to make the wheels illuminated, then our instructions will answer it for you. Let's do this job using LEDs, as they are best suited for this purpose. We will not describe installation on all four wheels. Let's look at the whole process using one wheel as an example, and the rest are performed in a similar way:
- To begin, we will need several LED strips, four current stabilizers, corrugated tubes, wires, sealant, glue and wire.
- Then we lift one side of the car and. If desired, the car can be placed on safety stands, since working with a car mounted on a jack is extremely dangerous due to poor stability.
- After removing the wheel, you must thoroughly wash the brake disc casing with gasoline and dry thoroughly.
- After everything has dried, you need to measure the length of the LED strip. This is quite easy to do - just wrap the tape around the casing and cut off the excess. Remember that the tape should only be cut in places specially marked for this purpose. Every three diodes there is a white mark, cut along it (if you cut it in the wrong place, you will simply ruin the tape, since it will no longer work).
- We coat the finished diode strip with glue on the side that will be adjacent to the casing.
- Carefully glue the tape to the casing and let the glue set. After the glue has dried sufficiently, we additionally attach the tape with wire to the brake disc casing.
- The tape is fastened quite tightly. Carefully seal the cut end of the tape using sealant. This is necessary so that moisture does not get into the silicone tape with lamps and ruin all our beauty.
- Wires (plus and minus) are released from the untouched end of our ribbon. We solder the wires to them that will connect to the stabilizer.
- We carefully insulate the soldered wires and place them in a corrugated tube, after which we bring them into the cabin.
- Next, the wires are connected to the stabilizer and lead from it to the headlight wires. If you connect it not to the headlights, but directly to it, then you will have to install an additional switch in the cabin for our lighting. In our case, the illumination of the car wheels will work only when the headlights are on.
Do-it-yourself wheel lighting requires a lot of care and precision on your part. The main components of the backlight are very fragile and can easily fail if handled incorrectly. Do not forget that when connecting LED strips it is very important to observe the polarity (plus and minus), since if you connect the poles incorrectly, the diodes will not work.
If you lower your financial priorities, you can purchase a ready-made kit. Ready-made car wheel lighting has many unique features. For example, sound sensors that respond to musical compositions. As a result, “light music” is produced on wheels. If the lighting kit is multi-colored, then the wheels will play with different colors of the light spectrum. The kits, as a rule, always contain detailed instructions for installing and operating a specific device.
Keep up with auto fashion and let your “steel friend” be the most beautiful, bright and memorable!
Illumination of car rims is an effective element of external car tuning, which has become increasingly popular in recent years. Car enthusiasts install various lighting options, which make the car stand out in city traffic at night. About installation methods and how to do everything correctly later in the article.
Do-it-yourself illumination of car rims - instructions
The choice of LED strips according to the emitted spectrum is very diverse, and here it is important to choose your own version of bright flashes and calm radiance, taking into account the color of the body and the design of the wheels. Typically, two-color disk backlight options with similar spectrum LED elements look advantageous.
These are white and silver colors, blue-black or yellow-green fill.
You can also put red lights on a golden field in the wheel well, diluted with blue flashes, but then a universal vehicle for all emergency services will appear on the road, and not an elegant car with unique lighting.
LED strips can be attached to the front (that is, driven) disks of a car in various ways:
To the stationary part of the protective casing (along its outer edge). First, double-sided mounting tape is glued to the edge - it is better to choose the highest quality (that is, sticky) and the optimal width that matches the thickness of the edge of the casing. An LED strip is glued to the tape and secured with plastic clamps every 8-10 cm. It is necessary to drill holes with a diameter of 3-5 cm for the clamps, the total number of mounting holes is from 8 to 12. The twist of the supply wire with the LED strip must be carefully insulated; If the car chassis is not equipped with a protective casing, its equivalent is made of thin aluminum plates held together with rivets. In the absence of rivets, bolted fastenings are acceptable. The further installation sequence is described above
Care should be taken when washing such a design - water from Karcher-type devices will sweep away all our lighting at close range. Illumination of discs using a special stand. It is made of steel strips and equipped with three “legs” for attaching to the drum from the inside
This is the most expensive, but also the most reliable design.
Choosing a belt for the machine
To correctly connect an LED strip in any car, you need to choose it based on two main criteria. This is the type of matrix and its technical characteristics, as well as the class of protection from external factors. Let's look at them in more detail.
LED Matrix Type
Among the main parameters characterizing the LED strip matrix for a car are:
- Ice crystal size. For example, in the marking it is designated as SMD3528, where the first three letters are the type, and the next four numbers are the size in millimeters, that is, 3.5 mm by 2.8 mm.
- Diode density. Determines the brightness and uniformity of lighting in a specific area of the machine. The number of LED elements varies from 30 to 240 per 1 meter of strip. In this case, the crystals can be arranged two in a row.
- Color of the luminous flux. LED strips can be either monochrome or three-color - RGB type. For the first options, the shade varies over a wide temperature range - from warm white to cold blue.
- Power. Depends on the type, size and density of the crystals. For example, 30 diodes with an SMD5050 matrix consume only 7 W, and 240 similar elements consume 57 W per meter of tape. This parameter determines the strength of the power supply.
- Operating voltage. Ice strips used to illuminate a car are available in 12 and 24 volts.
Protection class
It is important not only to install the LED strip correctly in the car and connect it according to the diagram, but also to protect it from dust and moisture. To do this, it must be selected in accordance with operating conditions in the following three categories:
- IP20 and below. The surface of the strip does not have an insulating layer, therefore it is intended for use only in dry, ventilated areas - in the cabin.
- IP65. It has a good level of protection against dust and condensation. The outside is covered with a silicone layer. However, it should not be used under direct flow of water or rain. It is permissible to install the optics outside, inside the trunk, or under the hood of a car.
- IP68. It has a sealed waterproof coating that allows the device to be used submerged in water. Mounted on the body, bumpers, rims and underbody of the car.
LED strips are available for sale in 5-meter rolls. Often sellers indicate the density of ice elements for the entire length, and not for one meter. Such a discrepancy can lead to errors in calculations. This, in turn, will not make it possible to connect it correctly in the car.
Advice from tuning center specialists on illuminating car rims
Before starting work, be sure to securely secure the machine
Before installation, when removing the wheel, use a jack; When working with the rear wheels, pay attention to the type of brake system of the car. If the brake is a drum type, then use a stand or thin plates to mount the LEDs; to improve the lighting effect, it is better to purchase alloy wheels; when working, use moisture-resistant tape: IP-65 (moisture-resistant), IP-68 (increased degree of moisture resistance)
IP-20 open type LED strip is not recommended for use in backlighting for car wheels; Work must be performed by first preparing the rims and/or wheels. Dirt and rust, which will stand out rather than decorate the car, should be removed.
Popular articles DIY Easter eggs: thread craft
When performing work, do not forget about safety measures. Use the right tool. Before installing the wheel lights yourself, it is recommended that you familiarize yourself with the training videos that are available on the Internet and look through technical literature.
Car tuning with glowing colors
Most often, car rims and sills are subjected to such tuning. Therefore, we will consider the work process using the example of their finishing. For tuning you will need the following materials:
Operating procedure
We take the disks, cover them with masking tape, leaving free only those parts that we will cover with paint.
The surface of the discs is thoroughly degreased and primed.
Now you need to prepare the paint - mix it with hardener (it is included in the kit).
Using a spray gun, cover the disc with two layers of paint. Moreover, the second one can be applied only when the first one is completely dry.
All that remains is to remove the tape and, turning off the light, admire the result.
Using this technology, you can paint any other parts of the car (and not only). Except that for most parts, for example the car sills (in the picture), you won’t need masking tape. As a result, without much effort we get luminous elements that look great during the day and highlight the car beautifully at night.
Advice from tuning center specialists on illuminating car rims
Before starting work, be sure to securely secure the machine
Before installation, when removing the wheel, use a jack; When working with the rear wheels, pay attention to the type of brake system of the car. If the brake is a drum type, then use a stand or thin plates to mount the LEDs; to improve the lighting effect, it is better to purchase alloy wheels; when working, use moisture-resistant tape: IP-65 (moisture-resistant), IP-68 (increased degree of moisture resistance)
IP-20 open type LED strip is not recommended for use in backlighting for car wheels; Work must be performed by first preparing the rims and/or wheels. Dirt and rust, which will stand out rather than decorate the car, should be removed.
When performing work, do not forget about safety measures. Use the right tool. Before installing the wheel lights yourself, it is recommended that you familiarize yourself with the training videos that are available on the Internet and look through technical literature.
Some tips
- Installation of lighting devices on car rims must be carried out on a well secured vehicle. Before installing the LEDs, remove the wheel using a jack. Carry out this procedure in the same way with the remaining wheels.
- When installing LEDs on the rear discs, pay attention to the type of brake system. If the brakes are drum type, then it is easier to use the last two options for installing LED strips.
- Note. If the rims of your vehicle have obvious damage and rust, then the backlight will only highlight the flaws and will not decorate your car.
Methods for tuning wheels
There are many ways to diversify the appearance of your wheels. All of them, to one degree or another, require DIY skills, and some require special equipment.
The easiest way to change something in the wheels is to install new plugs. They will create some zest in appearance, while simultaneously covering up unattractive parts of the structure.
Putting new plugs on the wheels is the easiest way to tune wheels
Painting wheels is very popular. You can choose any color you like. Sports car owners often choose bright neon shades of yellow, red, orange, purple and green.
Sports car owners love painting rims in bright colors.
Others paint the car completely black, not forgetting about the wheels. Such vehicles look incredibly stylish and mysterious. However, most motorists opt for classic chrome plating, which creates a metallic, almost mirror-like coating.
Chrome plating gives the wheels the appearance of a glass surface
In large cities you can find cars whose rims seem to be strewn with precious stones. In fact, everything is practically like this: this is an inlay technique that uses Swarovski crystals
Such wheels will certainly attract the attention of everyone around. Of course, it is almost impossible to perform this type of tuning in a garage.
Even if you try, the appearance will not be identical to what the professionals can achieve. In addition, the raw materials used will cost you a very large amount.
If you want to inlay discs with stones, then contact a special workshop
Many motorists resort to a tuning method such as welding. It increases the width of the parts, making them more similar to the elements of large jeeps.
Wider wheels give the car a more powerful look
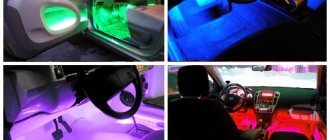
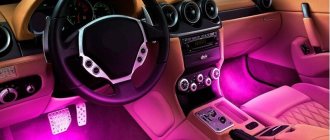
Another popular method is installing backlighting. Such cars look very impressive in the dark. And the variety of color combinations allows your imagination to run wild.
Illuminated rims are a fun way to highlight your car.
Of course, not all of the listed tuning methods can be done with your own hands. Therefore, we will focus on the most popular types, and also tell you how to cope without the help of auto repair shops.
Luminous discs for cars
Three-color wheel illumination (wheel illumination), you can change colors and modes with one click of a button. New in the field of automotive light tuning. Wheel illumination, set of 4 pieces. You can install the wheel lighting yourself in 10 minutes, for the best effect it is better on each wheel. To install the disc lighting, you need to remove the disc caps, measure the distance of the inlet hole on each disc, set the same disc lighting and insert it into the disc. The device is powered by a battery; the battery is charged in the sun; it lasts 50 hours on one charge. Charges even when exposed to minimal light and cloudy conditions. Each wheel of the disk has 12 bright light-directional diodes (4 blue, 4 red, 4 green). There are no penalties for using backlighting; lighting on discs is permitted. To turn on the backlight, press the start button for 10 seconds, then the device goes into standby mode and starts working from the movement of the wheels. Before you start driving, you can independently select the color of the disks on each device (red, blue, green, or all at once). You get a great effect and immediately stand out on the road!
.
The built-in battery is powered by solar energy.
Stops working within 10 seconds after stopping.
DIY bicycle lighting with LED strip
Home » Lighting » LED strips » DIY bicycle lighting with LED strip
We recently came across a bicycle on the street with a very interesting backlight; to be honest, we were seriously surprised by this. Therefore, we decided to repeat the experience of these craftsmen and tell you what lighting a bicycle with an LED strip is and how to do it correctly.
DIY bicycle lighting with LED strip
Bicycle wheels illuminated with LED strip always look chic; by installing such lighting, you will definitely stand out on the street. Plus, you can create good visibility both for yourself and for other road users.
I would like to say a few words about how to choose a tape for a bicycle; first of all, you should focus on its protection, minimum IP 65, if you install more, it will be better. The coating of the tape must be rubberized.
You also need to select a battery, the total power should be 12 V. If you wish, you can add a controller, but we do not recommend this, and the installation is not easy, and spending extra money is not a good idea.
Find out how LED strip is better.
Materials for lighting
Answering the question of how to make an LED strip for a bicycle, initially, you must prepare the following materials. They are not difficult to find; any store has them.
- LED strip (recommendations above).
- Battery holders.
- Two 9 V batteries.
- Switch buttons.
- Silicone sealant; if desired, you can also use regular hot melt glue.
LED strip for bicycle wheels: detailed instructions
We would like to immediately draw your attention to the fact that there is nothing easy about this. Even experienced electricians spend about one day on such an installation. The process has many features, you will have to re-read several more supporting articles on this topic
But the result will be justified in any case. If you're ready, gather your nerves and let's do everything together
The process has many features, you will have to re-read several more supporting articles on this topic. But the result will be justified in any case. If you're ready, gather your nerves and let's do everything together.
Cutting the LED strip
First of all, we determine the length of the tape that is needed for the bicycle wheels. To do this, you can attach a regular lace, using it, the result will be accurate. Also read: how to choose a block for an LED strip.
Next, cut the tape in the required place, as shown in the photo.
These are the pieces you should get.
We fasten and solder the tape
To get a beautiful LED strip lighting for your bike, you need to be especially serious about this stage. Here we need to do two serious things at once:
- Solder the tape.
- Attach it to the wheel.
Initially, we begin to solder it - this is the longest process that does not tolerate mistakes. We soldered it a little wrong the first time, and in the end our tape didn’t catch fire.
When you start soldering, try to do everything carefully, rushing will only hurt. Read in detail: how to solder an LED strip.
In the end result, do not forget to insulate, the connectors are not suitable, use special silicone sealants.
Popular articles Classic Christmas tree wreath: step-by-step instructions with photos
The situation with fastening is simpler; you can use several methods:
- You can buy self-adhesive tape.
- Or we begin to glue each piece separately using hot glue.
This is the final result.
Connecting the power
Here we have to connect everything together, the stage is not difficult, but a little untidy, it is difficult to climb between the spokes.
Solder two wires to the end of the LED strip. We bring them to the power button and bring them to the battery holder. The holder can be secured using “Clamps”; we install it on the wheel shaft. We secure all the wires
Next, we check the functionality - this is important! After this, we isolate all the contacts using silicone sealant
Connecting the backlight to the battery
Connecting the disc backlight to the car battery is done using standard wiring and soldering. The contact point should be insulated with corrugation; tight detachable connections are acceptable (their likelihood of oxidation and contamination is higher). Four wire pairs from each wheel are led inside the cabin and connected to the battery through a switch. The switch itself is located in a convenient place so that with one click your wheels will burst into flames with attractive sparkles of unique illumination.
With complex lighting options - in our case, when installing several LED strips on each wheel - it is necessary to install several toggle switches to turn them on. It is important not to confuse the wire pairs, otherwise when you turn on the LED strips, one will sparkle with golden light and the other with green light, which will give the car lighting an incredible originality.
Source
Neon or LED lighting
Previously, car owners tuned their “iron horses” with neon lamps. Due to the fact that technology is rapidly developing, LEDs have become competition for neon. They are more reliable, economical and have a long service life. The advantage of diodes is their resistance to any external influence. The same cannot be said about neon tubes. They are fragile, explosive, and can cause a vehicle fire.
Neon also contains mercury, which is extremely harmful to human health. Neon tubes are expensive to maintain.
It is worth noting their excessive power consumption, while LEDs require 9 to 12V. In addition, if the neon tube breaks, it will need to be completely replaced, which should be done by lighting professionals. Replacing diodes is not a hassle, unlike neon. Another advantage of LEDs is the ability to adjust the brightness and color of the glow, if they are equipped with a special controller. Neon does not have this option.
The above analysis determines the obvious advantage of LEDs over neon tubes. These diodes are ideal for car wheels.
Neon tubes are best used to illuminate the bottom.
What type of backlight is better?
In most cases, neon lamps were previously used to illuminate various parts of the car. But as you know, technology does not stand still and more economical, durable and reliable LED lighting devices have entered the market to replace the power-hungry and less reliable neon lamps. The advantage of diodes over is obvious.
LED lighting is safer than neon tubes. Neon lamps are very fragile, explosive and can cause a car fire. Neon lights also contain mercury, which is extremely dangerous to human health. The service life of a neon lamp is several times shorter than that of LEDs. After about five years, neon inexorably begins to fade and lose its appeal.
Neon is much more expensive to maintain than diodes. If the neon fails, it is extremely difficult to replace it. It will be necessary to change the entire tube and changing it yourself is not recommended (contains mercury and is extremely fragile), it is better to contact specialized tuning stations. Replacing a failed diode is several times cheaper, easier and faster.
The gluttony of neon, in general, leaves much to be desired. The tubes literally “drink” electricity. Diodes have left neon far behind in this regard - they require nine to fifteen volts of voltage to operate. LEDs easily withstand environmental influences and are more resistant to temperature changes. The brightness of the diodes can be adjusted independently; neon will not allow us such liberties.
But there are nuances that cannot be ignored. For example, an open neon tube spreads light evenly along its entire length, providing a wide beam angle. Diodes have a narrower angle of light propagation, and the light of most LED lamps is focused into a point. Therefore, the illumination of car wheels will look better when using LED lighting sources. Neon is more suitable for illuminating the underbody of a car.
How to make car rim lights?
Installation of the backlight should only be carried out on a securely fixed vehicle with the wheels removed.
Preparing to install wheel lights
First of all, you need to think about the LED connection diagram. If we discard the various tricky options with separate remote controls and wireless drive backlighting, then there are only two ways to turn it on:
- Together with car headlights;
- Using a separate toggle switch.
The length of wire you will need depends on which option you choose. Of course, for a separate switch, you will need to think about the placement of a separate toggle switch on the car’s dashboard.
An important point affecting the installation of wheel lighting will be the presence of a protective casing, which is designed to protect the brake discs from dirt.
Installing car rim lights on a protective casing
To do this, you will need to clean it well and degrease the surface on which the LEDs will be glued. In addition, holes will need to be made on the edge of the casing at a distance of 5-7 centimeters from each other; they are necessary for additional fixation of the tape.
Next you will need to perform the following steps:
- Cut the required amount of LED strip according to special marks;
- Solder the power supply wire and voltage stabilizer;
- Apply the tape to the degreased surface of the casing;
- Additionally, secure the LEDs using plastic clamps or wire.
Installing lights on car wheels without a protective cover on the wheel
If there is no protective casing, you need to make a frame on which the LED strip will be attached. It can be made from lightweight and easy-to-work metals, such as mounting strip
In this case, it is extremely important to measure the brake disc and leave the required distance between it and the tire rim
1352842600_untitled 1352844169_v3 1352844165_v2 1352842637_v4
After making the frame, you need to remove the disc and caliper and install the rays that will go from the center of the wheel to mount the backlight frame. Next, perform the same actions as with a protective casing.
Installing lights on the rear wheels of a car
The main difference in this case is that a brake drum can be installed on the rear wheels. Accordingly, you will have to use a slightly different method of mounting the backlight.
The easiest option is to remove the brake drums, drill mounting holes in them and use them to fix the LED strip. To make the light more uniform, the LEDs can be recessed slightly behind the brake drum.
Illumination using car hoods
Also quite simple to illuminate the wheels is the installation of luminous wheel caps. They are installed in the central holes of the wheel rims. Currently, there are a huge number of ready-made models, with different backlight options, differing in control method and operating modes. Of course, the easiest way is to use caps that fit on the car without additional modifications.
We continue diagnostics
First of all, open all the covers, then disconnect the sealant. Next, use a multimeter to check all transistors. There are four of them in the scheme. If a breakdown was detected in any of the elements, you should purchase a new field-effect transistor and solder it in its rightful place.
The standard transistor can be replaced with a 4N60. This completes the repair of the xenon ignition unit. However, if this does not help, further diagnostics should be carried out. Next, check the resistors - perhaps they are still intact. If this is not the case, then the burnt parts are replaced with new ones. The resistor power must be at least 5 W.
Rear wheel illumination
If you have the same situation on the rear wheels as on the front wheels (whether there is a protective cover or not), then the LED backlight is connected in the same way as the front wheels. Another question is if you have brake drums on the rear wheels. Here you can use several ways to implement backlighting:
- Secure the band by drilling holes in the brake drums after removing them. The tape is secured with clamps. But the method has one significant drawback - the light, therefore, will not have a reflected uniform appearance, but a point-like straight line. You can avoid this if you recess the band a little behind the brake drum.
- You can place the tape in front of the drum, for which you can use the spacer we described above.
Installation of LED strip on the brake drum
In any case, it is very important for you to also adhere to the following rules when performing light tuning:
- The tape must be placed so that the light comes from the middle of the disk to the street, through the spokes of the disk.
- The wiring for powering the diodes should be placed only in protected areas; for this, use clamps and thin plastic tubes.
It is worth cutting and connecting the LED strip in accordance with these recommendations:
- Since such a tape is simple sections with LEDs, it can only be cut between sections that include three LEDs. Calculate exactly the permitted place, it is most often already marked on the tape, and do not cut the section, otherwise it will not glow.
- To connect the tape to the machine wiring, you need to use a soldering iron; twisting is not allowed. You can also use a specialized connector for this; it will eliminate the need for a soldering iron, but may not provide sufficient contact density.
- The tape is very sensitive to bending, the minimum bending radius is 8 centimeters.
- When connecting to power, make sure that the negative terminal on the battery is disconnected.
- It is also advisable to use a voltage stabilizer for LEDs; 12 Volts are enough to power the backlight.
Soldering LED strip
Wheel lighting also requires basic knowledge of the correct handling of lighting and electricity, so if you are not confident in your skills, it is better to entrust it to professionals who can guarantee you the best result. In addition, you can be sure that the wiring is laid correctly and will not short out in bad weather.
Popular articles Pollock fillet with onions and sour cream
✔ IN WORK
Even in complete darkness, the pattern is visible, although not so bright and clear. Normally, the pattern begins to be displayed at a speed of more than 12-15 km/h.
If the speed is not enough, then only a fragment is displayed.
Unfortunately, in the video review the camera was unable to capture the drawing; it can be seen normally with the eyes, as well as with a camera. I loaded several test images from a CD into the LED strip. Images can be switched automatically every 5 seconds, or you can choose which image to display while driving. If there is no movement, then after 15-20 seconds the LED strip turns off; when moving, it turns on automatically. This is what it looks like in the dark.
Types of rims for cars
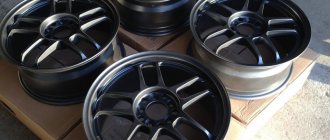
First, let's figure out what wheels are - why they are needed and what types of them exist. The disc is the central part of the wheel, made of metal, on which the tire is mounted. Together this structure forms the wheel of the car. However, this is not only a functional, but also a decorative element of the car, the design of which can significantly transform the appearance of the entire car.
Tuning wheels can transform a car
There are various manufacturing methods. There are three types of these car elements:
- stamped;
- forged;
- cast.
They are divided according to their characteristics, appearance and price. Let's take a closer look at each of the disks.
Stamped
On many low-price car models, stamped wheels are installed at the factory. At the same time, drivers often do not want to spend time and money on buying new spare parts, especially if they are quite satisfied with the appearance of the car. On the other hand, such disks are often chosen to replace broken or worn ones. The reason for this is the low price. However, this does not mean that the stamps are bad or of poor quality. On the contrary, they have no less advantages than disadvantages. Judge for yourself:
- stamping is more durable, as it is made of steel;
- if a wheel gets into a hole, the risk of the part splitting is less than in the case of cast ones;
- a deformed disc can be restored in a special workshop.
Of course, such elements of the car also have negative qualities:
- the weight of stamped discs is higher than forged and cast ones;
- subject to corrosion;
- unattractive appearance that repels motorists.
Stamped wheels are sold at a low price, but have an unattractive appearance
How significant such shortcomings are is up to you to decide.
Cast
This is almost the exact opposite of stamped ones. Just swap the pros and cons of the previous type of parts to understand their characteristics.
Alloy wheels are made of aluminum, so they are less durable, but lighter
- alloy wheels are made of aluminum, so they have much less weight, which has a positive effect on the speed and maneuverability of the car;
- aluminum is not afraid of rust;
- a special manufacturing technology allows them to be given any design shapes unique to each car model.
The disadvantages are also quite impressive:
- light and soft aluminum does not bend, but is covered with a network of cracks, so if it falls into a hole, there is a high risk of breaking the disk;
- as a rule, workshops do not undertake repairs of such parts, offering the owner to buy a new one;
- the price of casting is 2–4 times more than stamped ones.
Given the condition of most roads, driving on such wheels is a risky activity. However, this does not stop motorists from purchasing and installing these parts.
When purchasing castings, pay attention to the country of origin. Turkish parts have a bad reputation
Despite the use of aluminum in the design, their weight is not much different from stamped iron ones.
Forged
If you can't decide between appearance and durability, consider forged wheels. They combine the advantages of both previous types:
- special manufacturing technology increases their strength;
- just like stamped ones, they bend and do not crack, which allows them to be repaired if necessary;
- such parts are lightweight;
- corrosion will not damage the metal;
- simple but interesting appearance.
Forged wheels are both strong and lightweight, but they do have certain disadvantages.
Regarding the last point, it should be noted that among forged wheels there is not such a wide variety of designs as among cast ones
So if you're looking for something different, check out the previous look. However, unlike stamped ones, forged elements look more elegant
Of course, like everything in the world, forging also has negative sides:
- when it hits a hole, the disc does not break, but transfers the impact energy to the suspension, so when driving on broken roads, you are guaranteed frequent car repairs;
- the price is the same as for cast ones, or a little higher.
Recently, you can find a special type on sale - combined. It is a combination of a cast disc and a forged rim. Thanks to such modernization, they retain lightness, gain strength and can have a wide variety of appearances. Such parts have only one drawback - a very high price and low availability for sale.
Combined wheels combine the positive qualities of forged and cast ones, but have a very high cost