Reading time: 6 minutes
Stamped wheels are considered the most durable, since all that can deteriorate over time is the paint coating. The steel from which such models are made can withstand all the tests of modern roads. But the paint on a car disc gradually gets scratched and corrosion appears over time. To avoid serious damage, it is replaced with a new one, or simply repainted.
The wheel does not need to be beaded before painting. The tire pressure is reduced as much as possible and simply sealed along the edges with masking tape. This prevents paint from getting on them. But if the car disk has been severely damaged by corrosion, then it will still have to be beaded to remove the rust on the rim.
Painting of stampings
Painting in a car repair shop
Special car services perform painting quickly and efficiently, but they charge quite a lot of money for it. In such a workshop, the wheels are cleaned of old coating and rust using sandblasting, which is carried out using special equipment. Such a car is expensive, so not every car enthusiast has one in their garage.
Car wheels are also painted using a spray gun and high-quality paint. That is why this procedure costs a lot. But those car enthusiasts who want to get their wheels in order without extra costs can repaint them themselves. And for this you won’t need to buy expensive equipment, and all because almost all the materials that are needed can probably be found in every driver’s garage.
Painting stampings in a car workshop
DIY painting of stamped discs
The very first stage of painting wheels yourself is their proper preparation. The entire outcome of the work done depends on this. The materials you need are very easy to obtain and inexpensive. In order to paint a wheel rim, you will need:
- sandpaper of different grain sizes;
- drill with a hard wire attachment;
- degreaser;
- masking tape;
- primer;
- automotive putty;
- high quality paint;
- varnish
Then you can begin processing and removing the old layer of paint. But such work can take more than one day, so if the working surface is not very corroded, then all the paint does not need to be removed. It is enough to go through a drill with an attachment and remove minor rust.
But if you want to do the job efficiently, then you will need to work hard to remove all the old paint. If the rim has obvious defects that were not eliminated during pre-treatment, then you need to correct the surface with machine putty. But before that, degrease the disk with alcohol, gasoline or a special product. Use putty to smooth out all dents and deep scratches.
After the putty has completely dried, it’s time to apply the primer. The product should be applied at a distance of at least 25 cm, and several layers should be applied. Each of them needs to dry for about 20 minutes. You need to carefully monitor the spraying and do not stay in one place for a long time, otherwise drips will form. Next, the soil will need to dry for about three hours, but ideally a day is better so that it sets well.
Processing using a drill with an attachment
After all the preliminary stages, the moment of painting comes. And here newbies often have a question: how to paint car rims yourself (stamping)? There are actually few options. Painting can be done with special acrylic paint, powder, or liquid rubber. Powder paint is immediately eliminated, since this method can only be painted in a special auto repair shop. equipment.
It is inexpensive and very easy to use. There are several useful tips to help you paint thoroughly:
- the can must be constantly shaken during operation;
- the paint application distance must be at least 20 cm;
- the air temperature indoors or outdoors should not be very low;
- apply the paint in several layers, each of which must dry for at least 30 minutes;
- do not keep the can in one place for a long time to avoid drips;
If drips do occur, the problem can be corrected with fine-grained sandpaper. But this can only be done on the first layers of paint. After drying, varnish is applied. The wheels should dry out for 5-6 days, and during this period it is not advisable to touch them at all. If you do not allow the paint to dry completely, there is a risk of scratching the discs during assembly. Painting stampings with your own hands is quite possible, the main thing is to adhere to all stages of preparation.
The main stages of painting alloy car wheels with your own hands: technologies and their implementation
The painting technology implies the need to remove the tire; this is the most effective way to qualitatively paint a cast wheel in any color. Some amateurs do not want to waste time on dismantling and immediately paint the parts. In the installed state it is impossible to paint the surface of the material well. If the slightest disc area is not painted over, destruction will begin from that place. When deciding to reduce the time, you need to separate the steel or aluminum wheel from the tire using paper and tape.
Preparing alloy wheels for painting
Preparatory stage
The painting technique at home requires basic preparation measures:
- remove as much as possible any contamination from the wheel: paint, dirt, bitumen, any fastenings, etc. There are a lot of liquid cleaning products on the shelves of auto chemical goods, any will do;
- if the structure has chips or deep damage, they should be treated with putty. You should go over the composition two or three times with sandpaper. To begin with, use a larger fraction (200–300), then a smaller one – 400 and finally – 600;
- the disc will have to be thoroughly washed again with clean water to remove all debris remaining after grinding;
- degrease the base with solvent.
During the process of rubbing the putty, you need to periodically wet the surface when your hand feels significant heating. The manual procedure will take a lot of time, the work will be painfully monotonous and uninteresting. To speed up the work, it is better to use a grinding machine.
Painting stage
According to the dyeing technique and technology, an algorithm of actions has been developed:
Coating alloy wheels with primer
- Primer covering. When using a primer in aerosol form, be sure to shake the composition. To spray the product, you need to hold the can at a distance of 20–25 cm. High-quality lighting is important here to prevent leaks and leaks of liquid. Leave the layer to dry, it takes 10 to 15 minutes.
- Cleaning up. Now you need to form a plane using 200–300 grit sandpaper. To improve the condition of the surface, a cross motion is used, then abrasions and scratches do not appear.
- Purge. To remove dust after wiping, blow off the surface with compressed air. Now the coating is primed and sanded again.
- Wiping. Before painting, it is recommended to wipe the discs using napkins. It is important not to use standard rags, otherwise lint will appear, worsening the final result.
- Initial layer. Using a spray gun or from a regular spray can, you need to treat the part from a distance of 20 to 25 cm. To dry, you need to leave the disc for 20–30 minutes.
- Second layer. The procedure corresponds to the previous stage, only now you should especially carefully monitor the uniformity of paint coverage. All stripes must overlap each other. The disc is dried for 20–30 minutes.
- Finishing layer. When the paint has acquired its final strength, it needs to be treated with a varnishing compound. It is recommended to varnish 2 times, but 1 coat is sufficient. Varnish takes longer to dry than paint, about 18–24 hours.
If you want to improve the appearance, you can polish the top. The color with a matte effect looks attractive. Discs that glow at night have an extraordinary design. The luminous composition is relatively expensive.
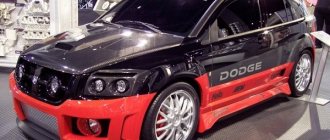
Car rim tuning
Tuning is one of the ways that makes a car stand out from all other vehicles. And there are many types of such tuning, for example:
- installation of new plugs;
- unusual painting of car wheels;
- chrome plating;
- inlay;
- backlight;
- unwelding
Installing plugs is replacing old ones with new, more original ones. You can simply buy a new kit and paint it the color you want, or make it yourself. The main thing in this matter is skillful hands and imagination.
Chrome plating is also quite popular among car enthusiasts, as it gives the wheels an incredibly stylish look. In this case, a metal coating with a mirror effect is created. Inlay is a decoration of the rim with Swarovski crystals. This procedure is painstaking and quite expensive. But the wheels end up looking amazing.
The backlight looks very effective at night.
And the last improvement method is welding. It involves expanding the disk by sawing parts and adding more metal to the structure. But this method has more disadvantages than advantages.
Unwelding wheels
Unwelding is an increase in the width of wheel rims, which is achieved by sawing parts and adding metal inside the structure. This is a fairly popular type of tuning, which, however, requires certain skills and knowledge. With the help of welding, you can give the car a courageous and brutal look, make it look like powerful SUVs or, conversely, sports cars.
Pros and cons of welding
Before you start unwelding, carefully weigh all the pros and cons, because this type of tuning has almost more disadvantages than advantages. Among the advantages:
- giving an unusual appearance to car wheels;
- improved traction with the ground;
- reducing the likelihood of overturning when skidding.
But the procedure has more disadvantages:
- increase in the total weight of the vehicle;
- increased load on the car’s suspension, and, as a result, its rapid wear;
- it is necessary to replace tires with wider ones, and their price is much higher than usual;
- when using narrow tires, it must be installed “housewise”, however this method can lead to the tire flying off during a sharp maneuver;
- lack of qualified specialists in tire shops who can properly install and inflate such a tire;
- not the easiest welding process, which a beginner may not be able to handle;
- unnecessary attention from traffic police officers.
Whether it's worth it is up to you to decide. All these shortcomings do not deter tuning enthusiasts. Unwelding in combination with lowering the car is especially popular.
Materials and tools for welding discs
In order to modify disks in this way, you will need the following materials and tools:
- two stamped disks (or one disk and a strip of metal of the required width) for each wheel;
- tool for cutting discs with replaceable attachments;
- welding machine;
- sealant;
- drill with a set of drills.
As a rule, old parts are used for such tuning, so before starting work, be sure to check the integrity of the discs and the absence of rust. In addition, their surface must be smooth.
Be sure to wear protective gloves before starting work. They will protect your hands from damage.
Boiling methods
There are two main ways to increase the width of the disk:
- welding two disks;
- welding a strip of metal to one disk.
The first method is easier to implement, while the second requires less investment, since you will need 4 disks instead of 8. So, let's look at both methods in more detail. When using two disks, the sequence of actions will be as follows.
- Inspect the disks. Mark cutting lines on each of them. The first disk will act as the base, and the second as the rim of the future product.
- Using a grinder, cut parts of both disks along the line.
- Place what is left of the first disc onto the rear axle hub.
- Securely fix and put on the second one.
- Align both halves of the piece.
- Using a welding machine, fasten both disks at at least four points.
- Apply sealant to the seam.
Scheme of unwelding of two disks
Mark the lines and cut the disks along them. Remove everything unnecessary. Place one disk on the hub of the other. Weld both parts to each other at several points.
After the sealant has dried, its excess must be removed with sandpaper. After this, you can begin decorative work: puttying, priming and painting the disc. By the way, the most convenient way to paint is from a spray can.
Video: unwelding two discs
The second method of welding disks involves using only one part, the width of which is increased by a sheet of metal. Its optimal width should be 3 mm.
- Mark the cutting line on the disk. It should be closer to the outer rim.
- Cut the disk into two parts with a grinder.
- Cut a strip from a sheet of metal with a length that matches the circumference of the disk. Choose the width at your discretion, but remember that wide tires are difficult to access.
- Bend the resulting metal strip. This is best done using special equipment.
- Take the part of the disk on which the hub is located and attach the resulting metal rim to it. Join the edges so that the surface is perfectly flat.
- Weld the strip in several places.
- Take the remaining part of the disk and install it in its place. Also make sure the edges match.
- Weld the second half of the part.
- Repeat the steps with the sealing compound and paint from the previous instructions.
The process will be more efficient if you have a special device that provides automatic welding of a rotating part. Otherwise, you will have to do everything by hand and measure by eye. Remember that crookedly welded wheels interfere with vehicle control.
Video: welding from one disk and a sheet of metal
As you have probably noticed yourself, some types of wheel tuning are quite controversial in terms of improving the car’s performance, and also require the ability to work with certain equipment. Of course, you can perform all the operations yourself in the garage (some craftsmen manage to make plastic bodies with their own hands, not to mention ordinary wheels), but if you are not completely confident in your abilities, contact a car repair shop. This way you will be sure that the backlight will work as it should, and boiled rims will not impair the maneuverability of the car.
Instructions for painting stamped car wheels with your own hands
Do-it-yourself engine chip tuning
What paint to paint car stamping wheels in two colors
It is better to use spray paint or a spray gun for such purposes. Coloring usually occurs in two shades, and this process does not require any special skills. The rim of a stamped disc is painted in one tone, and the middle in another. All manipulations are carried out using masking tape and oilcloth.
Painting in several colors
The area required for painting is left uncovered, and everything else must be covered with film and secured with masking tape. After the paint has dried, you should cover the painted area and paint where there is no paint yet. Even in the case of double paint, you can use special stencils with a pattern. The main thing is to carefully cover the places where the paint should not get.
How to paint the steel wheels of a car yourself and how is fully described in the article. An important point in this matter is its quality preparation. You should also pay special attention to your own safety. Gloves, a mask and a respirator must be present when working with paints and varnishes.
The main problem with steel car wheels made by stamping is their not very attractive appearance, especially after a year or two of use on winter roads sprinkled with salt. It provokes the rapid appearance of rust, which occurs in places where the paintwork is damaged. Because of this, buying new rims is not the best option, because you can get by with “little expense” - painting the stamped wheels yourself. In this way you will return the wheels to a presentable appearance.
Primer and painting
After cleaning the surface, painting stamped discs with your own hands involves applying a primer. This allows the paint to lie as smoothly as possible and not peel off. You will first need to apply masking tape to the rubber to prevent the compound from getting there. After applying the primer composition in 2-3 layers (after each layer you need to let the composition dry for at least 5 minutes), treat the surface again with fine sandpaper.
Do-it-yourself painting of stamped discs can be done using a spray gun or spray paint. The second option is available to any motorist. You should not use a brush - the structure of the disc is too complex, and only spraying helps to achieve a uniform layer.
Painting of stamped discs has the following features:
- It is carried out from a distance of 20-25 cm.
- The paint must be applied in several layers, and after each one, give it time to dry.
- You can speed up drying by using a hair dryer.
- After applying several layers of paint, you need to let it dry for several hours.
To provide better protection and add shine to the surface, a layer of varnish can be applied on top. The technology of its application is similar to painting stamped discs.
The main problem with steel car wheels made by stamping is their not very attractive appearance, especially after a year or two of use on winter roads sprinkled with salt. It provokes the rapid appearance of rust, which occurs in places where the paintwork is damaged. Because of this, buying new rims is not the best option, because you can get by with “little expense” - painting the stamped wheels yourself. In this way you will return the wheels to a presentable appearance.
Existing dyeing methods
Gone are the days when car enthusiasts who wanted to do the painting themselves could only use nitro enamel, and, as a last resort, used oil and pentaphthalic paints. Now new chemical compositions have appeared, thanks to which it is possible to paint rims in several ways:
- using acrylic paints sold in aerosol cans;
- application of polymer coatings;
- the old method is painting with automotive nitro enamel;
- laying a layer of so-called liquid rubber;
- chrome plating
This is what a newly painted wheel on a car looks like
Not all of the options listed are suitable for implementation at home. Take a polymer (powder) coating that is very resistant to environmental influences and mechanical damage. It is applied using a certain technology, consisting of the following stages:
- Surface preparation, including degreasing.
- Priming with a special composition.
- Application of powder enamel.
- Curing the paintwork in an oven.
Reference. On sale you can find polymer paints that harden without heat treatment. But their strength and durability are not so high and in terms of performance properties they are equal to acrylic coatings.
Since not every home has an oven for heat treatment of painted products, this method is not suitable for the average car owner. Unless you go to a specialized auto repair shop, where they will apply the polymer with high quality and charge a decent price.
For the same reasons, it is almost impossible to perform chrome plating at home. This is a complex technological process that includes the sequential application of various components with several intermediate rinses with distilled water. Moreover, the time for placing chemicals on the surface is strictly regulated. Therefore, to give the wheels the effect of a chrome surface, you will again have to turn to professionals.
Wheel rim with chrome finish
Note. Chrome plating can be imitated using special “chrome effect” aerosol paints applied to a layer of black primer. True, you will have to spend money on expensive enamel, since using a cheap one will give you a “metallic” color, and not a shiny surface. The coloring technology is similar to the use of acrylic compositions, which will be discussed below.
Plugs - how to make them yourself?
In addition to the decorative plug (aka caps), they perform another important function: they protect the inside of the wheel from dirt and moisture. Usually this element is already included in the kit. But if one or more plugs are lost or broken, it can be quite difficult to find a similar one, and buying the entire set can be expensive. Don’t worry: it’s not at all difficult to make such caps with your own hands, if you know certain rules.
Materials and tools
Standard caps are made of plastic, so you may want to purchase a similar material. Craftsmen can create a new part from almost anything: from plumbing plugs to beer cans. In addition to the material itself, you will also need:
- ruler;
- compass;
- a tool for cutting plastic (even a stationery knife can usually handle thin material);
- coarse sandpaper;
- vinyl film for covering;
- a small rubber spatula or an unnecessary plastic card;
- industrial dryer.
DIY process
You don't need a lot of time and space to make disk blanks. This process can even be done at home in the kitchen.
- Carefully measure the diameter of the future product. As a rule, this figure for modern disks ranges from 55 to 75 cm.
- Using a compass on plastic, draw a circle with the desired diameter.
- Cut out all the blanks.
- Sand the edges of the workpieces with sandpaper. You don't need to achieve any special smoothness, just remove all the nicks.
- Cut a square of vinyl film slightly larger than the cap blanks.
- Remove the film from the backing and place it on the plastic.
- Use an industrial hair dryer to heat the film and smooth it onto the surface with a spatula.
- Fold the edges and glue on the back side.
- Consider how to attach the cap. It directly depends on how the factory caps were fixed. Most often this is a central nut, but there are other options, for example, with holes for self-tapping screws.
Photo instructions for making do-it-yourself plugs
Draw a circle of the required diameter on the material
Cut out the resulting elements
Prepare the film for sticking on the plugs
Cover the plugs with film
Most often, a central nut is used as fastening
On some models, the plugs are installed using self-tapping screws
Video: DIY plastic plugs
Video: beer cans for caps in discs
You can diversify the appearance of the plugs by covering them with other materials rather than ordinary vinyl film. Some motorists put the first letters of the make and model of the car on the plugs, and some even their initials. You can use special equipment to cut out specific shapes or silhouettes, and then glue them with sealant to the main circle. In other words, you can bring any creative idea to life.
Options for painting stamped discs with your own hands
Most motorists who personally restore the appearance of stamped wheels use three types of paints:
- acrylic;
- automotive nitro enamels;
- liquid rubber.
Acrylic paints in aerosol cans
Acrylic coatings are quite strong and durable, and when applied they emit virtually no odor and dry quickly. The choice of such paints is very wide, so choosing a color is not a problem. If desired, you can paint the wheels with acrylic in 2 colors using masking tape or a special contour tape 6 mm wide. Two-tone wheels look impressive, which is why this option is becoming increasingly popular.
Stamped rims, painted in two colors
Nitroenamel is suitable for budget painting of wheels. It is quite durable and dries even faster than acrylic. One problem is that when painted, it emits a very unpleasant odor and emits harmful fumes, so you need to provide good ventilation of the room and use respiratory protection (a respirator).
Advice. If you want to paint the rim in 2 colors, you should not use nitro paint. There have been cases when, when applying the second layer of enamel, the first one began to dissolve and “float”, causing the colors to mix, so it’s better not to take risks.
The main advantage of liquid rubber over other types of coatings is to level out small potholes on the surface, which is facilitated by the filler of the composition - crushed rubber. In addition, the layer of liquid rubber is thick and elastic, which helps it withstand impacts from pebbles and other mechanical impacts. The composition dries quickly, and after hardening it does not require additional protection with varnish.
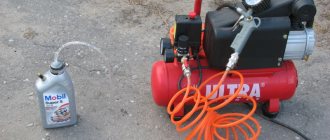
Preparation of equipment and materials
The technology for applying any paint to car rims involves spraying from a can or with a spray gun; brushes are not applicable here. To operate a spray gun, you need a compressor or an oxygen cylinder, and a small number of country house owners have such equipment.
A set of tools and materials for restoring rims
Hence the conclusion: it is best to buy coloring compounds and primer in aerosol cans, fortunately, there is a wide selection of enamels on sale in such containers. In addition, to complete the work you will need the following tools and materials:
- an electric drill or an angle grinder with a steel wire attachment (the so-called brush);
- coarse and fine sandpaper, 400 and 200 grits are suitable;
- rust converter or its analogue - phosphoric acid;
- degreasing agent - white spirit, nefras (otherwise - Galosha gasoline), organic solvent;
- masking tape, contour tape;
- paint is calculated as 1 450 ml bottle for 2 discs, more liquid rubber may be needed;
- primer (1 bottle for 4 discs);
- rags, rubber gloves, respirator or gauze bandage.
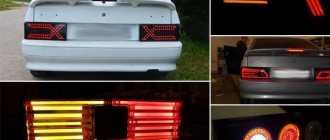
Backlight
Backlighting of disks is especially popular, especially among the younger generation. It allows you to highlight car wheels in a special way, as well as create a unique style.
Types of backlight
Neon lamps or LED strips are usually used to create lighting. The former allow you to make lighting more local and place it in the right places, but neon is not without its drawbacks. First, it is more explosive than regular LEDs. Secondly, neon lamps consume more energy. In addition, neon has a significantly shorter service life. However, replacing it requires more time and money. Do not forget about such an important characteristic as price. It is higher for neon tubes.
Neon tubes are rarely used for tuning wheels
For these and many other reasons, LED strip is much more popular. In addition, it is very easy to attach it to disks.
LED strip is very convenient for creating disc illumination
There are ready-made kits on sale that include all the necessary elements for light tuning of wheels. They will cost you more than if you bought the LED strip and other parts separately. However, they are quite easy to install.
Based on the type of connection, the backlight can be divided into two categories:
- wired;
- wireless.
The first type is usually connected to a car battery, while the second receives energy from solar panels.
Wireless lighting powered by solar panels
DIY lighting tools and materials
Before you start lighting your discs, make sure you have the following tools:
- equipment for dismantling disks (including a jack);
- LED strips;
- drill;
- double-sided tape, glue or sealant;
- clamps;
- metal tapes (if there is no protective casing);
- corrugation for sealing wires;
- current stabilizers;
- toggle switch
Instructions for making wheel rim lights
LED strip can be installed in several ways. The most popular one is on the disk guard. Before work, remove the wheel and prepare the garage for work.
- Prepare the casing: wash and degrease its surface.
- Measure the required length of tape by wrapping it around the casing. At this point, notice that the strip is divided into sectors with three LEDs in each. You can only cut along the sector border. Otherwise, the operation of the device will be impaired.
- Apply adhesive or sealant to the inside of the tape, and then press it firmly against the surface of the casing. And you can also use double-sided tape for these purposes.
- To ensure the tape holds better, secure it with clamps. Sometimes this requires drilling holes.
- Apply sealant to one end of the tape to prevent moisture from getting into it and ruining the operation of the LEDs.
- There are two wires coming from the second end: positive and negative. You need to solder the wires to them, which you will run to connect the backlight to the battery.
- Hide the wires in the corrugation.
It is most convenient to install the tape on the disk protective casing
In this simple way you installed the tape on the rims. But some models are not equipped with a casing. What to do in this case? The problem is solved by creating a special frame for mounting LEDs.
- Take a perforated metal strip and bend it into a wheel shape. You can also cut the tape into pieces and then bolt them together.
- Install and secure the resulting frame.
- Using the casings, attach the tape to the frame.
- All other steps related to fastening the wires are similar to the previous instructions.
Frame and tape fastening in the photo
Make a frame from metal tape and secure it to the disk
Attach LED strip to this frame
With this design, you will have to be careful when washing your car. High pressure water flow can damage the structure.
There is a third way to install the tape. It differs from the first two in that the light will come not from the edges, but from the center of the disks. To do this, you need to make a special metal ring, which will be located on the outside and attached to the protective casing. It is on this that the tape is installed.
With this design, the light will come from the center of the disk
Video: design for installing the tape from the center
Connecting the backlight
All wires must be reliably protected from dirt and drops of water, which is why corrugations are put on them. For complete peace of mind, you can wrap the entrance area with electrical tape.
- Next, you should bring wire pairs from all wheels into the car interior. Often special holes are provided in the bottom for such tasks.
- Install voltage stabilizers on the wires.
- Connect the resulting structure to the car battery.
- In order to regulate the inclusion of the backlight, install a special toggle switch.
- You can also connect the backlight wires to the headlight wires. In this case, the rims will light up at the same time you turn on the headlights. However, the rules of the road require that cars keep their lights on at all times, so your lights will be on all the time too.
Video: detailed installation and connection of the backlight from the center of the disks (third method)
Separately, it is worth highlighting the wireless backlight. As a rule, it consists of luminous plugs powered by solar batteries. Their work is triggered by the vehicle's motion sensor. To install such elements you don’t have to try at all: everything you need is included in the kit.
Video: wireless illumination of car wheels
Car wheel rim painting technology
The entire dyeing process is divided into the following stages:
- Removing the wheels, disassembling them and removing dirt.
- Preparing for painting.
- Application of primer.
- Coloring and drying.
The rims must be thoroughly washed to remove dirt and dried.
At the first stage, it is important to thoroughly wash the discs using degreasing detergents (kitchen detergents are suitable). If you decide to paint them without removing the tires, you will have to thoroughly wash the rubber as well. After washing, dry the wheels in the fresh air or in a ventilated area.
The process of preparing to paint stampings in color
At this stage it is necessary to perform the following operations:
- Removing rust and old paintwork.
- Degreasing.
- Pasting with a painting plaster (if necessary).
Initial cleaning of the disk with a brush
When performing the first operation, you need to achieve two goals: completely remove the rust and clean the applied varnish and paint as much as possible. Ideally, the old coating should be completely removed, which is quite difficult to achieve with manual processing. But the varnish should be completely cleaned, and the paint should be cleaned whenever possible. Where it holds firmly, sanding down to metal is not necessary. First you need to use coarse sandpaper, and then finer sandpaper to rub out scratches.
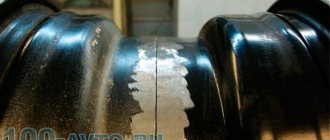
Advice. Do not allow the old coating to remain on the metal in the form of islands with clear protruding edges. After painting, the remaining islands will definitely appear, no matter how many layers you apply. The protrusions must be sanded down so that the surface feels smooth to the touch.
Pouring rust converter into disc slots
There is one weak point in the design of stamped steel wheels, where dirt is constantly packed and where rust occurs first. This is a gap located in a circle between two elements - the rim and the middle part with holes for mounting bolts. To clean and sand it, the following methods are used:
- treatment with a rust converter or phosphoric acid, followed by cleaning and sanding;
- use of sandblasting machines.
Advice. The last method is the most effective, use it whenever possible. If you have a compressor at home, you can purchase a sandblasting attachment for it and thoroughly clean the entire disk from traces of corrosion and old paint.
This is what a sandblasting nozzle with a sand tank looks like
After cleaning, degrease the wheel rim on both sides with a rag moistened with white spirit and let it dry. After degreasing, do not touch the metal with your hands or wet it with water. If you left the tires on the rims, then they need to be deflated to the maximum and covered with masking tape, trying to get it as far as possible under the edge of the rim. Another option is to frame the part to be painted from cardboard, cutting it into a semicircle and sliding it under the edge of the rim.
Wheel with rubber, ready for painting
Priming and painting
The first step is to create convenient conditions for performing these operations. In order to paint the wheels efficiently, it is worth coming up with podiums for them, for example, from upside-down old buckets. The ideal option is to hang the rim to provide access from all sides. When everything is ready to paint, proceed in this order:
- Shake the can of acrylic primer for 3-5 minutes, then carefully apply the first coat, holding the sprayer at least 20 cm from the surface.
- Dry the first layer for the time indicated on the package (up to 20 minutes).
- Apply a second layer of primer evenly and let it dry.
- After shaking the can of acrylic paint thoroughly, apply it in 3-4 layers with 10-minute breaks to dry. While staining, shake the contents of the container periodically and do not stop in one place, otherwise drips will form.
Painting is much more convenient when the disk is suspended on a wire
Advice. Do not prime or paint rims outdoors, in the open air. The problem is not the rain, as you might think, but the dust particles that settle on the painted surface from the slightest breeze. Dust will ruin all your work.
If the surface of the rim is dotted with defects from impacts, then the indentations should first be puttied and cleaned with fine sandpaper. But due to the direct interaction of the rims with the road surface, which in our conditions is rarely smooth, the putty can break off over time, exposing bare metal, where corrosion will quickly occur. Therefore, for such wheels, it is appropriate to paint them with liquid rubber, whose layer will cover all defects. The technology for applying such a coating is no different from painting with acrylic, only the number of layers can be from 3 to 7.
Using pasting you can create your own design
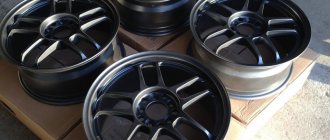
To paint in 2 colors, after the first paint has completely dried, cover the disc in the right places with masking tape. Then take enamel of a different color and apply it in 3-5 layers with breaks for drying. The drying process is accelerated when using a hair dryer. After the coating has completely hardened, the tape can be removed.
The result of painting in 2 colors
To ensure that the paintwork lasts as long as possible, it is recommended to protect it with a layer of clear automotive varnish. Then, when exposed to abrasive particles and impacts with pebbles, the main coloring layer of the disc will not be damaged. The varnish can be applied 1 hour after painting using the same technology: at least 3 layers with breaks for hardening.
Advice. So that your efforts on the beauty of the wheels are not in vain, before installing the wheels on the car, wait at least a day for the new coating to dry completely.
When you begin to remove the wheels from your car, pay attention to the appearance of the front brake calipers and rear drums. They are probably peeling off and will show through unsightly through the technological openings in the steel disk. To bring it to full beauty, it’s worth painting the calipers and drums in some color that harmonizes with the new coating of the rims.
Types of rims for cars
First, let's figure out what wheels are - why they are needed and what types of them exist. The disc is the central part of the wheel, made of metal, on which the tire is mounted. Together this structure forms the wheel of the car. However, this is not only a functional, but also a decorative element of the car, the design of which can significantly transform the appearance of the entire car.
Tuning wheels can transform a car
There are various manufacturing methods. There are three types of these car elements:
- stamped;
- forged;
- cast.
They are divided according to their characteristics, appearance and price. Let's take a closer look at each of the disks.
Stamped
On many low-price car models, stamped wheels are installed at the factory. At the same time, drivers often do not want to spend time and money on buying new spare parts, especially if they are quite satisfied with the appearance of the car. On the other hand, such disks are often chosen to replace broken or worn ones. The reason for this is the low price. However, this does not mean that the stamps are bad or of poor quality. On the contrary, they have no less advantages than disadvantages. Judge for yourself:
- stamping is more durable, as it is made of steel;
- if a wheel gets into a hole, the risk of the part splitting is less than in the case of cast ones;
- a deformed disc can be restored in a special workshop.
Of course, such elements of the car also have negative qualities:
- the weight of stamped discs is higher than forged and cast ones;
- subject to corrosion;
- unattractive appearance that repels motorists.
Stamped wheels are sold at a low price, but have an unattractive appearance
How significant such shortcomings are is up to you to decide.
Cast
This is almost the exact opposite of stamped ones. Just swap the pros and cons of the previous type of parts to understand their characteristics.
Alloy wheels are made of aluminum, so they are less durable, but lighter
- alloy wheels are made of aluminum, so they have much less weight, which has a positive effect on the speed and maneuverability of the car;
- aluminum is not afraid of rust;
- a special manufacturing technology allows them to be given any design shapes unique to each car model.
The disadvantages are also quite impressive:
- light and soft aluminum does not bend, but is covered with a network of cracks, so if it falls into a hole, there is a high risk of breaking the disk;
- as a rule, workshops do not undertake repairs of such parts, offering the owner to buy a new one;
- the price of casting is 2–4 times more than stamped ones.
Given the condition of most roads, driving on such wheels is a risky activity. However, this does not stop motorists from purchasing and installing these parts.
When purchasing castings, pay attention to the country of origin. Turkish parts have a bad reputation. Despite the use of aluminum in the design, their weight is not much different from stamped iron ones.
Forged
If you can't decide between appearance and durability, consider forged wheels. They combine the advantages of both previous types:
- special manufacturing technology increases their strength;
- just like stamped ones, they bend and do not crack, which allows them to be repaired if necessary;
- such parts are lightweight;
- corrosion will not damage the metal;
- simple but interesting appearance.
Forged wheels are both strong and lightweight, but they do have certain disadvantages.
Regarding the last point, it should be noted that among forged wheels there is not such a wide variety of designs as among cast ones. So if you're looking for something different, check out the previous look. However, unlike stamped ones, forged elements look more elegant.
Of course, like everything in the world, forging also has negative sides:
- when it hits a hole, the disc does not break, but transfers the impact energy to the suspension, so when driving on broken roads, you are guaranteed frequent car repairs;
- the price is the same as for cast ones, or a little higher.
Recently, you can find a special type on sale - combined. It is a combination of a cast disc and a forged rim. Thanks to such modernization, they retain lightness, gain strength and can have a wide variety of appearances. Such parts have only one drawback - a very high price and low availability for sale.
Combined wheels combine the positive qualities of forged and cast ones, but have a very high cost
About security measures
Painting work using sprayers (cans or spray guns) poses a health hazard, no matter what kind of paint you use. Tiny droplets of chemical compounds form an aerosol (a suspension of liquid in the air) that enters the respiratory tract and eyes. Harmful substances, especially carcinogens, take a long time to be eliminated from the body. When using nitro paints, harmful acetone vapors are added to this set.
To paint wheels without harm to health, follow basic safety rules:
- carry out work in a well-ventilated area (for example, a garage with an open gate);
- do not paint in your own apartment, where small children live with you;
- wear a respirator or protective gauze bandage and goggles;
- Put rubber gloves on your hands.
Set for safe painting of wheels
Advice. The respiratory tract must be protected, starting with the process of stripping the metal of rust, since fine abrasive dust also rises in the air. Another option is to periodically moisten the sandpaper, which will prevent dust from appearing and will make rubbing easier.
The most difficult and time-consuming part of the wheel painting process is the preparation. Washing, sanding and degreasing will take up the lion's share of your time allotted for this event. In general, you should expect that the procedure will take 1 day plus another day for the paint to dry. But professional painting in a car repair shop is also not done quickly, and it will not be cheap. Hence the conclusion: painting steel wheels yourself makes sense, provided that you have free time.
It is generally accepted that stamped wheels only spoil the appearance of the car. Therefore, most car enthusiasts prefer hubcaps as a way out of the situation. But there is another, no less interesting and reliable solution. Painting stamped wheels will give your car a completely new look.
At the same time, it is not at all necessary to contact a specialized workshop. You can do everything yourself. This will require some equipment and supplies, as well as step-by-step implementation of all the necessary processes.
Equipment and consumables
So, to complete the work you need:
Basic materials and equipment
- Spray gun with compressor;
- Drill with a special attachment;
- Sandpaper;
- Primer for discs;
- Paint (in the absence of a spray gun, aerosol at the rate of 2-3 cans per wheel);
- Solvent;
- Masking tape;
- Rags.
DIY painting is done using a spray gun and a compressor. In their absence, you can use regular cans. In addition to paint, you need to prepare a primer, sandpaper and, preferably, have a drill with a special attachment for metal brushes.
Before starting work directly, the condition of the disc is assessed for cracks, scratches and other damage, as well as rust.
Main stages
Painting stamped wheels is practically no different from painting a car body. It is carried out in several stages. If the sequence is followed correctly, a good result is guaranteed. Below are the main types of work that need to be done:
- Preparation of equipment and materials;
- Preparation of stamped discs;
- Application of primer;
- Painting;
- Applying varnish.
Working with a drill with an attachment
Preparatory work
Painting stamped wheels yourself is absolutely no different from painting a car body. The preparatory stage involves carrying out such activities as:
- dismantling the disk (optional procedure);
- washing off dirt and resin from its surface with further drying;
- removing paint residue or corrosion with a drill and a wire brush;
- sanding with coarse sandpaper to remove paint residues;
- sanding with fine-grained sandpaper to make it smooth;
- application of degreaser followed by drying.
Primer
Before you start applying paint to the surface, it is necessary to prime it so that the painting of steel wheels is of high quality. The primer is applied in several layers (usually two or three). After the last layer has dried, it is necessary to sand the surface so that it is smooth.
When doing all this work with your own hands, it is important to remember that the break between applying each layer can be from 4 to 6 minutes.
Methods for tuning wheels
There are many ways to diversify the appearance of your wheels. All of them, to one degree or another, require DIY skills, and some require special equipment.
The easiest way to change something in the wheels is to install new plugs. They will create some zest in appearance, while simultaneously covering up unattractive parts of the structure.
Putting new plugs on the wheels is the easiest way to tune wheels
Painting wheels is very popular. You can choose any color you like. Sports car owners often choose bright neon shades of yellow, red, orange, purple and green.
Sports car owners love painting rims in bright colors.
Others paint the car completely black, not forgetting about the wheels. Such vehicles look incredibly stylish and mysterious. However, most motorists opt for classic chrome plating, which creates a metallic, almost mirror-like coating.
Chrome plating gives the wheels the appearance of a glass surface
In large cities you can find cars whose rims seem to be strewn with precious stones. In fact, everything is practically like this: this is an inlay technique that uses Swarovski crystals. Such wheels will certainly attract the attention of everyone around. Of course, it is almost impossible to perform this type of tuning in a garage. Even if you try, the appearance will not be identical to what the professionals can achieve. In addition, the raw materials used will cost you a very large amount.
If you want to inlay discs with stones, then contact a special workshop
Many motorists resort to a tuning method such as welding. It increases the width of the parts, making them more similar to the elements of large jeeps.
Wider wheels give the car a more powerful look
Another popular method is installing backlighting. Such cars look very impressive in the dark. And the variety of color combinations allows your imagination to run wild.
Illuminated rims are a fun way to highlight your car.
Of course, not all of the listed tuning methods can be done with your own hands. Therefore, we will focus on the most popular types, and also tell you how to cope without the help of auto repair shops.
Applying paint
There are the following options for applying paint - using a spray gun with a compressor and using aerosols. Naturally, those who do not have the appropriate equipment will use spray cans. If you do the painting yourself without removing the tire, the first thing you need to do is make sure that the paint does not get on the rubber. This is what masking tape is used for.
As noted above, painting an iron disc can be done using a spray gun. Working with a brush is not suitable, since the disc has a rather complex structure and the application of the coating, in this case, will not always be uniform.
If you don’t have a spray gun, you can use aerosol cans. The distance to the disk should be at least 20-25 centimeters. The paint is applied in several layers in stages. After completing each of them, you must wait until it dries before moving on to the next one. To speed up the process, you can use, for example, a household hair dryer.
After completing this stage, you can begin varnishing the surface. Varnishing should follow the same principle as applying paint. Several layers with pauses between each for drying. The varnish will subsequently protect the paint from exposure to aggressive environments and will preserve the result of the work longer.