Types of sealants for car headlights and their use
Sealants for car headlights are divided into 4 main groups - silicone, polyurethane, anaerobic and heat-resistant. Let's look at them in order.
Silicone sealants
Most silicone sealants in their non-polymerized form are semi-liquids with good fluidity. They are made on the basis of natural or artificial rubbers. After polymerization (hardening), they turn into a kind of rubber, which reliably glues the treated surfaces and protects them from moisture and ultraviolet radiation.
However, their disadvantage is that most of them are destroyed under the influence of process fluids such as fuel, oil, alcohol. The last point is especially important in a situation where the car is equipped with windshield washer fluid for washing the headlights. Often these liquids are alcohol-based. However, there are also oil-resistant sealants, so you may want to look for those as well.
Silicone sealants for car headlights are one of the most popular due to their low cost and high efficiency. Silicone compounds are not fluid, so as a rule they are used to seal glass or headlights around the perimeter. All of them are able to withstand significant temperatures - conventional compositions up to approximately +100°C, and heat-resistant ones - up to +300°C and even higher.
Polyurethane sealants
This type of sealant is needed when repairing headlights, for example, when you need to glue individual pieces of glass or repair a crack in a glass surface. This is due to the fact that polyurethane sealants have excellent adhesion (the ability to stick to a surface), as well as excellent adhesive properties. In addition, the dried composition does not allow moisture to pass through. A few more advantages of polyurethane compounds:
- Application of glue is possible in a wide temperature range. Similarly, the compositions also have a wide operating temperature range, from approximately -60ºС to +80ºС, depending on the specific composition.
- The duration of action of the composition, calculated in years.
- Resistance to non-aggressive process fluids, such as fuel, oils, alcohol-based washer fluid, road reagents.
- High fluidity in the non-polymerized state, which allows gluing parts of various, even complex, shapes.
- Excellent resistance to vibration while the vehicle is moving.
However, polyurethane sealants also have disadvantages. Among them:
In an unpolymerized (liquid) state, their compositions are harmful to the human body. Therefore, you need to work with them and follow safety rules. They are directly indicated in the instructions. This usually comes down to the use of glasses and gloves. Less often - a respirator. Do not use appropriate products with headlights that heat up significantly (for example, up to +120ºС and above)
What is important if halogen lamps are used.
Anaerobic sealants
Anaerobic sealants are used to connect parts between which there is practically no air gap. In particular, as a cushioning layer, sealant for seams, sealed joints and so on. The fully polymerized layer is characterized by very high strength and heat resistance. In particular, it can withstand temperatures up to +150°C...+200°C.
For the most part, in a non-polymerized state, these products are in liquid form, so their use when repairing headlights of complex shapes can be somewhat inconvenient. No additional tools or protective equipment are needed during operation. The composition in polymerized form is safe for the human body, the main thing is to prevent the composition from getting into the eyes and mouth.
Heat-resistant sealants
These compositions can retain their properties at significant temperatures, up to +300°C...+400°C. That is, such a high-temperature sealant must be used in headlights where halogen lamps are installed. At the same time, they are quite strong and durable, resistant to mechanical stress and vibration. They are usually sold in solid and paste form, that is, in a two-component state. The only drawback of heat-resistant sealants is the fact that they take a long time to harden. This time can be 8…12 hours.
Repairing chips and cracks in plastic headlights
To repair a headlight made of plexiglass or polycarbonate , you need to prepare the appropriate material from which the damaged optics were made.
It is impossible to combine materials of different quality; it will be impossible to weld them properly.
Plexiglas with a thickness of 6 mm is selected for the headlights, and 4-5 mm for the rear lights.
The procedure for restoring a headlight that has a crack, chip or scratch:
- first you need to prepare the glass (clean off dust, wash and dry the chipped area);
- then prepare a gun for the adhesive composition;
- carefully fill with glue ;
- dry ultraviolet lamp ;
- Apply hardener to the surface and allow it to harden well;
- sand the area of damaged plastic material;
- polish the glass until it shines.
Repair with dichloroethane
To eliminate defects, we can use dichloroethane (molecular glue). This multi-component substance helps to firmly connect headlight fragments; this mixture can fill all cracks and scratches. The procedure for repairing a headlight is described above. Please note that the glue is preheated using a soldering iron.
It is worth considering that dichloroethane is a toxic mixture; when working, one cannot ignore the risk of the substance getting on the skin; when gluing pieces of headlight glass, you must wear gloves and protect your eyes with goggles.
Repair with epoxy glue
The chipped area can be filled with epoxy. To use epoxy resin, you need to prepare a bandage in advance.
Epoxy is a two-component mixture consisting of a resin and a hardener. The components are mixed according to the instructions, a viscous consistency is obtained.
Before gluing plastic headlights, it is necessary to remove dirt, sand the joints, degrease and dry. Then the fragments of headlight glass need to be spread out and joined together, after applying epoxy glue to the joints. Afterwards, gauze or fiberglass is used: a second layer of epoxy is applied to the material, and excess glue is removed. The surfaces of the headlights are well dried.
Soldering damaged headlights
Soldering is another way to restore headlights with your own hands if the glass is cracked. All fragments of the damaged plastic case can be connected using a technical hair dryer. If parts are lost, you must first make patterns and cut them out of the material from which the body itself is made, for example, ABC plastic. We heat all the parts with a hairdryer and install them in their place.
Old processing method
What did you use before? Mainly Lithol (Nigrolom). This is a technical lubricant designed for processing a variety of components.
The second most common is technical and even “ordinary” Vaseline. Its consistency also helped to form a protective layer.
However, these two treatments cannot be called highly effective; after all, LITOL and VASELINE conduct energy poorly and do not contribute to maximum efficiency. Therefore, if they got between the contact and the terminal, then the efficiency dropped significantly. Another disadvantage is that the film that formed on top was not so effective and was washed off (contaminated) very quickly.
How to glue film with your own hands: instructions
In auto repair shops you can apply the film for several thousand rubles. Depending on the cost of the car, the price for the work will increase. But you can do the work yourself.
Materials and tools
To properly glue the protection to the optics you will need the following kit:
- Film for headlights.
- Degreaser.
- A small rubber roller.
- Hair dryer.
- Textile.
- Stationery knife.
- Scissors.
Preparing headlights for booking
The wear resistance of glued protection largely depends on the surface preparation performed. Good cleaning will create a clean and bright stream of light; various contaminants on the glass will spoil the operation of the optics. Small dust particles and dirt impair the quality of adhesion of materials; the resulting air bubbles will eventually lead to peeling of the film.
Stages of work:
Cleaning from dirt
You can wash your car at a car wash, paying great attention to the area of optical instruments. Or wash only the optics separately
Rinse off the soap well so that there are no streaks left. Remove bitumen and other stubborn contaminants using special products. Allow the surface of the headlights to dry thoroughly. Use a degreaser to remove any grease that will interfere with good adhesion. It is forbidden to touch with hands after treatment. After degreasing, immediately glue the film so that dust does not have time to settle on the clean surface. Prepare your pattern in advance.
Pasting process
The shape of the blanks should not completely match the size of the optics. Rectangular blanks are cut out with an indentation of about 2 cm. The stones are struck in the central part, so you should pay close attention to the front part. In some cases, only this area is covered.
Smoothing is carried out in two ways:
- Wet. Before applying the protection, a foaming liquid with water is applied to the glass. Water is removed from the center with a roller or spatula. After complete contact with the surface, you can leave it to dry.
- Dry. Using a hairdryer, heat up the protection, and use a spatula to gently press it, expelling the air.
The wet method is suitable for pliable polyurethane, the dry method is suitable for vinyl.
We invite you to watch a video with instructions for covering headlights with film:
Air bubbles should not be left, as this will lead to rapid peeling of the protection.
Excess pieces are trimmed off, but be careful not to scratch the glass.
Reasons for optics failure
Modern car optics consists of a plastic body and a transparent front cover made of glass or polymer. A crack in the glass is the result of a stone hitting you while driving on the highway. They appear due to an accident or mechanical impact. If a defect is detected, you need to seal the area with transparent tape. This will protect the internal parts from penetration of moisture, dust, and sand.
If a plastic headlight is cracked, you need to turn off the light bulb or not use the light. Heating will deform the part, and it will be impossible to restore its original appearance. A defect in a plastic headlight appears due to a sudden temperature change, impact or strong pressure on the mask.
Breakage of headlight mounts is caused by abruptly closing the hood with a forgotten tool on the optics housing or when ice freezes in winter. The retaining tendrils can be torn off by a person leaning against a car or by an accident.
Headlight polishing
This procedure is the final stage of repairing headlights on your own. Coarse grinding is first carried out in several stages, then treated with polish.
As you can see, repairing a plastic case can be done easily and quickly yourself. The main thing is to prepare the right tool and be patient.
Quite often, problems arise with ordering plastic cases and glasses for damaged headlights. Based on experience, in most cases they can be repaired without having to buy new ones. This procedure is not that complicated. However, patience and attentiveness will be very helpful. Depending on the specific modification of the optics, there can be two types of design: a single monolithic block and with removable glass. If in the first case it is cheaper and easier to replace a damaged headlight with a new or used one, then in the second case, repairing a broken headlight will cost much less than buying new optics.
Varieties
When we are convinced of the very fact of the existence of miracle adhesives for glass, it remains to classify them by type. Depending on the composition, there are silicone, polyurethane, epoxy and polymer sealants. By the number of reagents - one- and two-component. There may also be adhesives for fastening and optical adhesives that restore the damaged area, masking the appearance of the flaw on the glass.
By purpose
Depending on their purpose, sealing adhesive compositions are divided into installation (for installing new glass) and repair. It is advisable to avoid attempts by salespeople and consultants to impose universal sealants.
The subtlety lies in the fact that the glass design provides not only visibility, but also the overall rigidity of the car, being an important part of the frame. Poorly repaired glass will not be able to perform this function.
Assembly composition for gluing
Such familiar, soft and elastic rubber bands that reliably fix the glass plane in the frame and absorb vibrations transmitted from the suspension are a thing of the past. Instead, a locally created layer of polyurethane or silicone-based sealant is used.
More often than others, craftsmen use sealant compositions such as DOW, 3M, Sika, Wurth, Teroson, and Eftec for gluing. A couple of hours will pass and the sealant will harden, securing the plane of the car glass, ensuring reliable contact with the body.
Optical or repair sealant
The next group of compounds is for repair or optical. Dealing with them is not difficult: you need to get rid of chips, seal the crack in the glass - choose an optical sealant. To form a bead of glass seam holding the window plane, you need another composition - an assembly one. These adhesives are not interchangeable because they perform different functions. Their sealant setting speed is not necessarily the same.
What is important for optical silicone is that after polymerization it will not become cloudy, will not lose transparency, and will not be noticeable. Otherwise, the repair loses its meaning, then it’s easier to change the glass
Repair technicians can use Henkel, 3M, Dow brand compounds, and sealants from other manufacturers.
By composition
The basis of modern miracle adhesives is polymers. Polyurethane, silicone, acrylic compounds, with ultraviolet stabilization - this is an approximate list of sealants offered by automakers. They also differ in different degrees of adhesion, depth of penetration into the glass, and curing time of the glue.
Balm
The main component of this glue is fir resin, resin. Suitable for gluing glass and fixing fragments together. The sealant has a slight yellowish tint.
Balsam
A variation of the previous composition, with a more pronounced yellowness of the frozen glassy mass. It features increased adhesion and reliability. Despite the quality characteristics of the sealant, glue is rarely used due to low transparency.
Balzamin-M
Modifier based on natural components with improved transparency. The composition retains the advantages of balsam: elasticity of the joint, work in a wide temperature range, light transmittance of the glue.
UV
To stabilize and set this composition, a source of ultraviolet radiation is required. After polymerization, the sealant is transparent, durable, and reliable.
Acrylic based
With the discovery of acrylic resins, they quickly found application in various fields, including car glass repair. There are no complaints about the characteristics of the resulting glue roller, with the exception of a slow, “thoughtful” setting. On average, acrylic sealants cure in 2-3 days.
Silicone
Viscous composition with a characteristic vinegar odor. Used in plumbing, construction, repairs. Also suitable for gluing glass. It sets quickly, the seam is moderately elastic, the glue does not lose its properties over time.
Polyurethane based
Polyurethane, rubber-like sealants are a serious competitor to silicone. They form a liquid-resistant, durable and elastic adhesive layer. They are not afraid of heat and cold and are comfortable to work with.
Polymeric
In terms of characteristics, polymer adhesives are close to silicones and polyurethanes, but after hardening, excess composition is difficult to remove without special solvents. Sealants are characterized by increased adhesion, are resistant to chemicals, and can be painted.
New headlight restoration technology Glass Mechanix Headlight Restoration
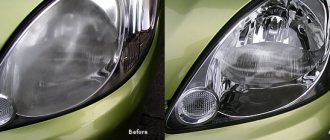
Today, almost every car on domestic roads can have defects in headlights - dimming or scratches, which not only worsen the appearance of the car, but also significantly reduce the brightness of the light beam, which is extremely unsafe for motorists. As you know, replacing headlights is not a very cheap pleasure, and the restoration methods known to us - polishing the headlights and applying acrylic varnish - do not provide the desired result and the effect of their use does not last very long. The EPIO school decided to conduct a small study of existing headlight restoration methods and is in a hurry to present to your attention its discovery - Glass Mechanix Headlight Restoration. Mechanix Headlight Restoration is a new simple and, at the same time, effective technology for restoring polycarbonate headlights. Restores yellowed, faded and scratched headlights to brand new factory condition, increasing beam brightness and visibility by over 50%. The main advantage compared to the headlight polishing process is that removing the top layer during polishing does not guarantee reliability and long-term effect, and Glass Mechanix Headlight Restoration technology is aimed at restoring the factory coating and preserving it for a long period of time. The fundamental difference between Glass Mechanix Headlight Restoration and acrylic varnish is its good adhesion to polycarbonate: particles of the applied varnish do not peel off, the headlight does not turn yellow or fade over time, as well as its resistance to ultraviolet rays. The undeniable advantage of Glass Mechanix Headlight Restoration is its ease of use - it takes no more than 10 minutes to restore headlights ( https://www.youtube.com/watch?v=1kjLbRbpu1w).
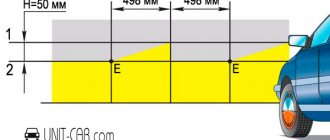
Mode of application:
1. Protect the car surface. Protect the surface of the car around the headlight using protective film and masking tape. 2. Wet sanding. Using a spray with plain water and the sanding paper from the kit, sand the headlight using wide strokes. This process is intended only to prepare the lens surface for application of the product. Avoid circular motions when sanding. 3. Cleansing. Remove excess water and all sanding by-products from the headlight surface. Wipe the surface of the headlight with the alcohol wipe from the kit. Wait until completely dry (usually takes less than a minute). 4. Application of the product. Shake the can of Glass Mechanix Headlight Restoration Spray. Apply in a circular motion along the contour of the lens in one layer. 5. Final step. Do not apply any other substances to the headlight for 10 minutes. Remove the protective film from the vehicle's dimensions. For the next 3-4 hours, the process of absorbing the product and eliminating defects on the surface of the headlight will continue. It is recommended not to wash the car for 24 hours.
The best way to glue headlight glass: types of sealants
The market offers a fairly extensive range of compositions that differ in chemical properties, ease of use, and cost. What to choose? First you need to understand the classification. There are 4 types of sealants for headlights and car glass.
For better bonding, it is better to dismantle the headlight
Silicone
In terms of composition before polymerization, these are semi-liquid fluid products made from natural or artificial rubber. After application, the material hardens, turning into a kind of rubber that glues surfaces, protects from UV radiation and seals joints. But silicone products have a significant disadvantage - poor resistance to chemically aggressive environments, for example, technical oil, gasoline, diesel fuel, etc.
This is especially important if the car has a headlight washer system, which uses a special liquid that contributes to the process of destruction of the sealant, but sometimes oil-resistant products are found. In winter, it is also affected by anti-ice reagents
The main advantage of silicone compounds is their low cost and the ability not to lose their properties over a wide temperature range - up to +100°C. Ideal for mounting fog lamp lenses.
Polyurethane
These automotive sealants are very helpful in situations where you need to glue individual fragments of broken headlight glass or simply repair a chip or crack. The main advantage of polyurethane compounds is high adhesion (stickability) and good adhesive properties. Dried polyurethane based sealant is water resistant.
There are other advantages:
- The adhesive material can be used in a wide temperature range - from minus 60 to plus 80°C;
- service life reaches several years;
- the composition is resistant to the effects of motor oil, fuel, alcohol washer fluid and anti-ice agents;
- good fluidity before polymerization makes it possible to connect fragments of the most complex configuration;
- frost resistance;
- The glued structure reliably resists vibration.
Polyurethane sealant: everything is written on the package But what about the disadvantages? They are also available. The first is toxicity, which requires compliance with special safety rules: you need to work in rubber gloves, goggles, and sometimes a respirator (if the amount of work is large, for example, in a machine shop). And another disadvantage is poor resistance to high (more than +120°C) temperatures, which is typical for halogen lamps. However, the product is quite suitable for repairing mirrors.
Anaerobic
These compositions are characterized by high strength and resistance to high temperatures (up to +200°C). Sealants of this type are used for sealing joints and seams. Before polymerization, anaerobic sealants are in liquid form. Because of this, there are some inconveniences during use. But the chemical composition of the product is harmless to humans, and additional protection in the form of gloves and glasses is not required. The only requirement is to prevent the sealant from getting into your mouth and eyes.
Heat resistant (high temperature)
The main advantage of these sealants for headlights and car glass follows from their name. Compositions of this type can easily withstand temperatures up to +300 and even +400°C. That is, these heat sealants are well suited for working with headlight lenses that contain halogen lamps. The heat-resistant product is quite durable and is not afraid of vibration and mechanical impact. Heat-resistant sealants are produced in paste form or in two-component form. There is also a drawback to high-temperature auto sealant - a long hardening time, reaching up to 8-12 hours.
Types of sealants
Special sealing compounds for headlights have a very specific purpose. They are used for minor repairs and installation of automotive optics made of transparent plastic or glass in order to obtain the most airtight connection.
Waterproof sealants perform the following tasks:
- prevent the penetration of water, air and dirt into the device;
- eliminate the appearance of condensation and a decrease in the quality of lighting;
- minimize the risk of damage to the diffuser and other metal elements;
- ensure strong joining of parts without the risk of peeling off.
Sealing agents can have different compositions, but most of them are sold in finished form and are single-component.
Silicone sealants
Products containing silicone are widely used in the installation of headlights, lanterns, and car windows. They are created on the basis of rubber and its subtypes (siloxanes, fluorosiloxanes and others), and represent a transparent elastic mass. Silicone sealants also contain vulcanizers, which impart strength and elasticity like rubber, ensuring no damage when in contact with water.
Typically, silicone compounds are used to seal cracks up to 6 mm deep or glue various parts together to seal joints. They help eliminate minor defects and unevenness of the base, easily withstand heating up to +250 degrees and above (products with the addition of copper - up to +375 degrees), and do not deteriorate from temperature changes. The big disadvantage of silicone is its poor tolerance to petrochemicals and a number of other substances that are used in cars. Therefore, silicone sealants can be used where there is no contact with such liquids.
Polyurethane compounds
Products with polymers based on urethane groups are considered the most popular for the repair and installation of optics. Car enthusiasts prefer them for their versatility, because sealants are excellent for gluing and protecting many body and working parts of a car. Their properties are:
- high degree of adhesion with most known materials - plastic, glass, ceramics, rubber, wood, metal;
- excellent moisture resistance, air tightness;
- work in a wide temperature range, tolerance of changes from -60 to +80 degrees or more;
- long service life (up to 25 years);
- resistance to petrochemicals, weak acids, alkalis, other aggressive substances, as well as microbes, fungi, mold;
- uniform filling of even small cracks and seams, the ability to glue optics of any geometry;
- no shrinkage after polymerization.
Polyurethane compounds, after hardening, have slightly less elasticity than silicone ones. Because of this hardness, they are not recommended for use on connections subject to strong vibration, although they are good for headlights. Also, sealants are not suitable for installing dismountable joints: they are so strong that removing them will be problematic.
Anaerobic compounds
Such products harden only when contact with oxygen ceases, maintaining their plasticity in air. They can be slowly applied to the parts and pressed tightly together, which is convenient for the craftsman. But in a vacuum, the process of rapid polymerization begins, as a result of which a strong seam is formed in a couple of minutes. Anaerobic sealants do not deteriorate at temperatures ranging from -80...+175 degrees, and are resistant to:
- fuel;
- oils;
- antifreeze;
- alkalis;
- weak acids.
The products create a reliable cushioning layer and help mount optics, front and rear windows, as well as seal body joints, threaded connections, and flanges. After hardening, a hard, durable plastic is formed at the site where the composition is applied, which lasts a long time, does not deform, does not shrink or expand. The ease of use is beyond doubt - there is no need for quick application, no physical effort for gluing, safety for humans and the environment.
Heat-resistant sealants
These compounds are characterized by increased strength and lack of reaction to high temperatures (usually up to +375 degrees). They are rarely used for repairing and installing headlights, because such connections are not subject to thermal stress. The finished seam is not afraid of shocks, shocks, vibrations, water and aggressive substances. The disadvantages of heat-resistant sealants are increased cost and long polymerization (8-12 hours until completely dry).
Reflector repair
How can I recover my contact password? How to restore a page in Contact if access is lost, deleted or blocked
You can implement three main methods with your own hands. Their effectiveness has been tested by time and the experience of many motorists.
The general condition is to disassemble the headlight into its main components, otherwise there will be no access to the reflector.
The sealant is destroyed under the influence of high, artificially created temperatures at home. The headlight is placed in the oven for a third of an hour at a temperature of 75 degrees.
After the procedure, the parts must be cleaned of excess substances, especially those obtained through contact with the oven. Then you can proceed to the main stage.
First option
To complete the repair you will need cans of white lame paint.
This is the simplest method in which chrome plating of a damaged element is carried out.
Interesting! Before applying paint, the reflector must be degreased for better adhesion of the applied coating. After washing, drying is carried out, because water also reduces adhesion and evenness of application.
The simplest use of the spray can allows the painting itself to take only a few minutes, and the next step is to install the reflector back into the headlight. Don't forget to let the paint dry. This completes the restoration of the reflector.
Second option
The principle is the same as in the previous method, but the quality of the resulting coating is higher.
Here you will need:
- metallized tape, resistant to temperature changes and durable;
- chromium.
Despite the larger amount of materials, the method does not require adhesive materials, because the tape itself performs a connecting function.
Algorithm of actions:
- Measure and cut pieces of tape to fit the shape of the reflector.
- Stick them to the corresponding parts of the headlights, having previously degreased the parts.
- Cover parts that cannot be covered with chrome.
Third option
Advanced option. You will need:
- chrome in a can;
- mirror film;
- construction hair dryer;
- thick tape.
After the general steps of disassembling the headlight and degreasing the parts, the film is attached. A mock-up of the required parts is first created: the tape is glued to parts of the reflector, and after determining the required dimensions, it is removed.
A film is cut out according to its shape and connected to the cleaned surface. Adhesion occurs using a hair dryer: the film is glued when heated. After a hairdryer, it is pulled over the edges of the headlight and smoothed out.
Important! Make sure there are no air bubbles. As in the previous case, the remaining parts are coated with chrome. Restoring a headlight reflector with your own hands turned out to be not such an impossible task
Moreover, the algorithm for each method is simple and feasible for any person
Restoring the headlight reflector with your own hands turned out to be not such an impossible task. Moreover, the algorithm for each method is simple and can be done by anyone.
If you are still concerned about the final quality, you can entrust the repair to specialists, but remember: this will entail losses and difficulties.
Types of automotive optics
Headlight glasses are an important element of the lighting system; auto prism can be made from:
Glass
Among the advantages: beautiful appearance, ideal light transmittance, long service life.
For protection, a special film is glued to the surface of the headlights.
Polycarbonate
However, polycarbonate becomes cloudy during use, and it can also lose its quality characteristics under the influence of acid-containing products.
Plexiglas
Optics made of acrylic (plexiglass) are more practical. Acrylic and polycarbonate are similar materials, but compared to polycarbonate, plexiglass is more transparent, but with temperature changes, cracks and chips may appear on it.
Glass replacement
Deep scratches cannot be removed by polishing, and large cracks spoil the appearance and compromise the integrity of the structure. You can repair broken optics by replacing the glass.
To do this, you will need to remove the headlight or fog lamp and disassemble it as follows:
- Place the part in a cardboard box with a pre-cut hole of small diameter.
- Use an industrial hair dryer to warm up the headlight housing.
- After 10-15 minutes of heating, remove the part and carefully pry off the glass with a screwdriver or sharp knife.
- Cut off the old sealant and thoroughly clean the internal parts from dust.
When removing glass, you should use gloves to avoid burning your hands or cutting yourself on the broken glass.
Replacement masks are sold in auto parts stores or on Internet pages with built-in catalogs.
When reassembling, car owners often wonder how to glue the glass to the body. For such tasks, black sealant is produced, and transparent options are also available. DoneDeal offers various compounds that are suitable for glass and plastic headlights.
Fastening
You can restore the fastening using a metal mesh, glue and a soldering iron. The mesh will add strength to the plastic and prevent a fracture from occurring in the same place. You can purchase the tool at a car enamel store. Before starting work, you need to remove the headlight from the car and fix the fasteners in place with second glue.
How to solder the mount:
- Cut the reinforcing mesh.
- Place the part on the fastener and heat the plastic with a soldering iron.
- Sink the reinforcement into the melted plastic.
- Carefully shape using a soldering iron.
You can refine the soldering area with sandpaper or a file with small marks.
Corrector restoration
The corrector raises and lowers the light beam using a motor, which exerts pressure with a rod on the moving elements in the headlight. During operation, the ball may fall out of the groove and damage the seat. In this case, the reflector will need to be repaired or replaced.
Types of car glue
Clear adhesive for car windshields is needed to repair chips and cracks. This is a polymer-based composition with high fluidity and strength. Glass re-gluing is carried out using the capillary method.
Many people have heard the phrase “windshield in glue,” but not everyone understands what this means. This phrase refers to the application of auto sealant to the ceramic edges of the windshield when replacing it. It often comes with a primer, with which you need to mix the composition before work. To apply, you need to use technical equipment: a pneumatic or battery-powered gun.
Often when replacing a windshield, you have to buy glue for mirrors. This is necessary when the new windshield does not have a mounting system for the rear view mirror. Then the mount is removed from the removed product and then installed on a new one.
Popular brands
Adhesive sealant for glass is made by many manufacturers. That's why it's so easy to choose the wrong one.
Among the popular products it is worth highlighting the following:
- SikaTack-Drive. Made in the United States of America. Known since the late 80s. The adhesive from this manufacturer is universal, intended for sedans, hatchbacks and trucks of different brands. Does not require preheating. It takes four hours for complete hardening.
- 3M Windo-Weld Super Fast Urethane. One-component ZM windshield adhesive does not require mixing. It can even be used for racing cars. Due to the fast-curing formula, polymerization occurs within 15-20 minutes under the influence of moisture. Apply the composition with a manual or mechanical pistol.
- Dow Automotive Betaseal 1527. Available with a primer. Can only be used at positive temperatures. Crystallizes quickly. About an hour and a half after applying it, the car can be used. In the USA it is considered one of the most effective adhesives for cars.
- Dow Corning 7091. Silicate adhesive, which is even sold in large packages of 250 liters. About three hours are allotted for complete polymerization. At the same time, greasy stains will not stand out on the coating. It can be applied without preheating.
There are many more brands of adhesives on the automotive market. Gluing a windshield is a serious process. Therefore, before purchasing a specific product, study forums on the Internet and consult with a sales consultant.
This is interesting: How to choose glue for a PVC boat - detailed instructions - we present them in detail
TOP 6 Best sealants for car headlights
APRO AS-904
Butyl sealant for headlights in the form of a roller with a diameter of 6 mm (± 0.6 mm) - black. A length of 4 meters is enough to easily seal 2 headlights.
This headlight sealant is resistant to aging, never dries out, and retains its properties all the time. Adheses well to all surfaces: metal, glass, plastic, aluminum, etc.
The adhesive is resistant to water, road salt and sunlight. If necessary, the headlight adhesive can always be removed from the reflector, just heat it, for example, using a hair dryer or a heat gun.
Advantages:
- Good adhesion;
- The tape may stretch;
- No unpleasant odors;
- Hardens quickly;
- The sealant is very durable.
K2 L3050
The effective composition will ensure a second youth for all lamps made of plastic or glass. If your headlights are dim, yellowed, or have gaps in the headlight design, K2 LAMP DOCTOR Car Headlight Sealant will do a great job of filling them. Repairs can be done by hand or with a polishing machine.
Thanks to K2 LAMP DOCTOR, headlights will regain their original clarity and glow, which will directly improve their performance, road illumination and safety. K2 LAMP DOCTOR sealants can be safely used on other transparent elements such as plexiglass in motorcycles, boats and even airplanes.
The ideal complement to K2 LAMP DOCTOR is the coating, K2 Lamp Protect, which protects lamps from fading, yellowing, scratches and UV radiation for up to a year after application.
Advantages:
- Frost-resistant;
- Elastic;
- Hardens quickly;
- Durable seam.
VersaChem Mega Gray
Specialized sealant for repairing headlights, especially recommended for Japanese cars. Meets the requirements of car manufacturers (OEM - Original Equipment Manufacturer) and can be used for all car models and brands.
It is resistant to oils, greases, coolants, diesel oil, water, UV radiation, etc. Temperature range: -73°C to +343°C.
Advantages:
- Durable seams;
- Moisture resistant;
- Over time it does not lose its properties.
Quixx Headlight Upgrade Kit
and headlight sealant. Matting and yellowing of car headlights dramatically reduces their brightness!
Reduced visibility while driving is a threat to all drivers. The QUIXX headlight repair kit solves this problem quickly, permanently and intelligently.
Features and Benefits:
- Removes yellowed and dull layers and fine scratches, making the reflector lens clear.
- Improves driving safety by restoring proper road lighting and improving visibility.
- Allows you to avoid costly repairs and replacement of headlights.
- The headlight adhesive sealant included in the kit leaves a durable protective layer and increases resistance to scratches and yellowing.
- The fully equipped kit contains all the components needed for the repair.
- The amazing effect is achieved thanks to plastic deformation technology (PDT).
SikaLastomer 710
SikaLastomer-710 Butyl Headlight Sealant is an excellent solvent based sealant with a paste consistency. Curing occurs by physical drying. The product is used to create reliable seals in many industries.
SikaLastomer - 710 is manufactured in accordance with the ISO 9001/14001 system, which guarantees high and consistent material quality.
Advantages:
- Fast curing;
- Easy to apply;
- Weather resistant;
- Good grip;
SILKAM
headlights SILKAM is a specialized adhesive and sealing composition for gluing and joining elements made of glass, wood, metal and plastic.
SILKAM does not stain the surface and does not corrode metal elements, making it ideal for embedding and joining. The manufactured joints are very durable.
SILKAM sets quickly when exposed to moisture from the air, has minimal shrinkage, very good resistance to ultraviolet radiation and weather conditions, thereby creating a strong, durable, flexible and tight connection that protects against water penetration. After curing, it remains plastic in the temperature range from -30 ° C to + 120 ° C, thanks to which the connected elements can be disassembled without damaging them.
How and how to paint headlight masks black
Posted by Jack ǀ Mar 30, 2017
Post by Chubak ǀ March 30, 2017
Posted by Jack ǀ Mar 30, 2017
Posted by Alex ǀ Mar 30, 2017
Posted by Jack ǀ Mar 31, 2017
Alex, yes, I’m somehow embarrassed to bother a person. If anything, I’ll say that it was you who encouraged me to write
I quickly googled, searched on the drive, and I realized that the most difficult thing is disassembly, so as not to break the fasteners and then not to apply 3 kg of sealant. I decided to raise another topic: how to disassemble a Honda civic headlight. I would like to ask you to discuss the issues of painting headlights and disassembling them in different topics so as not to overload the topic with unnecessary information.
Posted by adili ǀ Mar 31, 2017
Posted by Jack ǀ Mar 31, 2017
Posted by adili ǀ 01 Apr 2017
Posted by Jack ǀ 02 Apr 2017
Posted by Jusray ǀ 03 Apr 2017
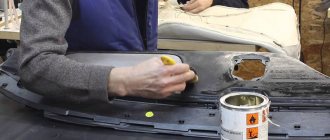
In this article I will describe how I painted the headlights matte black =) If anyone is interested in this, then read and watch further... I disassembled the face of the car in ten minutes, then for another fifteen minutes I unhooked the connector (well, very inconvenient) of the right headlight - someone had already removed it and I broke the tab on the latch, so I had to use a screwdriver.
I lit the stove, set up a place for myself, cleared the table, removed all the trash from it and sat down to disassemble...
First of all, I removed the electrical corrector and took out all the wiring so that it would not interfere with me
We begin to peel off the glass from the headlight. I had Hella headlights (luckily for me), so I didn’t need a hairdryer or oven (although I did pack a hairdryer). We unfasten the 4 brackets that hold the glass and begin to slowly and carefully separate our glass from the body with a screwdriver or something else..
The glass comes away from the sealant well. In some places the sealant stretches behind the glass - we cut it with a knife.
Here I've laid it all out...
The reflectors in the headlight are held on by 3 balls - 1 on the corrector and 2 on the adjusting screws. The corrector ball can be removed very easily, but with the other two you will have to tinker a bit... But since I already have some skill in this matter, I didn’t bother with them for a long time and I also didn’t think of taking a photo of them...
We unscrew the turn signal module so that it does not interfere..
That’s all for today I think I should go home, I’ll continue tomorrow...
Second day. I sanded all the Chrome down to plastic with 280-grit sandpaper, then glued the reflectors
ATTENTION! ! ! Don't try to put tape directly on the reflectors! Don't even use your fingers
Chrome peels off very well from the slightest careless movement, it is also advisable not to rub it with a rag, and if you do wipe it, do it very, very carefully
Then we do this - we cut out circles from cardboard according to the diameter of our reflectors and stick them inside, and seal the cracks along the edges with masking tape.
At first, of course, I wanted to paint it according to the rules - prime it in three layers, then sand it with 800-grit sandpaper, and then paint it. But after thinking a little, I decided to exclude the first 2 points and immediately blew out the paint without even priming. I didn’t count how many layers I poured, but I painted with all responsibility—I didn’t skimp on paint, five or six layers.
Of course, we perform the assembly in reverse order. We peel off the adhesive tape only after the reflectors are put on the balls - you have to press quite hard for them to snap into place; to make it easier, you need to spray silicone on the balls, but I soaped them with soap.
When I tore off all the tape, I unfortunately noticed some unevenness in the border between the paint and the chrome. But this problem was solved very quickly...
I put the glass back on the transparent ABRO sealant, snapped all the brackets into place and left it to dry.
I assembled everything, put the headlights in place, and that’s beauty...
Reading review articles from the Internet and posts on automobile forums, we can conclude: painting the inside of the headlight is more of an aesthetic matter. This procedure has minimal practical benefit and is not always justified.
A vehicle owner who decides to paint the inside of headlights with his own hands may encounter some problems. The main one is disassembling the headlight unit. The headlight glass can be attached to the body in two ways. The first option is to use a sealant, the second is when the glass is glued to the body with glue. While disassembling the headlight with sealant will not be difficult, in the second case difficulties may arise. There is a high probability of damage to the outer surface of the headlight. Before disassembling the optics, it is recommended to conduct an external inspection and after that decide whether it is worth restoring the reflector.
Inspect the headlights before disassembling them