On any roads and in all cities you can see a lot of cars with tuning, with different “bells and whistles,” as they say. There are many design ideas for giving a car a unique look, and among the most popular are original “eyelashes” on the headlights. It turns out interesting and flirtatious; such cars are suitable for female drivers.
In order to install such a cute accessory on car headlights, you don’t have to go to a workshop. Eyelashes for headlights are quite easy to do with your own hands , saving money and without having to part with the car even for a short time.
Angel eyes
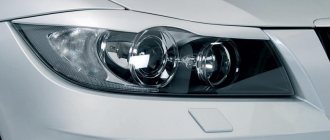
Installing angel eyes in headlights is not easy. This will require dismantling the optics with complete disassembly and connection to the standard wiring. With such a serious intervention, it is better to replace the incandescent lamp with a modern bi-xenon lens, around which to make a backlight of diodes.
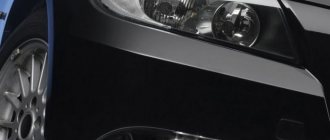
The fashion for the luminous eagle eye in optics was set by BMW, which invented this type of illumination back in the early 1990s. “Evil” headlights are valued among car enthusiasts, so conventional optics are often subject to similar modifications.
Making from scrap materials
The easiest way to make glowing rings is from plexiglass. To do this, you need to purchase 3-4 mm thick tubes, glue, LED lamps, a drill and wires. Before starting work, you should dismantle the headlights, disassemble them and measure the diameter of the reflector.
Manufacturing process:
- Cut out a stencil from cardboard.
- Using a hair dryer, bend the tube according to the template.
- Glue the edges with clear glue.
- The diodes are fixed on the reverse side in neatly drilled small recesses.
At first glance, it is very difficult to perform this work and improve the appearance of your vehicle. However, with step-by-step execution of actions, everything becomes logical and understandable.
When choosing parts, you should not save, because a burnt-out element will require complete disassembly of the headlight, dismantling the eyelash and re-soldering the light element. As protection, you can also install a resistor and a voltage regulator, which are sold in car stores.
Installation
Light tuning of headlights increases attractiveness, and the appearance visually becomes more expensive.
To install the peephole:
- Glue the finished plexiglass product to the reflector.
- Secure the wiring and connect it to the side lights.
- Glue the glass and install the headlight in place.
Tuned optics look better with the combined use of cilia and eyes. White or blue headlights look great during the day and at night.
Application of plastic
A more effective and impressive option would be a plastic eyelash. Buying material will not be difficult. Plus, there are a number of studios where you can get your decor done quickly and professionally. Moscow alone has dozens of such tuning studios.
But since the price is high, we do everything ourselves.
To work you will need:
- PVC or other plastic about 2-3 mm thick;
- hair dryer (a construction hair dryer is better; a household hair dryer won’t do the job);
- screwdrivers;
- sandpaper (coarse, medium and finishing);
- degreaser (regular alcohol will do);
- clean, lint-free rags;
- sealant;
- or double-sided tape;
- pencil;
- additional tools.
First you will need to remove the headlight, and work with it in a dismantled state. Unlike the use of films, plastic lashes require removal of the optics.
Typically, headlights are held in place by a few bolts at the top and a mount at the bottom. How exactly they are removed depends on the specific car.
After dismantling the element, follow this algorithm:
- cut a piece of plastic, the dimensions of which will cover the surface of the optics with allowances on the sides;
- give the material an approximate shape of the future eyelash;
- attach plastic to the headlight;
- turn on the hairdryer and start heating the material;
- gradually the plastic will become softer and more flexible;
- give the workpiece a shape;
- wait for it to cool down;
- remove the workpiece from the headlight;
- Mark the desired geometry of the eyelash with a pencil, adding an allowance of literally 0.3 mm;
- trim off excess;
- sand the edges;
- degrease the headlight itself and the plastic blank;
- Use sealant or tape to secure the eyelashes.
I recommend that you provide protection for the glass of the headlight itself in advance so as not to damage it during the heating process with a hairdryer. Cover with some thick material and gently move the hairdryer over the surface without touching other areas.
Also, the plastic will then need to be cleaned, primed and painted if it does not exactly match the color of the body.
How to make eyelashes on headlights with your own hands step by step instructions
How to polish car headlights
1. To start making eyelashes, you need to take measurements and make a template according to which we will make eyelashes. For convenience, I recommend removing the headlight.
2. Thoroughly wash the headlight from dirt and dust, after which you can begin gluing masking tape. This is done so as not to spoil the optics with resin.
3. Next, draw the shape of future eyelashes so that you can see where and how much resin and glass mat is needed. Don't forget to make allowance for cutting and possible errors.
4. The next stage is transferring the sketch onto the glass mat.
5. Now prepare the resin and start impregnating our glass mat template. Upon completion, lay the impregnated glass mat on the headlight, where you are going to install the eyelash. This will give your workpiece the required shape.
6. After this, cut out another layer of glass mat and place it on top of the first layer.
7. Use a roller to thicken the layers and remove air bubbles. Impregnate the new layer with resin again. As you can see, you need to make a “sandwich” of your own, layer by layer.
8. It is necessary to make 4-5 such layers, each new layer should dry for 3-4 hours.
9. Once completed, everything should be properly dry and hardened. At the end, the entire structure is removed and sanded. To do this, you must have an emery or grinder ready.
10. After leveling the workpiece, proceed to puttying. Before you start puttingty, do not forget to prime the surface. You need to putty in thin layers using a spatula. About 2-3 layers will be enough.
11. After everything is dry, start sanding. You need to start with coarse grains, gradually moving to finer grains. Your task is to perfectly level the surface for painting.
12. After sanding, you may need to putty again to ensure that the surface is as even and smooth as possible. Then we sand everything again.
13. When you have achieved a perfect surface to the touch, you can start coloring the eyelashes. In order not to “miss” with the tone, I recommend choosing paint from specialists, in some company store.
14. Painting is carried out at a distance of approximately 20-30 cm from the surface. For a more rich and high-quality result, I recommend applying 3-4 layers. Each new layer should dry for several hours. Upon completion of all paint work, open everything with varnish.
Now the finished eyelashes can be attached to the headlights; how you do this is your own business. There are many different options, it all depends on the shape of the headlights and the eyelashes themselves. That's all I have, I wish you good luck in making
Thank you for your attention and for visiting https://www.autoposobie.ru/. I hope you found what you were looking for!?
https://www.autoposobie.ru
Manufacturing process
When making eyelashes, you need to take into account one small nuance - the final result of the work should not interfere with the normal operation of the car's optics. Working with small parts requires perseverance, patience and attentiveness, as well as basic tool skills. The main material for manufacturing is fiberglass. Some craftsmen who have reached certain heights in this matter also use other materials. We will focus on the classic manufacturing option using fiberglass. In addition, we will need: masking tape, some putty and epoxy resin.
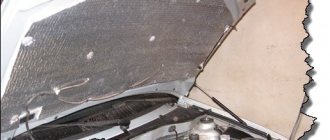
Before applying resin and fiberglass, the headlights must be protected with masking tape.
Preparing the optics
Since we will make the workpiece directly on the glass, we begin the process by dismantling the optics. This is necessary to simplify the process of applying layers of fiberglass to the headlights.
Sequencing:
- We clean the surface of the headlights from various types of contaminants.
- Seal the glass with masking tape.
- We check the sealed areas for unfinished areas (this procedure is necessary to ensure the glass is protected from sticking of the resin). It is impossible to remove hardened resin without the help of special means.
- Next, we proceed directly to applying a layer of resin to the surface, carefully attaching the fiberglass to the resin. Tip: to give extra strength, lay the filigree in several layers. Each layer must be allowed to dry before applying the next.
- After this, you just need to wait about three to six hours until the resin dries completely.
- After complete drying, the workpiece must be removed from the work surface.
- Using the same technology, blanks are made for the second headlight.
Then everything is extremely simple: you need to start designing the eyelashes. At this stage, you can give free rein to your imagination and bring your ideas to life. If your imagination refuses to help, then you can look for inspiration on the Internet - there are a huge number of stores selling similar decorative elements. You can borrow several original ideas from them.
What is it and why are they used?
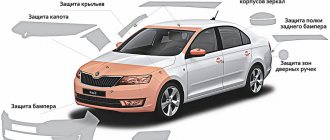
Not everyone really knows what eyelashes are. This is an interesting and unusual element of external tuning, which is presented in the form of narrow small overlays. They are installed on the head optics. Such a small change can significantly change the external perception of the vehicle. But here the correct choice of size is of great importance. If you install eyelashes that are too large, they will disrupt the correct operation of the light, which is why the headlights will not be able to function fully. Using cilia, rectangular headlights can be made semicircular, and semicircular headlights can be turned into rectangular ones. You should not perceive eyelashes purely as a decorative element. The materials used to make the linings form an additional protective layer for the vehicle's optics. Yes, they will not protect against strong mechanical shocks, but they can easily prevent the negative impact of small gravel, stones and other debris.
Eyelashes are not large in size and are not pronounced elements. But sometimes you are surprised how strong the effect is after installing them. That's why they are widely popular among tuning fans. Moreover, even those who hold more conservative views and are afraid to make any significant changes decide to put on eyelashes. Little things like eyelashes on the head optics actually significantly affect the appearance of the vehicle. And the main advantage here is that a similar result can be achieved with minimal financial investment. But before making and installing such an external tuning element on your car, it is recommended to become better acquainted with the types of eyelashes, as well as take an objective look at their strengths and weaknesses.
Varieties
Having decided to do a little tuning for your car, you should start by choosing the material itself. There are several types of products on the market. At the same time, the eyelashes for car headlights differ in the material of manufacture and functional purpose, but all of them can be easily installed with your own hands. When choosing eyelashes from film or plastic, you should determine in advance what effect you want to get and what you are striving for when doing such tuning yourself. Some eyelashes for headlights can serve a purely protective role, others a decorative one. As a result, all products are divided into 3 categories.
- Protective eyelashes. These products serve a more practical than decorative role. Their main task is to provide additional protection for body elements and the headlights themselves. They take on mechanical loads, impacts from various small stones and debris flying from the road and from cars in front. This is a great way to extend the life of head optics and prevent damage to the housing. Eyelashes should not be seen as a panacea for all attacks, but they can make their contribution to protection. For the manufacture of such elements, transparent thermoplastic is used. It is easy to apply different patterns and designs to the material, which will add decorative properties to the eyelashes.
- Chrome plated. Their main function is to give the car an exclusive and unusual appearance. Chrome parts always look good inside and outside the car. If the car itself already has some chrome-plated parts, the eyelashes will harmonize perfectly with them. For the linings, a different base is used, which is coated with chrome. And here it is extremely important that the coating is done with high quality and using good materials. Otherwise, the chrome layer will quickly wear out and lose its original appearance.
- Plastic elements. The most common eyelashes are in the form of dense extensions or thinner films. Plastic is very affordable, versatile, and varied in appearance. This reveals the main advantages of plastic or polymer eyelashes. For novice tuning fans, these elements will be the optimal choice. They can be easily selected for different cars to achieve the desired result. Already painted eyelashes are available for sale, as well as unpainted structures, which the car owner can decorate at his own discretion.
Each motorist will decide which eyelashes to choose individually. Plastic products are rightly considered the most universal. Their huge range and low price explain their high popularity. Chrome eyelashes are not suitable for everyone and not in all situations, so chrome should be used with extreme caution. As for protective eyelashes, even plastic products also provide good protection from mechanical damage. But they are superior to them in the decorative component. And since we are talking about tuning elements, the issue of appearance comes first.
Making your own eyelashes
There is a category of motorists who prefer to do many things themselves. For them, there is no problem in making eyelashes for headlights with their own hands. The procedure is not the most complicated, but it requires attention, accuracy and consistency in the actions performed. If you are also interested in how you can make eyelashes on the headlights of your vehicle, listen to a few recommendations and follow step by step.
First you need to determine what shapes and contours the tuning element will have. To do this, you can take a regular marker and draw the expected eyelash on the body. If you are not satisfied with something, you can erase and reapply the lines
It is extremely important that the result satisfies the car enthusiast. To transfer the line you like to the second headlight to get identical lines, you can use a template pattern. Simply take masking tape, stick it along the contour of the drawn lines, and then transfer it to the second block
Try to match the template as accurately as possible with the contours of the wings and radiator grille. Now draw a line again on the second headlight. There is no need to dismantle the optics. You can install the eyelashes directly on the headlight assembly. But first it is recommended to cover all areas of the body around with protective material. This can be polyethylene or the same masking tape. Based on the template, you should make markings on the fiberglass from which the eyelash itself will be made. It is important to draw straight lines and make a cut along them. Fiberglass is not difficult to process, so you can easily handle this material with your own hands. The work uses polyester resin. The adhesive tape applied to the headlight is treated with resin, then glass mat 300 is applied. It should also be impregnated with resin. While the resin has not hardened, apply another mat of the same type and go over the resin again. The last layer is applied to the previous ones. Try to collect all excess polyester resin. To do this, use a brush or other convenient tool. Once the fiberglass has hardened, it will be easy to remove from the tape. All that remains is to saw off the material along the line that you applied as a marking. Next comes the decorative stage. It is necessary to process the resulting overlays with fine-grained sandpaper, achieve perfectly smooth edges, and also apply a layer of paint and varnish. The driver chooses the decor option himself. You can apply it yourself, or entrust the work to a professional painter. If you decide to paint it yourself, first apply universal putty to the workpiece, sand it and lubricate it with putty. The treated surface should be perfectly flat and smooth. Therefore, always keep sandpaper at hand. And use only sanding blocks. If you work with your fingers, you are more likely to wear off the leather than be able to work the fiberglass properly. When the putty has dried, a layer of primer is applied on top. This will allow you to further use layers of the selected paint material, or apply some patterns. Having made the eyelashes, they should be installed on the head optics of your vehicle. You will need fairly thin, but definitely double-sided tape. It is applied along the entire length of the headlight. Next, remove the second protective layer and carefully place the eyelash on top. Press firmly and hold for 15-20 seconds. Once the glue sets, the tape will not let go of the overlay just like that.
The main difficulty lies in precise adjustment of size and shape. Do not forget that sometimes the hood lid can interfere, which will rest against the eyelash or prevent its normal placement. Try to accurately take all measurements in advance, draw neat lines and provide for the thickness of the finished product, taking into account the thickness of the fastening double-sided tape.
Installation recommendations
Since eyelashes are small and lightweight structures, regardless of the material used for their manufacture, there is no need to use any serious fastenings here. The best option for installing eyelashes on car headlights is to use double-sided tape. This is an affordable material that can be purchased at any office supply store. All that remains is to figure out how to properly stick the eyelashes on the headlights.
- You can glue the element to the headlights immediately after the homemade eyelash has completely dried, or after purchasing a product you like. Gluing two surfaces together is extremely simple. Even beginners in this matter should not have problems with how to decorate headlights;
- First you need to stick the tape to the headlight unit itself. It is advisable to apply the material along the entire contour of the future eyelash in order to obtain a stronger adhesion;
- This option of gluing tape will also prevent the creation of empty cavities under the eyelash, under which a head wind can blow and cause the decor to simply fall off at some point;
- Then the top protective layer is removed from the tape, and the eyelash itself is applied. Do this carefully and precisely along the contours so that no displacement occurs.
There are alternative types of fastening. You can use various fasteners and screws. But they involve drilling the car body or the headlight unit itself. And this is an extremely undesirable event, since problems can arise if the seal in the optics is broken. The minimum is the formation of condensation. Water in headlights has never led to anything good.
Eyelashes are an interesting, original and fairly easy to install tuning element for any car. They do not require large financial expenditures, but they allow you to achieve excellent results in changing the external perception of the car. Buying ready-made eyelashes or making them yourself is a purely individual question. If you are somehow not satisfied with the existing assortment, and you want to do something unusual, then try making eyelashes yourself.
Mini mop and cleaning brushes
The dimensions of today's cars make cleaning them yourself an almost impossible task. Therefore, innovations such as mini-mops and brushes used for washing external and internal surfaces come to the rescue.
Most often they are rectangular in shape with a reusable microfiber washcloth attached. The devices are also equipped with convenient telescopic handles. This accessory makes cleaning a simple process. The only negative is the small area of the plate with the sponge, which quickly becomes clogged.
Types of cilia for headlights
You can make your own eyelashes for headlights from the following thin materials:
- PFC plastic;
fiberglass;
decorative multi-colored film.
To make your own mounts, you first need to choose a stylish profile for your optics. The contours and color of the eyelashes should fit harmoniously into the design of the car. If necessary, the overlays can be painted in any color.
There are no limits to the realization of design fantasies here. The most common option is overlays that correct the rectangular shape of the headlights towards rounding or vice versa.
To give your car an exclusive, unique look, you need to experiment. Today, eyelashes using LEDs are popular among tuning masters. At night, headlight covers with LED modules create a unique and colorful glow that will stylishly make your car stand out from other vehicles.
The easiest way to attach the pads is to use double-sided tape or sealant. To ensure maximum connection reliability, experts recommend the integrated use of both methods.
Fur mitten and brush-rag
Almost every car has air filters, but the plastic is still covered in dust. This is facilitated by many factors, which are almost impossible to influence.
To do this, car stores offer a fur mitten that looks like a furry rodent.
You may also be interested in such an interesting invention as a brush-rag with three teeth. Thanks to an unusually shaped fabric nozzle on one side and a long pile on the other, this device should clean hard-to-reach places from dust and dirt, and wipe out depressions and irregularities on the panel.
It is not necessary to do general cleaning every day. To keep your car clean, all you need to do is acquire useful accessories that make car care much easier.
Eyelashes for headlights made of epoxy resin and fiberglass
This option for making eyelashes is the most labor-intensive, but the quality of the product when used is at a very high level. At the same time, all the bends and design features are repeated down to the smallest detail. It is with the help of this method that eyelashes are obtained well for foreign-made cars, the headlights of which are heavily slicked, and their surface is curved in both planes. And covers for headlights with a corrugated surface can generally be made only in this way.
To make eyelashes, you will need the following tools and materials:
- fiberglass;
- epoxy resin, and if you don’t have it, you can use epoxy glue;
- household tape and masking tape;
- a brush with short and hard bristles;
- roller of small width;
- rubber gloves to protect the surface of the hands;
- respirator to protect the respiratory tract of a worker.
It is better to remove the headlights from the car before starting work. Firstly, it will be more convenient to work with them, and secondly, it eliminates the possibility of staining the surface of the hood or bumper with resin.
The surface of the headlight is covered with masking tape, onto the surface of which the contours of the eyelashes are applied.
The removed headlights are placed on a surface covered with oilcloth. The surface of the headlight is covered with household tape. Painting tape is glued over it. The latter should be applied in such a way that the joints of household tape are glued - this is done to eliminate the possibility of particles of epoxy resin or glue penetrating the headlight.
The contours of the eyelashes are drawn on the surface of the masking tape using a marker. This is necessary in order to determine the limit of gluing thin or thick fiberglass.
However, we must remember that thin fiberglass allows layers to be applied more accurately, especially in places where the glass is sharply curved. Making blanks using thin fiberglass will require more time.
Sequence of work:
- Fiberglass is cut into narrow strips. Their length should be slightly greater than the width of the headlight.
- Epoxy glue is diluted at the rate of 1 part hardener to 10 parts glue. Violation of the proportions can lead to the glue hardening too early or taking a very long time to harden. In this case, the strength characteristics will be violated.
- Next, put on rubber gloves and apply a thin layer of resin to the tape. In this case, the contour of the drawn overlays should overlap by approximately one centimeter.
- We lay thin fiberglass fabric on the resulting layer of resin. Its surface is rolled with a small roller until the epoxy resin shows through.
- Another layer of epoxy glue is applied to the fiberglass with a brush, on top of which the fiberglass is again placed. In this case, the edge of the new layer should overlap the boundaries of the first by five millimeters. And again the surface must be rolled until the resin passes through the pores of the fabric. As a result of the roller treatment, all air bubbles should be completely removed from the space between the layers.
- The last layer of fiberglass is generously filled with epoxy resin. The total thickness of all layers must be at least 4 mm. The finished product is left for about a day to allow the epoxy resin to dry completely. The headlight should be positioned in such a way that the surface of future eyelashes is strictly horizontal. This will avoid smudges and unevenness.
- After the resin has completely dried, the covers are removed from the headlights. As a rule, this is not difficult to do - the surface of household tape is very slippery and masking tape comes off easily.
- Now you need to remove all the tape from the surface of the headlights and wash them with some solvent or gasoline.
- A pattern is applied to the eyelash blank with a marker, according to which it is cut using an electric jigsaw or grinder.
- The cut trims are tried on the headlights. If everything is normal, then the surface of the eyelashes is treated with sandpaper. First, rough sanding is used, and then finishing is done using fine sandpaper.
- The surface, treated to a perfectly smooth state, is primed and painted to match the color of the car body. In this case, as a rule, after applying the first layer of paint, small defects are revealed. They can be removed using finishing putty. The surface is again sanded, primed and painted. At least 3 layers of paint must be applied.
- Well-dried eyelashes are attached to the headlights using double-sided tape.
Fiberglass
For several reasons, this is the most difficult execution option: there is no ready-made material (the trim will have to be sculpted from scratch), the headlight must be dismantled, and painting is required. But the result is worth the effort: if you set out to make eyelashes from fiberglass, you will end up with a high-quality, durable product.
Easy way to make, paint and install
To make fiberglass eyelashes we need the following set of tools:
We dismantle the headlight and begin the process of installing the eyelashes.
And then we work according to the standard scheme, which was described above. We degrease, apply putty, wait until it dries, and sand. Degrease, prime, sand. We degrease, paint and varnish, wait until it dries.
It is easier to work with a removed headlight, but you can do without dismantling if you cover the adjacent elements of the car with film. Choose a thick film - thin epoxy resin will corrode.
Photo gallery: proven method of making eyelashes
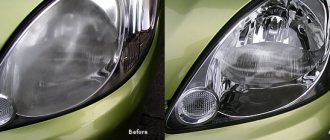
Getting ready - we cover the headlights with masking tape We draw a blank of eyelashes for the headlights We take fiberglass, cut it into the necessary pieces On the headlight, protected with masking tape, we apply a layer of epoxy resin and lay the fiberglass, then dry it. On the dried layer we apply a new layer of resin and fiberglass according to the same scheme Eyelashes are drying, and the owner of the car is impatiently waiting for the result of his work. We remove the fiberglass eyelashes for final processing. We trim the eyelashes, look at the result. This is what the eyelashes look like after puttying and sanding. This is how cool the eyelashes turned out after priming and painting
We install it on the headlight using double-sided tape or sealant. Let's enjoy the victory! A lot of time and effort was spent, but such eyelashes look great and will delight the eye for many years.
Video: making your own eyelashes
What it is?
The idea of a modification almost always comes after accidentally encountering a car with such crafts. The appearance of the car changes for the better, especially if a beautiful lady is driving. The eyelashes that are installed on lighting devices are narrow linings with very small dimensions, but they can radically change the appearance of not only the optics, but also the entire car. If you still have doubts about the need for such alterations, just imagine your car next to the tuning model. The main condition for the manufacture and installation of these products on optics is in no way to harm the main function of the headlights, to illuminate the road ahead of the car well. One of the advantages of such products is their ease of installation and ease of removal if necessary.
Optics preparation
Because the workpiece is prepared directly on the glass, the technological process begins with dismantling the optics. The optics are dismantled to simplify the technology of applying several layers of fiberglass to the surface of the headlight.
Workpiece execution algorithm:
The headlight surface is cleaned of all kinds of contaminants. The surface of the headlight glass is sealed with masking tape. Already sealed areas are checked for the presence of unfinished areas (a similar procedure is necessary to protect the glass itself from adhesion of the resin used, since it is practically impossible to remove the latter in a frozen state without special means). Then the procedure of applying the resin to the glass surface begins, and the glass cloth is carefully attached to the resin. Recommendation: to create additional strength, you need to fold the fabric in several layers, each of which is pre-dried before the next. Next, you need to wait about 3-6 hours for exposure, during which time the resin will dry out sufficiently. After final drying, the workpiece should be removed from the working surface of the headlight. For another headlight, blanks are produced using a similar technology.
For what reasons do interruptions occur?
There can be many reasons why gears do not shift when the engine is running. However, all of them, in one way or another, are connected with the two most important units of the car - the engine or gearbox. In case of serious damage, you should contact a good car service.
If the problem is in the gearbox, it will need to be removed for further disassembly and troubleshooting. If the problem is with engine components, they may need to be replaced. However, there are cases when, to eliminate a malfunction, it is enough to carry out preventive maintenance: removal, lubrication and careful adjustment of the components.
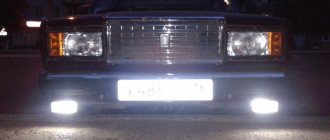
Simple stylish headlight tuning
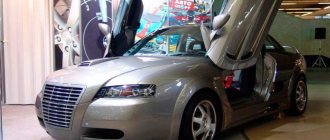
With the help of eyelashes you can emphasize the individuality of your car with minimal investment. The stylish and simple accessory began to be used after manufacturers applied a new hood design, which is called “Bed Boy”.
It involves creating an aggressive appearance for the front of the car by covering the upper cut of the headlights with the protruding part of the hood. During the tuning process, changing the hood configuration is quite difficult. Much easier to install are eyelashes that you can make yourself. They are easy to install and can be removed at any time if necessary. With the hood, such manipulations cannot be performed so quickly and cheaply.
PVC plastic eyelashes
For such overlays, you must take plastic whose thickness is no more than 2 millimeters. To install the plastic eyelashes, you must first remove the headlights. Then you should apply a piece of plastic and smooth it along the contour, using a technical hair dryer to heat it. To avoid mold movement, use insulation tape. After the plastic has completely hardened, we draw on it with a marker the shape of the eyelashes. Then everything is simple - cutting, priming and painting.
Original eyelashes - extensions
To give their car individuality and make it stand out from the crowd, car enthusiasts resort to various tricks, looking for new tuning elements.
It's no secret that for many, a car is a pet, a favorite, practically a member of the family. No matter how strange it may sound to those who are indifferent to cars, there are “boys” and “girls” among cars. Cars have their own character, and if the friendship between the owner and the iron horse has worked out, the car owner tries to please his car. In this article we will talk about jewelry for “girls,” which is popularly affectionately called “eyelashes.”
Ready-made eyelashes in the store are not that cheap, so let’s try to figure out how to make eyelashes for headlights with our own hands. Materials that are suitable for this purpose are available freely on the market or in construction stores. All you have to do is have patience, ingenuity, creativity and a little desire.
Headlight covers made of plastic are the simplest and most affordable option. They will not require expensive components and will not take a lot of time and effort. It is unlikely that you will be able to buy special plastic blanks, but a small sheet of plastic will be easier to find. First of all, you should look in auto stores and car markets. If you can’t find it, contact art stores and advertising agencies. There, PVC sheets are often used for painting and printing. In principle, any polymer with a thickness of 2-3 mm can be used.
Thin plastic is easy to process. In order to make eyelashes, you need to decide on the shape of the tuning elements, draw them on the plastic and cut them out. Try to cut evenly so as not to leave burrs on the workpiece. The edges of the workpiece need to be sanded and polished.
. If desired, you can change the color of the eyelashes using self-adhesive film. Before attaching the finished eyelashes to the car, the headlights must be degreased and dried.
In order to make “natural” eyelashes, and not just extensions, you need a different plastic. It should be thin and bend freely so that the headlight covers look natural.
If you want to change the shape of the workpiece, curl the eyelashes upward coquettishly, then use a hairdryer; the heated plastic will easily change the shape according to your desire.
The easiest way to make eyelashes
We make a template and cut out the desired part. You must act carefully so that no burrs remain. Finally, carefully sand the surface of the product and sand it. The big advantage of using plastic eyelashes is the ability to choose the shapes you want and change their color without using paint. You just need to apply the self-adhesive film in the color you like. But, nevertheless, remember that before attaching the cilia you need to thoroughly clean, degrease and dry the surface of the headlights. Ideally, the plastic should bend well and be small in thickness.
What are eyelashes on headlights?
data-full-width-responsive="true">
The essence of tuning is the application of small overlays of different shapes, thicknesses and volumes to the surface of the headlight. Despite their compactness, eyelashes under the headlights transform the car, making it unique and different from others. As for the material, there are a lot of options - you can use film, carbon, metal, plastic, fiberglass and so on. The advantage of this tuning:
Video: LED eyelashes for headlights
- Simplicity. It takes no more than a day to complete the work. In this case, the duration of work depends on the total complexity of tuning and the materials used; minimum costs. For such work you do not need to involve specialists or go to a service station. Making eyelashes for headlights yourself is a matter of several hundred rubles. As a rule, a standard set of materials is required - sandpaper, film, putty, and so on;
- Original appearance. If everything is done correctly, the car becomes more attractive and is memorable for its appearance;
- Wide possibilities. Today there are many options for making car eyelashes. We will present the best of them in this article;
- Reliability. When using high-quality materials, the new tuning will last a very long time and will please the eyes of the owner and people around him.
Why did it happen so?
Perhaps the automatic requests do not belong to you, but to another user accessing the network from the same IP address as you. You need to enter the characters into the form once, after which we will remember you and be able to distinguish you from other users exiting from this IP. In this case, the page with the captcha will not bother you for quite a long time.
It is also possible that your computer is infected with a virus program that is using it to collect information. Maybe you should check your system for viruses.
If you have any problems or would like our support team, please use the feedback form.
The topic of external tuning has become increasingly popular in recent years. Car enthusiasts set a goal to change their car, make it stand out from the traffic flow, and give it an individual appearance. All this is easy to implement - just show a little imagination and take the time to transform your car. There is an opinion that tuning is always expensive and difficult. Indeed, some work (repainting the body, applying airbrushing, installing spoilers and other activities) is not cheap. But you can start with something simple - make eyelashes for the headlights with your own hands. Such tuning takes a minimum of time, and costs amount to several hundred rubles. But more about everything.
General information about eyelashes
Eyelashes are small pads that fit tightly to the headlight and cover its part (usually the top)
The main function is decorative: such elements are used to visually change the shape of the optics, but they also serve as protection against mechanical damage and environmental influences if you are not driving very carefully.
Photo gallery: images of eyelashes on headlights
Tuning on the headlights: Honda HR-V Tuning on the headlights of the Mazda 3 makes the car more impressive Many owners of foreign cars do not disdain such elements - here are the headlights of the BMW X6 Eyelashes on the headlights: Subaru Legacy
In addition to the variety of shapes and colors, the main parameter for classifying eyelashes is the material of manufacture. The most popular eyelashes are made from self-adhesive film, PVC and fiberglass. To understand which material is better to choose, we will consider the pros, cons and difficulties of working with each of them.
Film eyelashes
Eyelashes for headlights made of film are the simplest and least expensive option, but they have the appropriate quality and service life. For this work you will need black glossy film, electrical tape and tape, tracing paper, pencil and scissors. The pattern is made from black electrical tape and tracing paper, then the outline of the future eyelash is transferred to self-adhesive and cut out. Previously, we talked about how to make vinyl stickers for a car from the same film.
In order for the eyelashes to be denser, they can be made in two layers. They will flutter in the wind, so carefully calculate their length so that their beauty does not interfere with proper lighting.
Adhesive tape
Today you can find any colors and textures of self-adhesive film to make eyelashes for headlights from it.
The easiest way to make eyelashes is to use “self-adhesive”. To work with the film, no special skills or tools are required, it is cheap, you don’t have to paint it, you can choose any color, you don’t need to remove the headlights, and the entire process of making eyelashes will take you no more than 40 minutes.
It would seem that these are continuous advantages, but they are also disadvantages at the same time. The film is inexpensive, but it looks cheap on the car, does not require painting - and does not exactly match the body color, it is easy to use - and therefore anyone can do the same.
In addition, the service life of the film on the headlights is limited: the edges of the “self-adhesive” after washing lift up and tear, dirt gets clogged into scratches from stones, and after only 3 months of driving on Russian roads, such tuning will not improve, but will spoil the appearance of the car. Keep in mind that 10 years ago, when stores were not yet overflowing with car accessories, tuning studios were developed only in the capital, and ordering tuning via the Internet was just becoming a reality, eyelashes made from film could cause admiration and a desire to “do the same.” Today it is difficult to surprise anyone with them.
Chevrolet car tuning element - stickers made of self-adhesive paper
Advantages and disadvantages
It is a mistake to believe that installing eyelashes gives only a visual effect, and this is where the benefits or advantages of such tuning elements end. In fact, we can highlight several strengths of cilia installed on vehicle optics:
- The gap between the headlights and the hood is visually reduced. Although this largely depends on the car manufacturer who carefully connected the parts, the effect is still noticeable,
- The use of eyelashes gives the car an unusual, non-standard and original appearance,
- A variety of solutions allows you to modify the external perception of the car. Eyelashes of different types and shapes look completely different on the same car,
- An additional protective layer is created. Moreover, it is not necessary to use special protective structures based on transparent thermoplastic. More affordable plastic eyelashes also do a good job of protecting the headlight unit from damage,
- Affordability and wide range. This is a fact of tuning that requires minimal financial investment with a very decent effect from installing eyelashes.
This cannot be considered an advantage, since the fact has not been proven, but some are sure that the presence of cilia makes the light from headlights less dazzling. This supposedly has a positive effect on the comfort of drivers of oncoming cars. There are quite a lot of arguments in favor of eyelashes on headlights. But there is also something that speaks against such an element of finalizing the appearance of the vehicle. It is difficult to find any significant flaws in eyelashes. Yes, with their installation you will have to work a little and try hard to achieve a high-quality result. Some turn to specialists for help. But with the right approach and the use of high-quality materials, everything can be done independently at home. Another conventional disadvantage is the sail effect that occurs when the car moves at high speed. Strong air currents begin to flow under the eyelash, which can lead to damage to the decor. Or the eyelash will simply fall off. But this can be avoided. It is enough to properly fix the eyelash and adhere to the basic rules of installation. Then nothing will fall off.