Traveling at night has its own romance and the opportunity to save valuable time during the day, but the main disadvantages are poor road lighting or incorrect headlight adjustment. If the lighting fixtures are set incorrectly, the car will not illuminate all sections of the road, and accordingly, there will be a risk of falling into a large hole, breaking a wheel on sharp objects, and even worse, hitting a living creature. Another problem may be headlights shining into the eyes of motorists from the oncoming lane, which creates an emergency situation.
How should low beam headlights shine?
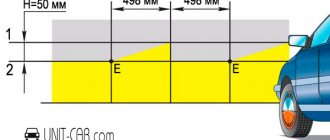
There are requirements for luminous intensity for lighting devices, but there is no point in studying the indicators, since they cannot be measured without special equipment. Therefore, it is worth understanding the features of the low beam in order to understand what it should be like under normal conditions. The features are shown in the diagram, from which you can understand that the light flux is distributed unevenly, this occurs due to the different shapes of the diffusers.
This is what the ideal low beam distribution scheme looks like in headlights with halogen lamps.
Based on the graphic image, several conclusions can be drawn:
- The main part of the light should be distributed along the traffic lane over a distance of at least 60 meters.
- The side of the road should also be illuminated; for this purpose, the luminous flux is slightly shifted to the right (and in countries with left-hand traffic, to the left).
- Part of the light is distributed to the oncoming lane. But here it is very important to adjust the light so that it does not blind oncoming drivers; this is why adjustments are most often made.
In modern cars, automatic headlight leveling is often installed, which lowers or raises the light, depending on how the car is loaded. In models with a manual corrector, this must be done independently.
What does the price consist of?
The car mechanic will tell you the exact amount for the headlight adjustment service. Typically, services do not have a fixed cost for work. Price lists often contain a price range or indicative value.
The amount of the service is affected by the following criteria:
- Features of the car.
- Difficulty of work.
- Type of lighting device.
- Urgency of implementation.
Adjusting headlights usually takes no more than half an hour , and the cost of the service rarely exceeds 1 thousand rubles . Adjustments are rarely required. The precise operation of lighting devices improves the road environment for all road users. All these arguments point to the need for periodic work.
Where are the headlight adjustment screws located?
Even before starting work, you need to clearly know where the adjusting screws are located. They are found on all types of headlights, but the location may vary, as will the design. It is important to remember the following:
- The easiest way is to study the information in the car’s operating instructions or find data on thematic forums dedicated to a specific car model. You can often find videos where everything is shown clearly, which greatly simplifies the process.
- There are two screws on each headlight. The first regulates the luminous flux in the vertical plane, the second - in the horizontal . Therefore, you can adjust not only the height of the light, but also, if necessary, shift it relative to the road surface.
- The adjustment system may also differ. You can rotate the screws manually, using a flat-head or Phillips screwdriver, a hex or even an asterisk. It is worth clarifying this point in advance so that the necessary tool is at hand. Do not rotate plastic parts with an inappropriate tool; they are very easily damaged.
In some models, auto adjustment is carried out through special holes in the front trim. In this case, the main thing is to choose a screwdriver or other wrench of suitable length.
Sometimes headlights are adjusted through a special hole above the headlight.
Preparing the car
As a rule, the headlights are adjusted when the car is fully equipped. What is meant here is;
- the tank must be 50% filled with fuel;
- ensure that the tires are at the pressure specified in the operating manual for this model;
- Place a weight on the driver's seat that matches the driver's weight;
- the spare tire, jack, set of keys and other equipment are located in regular places;
- Set the headlight auto-leveling switch (if provided) to position “I”.
Why is adjustment needed?
This work should be done not when problems arise, but at least once a year or immediately after a light disturbance is noticed. You need to periodically adjust your headlights for several reasons:
- Ensuring normal visibility at night. A large number of accidents occur because the driver did not see an obstacle or a pedestrian in time.
The low beam must provide visibility at a distance of at least 60 meters. - Avoiding glare of oncoming traffic . This also often leads to emergency situations.
- Maintaining the performance of the regulation system . Over the course of several years, plastic elements can simply stick to each other and will not move.
Without properly adjusted headlights, you will also not be able to pass the inspection. It is better to make sure in advance that everything is in order with the light.
Adjustment options: independently or with the help of a car service
The car owner can adjust the headlights either independently or with the help of car service specialists.
The main advantage of self-tuning is the absence of financial costs. However, if you are not sure that you can carry out the adjustment competently and efficiently, it is better to contact the service.
At service stations, headlights are adjusted using devices specially designed for this purpose. It is not advisable to purchase such a device for yourself: its cost is far from the most affordable, but at the same time you will have to use the device infrequently.
It is recommended that owners of cars with automatic control elements for lighting devices contact the car service first. Adjustment of automatically driven optics should only be trusted to specialists, without trying to do it yourself.
Settings
If it is not possible to set up the system at a car service center, you can do it yourself. To do this, you will need a flat area with a wall or a solid fence opposite it. This is a prerequisite for any adjustment option.
Low beam
In this case, it is easier to use a universal method, which is almost the same for all cars. Only the distance from the wall to the car can differ; most often it is 7.5 meters , but some models are placed 5 meters away; it is better to clarify this point separately in order to correctly adjust the light. Next you need to prepare the markup.
- The car is driven close to a wall or fence, then marks are made on the surface clearly in the middle of the low beam headlights and opposite them. These will be the main guidelines.
- Then you can drive the car away and start drawing. Two more marks are placed 5 cm below the center of the headlights and connected by a horizontal line. Vertical lines are also drawn through the points to provide a clear reference point.
- The central axis of the machine is determined and also marked on the wall. The end result should look something like the diagram below.
All parameters are determined individually, since the size of the cars and the location of the headlights are always different.
Then you can start setting up. It is important that at least half a tank of gasoline is filled in the car, and that a person is sitting in the driver’s seat or there is a load approximately equal in weight to the driver. The easiest way to adjust headlights near a wall is this:
- The car is located at a distance of 5 or 7.5 meters, and the center line should coincide with the middle of the hood. It is important to position the car correctly.
- The hood is opened and a screwdriver or other tool is prepared for adjustment. The light is turned on and one headlight is covered with cardboard or any other opaque element.
- The upper edge of the light flux (it is clearly visible) should be located along the line. If it is displaced, adjustment is made with the corresponding screw that regulates the light in the vertical plane.
- Adjustment in the horizontal plane must be done so that the place where the luminous flux begins to rise is at the vertical mark opposite the headlight.
This is what the adjusted light output looks like.
The second method is in many ways similar to the first, but in this case you will need to place the machine at a distance of 10 meters from the wall. In this case, the horizontal line is drawn 12 cm below the center. Some argue that increasing the distance allows for greater tuning accuracy, so if you have the space, you can try this option.
Before adjusting the light, do not forget to set the headlight range control to zero.
Video: A visual example of setting up the headlight.
High beam
The high beam headlights do not have clear lines, they distribute the light evenly, so the adjustment will be much easier. The preparation process is almost the same as with low beam, the main guideline will be a horizontal line 5 cm below the center of the headlights and vertical lines opposite the bulbs.
In this case, you need to adjust the light so that the center of the beam falls at the intersection of the vertical and horizontal lines of the corresponding headlight. Here accuracy is not so important, since long-range lighting is used only when there is no oncoming traffic. If the low and high beam are combined in one bulb, then adjusting one option is enough for the headlight to work as it should.
High beam is distributed differently than low beam.
If the adjusting screws do not provide normal adjustment, it is worth loosening the headlight and adjusting its position. Often problems with light are caused by improper installation.
In the video they set the high beams on a Hyundai Tucson.
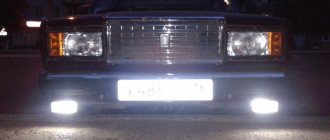
Fog lights
In this case, there are no screws for adjustment and the position of the light flux can only be changed in the vertical plane. Before you begin, you should loosen the fog lights. They often oxidize, so it is advisable to treat them with a penetrating lubricant in advance.
A line is drawn on the wall; its height should be 10 cm below the location of the fog lights. After this, the car needs to be driven 7.6 meters, positioned opposite the markings and the headlights turned on. In this case, the upper limit of the light flux should coincide with the line; only this position will ensure normal visibility in fog.
Fog lights also require adjustment to function properly.
Types of lighting sources on a vehicle
Before moving on to the lighting adjustment procedures, you need to clarify that there are different lights in the car, their adjustment is somewhat different. There are 3 main sources:
- high beam The task of long-range lighting is to ensure the visibility of any elements of the highway with a range of up to 150 m. It is used to examine road markings and the presence of road signs. The strong brightness of the lighting leads to difficulties in moving in urban environments; traffic rules prohibit turning them on in populated areas and when an oncoming car approaches. Many accidents occur due to glare;
Basically, on all brands of cars, the direction of the light flux is adjusted using two adjusting screws
- low beam It turns on to illuminate the roadway with a range of 30–40 m. This light must be adjusted to prevent blinding oncoming drivers. Proximity lighting is the most popular; it is almost always used in cities;
- fog beacons. Lights of this type can be used to create better visibility in the dark, when it rains, or during fog. The first 2 types of lighting are ineffective in conditions of high humidity; the light simply reflects from water particles and blinds the driver. To improve visibility, lights are used that are located below the outline of the fog and have a yellow glow.
parking lights
Dimensions are small light devices located approximately at the corners of the car (4 pieces in total). They do not shine very brightly and are primarily designed so that drivers of other cars can understand in the dark where your car begins and ends.
As a rule, the car is designed in such a way that when you turn on the low or high beam headlights, the dimensions turn on automatically. That is, low beam without side lights does not work.
Daytime Running Lights
DRLs are light devices in the front of the car (2 pieces), which shine quite brightly. They are designed to improve visibility of the car from the front during daylight hours.
Daytime running lights should not be used at night because... at night, they can blind oncoming drivers due to their high brightness. However, they do not illuminate the road.
In 2021, most cars are equipped with daytime running lights, but such lights are quite rare on cars manufactured before 2010.
Low and high beam headlights
Low beam (2 bulbs) and high beam (2 bulbs) headlights are the main lighting devices that are designed to illuminate the road in front of the car.
In this case, the low beam illuminates the area directly in front of the car, and the high beam illuminates a more distant area. It makes sense to use low beam at low speeds, high beam at higher speeds.
Fog lights
PTF - 2 headlights in the front bumper of a car, designed to illuminate the road in poor visibility conditions.
Fog lights are optional for 2021, so not all vehicle trim levels have them. That is, the car may not have PTF.
Fog light
Fog light - a red light at the rear of the vehicle, designed to improve visibility of the vehicle in poor visibility conditions. This light device is very bright and in good weather it can blind drivers of cars behind.
This lamp is required to be installed on all cars.
Security measures
In order not to cause harm to health or break the headlights during work, you need to remember a few simple tips:
- Wear gloves when working and do not touch the wiring.
- Only use suitable tools for the adjusting screws, they break very easily.
- Put the car on the handbrake.
- When adjusting, do not apply excessive force.
Finally, one more adjustment method.
It is not difficult to adjust the headlights if there is a flat area with a wall opposite it. The main thing is to apply the markings correctly; the accuracy of the adjustment depends on this. If after carrying out the work oncoming drivers blink, it means the light is too high and needs to be lowered.
How to set it up correctly: preparation for work
Before adjusting the headlights, you should carefully prepare and study this issue. Every driver must figure out how to properly adjust the headlights on a car. It is important to bring the car closer to the most realistic conditions. This primarily concerns carrying capacity. That is, before starting work, you need to take into account that there is always a driver, cargo in the trunk and, possibly, passengers in the car.
When starting work, the driver's trunk must be equipped with a jack, a fire extinguisher, a spare tire and a set of tools. You can also invite a friend of similar build to temporarily take the driver’s seat.
It is equally important to check the tire pressure. If the performance is reduced, it is recommended to use a compressor. Before starting work, you need to make sure that the screw assembly is easily adjustable and that the fasteners on the lamps are in good condition. If there is rust, it should be removed immediately.
Do-it-yourself headlight adjustment is done only with clear lenses. If there is dirt on or near the headlights, you need to get rid of it. You need to regulate the light only with working equipment, for which the generator and voltage regulator are responsible.
Do-it-yourself headlight adjustment