If there is a need to replace the fog lights in the Renault Logan model, then you should not rush to contact a specialized service about this. This procedure can be performed independently when the Renault Logan car is already out of warranty or the fog light bulb is not on the scheduled list for a free warranty replacement. The work does not include complex operations, but consists of fairly simple manipulations. Replacing a fog light will be greatly simplified if you first study the instructions below.
Fog lights: what are they?
Fog lights are additional lights on a car designed to illuminate the road at night in conditions of rain, fog or snow.
Every car enthusiast knows that in such conditions, headlights are practically useless. The beam of light is reflected from drops of fog or rain and blinds the driver, creating a dangerous emergency situation. A droplet-air mass of fog, as a rule, hangs over the road at a certain height. And it is in this case that a beam of light from low-lying sources reflects much less from water droplets - it shines below the bulk of the fog. If we talk about snow or rain, then a completely different factor plays a role here - the color tone of the light beam.
Fog lights can be standard or installed on a vehicle as an addition. You need to know that they can in no way replace headlamps, since they have a much shorter illumination range.
However, they can be used as the main light source in moderately limited lighting conditions. They allow you to perceive the road much better. They make the vehicle more visible on the road and do not dazzle oncoming drivers.
If you install them yourself, you need to know that lights that are located too high do not improve, but, on the contrary, significantly distort visibility on the road, since they are reflected from drops of fog. And it should be remembered that here it is advisable to install lights with yellow light filters - they are the most effective.
Replacing lamps in PTF Logan phase 1 — Renault Logan, l., year on DRIVE2
Kit before installation. If you install them yourself, you need to know that lights that are located too high do not improve, but, on the contrary, significantly distort visibility on the road, since they are reflected from drops of fog.
Replacing the Fog Light Lamp Renault Logan
And it should be remembered that here it is advisable to install lights with yellow light filters - they are the most effective. Such lamps must be installed in pairs. The distance from the side marker light along the outer edge of the lens should be no more than 40 cm, and the height from the road surface along the lower edge of the lens should be no more than 25 cm.
They must be installed no higher than the headlights. In principle, any car enthusiast can cope with this task, even without special knowledge and skills.
Replacing a fog lamp on a Renault Logan 2
Let's take a closer look at how this can be done. The basic equipment of Renault Logan includes a regular headlight.
First, you will need to stock up on all the necessary materials. In order to purchase what you need and not make a mistake, you should take into account the model and equipment of the car.
If your car is not under warranty, or the PTF is not included in the list of parts available for free replacement, you can do the work yourself.
It is enough to have with you all the tools necessary for the work, as well as to first familiarize yourself with the procedure for carrying them out. Sequence of work First, the owner needs to remove the special mudguard located on the bumper of the Renault Logan car.
It is removed from the side on which the defective light source is located - PTF. Once this work is done, the next task is to disconnect the plastic wire retainer. The phase is checked for intermittent operation.
This work is being done extremely well. The next step is to disconnect the connector from the fog lamp, the phase is turned off.
Replacing a Renault Logan/Sandero fog lamp
As soon as it is separate, the lamp must be turned counterclockwise. Now the fog light can be removed, and the wire on which the phase is located should preferably be put aside.
High beam
Conveniently, all the light on the Renault Logan - both high and low - is provided by one element of the headlight. The electronic control unit, having received a signal from the switch button, changes the lighting options.
In addition to the head light, side lights are installed here. Replacing dimensions step by step:
- The headlight housing is removed.
- The pad lock is released.
- The wire block is disconnected from the light bulb socket.
- The marker rotates clockwise for the left headlight and counterclockwise for the right headlight.
- The lamp in the socket is removed from the headlight unit and freed from the socket.
- The element is being changed to a new class PY21W.
- The cartridge is installed in the reverse order.
A rubber gasket is used as a seal for the cartridge. It is recommended to update it after each removal.
What are fog lights for?
Fog lights are designed for safe driving during rain, snow or fog. They can be turned on instead of daytime running lights or low beams when driving in the daytime. Those who have a car know that in such conditions, using ordinary light in a car does not bring the expected result.
It is recommended to rebuild the PTF additionally at the service center so as not to blind oncoming cars. Also, after correctly installing such lamps, you can use low beams in the dark (if they don’t light up, you may need to replace the low beam lamp) and PTF lights, this way you can better see the area from the sides (curbs, branches).
Replacing the fog light bulb on a Renault Logan with your own hands
I started looking for information with instructions for installing them and then it started... Somewhere there is a recommended lift or pit, I even wonder how they would jump with them, somewhere people describe that almost the bumper needs to be unscrewed!
Currently reading: Applicable lappets for Renault Logan cars, 1st and 2nd generation.
The next step is to disconnect the connector from the fog lamp, the phase is turned off. As soon as it is separate, the lamp must be turned counterclockwise.
Now the fog light can be removed, and the wire on which the phase is located should preferably be put aside. Fog lights do not always need to be replaced entirely.
It also happens that you need to replace a burnt-out lamp in which the phase has burned out. After disconnecting all connectors powering the light source, removing the lamp will be possible with a slight movement of the hand
If it is necessary to replace only the LED lamps, and not the entire PTF headlights, you need to pay attention to the presence of condensation
How to change it yourself
How to change a light bulb in a PTF and can this be done without the help of a specialist? It turns out that everything is not as complicated as it might seem at first glance. Yes, you can’t just get to the fog lights in a Renault Logan; you’ll have to disassemble the car a little, but disassembly is minimal and won’t take much time.
What do we need
So, we have decided on the headlights and the type of light source on our Renault Logan, we can start replacing. For work we will need:
- Torx key 20;
- flat screwdriver;
- clean cotton gloves or cotton cloth;
- replacement lamps of the required size.
That's all you need to replace the bulbs in the Renault Logan fog lights
Bulb replacement process
First of all, you need to remove the mudguard from the bumper. To do this, first remove the piston securing the shield to the fender liner by unscrewing the spacer screw from it.
Removing the piston securing the shield to the fender liner
Using a screwdriver, press the shield down and remove the piston securing the shield to the subframe.
Removing the piston for attaching to the subframe
Using a Torx 20 wrench, unscrew the fixing screws located around the perimeter of the shield. Now you can remove it and gain access to the fog lamp.
Removing the splash guard from Renault Logan (Sandero) 1
Important! The location and number of screws and pistons on different modifications and generations of Renault Logan may vary. As an example, the dismantling process for a first generation Renault Sandero is shown.
We feel for the power supply and, pressing the locking latch, remove it. The photo shows a headlight under H11; for other modifications of headlights, the block is removed in the same way, but on Renault Logan 1 from 2010 to 2014, the connector “looks” back, and not to the side.
Removing the power supply
On Renault Logan of the first phase until 2010 and on all cars of the second phase, the lamp is removed in the same way. Turn it counterclockwise a quarter turn and remove it.
Removing bulbs H11 and H16
On Renault Logan 2010-2014, the lamp socket has special latches that need to be pressed.
Removing a PSX24W type lighting fixture
Now we put on cotton gloves and install the new lighting fixture in place. We connect the power supply to it and put the splash guard in place.
Expert opinionAlexey BartoshSpecialist in repair and maintenance of electrical equipment and industrial electronics.Ask an expert a questionImportant! Do not handle the bulb of halogen light sources with bare hands: sweat and grease remaining on the glass lead to overheating of the device and its failure. For ordinary incandescent lamps such precaution is not necessary.
So we replaced the bulbs in the fog lights of Renault Logan phases 1 and 2. Now you know that in case of such a malfunction it is not at all necessary to go to a service station - you can do everything yourself in just half an hour.
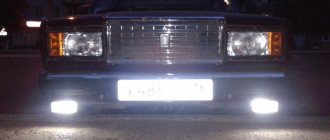
At night, during rain or fog, special fog lights come to the aid of the low beam. When properly installed and adjusted, such lighting elements become indispensable assistants for the driver in adverse weather conditions.
Thanks to the diffused light, when such headlights are turned on, the roadside is clearly visible, which in turn is a determining factor for safe movement by car in conditions of limited visibility.
Replacing a Renault Logan fog light bulb
Generator Renault Sandero 1. Replacing the timing belt vw passat b5.
Step by step video. Part 1. Replacing the timing belt on a Volkswagen Passat B5.
They also check for the absence of cracks and other structural defects. Replacing the backlight lamp for power window buttons on a Logan. Files Engine. The following is used in the Renault Logan window lifter housing: After this, we install the lighting elements and assemble the unit. Regardless of the PTF model and the type of lamp used in it, the installation work looks identical and is carried out traditionally in the reverse order of dismantling the Renault Logan fog lamp.
After completing the assembly, we check the operation of the Renault Logan lighting device and make sure that there are no side effects - flashing lamps, etc.
What does the replacement sequence look like?
How to change the fog light bulb step by step:
- Replacing a fog light begins with dismantling the mud shield, which is attached to the surface of the bumper on the side where the fog light is to be replaced.
- After this, disconnect the plastic clamp of the wires leading to the lighting fixture.
- We disconnect the electrical connector for the power supply of the socket with the PTF lamp.
- Using a Torx-20 wrench, unscrew the two screws that secure the fog lamp unit to the bumper.
- Now the headlight can be freely removed, and a new analogue lighting device is installed in its place.
Sometimes it is necessary to replace the fog light, but not the entire one, but only the burnt out lamp. The PTF light bulb is being replaced - it's not difficult at all. After disconnecting the connector, rotate the socket at a slight angle counterclockwise and remove it together with the lamp from the fog light housing.
Attention! If you need to replace the fog light with an LED analogue, then before installing it, it is recommended to check the inner surface of the headlight housing for the presence of condensation. If there is one, then the dismantled headlight (housing) should be dried until the signs of condensation disappear. After this, we install the lighting elements and assemble the unit.
Regardless of the PTF model and the type of lamp used in it, installation work looks identical and is carried out traditionally in the reverse order of dismantling operations.
How to replace
Removing the optics on Logan 2 varies depending on whether it is a left or right headlight. If you need to change the part on the left, you need to remove the battery. In some cases, car service technicians replace the lights on the left headlight without removing the battery.
Replacing the halogen on the right is carried out without removing the battery.
The replacement procedure can be described in stages:
- AB dismantling. The tools you will need are: a 13mm socket wrench and a 10mm and 8mm open-end wrench.
- Using keys, the wires are removed, first from the ground (the “-” sign), then from the positive. The socket head presses out the battery fasteners.
- There is a plastic cover in the center of the headlight unit, the lock is located on top. Press the latch with your finger, press the lid and pull it towards you.
- The power supply block with wires and the sealing cover are removed.
- By squeezing the hooks of the latch, the light bulb is removed from its regular place in the headlight.
- Installation of a new lamp is carried out in the reverse order.
The specified length of the bulb in this model is 82 mm. The headlight housing has standard recesses into which metal tabs located on the base should fit. This will ensure the optimal position of the part relative to the reflector and diffuser.
How to quickly replace PTF?
If the light fixtures we are considering are damaged, then replacing the fog lights will not take much time. Next, we will provide instructions using the example of the left PTF, since all manipulations with replacing the right headlight will be absolutely identical.
We use a Phillips screwdriver as a tool for work.
We operate from under the LADA Largus car quickly without dismantling the front bumper.
- First we remove the front fender liner (left).
- We press out the latch that holds the cable harness block.
- We remove the block itself from the base terminal of the headlight.
- Next, unscrew the three screws that hold the PTF in the bumper seat.
- We take the headlight out and put it aside.
- We install a new lighting device into the resulting niche.
- We connect the PTF to the network and check the functionality.
- We return the fender liner to its original place.
- If necessary, adjust the light beam.
A little about Renault Logan
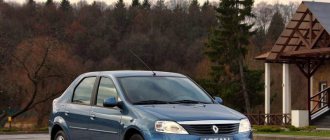
Renault Logan cars appeared on the world market in the fall of 2004. In fact, this car can be described in two words: modesty and modernity. Discreet design, a minimum of frills both inside and outside. But at the same time, the functionality of each element is ensured to the maximum. Roomy interior, excellent assembly accuracy of all components, large three-spoke steering wheel, comfortable driver's seat. Despite the modest and unpretentious design, Logan looks quite stylish and modern.
One of the distinctive features of the product is its ease of maintenance and repair work. Any driver can cope with many of them independently, without turning to a service station for help. Replacing some parts, simple adjustments and debugging - here Logan gives you the opportunity to show your abilities as an auto mechanic.
For example, if your car needs to replace the fog lamp, you can easily do it yourself by reading the instructions. There's nothing complicated about it.
Replacing light bulbs in Renault Logan fog lights
Replacing PTF lamps on Renault Logan first and second generation
We adjust the fog lights in such a way when the upper level of the light spot coincides on our created screen with a drawn horizontal line, which is necessarily located mm below the previously marked centers of the headlights with a straight line connecting them. The distance between these centers should be in mm. Conclusions Installation of fog optics in Renault Logan, as practice has shown, usually does not cause difficulties and increased time costs.
If problems arise when replacing the PTF light bulb or subsequent adjustment, a reasonable measure would be to contact specialists, which will save time and nerves. In most cases, they resort to replacing a set of Renault Logan headlights if they are damaged. If there is no such factor, then we limit ourselves to replacing the lamps and, if desired, polishing the working surface of the plastic bulb.
Replacing a lamp in a fog lamp on a Renault Logan Replacing a lamp in a fog lamp is more difficult than replacing side lamps and low beam lamps. Remove the protective shield on the bumper. Removing the shield Disconnect the wires from the light bulb and remove it.
PTF socket and wires Install a new lamp and connect it. The lamp is in the socket, ready for use. Lamp type All information about the bulbs and their type is indicated on the lamp socket H11 12V 55W - standard sizes and type of lamp in the fog lamp on Renault Logan.
It’s better not to use anything more powerful, the plastic will melt!
Diode lamp versus standard We recommend installing diode lamps in PTF. The service life is longer, they shine better, but they are more expensive.
You decide! The old lamps are already yellowish. In general, the lamps were already doing their job, but they were many, many years old, the same age as the car itself, and therefore over the years they had become foggy and burnt out. I showed a detailed replacement using the example of the left fog lamp. With a TORX head, in my opinion, 20, unscrew the screws, as shown in the picture below.
Features of light beam regulation
After replacing the Renault Logan headlight, you will need to adjust its light beam. To ensure the correctness of the indicated process during adjustment, we follow these mandatory rules.
- The light beam emitted by LED sources requires very precise adjustment. In no case should its direction exceed the maximum permissible vertical level in relation to the horizontal plane.
- Installation of headlights with such lamps on Renault Logan should ensure that the fog lighting equipment is located as close as possible to the road surface. This will ensure that the correct light beam boundary is completely reached.
- Sometimes exceptional cases arise that require adjustment work to be carried out in a specialized workshop. If during self-adjustment it is not possible to achieve the required parameters, this entails the need to contact servicemen.
- After the fog light bulb was replaced. If there are no force majeure circumstances, then independent regulatory measures usually take no more than 1-1.5 hours.
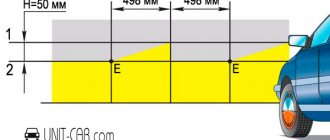
- The adjustment process will be convenient if you use a special improvised screen. Its role can be an ordinary flat vertical surface with markings applied on it. The Renault Logan should be located at a distance of about 5 meters from this surface.
- We adjust the fog lights in this way when the upper level of the light spot coincides on our created screen with a drawn horizontal line, which is located (necessarily) 100 mm below the previously marked centers of the headlights (the straight line connecting them). The distance between these centers should be 1200 mm.
Currently reading: Removing the fog light | Renault | Renault management
Adjustment
Replacing the headlight alone is not enough. Its main feature is that some Logan models can emit white light (usually LED models), and some can emit yellow light. The main point is that you need to set up the PTF correctly. So, you can be sure that the flow of light is directed exactly where it is needed, and not up or to the side. During the adjustment process, the following rules must be observed:
- Adjustment of the boundaries of the light beam emitted by LED PTFs must be performed as accurately as possible. Remember - light from a given source should never be directed above a certain horizontal plane;
- The installation of such PTF headlights on Logan should be carried out as close to the road surface as possible. This will allow you to accurately determine the boundary of the light beam emitted by LED models.
Only in exceptional cases is adjustment required at a service station. In most cases, this work is done independently, since the principle of disassembly and assembly is quite simple. However, if you see that problems arise with adjusting the fog light on a Renault Logan car, you will most likely have to visit a service center.
To complete the full list of work described above, a maximum of one hour of free time is required. At the service center, this time may be longer, depending on the queue for repairs of other vehicles. Replacing the PTF on a Renault Logan car should be carried out if the fog light is unstable in its seats, the lamp has burned out, or the protective glass has cracked. It is quite possible that the lamp will have to be replaced if there are deep chips, since they can worsen the dispersion of the light flux. Accordingly, this leads to problems when driving in fog.
Types of suitable lamps
When choosing a new lighting device instead of a burnt-out lamp, you should take into account that replacing the Renault Logan low-beam bulb is preferable to halogen samples of class H4. These are double-filament lamps that illuminate the roadway in both low and high beam. They are produced in two versions depending on the voltage of the vehicle's electrical system - 12 and 24 V.
Type H4 is convenient for drivers. It is enough to install only two elements when replacing to provide head lighting.
LED lamps can be installed in compliance with the operating rules of the vehicle. If the manufacturer provides halogen lamps, then the reflectors are configured to work specifically with this type of lighting. It is prohibited to install LEDs in a standard place of suitable size on the basis of Art. 12.5 Code of Administrative Offences, part 3.
PTF on Logan is also a halogen lamp. This type of lighting is provided by the manufacturer as the most suitable.
Renault Logan lamps
Your safety on the road, as well as that of other road users, directly depends on the proper operation of the vehicle’s external lighting devices. Therefore, it is worthwhile to promptly change lamps that have failed, paying special attention to quality and reliability.
Read our article about which lamps are used in each generation of Renault Logan.
Headlight bulbs
Tail lamps
Individual lamps
H11 from 2005 to 2009
PSX24W from 2010 to 2015
Your safety on the road, as well as that of other road users, directly depends on the proper operation of the vehicle’s external lighting devices. Therefore, it is worthwhile to promptly change lamps that have failed, paying special attention to quality and reliability.
A wide range of car lamps for Renault Logan is available on the website and in stores of our company Logan-Shop St. Petersburg. These are products from trusted suppliers, presented with products with different lighting technologies and scope of application.
Renault Logan lamps: this is important for everyone to know
Thanks to a wide selection of lamps for Renault Logan, each owner of a car of this model can choose the optimal version of the device. Car lamps are available in various versions: halogen, xenon, LED.
Name and marking of lamps:
- low beam - H7 at 55 W;
- high beam - H1 at 55 W;
- front turn signal - PY21W at 21 W;
- dimensions - W5W at 5 W;
- fog lights - H11 at 55 W;
- side indicator - WY5W at 5 W;
- Reversing light - P21W 16 W, etc.
The catalog of the Logan-Shop St. Petersburg website will introduce you to a complete list of markings and lamps. Through the website, purchasing lighting equipment and components for Renault Logan is available at an attractive price.
In our store you will find high-quality Renault Logan bulbs. It should be borne in mind that most lamps are included as standard and are installed during the production of the vehicle.
Therefore, it is important to take into account the manufacturer’s recommendations when choosing light bulbs to replace worn parts. This approach will allow you to avoid unpleasant consequences and ensure a high level of safety on the road. All types of products are guaranteed.
Features of choice
To choose a lamp for your car, you need to take into account the recommendations of the manufacturer, which are specified in the instructions for the vehicle. It is important to carefully read them when deciding to purchase and replace the lamp yourself. Besides:
- study the alphabetic, digital and other indices indicated directly on the lighting device;
- take into account not only the car model, but also the year of manufacture and engine size;
- select a lamp according to the type of element indicated on the lamp bulb or base, as well as the power.
When choosing a high-quality and inexpensive Renault Logan light bulb, pay attention to the parameters, otherwise if you install an unsuitable device, it will immediately burn out.
Do you doubt the correctness of your choice? Then contact our online store to get a free specialist consultation on all your questions. We will quickly and accurately select an identical lighting fixture that will meet the requirements of the manufacturer.
Our company has been professionally selling original and analog lamps for Renault Logan for a long time, which meet the highest requirements of European standards.
To order, call 8-911-199-89-79 or simply leave a request on the website.
Installing fog lights in Renault Logan
The design of the Renault Logan car allows the installation of fog lights. In principle, any car enthusiast can cope with this task, even without special knowledge and skills. Let's take a closer look at how this can be done.
The basic equipment of Renault Logan includes a regular headlight.
First, you will need to stock up on all the necessary materials. In order to purchase what you need and not make a mistake, you should take into account the model and equipment of the car. You will need to purchase:
- Fog lights.
- Special switch.
- Bumper covers.
- Wires for switching.
- Double-sided tape.
Before starting installation, it is necessary to check and adjust the air pressure in the tires. This is due to the fact that legislation strictly regulates the installation height of the fog lamp. And in order to correctly carry out all height measurements, it is necessary to ensure the correct height of the bumper relative to the road level. Once you have done this, you can begin installing the lights:
- We check whether there is a fog lamp relay in the engine compartment.
- Make sure there is a fuse.
- We install the switch in the steering wheel area so that you can use it comfortably. We move the seat back as far as it will go, unscrew the two bolts from the steering wheel casing, and remove the casing itself (top and bottom). To do this, you will need to lower the steering wheel adjustment lever. We unscrew the switch mounts and install a new one in its place. Then we assemble everything in reverse order.
- The bumper covers have latches, but to be safe, it is better to use double-sided tape.
- We remove the Renault Logan bumper and degrease it. After this, we cut out the plugs and holes for the lights. For convenience, we use a template cut out of cardboard.
- Clean and degrease the holes.
- Insert the plugs until they click and wait for the tape to stick.
- We install the frames and lights in the original mountings.
- We connect the wiring. We connect the wire harness to the connector located behind the bumper on the driver's side. We pull it along the bumper and secure it under the lower grille.
- We install the bumper in place. We check how the headlights work: if everything is in order, then you have completed the task.
Currently reading: How to change a headlight on a Renault Logan
Self-replacement of lamps in the Renault Duster PTF
Some car enthusiasts use fog lights as DRLs (daytime running lights), so as not to turn on the low beam lamps, and drive with the PTF lights on. And why do fog lamps burn out faster than others? In our instructions we will tell you in detail how to replace lamps in PTF, which lamps are better to choose and the quality of their lighting.
What lamps are installed in Duster's PTF
Halogen lamps with H11 12v/55w base are installed from the factory. As a rule, Philips lamps of the long Life type are installed from the factory. That is, an h11 lamp with an extended service life. Its service life depends on operating conditions, with the fog lights constantly on for about a year. If you use PTF only in the dark or in poor visibility conditions, the “original” lamps last up to 4 years.
Which lamps are best to install?
- PHILIPS H11-12-55 LONGLIFE ECO VISION P-12362LLECO
- BOSCH H11-12-55 Pure Light 1987302084
- OSRAM H11-12-55 O-64211
- BEACON H11-12- 55 ULTRA 82110UL
- KOITO H11-12-55 0110
These are standard halogen lamps, from original to inexpensive Chinese ones. If you don’t have enough light and want to install brighter lamps, you can install lamps in the Duster’s PTF
- KOITO H11-12-55 W (100 W) Other Brand
- OSRAM H11-12-55 +110% NIGHT BREAKER UNLIMITED
These are lamps with increased brightness that will illuminate the road much better than standard ones. Their disadvantages are high cost and relatively short service life. If you use PTF as running lights, then it is better to install LED lamps.
- H11-12V/24V 4+1 diode SMD 5000K 11W 520LM Xenite
- H8/H9/H11/H16-12/24V white 7000-8000K Mayak
These lamps will not illuminate the road, but are perfect as DRLs and will consume no more than 5-10 W, compared to conventional halogen lamps consuming 110 W.
Read our instructions for replacing lamps in the front headlight units (low beam, high beam and side lights) on a Renault Duster.
In addition to the lamps, it is also necessary to replace the spark plugs on the Duster; here we have described in detail how to do this.
Don't forget to monitor the condition of the Duster's front brake pads, they affect safety and braking. Change the pads when needed.
Instructions for replacing lamps yourself
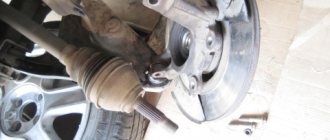
Remove or turn the right wheel to the left. This is necessary to get to the plastic protection.
Carefully pry up the clip with a screwdriver and remove the protection.
Next, unscrew the top plastic nut securing the mudguard and pull it out of the fender liner.
Now, using a Torx T-20 wrench, you need to unscrew the two self-tapping screws securing the protection to the bottom of the bumper
And one self-tapping screw in the wheel arch.
We bend the protection and see the fog light in front of us
Press and remove the block going to the lamp
Take the lamp and turn it half a turn counterclockwise.
We install the lamp and reassemble in the reverse order.
How to remove a fog light
If you need to replace the PTF itself, it is very easy to remove it. We will need a Torx T-20 wrench with which we unscrew the two self-tapping screws securing the PTF and remove it.
Adjusting PTF on Renault Duster
After replacing lamps or installing new PTFs, it is advisable to check the adjustment. For this purpose, there is a special hole for adjustment at the bottom of the bumper.
Using a screwdriver, unscrew or tighten the adjusting screw and adjust the light beam.
What PTFs are installed from the factory on the Renault Duster?
Valeo fog lights . The left and right PTF are the same. This is the part number for the fog light without the trim as they are sold separately.
Right trim: 261A23831R, 263316044R
Left trim: 261A35148R, 263361007R
If for some reason your PTF wiring on your Duster has failed, here is its original part number 240707566R
Interesting articles on the topic
How to replace brake light, tail light and turn signal bulbs
How to replace the lamps in the additional brake light on a Renault Duster
How to replace low beam, side and turn lamps in Renault Sandero
Leave a comment
You must be logged in to post a comment.
Installation of fog lights
Standard PTF in the bumper
Anyone can change or install fog lights on a Renault Logan on their own. No special knowledge is required for this. To carry out the work you will need: a switch, headlights, bumper covers, wires and tape.
Before installing the headlights, you need to adjust the tire pressure in order to more accurately determine the height of the headlights, especially important for non-standard tires (more than 15th radius). After this you need:
- Check if there is a relay for connecting the fog lights in the engine compartment.
- Check the fuse.
- Install a switch in the cabin.
- Install the bumper covers until they click, having previously degreased the mounting area.
- Connect the wiring.
- Check the operation of the headlights.
conclusions
Installing fog lights on a Renault Logan car does not require the use of brute force or spending a lot of time. Special skills may only be useful when adjusting the light beam. If you have serious problems with the PTF, it is best to seek help from service center specialists. They will quickly and efficiently carry out replacement and adjustment work.
REPLACING THE FOG LIGHT BULB
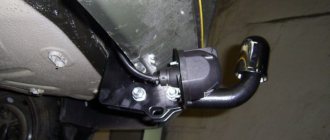
Remove the front bumper mudguard from the side of the lamp being replaced (see “Removing the front bumper mudguards”). We press out the plastic clamp of the wire block...
...and disconnect it from the lamp.
Turn it counterclockwise and remove the lamp. We replace the faulty lamp with a new H11 and install the parts in the reverse order.
REMOVAL OF THE FOG LAMP
We remove the fog lamp to replace it. We show the operations on the left fog lamp (the right fog lamp is replaced in the same way). Remove the front bumper mudguard from the side of the headlight being replaced (see “Removing the front bumper mudguards”). Disconnect the wiring block from the fog lamp (see “Replacing the fog lamp”).
Using a Torx T-20 wrench, unscrew the two screws securing the headlight to the bumper...
...and remove the headlight.
Fog lamp markings. Install the fog lamp in the reverse order. After installing the headlight, we adjust the direction of the light beam in the vertical plane.
Using a slotted screwdriver, rotate the plastic adjusting screw clockwise to raise the light beam, or counterclockwise to lower the beam.
REMOVAL OF SIDE TURN INDICATOR, REPLACEMENT OF LAMP
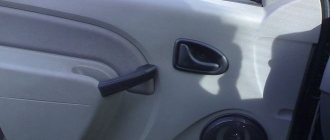
We remove the side turn signal to replace the lamp or the indicator itself. The work is shown on the left side turn signal; the right side turn signal is removed in the same way.
The side turn signal is installed in the hole in the body wing and is secured with two clamps (one clamp is shown by an arrow, the second clamp is not visible in the photo). There are two ways to remove the side turn signal. In one method, we remove the front wheel mudguard (see “Removing mudguards and front wheel fender liners”). Having folded back the rear part of the fender liner, we put our hand into the gap between the fender liner and the wing and, squeezing the two turn signal latches...
...push the pointer out of the wing hole. In another method, we remove the turn signal by squeezing its latches on the outside of the wing. For this…
...insert two plastic plates (plastic cards can be used) between the wing and the indicator on both sides and, squeezing the two latches, remove the side turn indicator.
Next to the clamps 2, there are two protrusions 1 on the indicator body. Therefore, when removing the left turn signal, we insert the front plate below the protrusion, and the rear plate above the protrusion. When removing the right turn signal, insert the plates in reverse.
Turning the lamp socket counterclockwise...
...remove it from the pointer housing.
We take out the lamp and replace it with a new WY5W. Install the side turn signal in the reverse order.
Replacing fog lamps Renault Scenic 2
CAR WORKSHOP - do-it-yourself car repairs
Replacing a light bulb in a Renault Megane Scenic fog light
Installing the right light bulb on a Renault Scenic will also seem like a complicated and time-consuming procedure for inexperienced car enthusiasts, however, drivers who have replaced it more than once say the opposite. Replacing a light bulb, Renault, Megan, Scenic.
Replacing fog lights on Renault Scenic 3
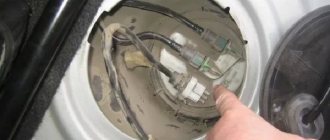
The neck of the tank can be removed completely, remove the rubber cap, unclick the spring (feel for the eyelet and press down and towards the engine compartment), remove the light bulb (preferably together with the chip, although the wires are a little short), replace the light bulb, reassemble in the reverse order. Replacing fog lights on Renault Scenic 3 Bought here...
repair of running lights fog lights Renault Megan 2
So, if the left lighting element fails, at the first stage it is necessary to remove the battery, having first disconnected the general power terminals of the car. After this, it is necessary to remove the protective rubber part from the low beam lamp, while visually assessing its condition for possible defects or damage. Next, using a screwdriver with an attachment, you need to unscrew the fastening screw that holds the lighting element. After performing this operation, it becomes possible to disconnect the power terminal from the part. The main inconvenience during replacement is the short wire, which significantly reduces the level of comfort when carrying out such work.
Replacing the rear brake light bulb Renault Scenic 2
The light bulb in the fog lamp burned out (stage 1 phase 2), in all the manuals they write that you need to remove the bumper, and then unscrew the mount, etc., etc. It's not a tricky thing. Once you watch the video, you will immediately understand how to act. Good luck!
Replacing the fog light
It is quite possible to install fog lights on Renault Logan or replace the lamp in them yourself. To do this, you just need to adhere to the recommendations given above. Replacing the fog light of a Renault Megane car.
Replacement of a passing beam lamp in Renault Scenic 2
In terms of performance and lighting efficiency, the best options are lighting elements from the Philips, Osram and General Electric brands. These products meet all the requirements of standards and technical norms that apply to automobile light bulbs for Scenic vehicles. The format of the low beam lamps used on the Renault Scenic car is H7 - 64210 or 64210 L. The latter option is characterized by increased light output and helps to quickly recognize the source of danger when the car is moving. Replacing the low beam lamp in Renault Scenic 2.