Modernization of the VAZ stove
As you know, in the cold season a car simply cannot do without a heater, since without it both the driver and the passengers themselves will freeze. Naturally, all VAZ cars are equipped with a stove, however, the quality of its installation is an open question. Objectively, modernizing the VAZ 2110 stove is not only a necessary condition, but also mandatory. Because it is better to stop the emergence of negative consequences at the stage of their appearance, rather than try to overcome the consequences later. Upgrading the stove on a VAZ 2110 is a responsible process, but completely doable on your own.
How relevant and necessary is it to modernize the heater?
VAZ 2110 stove modernization
A short list of possible negative consequences of a VAZ factory stove:
- low degree of operating efficiency, the heater seems to be functioning, however, the effect is hardly noticeable;
- moisture regularly accumulates on the windshield;
- traces of estrus, etc., visible to the naked eye.
Note. Before you move directly to upgrading the heater, you should first make sure that it is functioning properly. If during the inspection even small functional defects are discovered, they will need to be eliminated without fail before starting the upgrade.
To modernize the furnace, you first need to:
- remove the stove block;
- after which, it must be disassembled into individual components.
All functional elements of the furnace are connected to each other using bolts.
Upgrading the ventilation function of the furnace
VAZ 2110 stove modernization
You can improve side ventilation in two different ways:
- to create full blowing of the side windows, use corrugations with their appropriate gasket;
- insulate the side windows themselves directly, creating an absolute degree of insulation by eliminating all existing cracks.
In practice, the use of corrugations is a very relative concept, since their effect will only be noticeable to the feet of passengers. Corrugations are not suitable for creating proper ventilation, as they will provide virtually no real effect. In most cases, after installing the corrugations, the ventilation properties of the heater become worse even than before their use. In particular, especially rare cases, sometimes the ventilation properties after installing the corrugations may not be affected and remain at the same functional level.
Note. Based on the above, installing corrugations is not recommended.
If possible, sealing all the cracks seems to be a much more practical and effective solution. Gaps that need to be closed as a priority:
- first it is necessary to eliminate the cracks in the lower and upper panels;
- then bolt mounting holes; for this purpose, you can use modelin sealing agent.
After eliminating the cracks, you need to take a close look at the heater damper. Because it is she who controls the efficiency of the ventilation air flow.
Furnace damper modernization
- due to the fact that the damper itself is not directly adjacent to the heater, a significant part of the air does not flow to its intended purpose;
- using a sealing agent, glue and double tape, you need to eliminate all existing cracks and cover the heater valve with double tape;
- Initially, the furnace body itself is completely covered with standard sponge, which must be removed and Bitoplast 10 installed in its place; sometimes a double layer can be used;
- a huge amount of air is lost directly in the crack of the driver's window, since its dimensions are quite large, so foam must be used to eliminate it.
One of the most frequently asked questions is the squeaking of the heater panel, in practice it does not exist, so there is no need to worry about it.
Improving the efficiency of airflow in the lower part of the car interior
Heater stove VAZ 2110
The main reason for the insufficient efficiency of blowing the feet of passengers and the driver is the presence of multiple holes in the plastic housing of the air blowing and distribution system. An effective way to eliminate a defect in the air distribution system:
- to eliminate defects, you can try to seal all the cracks, however, the most effective method would be to use corrugation, as this will eliminate not one, but several problems at once;
- the corrugation itself is compact and small in size, so it certainly won’t take up much space under the heater panel;
- it is under the panel that all the furnace wiring is located, so access to this place should not be hampered in any way;
- installing corrugations will create additional free space under the heater panel;
- so, it’s time to part with the plastic air distributor block, it needs to be cut off and filled inside with three corrugations;
Note. To prevent the corrugation from whistling, it is necessary that its inner surface is smooth.
- one corrugation is necessary for the legs of the driver himself, the remaining two for the front and rear groups of passengers;
- the tunnel partition must be cut so that the corrugation can easily fit inside;
- after which it is necessary to again resort to the help of Modelin sealing glue and, with its help, eliminate the remaining holes in the air duct.
Note. Before using Modelin, you need to look at its expiration date, since if the latter has long expired, then the sealing process will simply be ineffective.
The instructions presented above are not difficult to do with your own hands and require large material costs. The main thing is to understand the essence of the process itself and everything will fall into place. For practical understanding, it is necessary to familiarize yourself with photos and videos - materials that will provide practical understanding. The price of the technical procedure described above is low, however, provided that all work is carried out independently and not in a car service center.
The modification of the VAZ 2110 stove is carried out in order to improve the operation of the system. Problems with the heater will cause discomfort to the driver and passengers during the trip.
Diagram and design of the heating system in the VAZ-2110
The heating unit itself is represented by several components:
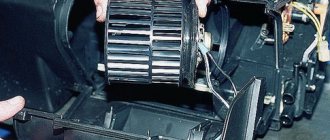
- Electric motor. A ventilation device is fixed on it, designed to pump a hot air flow.
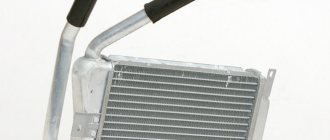
- A radiator device, the failure of which will lead to the inoperability of the stove. On old-style heating systems, the radiator assembly is not equipped with a valve designed to shut off the flow of coolant through the device. Therefore, the unit practically does not leak, since leaks are usually associated with the faucet. The absence of this element ensures the fastest heating of the car interior.
- Three dampers. One of them is designed to close and open the heating channel, the second is used for recirculation, and the third is necessary to control the heater.
- The resistor device is designed to regulate the blowing speed.
Components of the heating system
The main parts of the heating system for the interior of the VAZ 2110 car:
- 1 - electro-pneumatic valve device;
- 2 — front housing of the air intake of the heating unit;
- 3 - water deflector device, presented in the form of an air intake flap;
- 4 — valve device for controlling the damper of the air flow recirculation system;
- 5 — recirculation system damper;
- 6 — rear part of the air intake housing of the heating unit;
- 7 — heating channel damper;
- 8 — damper of the heating unit control system;
- 9 — radiator unit;
- 10 - protective plastic casing of the radiator device;
- 11 - bushing installed in the steam outlet pipe;
- 12 — bushing for the supply line of the heating unit;
- 13 — bushing of the outlet pipe;
- 14 - electric motor of the heating system;
- 15 — electric motor housing;
- 16 - supporting surface of the damper drive lever used to control the stove;
- 17 — drive handle for controlling the damper of the heating system;
- 18 — gear motor of the drive device, presented in small sizes;
- 19 - resistor element;
- 20 - protective cover for the heating unit lining.
Weak supply of warm air, stove modernization
One of the main problems of the VAZ-2110 heater is leakage and poor-quality assembly, low quality of air duct elements.
The stove can wildly heat up the air entering it, but the barely perceptible warm breath of the heater can reach the cabin. It's all about leaky air duct connections, and, unfortunately, there are quite a lot of them. Firstly, it is recommended to seal the primary air ducts ; a leak of heated air is often detected between them and the stove itself; it simply warms the engine shield.
Disadvantages of the heater in the VAZ-2110
The main disadvantages, as a result of which car owners are forced to improve and modernize the heating unit:
- Weak air flow to the side mirrors and driver's feet. This problem often occurs during normal operation of the heating unit.
- Often consumers encounter a leak on a radiator device. The unit is equipped with a special tap, which wears out over time and begins to leak coolant. The faucet requires repair, but often the problem can only be solved by replacing the radiator assembly.
- The central air duct of the system includes two parts that are not sealed together. From the radiator device, this blower must supply a heat flow to the feet of the passengers sitting in the rear. If we take into account all the bends, then this is at least 2.5 meters. Of course, the heat flow does not reach the rear passengers.
Symptoms of a heater malfunction
The main signs by which you can identify problems with the heating unit:
- The temperature mode of the heater is not regulated. The problem usually lies in the control unit or in the operation of the heater dampers.
- The sensor located on the ceiling does not function. It is designed to determine the temperature inside the car.
- The heating unit does not function; only cold air flow is supplied to the vehicle interior.
- The side windows of the car or the feet of the driver and passengers are blown with hot air ineffectively.
- The volume of refrigerant in the cooling system decreases. The problem can manifest itself covertly or overtly. In the latter case, a leak can be noticed from the lines of the heating system or radiator device.
- The heating unit functions, but is very noisy.
The channel In Sandro's garage spoke in detail about replacing the electric motor of the heating unit on the "ten".
Causes of poor foot airflow
Heater malfunction
Air through the cabin filter is taken from the street by the rotating blades of the electric heater motor. Through a damper system, air is distributed through air ducts and supplied into the cabin through deflectors and non-adjustable grilles.
Air, like any gaseous medium, tends to follow the path of least resistance. Therefore, it is logical that the air flows first come out of the central and side deflectors. The feet of the driver and passengers are blown last. Structurally, the air ducts to the central deflector and the upper side airflow points have a larger cross-section, and it is much easier for air to pass through them.
Initially, you need to make sure that nothing interferes with the intake of air from the atmosphere. After all, if the air is supplied in insufficient volume, then it will not be enough to supply all airflow points with the intensity that was calculated at the design stage of the car.
Check the condition of the cabin filter. To do this, remove the wipers and frill. The cabin filter is located on the right side of the vehicle under the windshield. It is covered with a plastic casing, which is secured with four self-tapping screws. Unscrew the screws and remove the cabin filter. We start the engine, warm it up to operating temperature and check the operation of the stove. If the situation has improved, change the cabin filter and close the issue.
The second common cause is a clogged heater core. In this case, the heating of the interior will be weak, because warm air does not come out of all the deflectors well, and not just into the legs. But the fact is that when driving for a long time, your feet begin to freeze first, so it seems that the problem is in this part of the airflow.
Video: Why the stove does not blow at the feet of VAZ 2111,2110
This malfunction is easily diagnosed. We find two pipes for supplying antifreeze to the heater radiator (rubber hoses on the left side in the direction of travel of the car). With the engine warm, carefully touch the two pipes one at a time with the heater running at full power. The difference in temperature between the pipes should be minimal. If one pipe is hot and the second is cold or barely warm, we wash or replace the heater radiator.
Checking the operation of the dampers
There are nine exit points for air flows from the heater on the VAZ-2110:
- central deflector;
- two side deflectors and two windshield air vents;
- heated feet of the driver and front passenger;
- two outputs for heating the feet of rear passengers.
In an ideally operating system, the pressure generated by the heater motor is sufficient to create an effective flow to warm the feet. However, over time, gaps form in the joints of the air ducts, and the dampers of the VAZ-2110 heater begin to fit loosely to the body. This leads to atomization of the air flow. As a result, a minimum amount of air reaches the distant exit points.
First, dismantle the panel with the central deflector. It is held in place by four plastic clips. To remove it, simply pry it off one of the sides with a suitable object, such as a flat-head screwdriver. Be careful: the clips are fragile.
Evaluate the operation of the damper. In older cars with a manual damper drive, pay attention to the play in the linkage of the rods. A broken rod system will not allow the damper to fit tightly to the body in the extreme position, which will cause air to leak from the cold circuit. The problem is corrected by adjusting the damper. In a mechanical drive, it is possible to shorten the rod due to a movable lock on a gear rod or a threaded tip. During the adjustment process, check that the position of the switch on the panel corresponds to the actual position of the damper.
Another reason why the VAZ-2110 stove does not blow into your feet is a malfunction in the operation of the automatic heater control system (AHC) unit or the gear motor of the VAZ-2110 stove. In this case, there is usually insufficiently warm or even cold air from the stove operating in maximum heating mode. This is due to the incorrect position of the damper in which the gearmotor sets it.
Evaluate the operation of the gear motor of the VAZ-2110 stove. To do this, visually check how it closes the damper when switching modes. The easiest way to do this is to remove the panel with the central deflector. Move the temperature knob to the extreme position (for example, set the minimum temperature), then sharply switch to the opposite mode. The damper should completely block the channel visible from the driver's position. If this does not happen, the problem lies in the gear motor or the automatic control system unit. Check the serviceability of the gearmotor and unit.
Video: Airing the legs of VAZ 2112, 2110
How to modify and modernize the stove with your own hands?
There are many options for tuning and improving the operation of the heating unit, which you can do yourself. To implement each task, you will have to completely or partially disassemble the heating unit.
Before remaking the heating unit of the VAZ 2110, it is necessary to seal the main air duct as much as possible.
Improved side ventilation
There are two ways to improve side ventilation:
- lay the corrugation, which will be aimed at blowing the glass of the side windows;
- modification of the VAZ 2110 stove may involve sealing all the cracks that lead to loss of air flow.
The first option is more effective for blowing the feet of passengers sitting in front and behind. In fact, practice shows that this method has no effect for blowing glass on windows. Therefore, to solve the problem, all the cracks in the panel are sealed.
The task is carried out using silicone sealant or a special anti-creaking agent. All cracks located around the perimeter on the upper and lower components of the center console panel are sealed. All holes located around the fasteners are treated with silicone.
Damper modernization
In cars manufactured after 2003, setting the damper to blow the feet does not produce results, since the heater blows in all directions. In older versions of the car, the damper works better.
The upgrade procedure is performed as follows:
- Using a metal saw, you should cut out the end parts of the damper. There is no need to dismantle the elements of the heating system. The place that needs to be cut is marked in red in the photo below.
- The flap intended for blowing the windshield does not need to be touched. If the consumer cuts off the end parts on it, then the airflow along the edges of the windshield will be worse.
- To increase air intake, a piece is cut out onto the windshield on the driver's side. This part is marked in green in the photo above.
- It will take a long time to cut out, it must be done carefully. The task may take several hours to complete.
- Next you will need a piece of soft aluminum. Alternatively, you can use iron from a coffee can, as shown in the photo. The iron is cut out with a regular knife and fixed on the stove elements.
Improved foot airflow efficiency
To complete the task you will need:
- new boots, the type of parts does not matter;
- grille, can be used from old speakers, you need to cut a circle out of it, if there is no grille, you can use rubber pads for a Fiat Punto car;
- A piece of rubber can be purchased at the car market.
Upgrade procedure:
- Using an elastic band, the cut circle from the grille is fixed to the boot. You can use super glue to attach the elements.
- On the other side, fixation is performed with a tie. In its absence, the use of plastic clamps is allowed.
- To modernize the driver's foot airflow system, it is necessary to ensure air flow to the pedals. To do this, a corner is cut on the plastic wall of the cladding from the bottom side of the pedal.
- A plumbing pipe is installed into it. This option is the simplest to implement and quite effective.
- To create a system for warming up the feet of passengers sitting in the rear, the corrugation must be removed from the ashtray. The use of plastic pads located under the seats is not recommended. To implement this option, it will be necessary to install two corrugations instead of one, and it is necessary to use elements with a smaller diameter. If you use this method, the plastic guides under the seats must be raised slightly, this will avoid directing the air flow onto the mats.
- After completion of the work, quality must be checked. To do this, turn on the stove, and bring a lighter with fire or a match to the blowing point.
If there is no grille, it is permissible to use deflectors from a VAZ 2105 car. This will allow the driver to control the air flow directed to the legs of passengers in the rear.
Rear seat heating system upgrade
To improve the operation of the rear seat heating system, it is necessary to install corrugated heating ducts. The problem of the operation of the device (module) for distributing the air flow to the driver's feet and the passenger can be solved by sealing the cracks. For this, as in the first case, you will need silicone sealant or modelin. The use of these products will prevent violation of the standard aesthetics of the interior cladding.
A simpler option is to remove the so-called Christmas tree, which is used to distribute air flow. Instead, three separate corrugated pipes are installed in the heating channels. The diameter of each of these pipes should be 4 cm.
Heater prevention
To prevent damage to the heating unit, it is necessary to follow the preventive measures of the system:
- The refrigerant level in the expansion tank is periodically checked. If there is a shortage, antifreeze is added, the causes of the leak must be eliminated.
- To ensure high-quality operation of the cooling system, only high-quality antifreeze is used.
- The engine temperature must not be allowed to increase. You can monitor this parameter using a sensor located on the instrument panel.
- Water is not used instead of refrigerant, since this liquid has a lower boiling point compared to antifreeze. Using tap water will cause rust and rapid wear of system components. Filling with water is allowed only as a last resort - if a leak occurs, the problem is discovered on the road, and there are no car shops nearby.
Video “Guide to replacing the damper gear motor”
The channel In Sandro's Garage presented instructions for changing the damper gearmotor in a garage environment.
Vehicles of the VAZ concern have one global disadvantage - the car's stove. Despite the fact that VAZ-2110 cars have already taken into account some shortcomings in the heating system, the situation with air distribution remains at an insufficient level.
Often, with the onset of cold weather, drivers are faced with the problem of poor-quality operation of the car’s heating system or its complete failure. An unforeseen situation must be resolved urgently, since improper functioning of the heater causes significant discomfort for the driver and passengers and reduces safe driving.
The temperature in the vehicle interior is adjusted by using the VAZ-2110 heater damper, which often fails. Let's take a closer look at how to repair and replace the VAZ-2110 heater damper with your own hands.
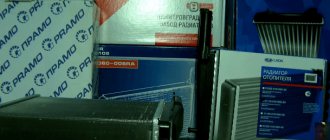
Which heating radiator to choose?
The main source of heat in the car interior is the radiator, which modern manufacturers produce from two materials - copper or brass, and aluminum. Which heater radiator is better - copper or aluminum for a VAZ 2110 - 2112 remains to be seen, since not only the efficiency of the heater, but also comfortable driving in winter depends on this choice.
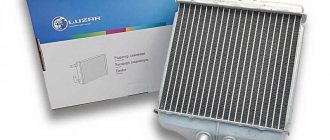
Advantages of an aluminum radiator
To find out which heater radiator is better to install on the seven, let’s make a comparative comparison. To do this, you need to find out all the advantages and disadvantages of the two types of stove heat exchangers. First, let's figure out what the pros and cons of aluminum units that are installed on classics from the factory.
- Cost is one of the main advantages of such devices, since it is precisely because of the low price that many choose models made of aluminum alloy. The price difference between copper (brass) and aluminum devices can be up to two times.
- Large selection - these models are more popular, despite some of their disadvantages. The reason for this popularity is their price, but you often have to make sure that it is better to buy a copper unit for the stove. Among the advantages, heat transfer should also be noted, however, practice shows that heat transfer rates are significantly inferior to brass devices.
It is important to know: For “ten and twelve” manufacturers do not produce three-row heat exchangers made of aluminum, which actually causes low heat transfer. Only two-row ones are produced.
Advantages of copper heater radiators VAZ 2110 - 2112
Now let’s find out why a copper stove radiator is better than an aluminum one. The advantages of these units include:
- Thermal conductivity - even if we take into account the fact that copper ones are only called such, since they contain much more brass than copper, they have high thermal conductivity. It is this indicator that is fundamental when choosing a heat exchanger from which you can get more heat to heat the interior.
- Easy to repair - even the slightest mechanical damage can be repaired at home. Moreover, after soldering work, the unit can last a long period of time (which also depends on the quality of the soldering). The entire radiator is made entirely of plastic without the use of plastic.
- Not only are the plates made of copper, or rather a brass alloy, but the body itself is also made of a similar material. This is a big advantage, because due to this design, operational parameters are increased.
Three-row versions of radiators are produced. This brings more heat into the cabin. With so many advantages, one wonders if these devices have any disadvantages.
It is necessary to note some disadvantages of the copper heat exchangers under consideration. They also exist, and sometimes play a decisive role in choosing the appropriate units. The main disadvantage is the cost, which is 2 times higher than the price of aluminum analogues. It is precisely because of the big difference in price that most car owners give preference to aluminum competitors, having never experienced copper heater radiators on a VAZ 2110 - 2112
We recommend: How to properly connect the on-board computer
Diagnostics of the heater damper operation
In most cases, stove problems appear with the arrival of cold weather, when it is one of the main attributes that ensure comfort in the vehicle interior. A common problem in dozens of stoves is the incorrect distribution of warm air flows that enters the car interior. Often a situation arises when the stove does not respond to switching temperature modes and supplies only cold or only hot air. Both the first and second options bring significant inconvenience for the driver.
Repair of the VAZ-2110 heater damper
Repair of the damper is carried out only in a situation where it is skewed or jammed in a certain position. It is very difficult to call this a repair; it is most often a forced measure to extend its operation for a short period of time. If there are problems with the valve or its drive, then soon you will still have to disassemble the stove and replace the failed parts.
The repair consists of installing the valve in its standard seat. To do this, you do not need to completely disassemble the heater. With the ignition on, it is enough to try using manual adjustment to try to seat the valve in its seat. You can also remove the deflector and try to activate the damper by hand. If it starts to move, then you have a temporary fix. However, as previously stated, this is a conditional fix for the problem. If a part jams, it will soon have to be replaced, since the stove will not function correctly.
If, after restoring the performance of the damper with the ignition on, it is only possible to manually control the damper, then the source of the breakdown is the micro-gearbox.
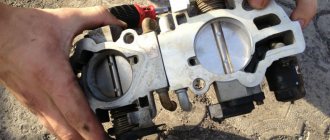
Design Features
For the VAZ 2110, it is possible to install two types of stoves - new and old. Regardless of the engine used (injection or carburetor), there are no fundamental differences in the designs of the stoves.
But what is the difference between the new and old type stoves? Let's try to figure it out.
- Radiator design. This is the main difference between the devices. Therefore, when replacing a radiator from an old one to a new one, be sure to take into account the installation nuances;
- The controller knob on stoves is slightly different. Old-style heaters have a main problem - they have been discontinued. They cannot be an analogue for 4 and 5 position controllers, which began to be equipped with dozens of them in the fall of 2003;
- The micro-gear motors for the stoves are different, starting in September of the same 2003. The difference lies in the shaft position sensors (resistors). Therefore, when making repairs, make sure that the devices are truly interchangeable and that you bought old-style resistors for your old stove, not new ones. Otherwise the gearmotor will not work.
We recommend: Error codes for VAZ 2114
Replacing the VAZ-2110 heater damper
Replacing the heater damper is not particularly difficult, however, it requires extreme care from the performer. In order to get to the valve, it is necessary to completely dismantle the stove. The main part of the work on removing the stove will be carried out in the engine compartment of the vehicle. Before directly disassembling the stove, it is important to initially disconnect the battery and drain the coolant from the heating system. After this, the windshield, soundproofing material, and heater fan are dismantled and adjusted. Next you need to disconnect the vacuum hose clamp.
The next step is to remove the front part of the heater housing. The work is quite complex, so to simplify the removal of the heater body, you can additionally dismantle the instrument panel and unscrew the fasteners from the inside of the cabin that hold the heater in place. After this, you can lift the heater from the engine compartment and remove the brackets and screws securing the front part of the heater. Only after completing this amount of work can the front part of the stove be dismantled without difficulty.
Next you need to disconnect all the hoses and pipes that go to the radiator. After this, the rear heater casing and radiator are dismantled. Only after these manipulations have been performed will access to the damper be opened. At this point, the preparatory stage of work can be considered complete. After this, you need to proceed directly to replacing the VAZ-2110 heater damper with a new part.
Dismantling a damaged part and installing a new one is not particularly difficult. The only question that may arise during dismantling is how to remove the heater damper rod of the VAZ-2110. Although it is plastic, it fits extremely tightly on the shaft. To dismantle it you will need two screwdrivers. Use a thin screwdriver to lift the fastening lever, and use a second screwdriver to loosen the plastic protrusions of the rod. After disconnecting the rod, the upper valve will go down on its own, since nothing else will hold it.
When installing a new part, you need to pay attention to the fork located on the valve axis. It is important to secure it in such a way that it engages with the lever. When installed correctly, the heater valve should be in a raised position. In another situation, it will be impossible to adjust and replacing the part will not give the desired results.
When installing a new part, some drivers simultaneously modify the heater damper rods. The design of the rods has some disadvantages. When switching the damper control lever, you can see that in any position of the lever, the air flow towards the driver’s feet is blocked by either the first or second damper. To improve the distribution of air flow, it will be necessary to shorten the adjustable draft by three divisions. For this purpose, it is necessary to cut off the retractable rod end. Such a simple modification will help the damper to move to the required position, which will have a positive effect on air distribution. The flow of warm air will flow evenly to the driver’s feet, the side windows of the car and from the central deflector.
After this, all the removed parts are installed in the reverse order, and coolant is added. Care must be taken when connecting pipes and hoses. Only sealed connections will guarantee high-quality functioning of the heating system. After this, you can check the operation of the dampers and the entire heating system.
Options for improving the heating of the area around the driver's feet
To solve the problem of poor-quality heating of the driver’s feet, you need to start by improving the plastic air distribution unit. To do this, you need to completely dismantle and disassemble the car dashboard. After that, you can begin to seal the cracks. At the same time, sealing the holes will solve another important problem of the VAZ-2110 stove - poor-quality blowing of the side windows.
Most often, drivers use two methods to seal the elements of the heating system of a car: the first involves replacing the corrugated hose for air supply with a new product, the second involves gluing all elements of the heating system where there are holes.
It is best to use both methods in parallel. Anti-creak product is very suitable for eliminating holes. With its help, you need to glue all the existing holes around the perimeter of the parts for supplying air to the car interior. And at the same time it is necessary to seal and seal the cracks in the vehicle panel.
The next stage of work is the modernization of the heater damper. To do this, the valve is dismantled and the factory seal is removed, which copes very poorly with the assigned tasks. The heater damper and the places where it is attached to the car body must be treated with modelin or silicone to eliminate cracks. Next, instead of the standard sponge, you need to glue the bitoplast in several layers. This will help reduce the loss of warm air as much as possible and will accompany the supply of heat along the right path.
Repair of the stove damper drive
When replacing the VAZ-2110 heater damper, it is simultaneously necessary to carry out work to check and, if necessary, repair or replace the heater micro-reducer. It is located under the windshield trim, where the vacuum booster is located. To dismantle it, you need to remove two connectors - the micro-gearbox and the motor, and also unscrew the fastening screws. After this, the motor is removed from the micro-gearbox and its operation is checked by connecting it to the stove control unit. If it is faulty, then you need to replace the part with a new product. It is also possible to repair the motor, however, only in extremely rare cases.
A working motor is installed in the micro-reducer and it is mounted on a standard seat. This must be done very carefully so that the motor pin fits correctly into the lever connector on the heater valve.
After installation, it is necessary to check the movement of the damper drive levers by turning the temperature regulator in the vehicle interior. After checking the movement of the levers, it is necessary to reassemble all dismantled elements in the reverse order.
Popular problems
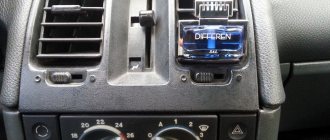
Diagram
The reasons for valve failure are different
| Causes of failure | Characteristic |
| Micromotor gearbox jammed | This element is responsible for controlling the damper drive |
| Problem in the control unit | It should be checked in order to understand whether the micromotor gearbox, the damper, or the control unit is at fault |
| The plastic dampers have moved from their seat and are jammed, making it impossible to control the stove. | This is typical for the old-style VAZ 2110 heater damper, when plastic was still used for this component. |
When the gearbox is functioning, but the damper still does not turn, you can hear characteristic sounds - clicks . This indicates that a square shaft rotates inside the socket.
There is only one way to cure such a malfunction - remove the old damper made of plastic with foam insulation, and replace it with a new, modern one. The new type of damper is made of metal, and the seal for it is made of rubber.
Let's sum it up
Malfunction of the VAZ-2110 heater damper is a common malfunction, especially in vehicles with old-style heaters. Breakage in most cases is due to the quality of plastic dampers, which are very often subject to deformation. It is possible to repair and replace the VAZ-2110 stove valve yourself without the help of professionals. Before starting work, you need to understand that in order to carry out high-quality repairs and restore the previous functionality of the heating system, the stove will have to be completely dismantled.
Despite the complexity of the work ahead, the result will please the driver and passengers with warmth and comfort in the vehicle interior. A high-quality repair of the heater damper and its drive guarantees stable operation of the vehicle’s heating system at any time of the year.
Differences in design
The VAZ 2110 was equipped with stoves of the so-called new or old model. Both systems, including those on the VAZ, which has an injector instead of a carburetor, are not particularly different in design.
So, the immediate differences:
- The main difference between the new stove and the old one is in the design of the heater radiator. Therefore, if you are repairing a heating system and decide to install a new model instead of an old radiator, then take into account some nuances;
- In addition, the SAUO controller is also not exactly like that. 4 or 5 position controllers manufactured before the fall of 2003 have already been discontinued and are not suitable for new heater models;
- The micro-gearboxes are also different, starting from release in September 2003. They differ in resistors (shaft position sensors), so you need to check whether the resistor in the MMR model that you purchased is interchangeable.
MMR of the old type MMR of the new type