Rack and pinion steering has a number of disadvantages:
- It doesn't take impacts quite well.
- It is strongly influenced by vibration.
- The load on the parts is quite large, which affects the duration of their operation
- The installation process is quite complicated and requires relatively large labor costs.
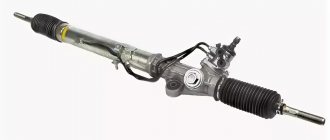
The steering rack transmits rotation from the steering wheel to the wheels. It affects handling, and any malfunction of this unit makes the car less obedient. Steering rack elements are subject to natural wear and tear, and they are also subject to shock loads from driving on rough roads. This leads to the fact that by the mileage of 200–250 thousand km, the steering rack of almost every car requires replacement or repair.
Repair or change?
Replacing a faulty rack with a new one is easier than repairing it. But more expensive. Let's consider the costs of repairing the rack of a 2009 Ford Focus II. A new original rack costs approximately 800 USD. Replacements are offered for purchase at a price of 350 USD, but their service life, according to reviews from car owners, is unpredictable.
A repair kit for a Ford Focus II rack costs 30-40 USD, boots with clamps - 9 USD. The savings are obvious, but it will take about 2 days to remove, repair and install the unit. For dismantling and installation, a regular set of wrenches is suitable, but to disassemble and assemble the rail you need a special tool that you will have to buy or make yourself.
Before starting repairs, try to soberly assess your strengths and capabilities, compare the benefits of self-repair and the upcoming labor costs.
Removing the steering rack
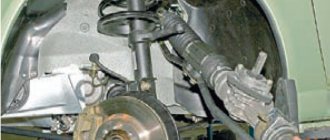
Removing the rack has its own characteristics for each car, but in general, the procedure is as follows:
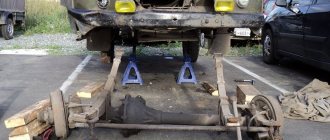
- Place the front of the car on stands and remove the wheels.
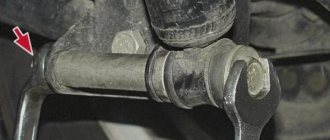
- Press the steering ends out of the steering knuckle axles (use a special puller).
- Remove the rack heat shield.
- For cars with hydraulic power steering, unscrew the oil supply and return hoses (place a container under the hoses to drain the fluid), for cars with electric power steering, disconnect the connector or remove the steering shaft position sensor.
- Unscrew the bolts securing the steering rack to the subframe or engine shield (depending on the make and model of the car).
- Loosen the coupling bolt of the universal joint between the rack and the steering shaft.
- Pull the rack in the direction of the steering shaft to release the spline joint (if the rack does not go, you can knock it down with light blows of a hammer).
- Pull the rack out through the left or right wheel arch (depending on the layout of the engine compartment).
Advice: not in every car you can get the rack just like that - the subframe may get in the way. Removing it completely is long and difficult; try unscrewing only the rear bolts and the engine mount, then move the subframe down. Often this is enough and the rail is released.
After dismantling, the rail must be cleaned of dirt and washed.
DIY steering rack diagnostics and repair
The steering rack transmits rotation from the steering wheel to the wheels. It affects handling, and any malfunction of this unit makes the car less obedient. Steering rack elements are subject to natural wear and tear, and they are also subject to shock loads from driving on rough roads. This leads to the fact that by the mileage of 200–250 thousand km, the steering rack of almost every car requires replacement or repair.
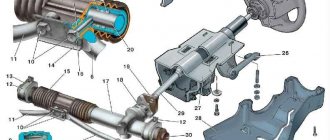
Disassembling the rack
It is better to disassemble and reassemble the steering rack cleanly, without sand and dust. If abrasive particles get inside, the surfaces and seals will quickly wear out, and the rack will leak. Secure the rail in a bench vise; if you don’t have one, place clean cardboard or other material in the disassembly area.
Important: do not clamp the rail in a vice too tightly - its body, made of a fragile aluminum alloy, may burst or become deformed.
Procedure for disassembling the steering rack
- Remove the clamps and pull off the tie rod boots.
- Securely fix the rack body and unscrew the steering rods (there are grooves for an open-end wrench on the threaded coupling).
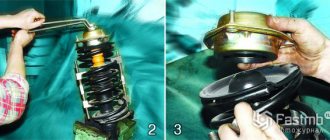
- Unscrew the lock nut and the adjusting mechanism nut, remove the washers and the pressure sleeve from the mounting socket.
- Unscrew the drive shaft housing or nut (a special wrench may be needed) and remove the shaft from the housing.
- Pull out the rack gear rod.
- Remove the sealing collars, bushings and fluoroplastic rings from the rack body.
Tip: before disassembling the rack, mark the position of the gear rod or measure how much it protrudes from the body on both sides, so that you can assemble it correctly later. Mark the position of the adjusting nut and count the threads as you unscrew it to ensure that the clamping sleeve is in the correct position after assembly.
Diagnosis of the causes of malfunction of the Chevrolet steering rack
There are several causes of breakdown that the Chevrolet owner needs to know about. This is necessary in order to carry out timely maintenance and diagnostics of the element in order to extend its service life and avoid costly repairs.
A malfunction that requires troubleshooting may occur for the following reasons:
- elements of the Chevrolet rack are worn out;
- there was an accident in which the wheel was hit;
- The steering mechanism is leaking.
It is recommended to carry out diagnostic measures and repairs at a car service center. If you do the diagnosis yourself, you need to be extremely careful. Often, illiterate actions of the Chevrolet owner led to repairs (for example, a sharp turn of the wheel, loosening of the mechanism, jerking of rods). If strange knocking noises occur in the steering rack (in a Chevrolet Lacetti), you need to do the following:
- stop moving as it may be dangerous;
- without starting the engine, check the free play of the steering wheel - try to turn the steering wheel in different directions: if the play is increased, it means that the internal part of the mechanism is worn out; if there are clicks at the extreme positions of the steering wheel, the steering tips are most likely faulty;
- If a leak appears in the passenger compartment, this indicates a leak in the upper oil seal of the Chevrolet steering rack.
- open the hood and visually inspect the mechanism, as well as the anthers, assess their degree of wear.
Important: if you do not have the experience and skills of an auto mechanic, it is better to carry out diagnostics, and even more so, repairs at a special service station.
Defective parts
The parts of the disassembled rack must be wiped of oil, cleaned of deposits and carefully inspected. Repair kits usually include only rubber seals and fluoroplastic bushings with rings. This may not be sufficient for every case.
Carefully inspect the surface of the gear rod - there should be no damage or signs of wear. Pay special attention to the working area - the teeth and the part of the rod that comes into contact with the rings, seals and bushings. Any damage, corrosion, risks and scuffing will lead to rapid wear of the seals and rack leakage.
Deep corrosion of the rack rod. Such a detail cannot be installed.
There should be no cracks, nicks, chips or deep wear on the helical teeth of the drive shaft gear. It is dangerous to install a shaft with such damage - the rack may jam in motion.
A common cause of knocking noises in the rack is wear of the pressure bushing. The working surface of the part must be smooth, without signs of pressing or scoring. The pressure bushing is usually not included in the rack repair kit, but for many cars it can be purchased separately.
Wear of the pressure sleeve - the fluoroplastic insert is pressed through
Severely worn and damaged rack parts cannot be restored in a garage. If problems are found during troubleshooting, contact specialized service stations for help. There they can restore the rack shaft and rod using professional equipment.
Defects of the working surfaces of the steering rack
Rinse the inside of the rail with nefras under pressure
Inspect the working surface of the distribution head for wear
Inspect the working surface of the shaft piston for wear.
Inspect the Teflon rings of the piston and distributor head
Inspect the shafts where the seals work for corrosion, wear and scratches.
Detection of working surfaces is completed. Let's move on to the next stage
Rail assembly
Assemble the rack in the reverse order of disassembly. Lubricate the parts with power steering oil before installation to prevent scoring on the bushings.
Insert fluoroplastic rings and bushings into the rack body carefully - the material is fragile and can burst from impacts or great force. For accurate pressing, you can use a socket head and an extension of a suitable size from a set of keys.
After installing the gear rod, center it according to the marks made before disassembly, then insert and screw the drive shaft.
Insert the pressure sleeve and washers into the socket, tighten the adjusting nut the required number of turns and turn the mechanism by hand several times from lock to lock (you need to rotate the drive shaft). If the rack is assembled correctly, the gear rod should move easily, without jamming. Tighten the adjusting mechanism locknut.
Tighten the tie rods and install the boots, crimp them with special clamps.
Important: do not use plastic ties instead of clamps, they do not provide reliable compression of the boot, moisture will get inside the rack, the rod will rust and damage the cuffs. The rail will leak.
How to adjust the Avtokar steering rack
DIY car window lift repair
The service life of the steering rack should be about 15 years, as manufacturers assure. However, it will only be so under the following conditions: regular rack maintenance, use of recommended high-quality oils, driving the car on good roads and/or on the roads for which your car is intended, otherwise you cannot avoid repairing the steering rack yourself.
Of course, if you constantly drive only on high-quality roads without potholes and holes and with good coverage, then you may very rarely have to climb into the car to repair it. But, unfortunately, good smooth roads still remain an unfulfilled dream for Russian car enthusiasts, so the steering rack has to be repaired somewhat more often than we would like. One of the types of steering rack repair is its adjustment.
When is steering rack adjustment necessary?
Adjusting an automotive structure such as a steering rack is quite simple and does not take much time from the driver.
Before you start adjusting the steering rack with your own hands, you need to make sure that it is the adjustment that should be done; for this, it is better to familiarize yourself in advance with the possible harbingers of this type of repair. But before I announce them, I would like to briefly explain the principle of operation of the reiki, knowledge of which will help to better understand possible problems.
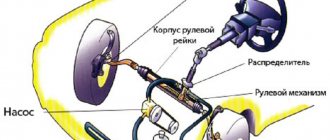
The operating principle of the steering rack.
So, the principle of operation of the steering rack is to transfer the forces that the driver applies to turn the steering wheel to spur or helical gears mounted on a bearing and coming into action together with the rack. Backlash-free interaction between the rack and pinion is ensured by pressure springs.
Design and operation of the steering rack video
Steering rack faults.
The most common problems that arise with the steering rack are play and knocking. With them, adjusting the rack may not help. After all, in most cases they arise due to the fact that simple wear has occurred (it can only be seen when the rack is completely disassembled) of the parts of the rack and pinion.
However, play and knocking of the steering rack can also appear for other reasons:
- the fastening of the steering bipod or steering housing has become loose, or the fastening of the lever bracket has become loose;
- The gearing of the transmitting pair needs adjustment.
If the steering wheel begins to turn harder and with greater effort, then this is also a sign that the steering rack needs to be adjusted. Together with the adjustment, oil is changed or added to the rack housing.
How to adjust the steering rack?
The main task of adjusting the steering rack is to get rid of knocking, play and make it easier to drive. For this procedure, you will need the help of a friend, since it will be difficult to do it alone.
Stages of work:
- We bring the car onto a pit or overpass; in extreme cases, jacks are also suitable. In the latter case, the front wheels must be placed straight, and do not forget to secure the jacks when lifting the car.
- To adjust, tighten the adjusting screw, which is located in the steering system, namely in the end cover.
- The screw should be tightened very slowly. When adjusting the screw, we check for play, steering wheel travel and the presence of knocking. Backlash can be measured using a special device - a backlash meter. When measuring, you must adhere to GOST, according to which the backlash cannot be more than 10 degrees.
- After adjusting the screw, test the machine in motion. If there is no heaviness during maneuvering, then everything is tightened well, but if there is such a problem, then the screw needs to be loosened a little.
That's all. Finally, I’ll just repeat that tightening the steering rack screw may not solve the problem; in such cases, the best solution would be to go for a consultation with a specialist.
Steering rack adjustment video
Installing the steering rack
It is better to install the steering rack on the car with an assistant - one starts the rack from the engine compartment, the other directs the universal joint into the shaft splines from the passenger compartment. The universal joint can be placed in only one position - there is a special casting in the spline joint, which must be aligned with the groove on the mating part. Do not immediately tighten the pinch bolt - the universal joint will take the correct position on the splines after the rack and subframe are finally screwed on.
Install and tighten the steering rack and subframe mounting bolts, then finally tighten the steering shaft universal joint pinch bolt.
Insert the steering pins into the axles and tighten the nuts. Connect the power steering tubes and hoses (or wire connectors for a system with power steering). Pour power steering fluid into the reservoir until about.
Install the wheels and, without removing the car from the stands, begin bleeding the system (for cars with power steering).
How to bleed the power steering system
- Turn the steering wheel several times from lock to lock with a slight delay in the extreme positions.
- Remove the car from the stands, add fluid to the power steering reservoir if the level has dropped.
- Start the engine.
- Turn the steering wheel from lock to lock several times, also with a delay in the extreme positions.
- Make sure that the power steering pump does not make noise, add fluid to the reservoir if the level has dropped and inspect the connections, hoses and power steering tubes for leaks.
Tip: Don't rush to install the heat shield; it will make it more difficult to inspect the rack during the test ride.
After bleeding, check again the tightness of all threaded connections and make a test drive. Steering rack repair can be considered successful if:
- The steering wheel has become lighter and sharper.
- The knocks and noises stopped.
- The fluid level in the power steering reservoir does not drop.
- The rack is not leaking.
- The car handles well and holds the road confidently.
If everything is in order, reinstall the heat shield.
After repairing the steering rack, be sure to check the wheel alignment at a car service center or yourself.
Signs of a faulty Chevrolet steering rack
Before repairing the Chevrolet steering rack, you need to make sure whether this particular mechanism is broken. Several direct and indirect signs may indicate this malfunction.
It would be more correct to carry out diagnostics and repairs at a car service center, but you can try to find out the cause of the problem yourself. The following are the most common symptoms of a bad steering gear:
- knocking noise under the hood when turning the steering wheel;
- the appearance of longitudinal steering play;
- the steering wheel turns hard;
- Oily spots form under the car;
- The steering wheel sticks when turning.
All of the above signs directly indicate a breakdown, so when they appear, you need to diagnose and repair the unit.