Replacing the rear spar of a VAZ 2110 on your own
- 1 Equipment and tools
- 2 Body geometry 2.1 Removing the side member
- 2.2 Installation
- 2.3 Coloring
Replacing the rear spar
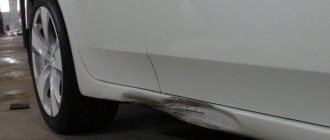
Replacement of the rear side member of a VAZ 2110 is carried out after a strong blow to the rear of the car. Also due to inattention to the body during operation. When the load-bearing capacity of the spar is lost, the geometry of the body is disrupted and the rubber of the rear wheels is eaten. The car becomes uncontrollable on the road; it is constantly necessary to correct the direction of movement. Replacing the rear side members of a VAZ 2110 is a responsible and important task, but it can be done on your own. When the side members burst or are bent, this makes it difficult to control and keeps the driver in constant tension. An outdated spar can be straightened in a car repair shop, but keep in mind that the metal ages quickly. Therefore, after restoration it will lose strength, which will affect further operation.
Equipment and tools
Replacing rear side members on a VAZ 2110
Repair work to replace the spar must be carried out in an equipped and spacious garage. It is necessary to prepare equipment and tools:
- welding machine or gas welding;
- rear side members complete with rear suspension;
- two jacks, hydraulic racks;
- drill;
- Bulgarian;
- chisel;
- plumber's hammer;
- disc on a grinder for stripping metal where the old part was cut.
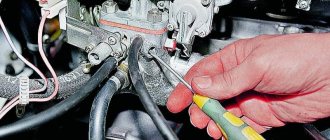
Before starting repairs, you must remove the battery and drain all remaining gasoline from the gas tank. If possible, cover the gas tank with fireproof material. To prevent spontaneous combustion from remaining gasoline vapors in the gas tank. Since the repair will be carried out using a power tool that produces a spark.
Body geometry
VAZ 2110 rear spar
A spar that has become unusable disrupts the proportions of the body. Repairs must begin with correcting body parameters:
- The car is lifted on a rack lift; if there is no such thing, lift the rear of the car with jacks.
- Place it on reliable supports, taking into account the availability of work on replacing parts and straightening the body (see Repairing a VAZ body - from a car mechanic’s textbook).
Note. Before editing the body, it is necessary to apply markings along which the damaged parts will be cut off. Spacers for straightening the body are installed under the bottom, and are pushed out from the ceiling with hydraulic struts. Then the bent body element is aligned under pressure. The proportion of straightened structures, rear pillars, door and trunk gaps are checked.
- After completing work to correct the geometry of the body, the rear wings are removed.
Removing the spar
VAZ 2110 rear spar
Dismantling begins with the following:
- One side is hung on the jack to relieve stress on the metal.
Note. To facilitate access to dismantling repair work, the machine can be placed on its side. First lay the old tires under the side to be laid, place reliable supports under the raised part of the body, preventing the lifted car from returning.
- The rear suspension is removed to facilitate the work of cutting the spar.
- Parts are cleaned of debris and dirt.
Note. It is advisable to wash the entire rear body area with a stream of water under pressure. Use a metal brush to remove mastic and paint from all parts down to the metal. Wait for the underbody to dry and clean the area where the repair work is being carried out again.
Rear spar VAZ 2110
In the factory, on the assembly line, the old spar is attached to the body by spot welding. The fastening points are drilled out with a drill, using a drill according to the diameter of the spot welding. A grinder with a metal disc is used to cut off welding points that could not be drilled out. The part is cut strictly along a line perpendicular to the longitudinal axis of the body. In places where it was not possible to cut off the weld points with a grinder, it is necessary to cut them off by hitting a chisel with a hammer. By removing the spar using this method, there is free access to the remaining parts of the rear body. With the help of a mechanic's hammer, the identified defects are corrected, the cut areas are cleaned with a grinder with a grinding wheel on to bare metal.
Installation
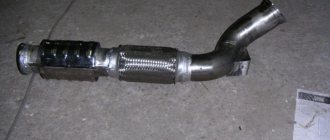
Having dismantled the old spar, the new one is tried on. If necessary, you need to trim the part to length. Drill the new spar at the attachment point by welding in three places with a pitch of 3 mm. It is recommended to try on the spar very carefully so as not to spoil the part. So:
- The finished part is secured in its original position using clamps, without violating the linear dimensions according to pre-applied marks.
- Then carefully, using a semi-automatic welding machine, it is tacked in three places along the previously drilled holes.
- Having installed the first spar, carry out the same work relative to the second.
- Checking their installation along the longitudinal lines of the body, we study the manual on carrying out body welding work.
- Additional metal plates are applied to the bottom and inside and welded to strengthen the structure.
- After finishing the welding work, carefully use a grinder with a grinding disc to clean the welding areas.
Coloring
Spars VAZ 2110
- all parts should be cleaned of scale and foreign sludge;
- treat with solvent;
- coat welding seams with epoxy resin;
- Cover metal parts with two layers of primer.
Note. After complete drying, after 24 hours, paint with mastic. After this, anti-corrosion mastic is applied. And the last step is installing the rear suspension.
Repair work related to replacing the rear spar requires professional training, knowledge of welding, and practice. Without these skills, it’s easier to turn to a specialist auto repair shop or car service center. Our technicians will quickly and efficiently carry out all car repair work. After the repair work is completed, the car is checked at the stand, the tires are balanced, and a guarantee is issued for the service performed. The machine will be operated without restrictions. For any questions that arise, please contact specialized VAZ service centers that have proven positive results. The cost of repairs with all the work (replacement of the spar, painting and mastic coating) will be within 20,000 rubles. The work will be completed in the workshop in 3-4 days. Therefore, you should carefully weigh everything, calculate it, and make the right decision on the issue of replacing the rear spar. If you can’t afford to overpay, because the price is not low, you can do the work yourself. It is important to strictly follow the instructions, use video and photo materials.
You can also find out about replacing the front spar on our website.
Source
Repair of the front side member of a VAZ 2112
Trying to find out what the problem was with the loose steering wheel, I started digging and saw a crack on both sides of the spar, I wrote about this crack once before, it was only on the side of the engine compartment, luckily after removing the wheel I saw that on the outside it was also there under a layer of dirt and anti-corrosion. This is where the crack was located; when the wheel rotates, this crack moves back and forth. What do you advise? Weld patches or make a cover with bolts?
Here it will be clearer where the crack runs.
Dismantling the engine is unrealistic, I’ll cook it at the dacha with an inverter, I’ll try with short electrodes, how can I sell it later? :ooo:
Dismantling the engine is unrealistic, I’ll cook it at the dacha with an inverter, I’ll try with short electrodes, how can I sell it later? :ooo:
It’s easier for you, my spar was completely rotten, but the one you have can be welded on one side and bolted together.
It's not easier. Maybe some Guru will advise how to repair this crack, because water probably got inside there, maybe cut 2 mm on each side to remove the rust from the edges of the crack?
And on the engine side, the adsorber and brake tubes seem to be lying there, and they don’t really want to turn the brake into steam.
I advise you to sell the car
How can you sell it with a crack? it is obvious and shakes in dynamics. I need to carefully weld it like a thread, I’ll try welding it on the outer and lower parts of the patch, and just go through the seam on the inner part carefully and seal it flush, go over it with an edge and use Movil.
I found some crap for myself for the weekend.
First you need to do it. I don't think you can do it yourself.
A semi-automatic machine would be nice, of course, but we’ll also try an inverter, I think it won’t go anywhere, it will work.
What’s amazing is that the old 10 from ’98 didn’t have any cracks, only the sills rotted, but here in such a place it’s fucked up.
And there is no money for a new car.
Do you have it again? Where could I catch such a crack?
No, not new, last year I found something like a hair in the paint last year on this side member from the side of the engine compartment, I cleaned it and painted it over, I thought it was just some kind of crap under the paint, but luckily here it is on you, after replacing the silent blocks (daisies and silents in the front beam) finally the crack came out after 3 weeks.
How can you sell it with a crack? it is obvious and shakes in dynamics. I need to carefully weld it like a thread, I’ll try welding it on the outer and lower parts of the patch, and just go through the seam on the inner part carefully and seal it flush, go over it with an edge and use Movil.
+1 then let whoever needs it fix it. It may not be pretty, but this is my opinion.
If I were you, I would carefully try to boil the engine off, then add more anticorrosive and off to the market!
My hood lip is all rusty, and above the windshield there is standard rust next to the seal, so you can’t really sell it right away and for reasonable money. In short, I’ll cook, paint, clean the interior, and probably add some salt in the fall. I'm definitely tired of it.
And I’ll take a thread in this spirit https://all.auto.ru/cars/used/sale/1694440.html
Well, look, you are closer to the hardware.
then boil and be sure to check the water in the spar, if there is sushi in all possible ways.
I looked, it looks like there are rubber plugs in the side members both on the side of the engine compartment and somewhere under the bottom, I’ll chop it all off, cook it and pour it with Movil.
go to the lumps and put two seams there. they will brew it and that’s it, otherwise there is such a discussion, but if there is water there, it will evaporate a second after the start of cooking. then clean the whole thing with a grinder and mastic, glue a newspaper on top and apply some mastic and it will be like it came from the factory
I don’t really need seams, I’ll make patches and maybe add rivets to make it hold tighter.
That's it, I went to the dacha to cook this whole thing.