Car window tinting is, without a doubt, an important element of external tuning. To tint your car or not is a matter of choice for every car enthusiast. In this article we will talk in detail about how to properly tint car windows with film yourself. And at the end you can watch a training video.
Tinting is a process that requires care and preliminary preparation. But with some skill, you can do car window tinting yourself.
You may also be interested in the following materials on our website:
- Athermal glass tinting film;
- An alternative to tinting is frame curtains;
- Instructions for tinting headlights with your own hands;
- How to remove tinting from glass yourself.
Below we have prepared for you step-by-step instructions for tinting car windows: from choosing a tinting film to gluing a reflective strip on the windshield.
Choosing a film for car window tinting
The tinting film market is so large that to review it, we wrote a separate article about films for tinting car windows.
We do not recommend buying cheap Chinese DIY kits; instead, we recommend purchasing only high-quality roll film for window tinting.
Also listen to the recommendations of sellers who sell tint films. From them you can purchase all the tools necessary for tinting windows.
Still, it is better to see once than to hear a hundred times. Therefore, we suggest watching a video tutorial on tinting car windows with your own hands, which is located at the bottom of this article.
And for better assimilation of the material, all stages of self-tinting windows are described below and can be used as a cheat sheet.
Denshik › Blog › Car tinting
Do-it-yourself car window tinting, do-it-yourself car window tinting
For those who want to save on tinting car windows in the showroom, we offer instructions on how to tint car windows with your own hands. Please note that it is prohibited to heavily tint the windshield and front windows of a car (only the stripe at the top of the glass is allowed on the windshield); for rear windows, use tinting of any intensity except mirror.
Doing car window tinting with your own hands (without resorting to the services of car service workshops) is quite simple and relatively cheap at first glance, but if you are doing this for the first time, the costs can be commensurate or even more than the money spent on a specialist in a specialized salon, while the quality is with the first time, with all the care, it will definitely not exceed what was offered to you by the salon. Nevertheless, for a better understanding and for those who dare to try, what is written below is attached.
Materials and tools for tinting car windows
In the process of tinting your car windows yourself, you will need the following tools:
- Spray,
- Soft and hard forcing,
- Paper napkins,
- Sponge,
- Scraper,
- Ruler,
- Knife,
- Hair dryer.
To work with the tint film, use a water-soap solution prepared in the following proportion: 5 drops of washing shampoo per 1.5 liters of water. Mix the solution thoroughly (you can use the container of your spray bottle for this).
Before you start tinting, you should thoroughly clean the exterior of the glass using a prepared water-soap solution.
Pros and cons of tint films
Everything in this world has positive and negative sides.
And especially for construction and finishing materials. Films that provide glass tinting are no exception. The advantages of this finish include:
protection from direct sunlight; a barrier to the unhealthy curiosity of others; protection from intruders; protection from injuries associated with breaking glass in a window.
As for the shortcomings, they are also obvious: twilight in an apartment with windows decorated with tinted film comes earlier than in apartments whose windows do not have such finishing; and limiting the light transmission capacity (after all, the film transmits only a certain light spectrum).
Pattern of film for tinting car side windows
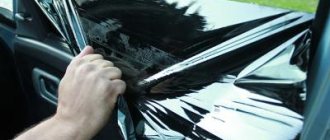
Before you start tinting your car windows, you need to cut out the tint film.
To do this, you need to determine where the adhesive layer is located - it is protected by a transparent liner. Always cut the film along the roll and make sure that the cut piece is a few centimeters larger than the glass.
- Moisten the outside of the glass and place a pre-cut piece of tint material on it with the liner facing toward you. The bottom of the film should be parallel to the outer horizontal window seal and overlap it by approximately one centimeter.
- Using a punch and a knife, make side vertical slits in the film so that you can then place the pattern over the vertical seal by about one centimeter.
- Next, having folded the bottom part of the pattern, lower the glass a little and, having secured the film along the upper edge of the glass, make a horizontal cut in it, and then give it its final shape.
The blank for tinting fixed glass is cut out so that it is several millimeters larger than the transparent area of the glass.
- Pre-fix the film on the outside of the wet glass surface.
- Cut out the workpiece carefully and slowly.
- If the transparent area is limited by the seal, then cut along the seal using a forcing.
Be careful not to damage the car's exterior parts with a knife!
- For ease of work, try to remove excess pieces of the pattern immediately after the cut.
- If the transparent area is limited by an opaque strip of paint, then the cut should be made so that it extends a few millimeters into the opaque part.
Be sure to ensure that the knife blade is always sharp (break off dull parts of the blade in a timely manner).
Preparing the car
There is nothing complicated in preparing the machine itself. But before tinting your car windows, you should perform several procedures.
- Choosing a location. It is better to do tinting in a well-ventilated, bright room where there is not a lot of dust. Typically, a simple garage is chosen for such procedures. Before you begin pasting, it is recommended to clean the room. It won't hurt to sweep and dampen the garage a bit to ensure all the dust settles.
- Car wash. If the car is dirty, it is better to wash it thoroughly in advance. You can do it yourself. Do not allow contaminants from the body and windows to get under the adhesive film.
- Polishing. There are a number of special products for car glass that allow you to clean and polish them efficiently. Be sure to use them. This will create a perfectly clean and smooth surface.
- Dismantling. In fact, it is not at all necessary to remove the windows from the car. This significantly complicates the tinting process and requires more effort and time. By following the instructions, you can easily do without dismantling work.
When all preliminary procedures have been completed, you can proceed to the most important stage.
To carefully stick the film on all the glass, it is better to first ask a friend for help. Having 4 hands makes working much more convenient and easier. An assistant in such a matter will definitely not hurt.
Pattern of film for tinting the rear window
The pattern of the tint film for the rear window of a car has some features due to its spherical surface.
- Before cutting, the outer surface of the glass and the film for tinting must be completely dry.
- The letter “H” is drawn on the surface of the glass with a wet sponge, and the tint film is rolled out along the roll with the adhesive layer facing out. Our blank must be larger than the transparent area of the glass.
- The remaining tint material along with the roll must be carefully removed. To do this, it is better to resort to the services of an assistant.
- After this, place the workpiece on the outside of the rear window so that there are no horizontal folds, but only vertical ones.
- Smooth out the film in an “H” pattern, since glass has a spherical surface.
Wrinkles on the tint film must be smoothed out using a hair dryer. Be careful - do not overheat it; only the vertical folds can be heated!
- After removing all the folds, moisten the surface of the glass and film, and carefully smooth the pattern. As a result, it should take the shape of glass without wrinkles.
- Smooth the workpiece from the center of the glass to its edges, both vertically and horizontally.
Carry out this operation carefully using forcing. Make sure that the film does not break during the tinting process, but is evenly smoothed over the surface of the glass.
The next stage of tinting is precise cutting of the film. In this case, it is recommended to use a spotlight to illuminate the car interior, and the cutting line should extend several millimeters onto the opaque area of the glass (see the video below).
Important points
Before you start tinting your car windows, pay attention to a few important points:
- Don't forget, the film is attached to the inside of the glass. This will save it from environmental influences, as well as adverse weather conditions;
- Be sure to follow the norms established by law, otherwise you risk having your tint removed at the very first traffic police post. And you will be guaranteed a fine;
- To tint the glass you do not have to remove it. Of course, it is more convenient to carry out work with the glass removed, and the film will be fixed more smoothly, but with careful execution everything should work out just the same;
- Direct pasting must be carried out in a well-lit, clean room. You can do this outside, but then you will have to find a place where the appearance of dust is minimized, and also “catch” calm weather.
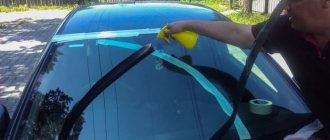
Applying film for tinting on car side windows
Wet the surface of the side glass and use a scraper to clean its lower part. Then lower the glass a few centimeters, wet it and also clean the rest of the surface using a scraper.
Clean the surface with the blade consistently and make sure that there are no uncleaned areas.
Next, wash the glass with a hard sponge and wipe dry using a rubber pad. Wipe the edges of the glass with a napkin. Moisten and wipe the glass again with a rubber pad.
- Before applying the tinting film, wet the glass generously.
- Then it is necessary to remove two-thirds of the liner protecting the adhesive layer from the workpiece and moisten the adhesive surface. It is convenient to carry out this operation on the rear window of the car by placing the pattern with the adhesive layer facing outwards.
- It is better to cut off the excess liner removed from the workpiece before applying the tint film.
Wet your fingers. Your fingertips must be clean, since in the process of tinting the glass you will need to touch the adhesive layer of the film.
Carefully take the workpiece and place it on the prepared glass surface.
Try to ensure that the adhesive layer only touches the surface of the glass and does not touch the seals or other surfaces.
Align the tint film along the top edge. Make sure that there are no gaps or gaps anywhere, and begin to carefully squeeze the solution out from under it.
Follow a few simple rules:
- Hold the pattern with your hand, since when you initially squeeze out the liquid, the workpiece will slide along the glass.
- Squeeze water from the center to the edges.
- Use rubber and then hard forcing. Using hard distillation, expel the liquid in the same directions - from the middle to the edges.
- Then, using a forcing tool and a hair dryer, fix the film at the top edge of the glass.
- After this, use a knife to remove the excess tinting film protruding onto the upper edge of the glass - this technology allows you to avoid leaving gaps along the upper edge.
Raise the glass. Bend down the bottom part of the pattern protected by the liner and generously moisten the glass with the solution. Remove the liner completely.
Do this extremely carefully and make sure that the film without a liner does not touch anything other than the glass with its adhesive layer!
Carefully tuck the tint film under the glass seal. Squeeze out the horizontal inner seal using a force and, when inserting the film for tinting, make sure that it does not break - this operation also requires certain skills, so be especially careful (pay attention to how the master will carry out this operation in the video tutorial below) .
- Squeeze the solution out from under the film using hard forcing: squeeze out the water in successive movements from top to bottom and from the middle to the edges.
- Finally remove any remaining moisture using a distiller wrapped in a napkin and a hairdryer.
- Make sure that no water bubbles remain under the film during the tinting process.
The technology for cleaning and sticking small fixed glasses will be identical.
avtoexperts.ru
It seems that many car enthusiasts have more than once looked with hidden envy at cars passing by and tinted to zero. Of course, high-quality tinting changes the appearance of the car, making it visually attractive. However, in addition to a purely aesthetic role, car window tinting also performs useful functions. For example, it allows you to reduce the temperature in the car interior in the summer, without letting in a significant share of solar energy, and in the winter it helps to accumulate heat - after all, the sun's rays warm up a dark surface better. In addition, tinting performs a protective function, hiding from the eyes of ordinary people what is in the cabin and trunk (if it is a hatchback or station wagon) of the car. The only inconvenience that tinting can cause is a decrease in visibility at night.
The windows of many modern cars can be tinted at the factory. The manufacturer often determines the comfortable degree of tint (the throughput of the tint film) in accordance with international safety standards. The traffic police has no complaints about such tinting. If the film used to tint car windows does not meet the specified standards, the traffic police may fine the car owner and force him to remove the tint. However, we are talking only about the glass of the front doors: according to GOST, the throughput of the tinting film for these windows should not exceed 30% (that is, the tinting should absorb no more than 30% of the light).
Let's say you decide to tint the windows of your car. But you don’t trust companies that do tinting and want to do everything yourself. Commendable. We will try to help you with some tips.
Tip #1. Film selection.
You are probably not your own enemy, and therefore you must approach the choice of film responsibly. First, remember that a good film, characterized by durability and optimal transmission capacity not only for sunlight, but also for the driver’s vision, is not cheap. However, is it worth saving the budget when it comes to high-quality car tinting? Secondly, it is worth deciding which glasses will be tinted. All car windows can be tinted, but the throughput of the films for the windshield, rear and side windows will be different. Let's say you wanted to tint all the windows of your car. Then a film with a transmission capacity of 50% is suitable for the windshield, for the front side windows - 35%, and the rear windows and trunk windows can be tinted with a film whose transmission capacity is 15%.
In addition to the degree of transparency of the film, its color must also be taken into account. The optimal choice is charcoal gray, which is comfortable for the eyes of car passengers and well prevents sunlight and prying eyes from entering the cabin.
Tip #2. Preparing for tinting film.
Now all that remains is to dismantle and clean the glass. We advise you to remove them, since covering car windows with tint film without removing them is a complex matter and you cannot do it without experience. It's better not to risk it and remove the glass. Then they should be thoroughly washed with soapy water, complex stains should be removed with a solvent, and then washed again with soapy water. The next stage is preparing the “pattern”. To do this, take a piece of tint film, apply it to the glass and mark the edge of the cut with a marker, leaving a tolerance of 5-7 millimeters. Then we cut this pattern with a stationery knife.
Applying film for tinting on the rear window of a car
The process of cleaning the rear window of a car is slightly different as it has heating filaments and extreme care must be taken not to damage them. It is also recommended to use a plastic spatula instead of a scraper.
- After cleaning, the glass should be washed with a hard sponge, wiped dry using a hard scrub and wiped with a napkin around the perimeter.
- Before applying the film for tinting, moisten the glass generously with the solution, while covering the rear shelf with a rag or some other available material so as not to flood the car’s electrical equipment with water.
To apply the tint film to the rear window, it is better to use an assistant.
- When removing the liner, immediately wet the exposed adhesive layer with a soap and water solution.
- Carefully, without touching the adhesive layer to foreign objects, place the workpiece on the glass - this is a very important operation and requires a certain skill.
- Make sure that the film does not curl, wrinkle or bend.
The adhesive layer of the pattern should only touch the treated surface of the glass and, in no case, any parts of the car’s interior or the installer’s clothing.
Align the pattern with the glass so that there are no gaps, and begin to smooth it using a rubber pressing tool.
When tinting the rear window, smooth the film from the center to the edges so that no air or water bubbles remain under it. Use a plastic spatula in hard-to-reach places.
- Next, moisten the tint film and squeeze out the remaining solution from under it using hard forcing.
- Squeeze along the heating threads - from the center to the edges.
- Then perform this operation by hard forcing, but already wrapped in a napkin.
The final stage is pressing the tint film around the perimeter by forcing, while simultaneously heating the glass from the outside using a hairdryer.
Be careful not to overheat the glass with a hairdryer - it may burst!
Choice of tint
The most common and affordable way to tint a rear window is to use a tint film. By the way, if we talk about the most modern achievements in the field of tinting, it is worth mentioning the so-called electronic tinting, which recently appeared on the auto services market. Its main feature is the unique property of changing its light transmittance in seconds. One press of a button on a special key fob, and tinted windows turn into regular ones. Another press, and vice versa.
However, this tint is still a luxury due to its high cost (up to 10 thousand US dollars). It also cannot be done at home, as it requires special equipment. Regular tint film is affordable and comes in a wide range of colors. Therefore, if you are thinking about how to tint your rear window, I can safely recommend its use.
Video “Instructions for tinting the rear window”
This video provides detailed instructions describing the process of tinting the rear window.
Pasting a reflective strip on the windshield
The tint strip must be cut along the roll with a small margin. Then wet the surface of the glass and place your workpiece on it with the adhesive layer facing out.
Make slits along the seals and remove excess tinting film.
Do not forget that you must use only special blades that do not leave scratches on the glass!
- Smooth out the pattern so that there are no horizontal folds - only vertical ones.
- Then, using a hairdryer and forcing, heat and smooth out the vertical folds.
The windshield is sensitive to temperature changes, so do not heat it up or cool it down suddenly!
- Moisten the workpiece, fold it in half and smooth it carefully so that there are no folds or wrinkles.
- Then, using a ruler and a knife, make notches at a distance of 10-12 centimeters from the top edge of the pattern.
Make notches as often as possible. Using this method you can make a reflective strip of any width. The width will depend on how far from the edge you make the notches.
- After this, remove the excess tint film.
- Then lay out the pattern along its entire length and use a ruler to cut the notches between each other (this process is clearly shown in the training video below).
When working with film when tinting windows, always place the adhesive layer and liner on yourself.
- After this, place the resulting workpiece again on the damp windshield from the outside.
- Wet and smooth the pattern and use the light from inside to make precise cuts.
To avoid gaps after applying the tint film, make a cut so that the film extends a few millimeters onto the opaque area of the glass.
Clean the glass and apply the film for tinting from the inside in the same way as in previous cases.
In conclusion, I would like to note that tinting car windows is not the easiest job if you lack the proper experience. If you still want to make your car stand out from the gray mass of “steel horses” like it, we advise you to also pay attention to other types of car tuning.
We give a definition
In simple, accessible language, tinting car windows is darkening them using a special film.
It is necessary to carry out such work independently only if you already have some knowledge in this area, and it is better if you also have experience.
The most common method of tinting is gluing glass with a special polymer film with a layer of paint of a certain intensity and shade applied.
In general, car enthusiasts are not too bothered by the choice of color, preferring the classic blackout.