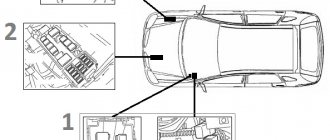
The standard arrangement of fuses in the Nissan Almera N16 car is different from previous modifications. Engineers preinstalled three blocks with fuses and one mounting block with relay switches. Location:
- In the cabin, to the left of the steering wheel;
- In the engine compartment, to the right of the battery;
- Near the expansion tank of the cooling system.
In order to simplify the fuse identification process, a diagram, markings, and pinouts are printed on the back of the housing cover.
The process of replacing modules on a Nissan Almera H16 car is not difficult, the task can be done by a car enthusiast, but be extremely careful and do not make mistakes.
Regardless of the modification of the Nissan Almera N16, the standard arrangement and number of modules are unchanged. In the period from 2000 to 2006, the Japanese brand was manufactured in three body modifications: three- and five-door hatchbacks, and a sedan.
Relay-breaker layout diagram
| Designation | Who is responsible for what/what provides |
| K 1 | Headlight |
| K2 | Throttle valve |
| K 3 | Window lifters |
| K 4 | Rear fog lights |
| K5 | Ignition |
| K 6 | Fuel equipment |
| K 7 | Electrical equipment |
| K 8 | Reservation |
| K9 | Reservation |
| K 10 | Reservation |
| K11 | Reservation |
| K 12 | Stop signals |
| K 13 | Backlight |
| K 14 | Interior lighting |
| K 15 | Reservation |
| K 16 | Reservation |
| K 17 | Reservation |
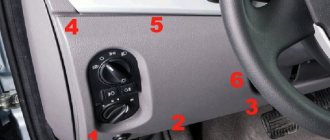
Almera N16 fuse box in the passenger compartment
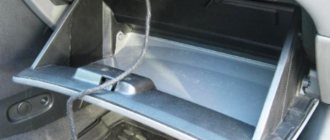
The interior mounting block of the Nissan Almera H16 consists of a set of fuses and relays. There is a place for it in the lower left part of the front console on the driver's door side. The block is closed with a lid that opens like a glove box.
The relay part is made of seven elements. Four of them are located on the front side:
- R1 – headlights;
- R2 – throttle control complex;
- R3 – electric window drive;
- R4 – rear fog lights.
The remaining three are located on the back of the block:
- R1 – ignition system;
- R2 – engine supercharger;
- R3 – auxiliary equipment.
Fuses have the following areas of responsibility:
- 1 – electric drive of side mirrors;
- 2 – brake lights;
- 3 – socket;
- 4, 6, 26 – used for additional equipment;
- 5 – turn signals, emergency stop light;
- 7 – heated rear window;
- 8 – lambda probe;
- 9, 10, 12 – illumination of the instrument panel, glove compartment, center console, instrument panel power system;
- 11 – automatic transmission;
- 13 – interior lighting;
- 14, 16 – fan of the heating complex and air conditioning;
- 15 – air conditioner;
- 17 – injector;
- 18 – airbags;
- 19, 24 – auxiliary electrical equipment;
- 20 – electronic engine control unit;
- 21 – launch system;
- 22 – cigarette lighter;
- 23, 32, 33, 34 – not used;
- 25 – wipers;
- 27, 28 – washer complex for front and rear windows;
- 29 – fuel supply pump;
- 30 – meters for speed, engine speed and temperature, fuel level;
- 31 – ABS.
The specified fuses are equipped with fuse links for the following rated currents:
- 7.5A – 4, 26,
- 10A – 1, 2, 6, 8-13, 15, 17, 18, 20, 21, 30, 31;
- 15A – 3, 5, 14, 16, 22, 27, 28, 29;
- 20A – 7, 19, 24, 25.
It is located in the instrument panel on the left side, behind the glove box.
Fuse installation diagram
| Marking/amperage | What he is responsible for (with description) |
| F (F-1) / 20 | Side mirrors |
| F (F-2) / 5 | Stop signals |
| F (F-3) / 10 | Car socket |
| F (F-4) / 10 | Additional electrical network |
| F (F-5) / 20 | Hazard warning lights, turn signals |
| F (F-6) / 30 | Reservation |
| F (F-7) / 30 | Heated rear window |
| F (F-8) / 7.5 | Oxygen sensor |
| F (F-9) / 10 | Reservation |
| F (F-10) / 10 | Window lifters |
| F (F-11) / 10 | Automatic transmission controller |
| F (F-12) / 10 | Oven heater, cigarette lighter, interior lighting |
| F (F-13) / 30 | Glove compartment lighting |
| F (F-14) / 30 | Heater fan |
| F (F-15) / 10 | Air conditioning system |
| F (F-16) / 15 | Fuel system, fuel pump |
| F (F-17) / 15 | Safety system |
| F (F-18) / 10 | Reservation |
| F (F-19) / 10 | Powertrain sensor |
| F (F-20) / 10 | Car horn |
| F (F-21) / 5 | central locking |
| F (F-22) / 5 | Reservation |
| F (F-23) / 5 | Electrical power system |
| F (F-24) / 5 | Windshield wipers |
| F (F-25) / 5 | Headlight washers |
| F (F-26) / 5 | Rear window washer |
| F (F-27) / 20 | Fuel equipment (optional) |
| F (F-28) / 15 | Speedometer, tachometer, gauges |
| F (F-29) / 15 | Exchange rate stabilization system |
| F (F-30) / 20 | ABS |
| F (F-31) / 15 | Reservation |
| F (F-32) / 15 | Reservation |
The cost of the mounting block included is from 2300 rubles. Original fuses from 120 - 130 rubles apiece, high-quality analogues from 100 rubles apiece.
Signs of faulty fuses
- After starting the power unit, an indicator lights up on the dashboard, notifying that there is a breakdown in the engine compartment;
- No power is supplied through the circuit to the equipment, but the mechanism is inactive;
- The mounting block feels warm to the touch;
- The smell of melted plastic can be heard in the cabin.
Causes of fuse failure
- Violation of the terms of technical inspection, due to which the modules became unusable;
- Purchase of non-original spare parts and components;
- Installation with a violation of the technological process;
- Mechanical damage to the block. Modules, related parts;
- Short circuit in the electrical circuit;
- Damage to electrical wiring insulation;
- Terminal oxidation;
- Weak fastening of the contact board;
- Water getting inside, condensation forming.
Fuses and relays under the hood of Nissan Almera H16
We consider mounting block No. 2 (in diagram 2) . The block is located near the battery closer to the front of the car.
Description
| Fuse | Terminal | Current strength | Purpose |
| A | 2 | 100A | Generator (ALTernator) (charging the battery) |
| IN | 2 | 40A | electric windows |
| WITH | 2 | 40A | cooling fan controller |
| D | 2 | 40A | cooling fan controller |
| E | 2 | 30A | for diesels |
| F | 2 | 60A | for diesels |
| G | 2 | 80A | for diesels |
| H | 2 | 80A | main power supply, ground circuit |
| I | 2 | 50A | ABS |
| J | 2 | 30A | to the battery ignition switch |
| TO | 2 | 30A | ABS/ESP |
| L | 2 | 30A | ESP |
| M | 2 | 30A | headlight washer |
| 32 | 1 | 20A | Rear window washer |
| 33 | 1 | 15A | Fog lights |
| 34 | 1 | 15A | Electric throttle actuator and relay |
| 35 | 1 | 15A | Headlights, daytime low beam system |
| 36 | 1 | 15A | Headlights, daytime low beam system |
| 37 | 1 | 10A | Rear fog light |
| 38 | 1 | 10A | Dimensions, license plate lighting |
| 39 | 1 | 10A | Klaxon, battery charging (excitation current to the generator from the battery) |
| 40 | 1 | 15A | Audio, navigation, LCD display |
| 41 | 1 | 10A | Engine management system |
| 42 | 1 | 10A | Ignition coil |
| 43 | 1 | 15A | Not used |
| 44 | 1 | 10A | Not used |
We consider block No. 3 (in diagram 2) . The unit is located near the window washer reservoir near the right wing.
Replacing fuses on Nissan Almera N16
Preparatory stage:
- Flat head screwdriver;
- Plastic spatula;
- Tweezers for removing modules;
- Additional lighting as needed;
- A set of new modules, relays – switches.
Sequence of actions when replacing fuses in the passenger compartment:
- We place the car on a level surface, provide safety measures, fix the shoes, squeeze the parking brake;
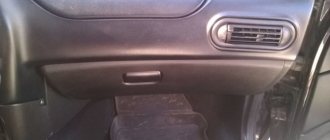
- Open the driver's door and remove the storage compartment at the bottom of the dashboard. Behind it is a mounting block;
- Carefully pry up the fuse with tweezers according to the serial number. To simplify the module identification process, markings and pinouts are indicated on the back of the cover;
- We insert a new fuse and check the equipment.
If there is a need to replace the entire mounting block, then you additionally need to unscrew the two bolts that secure the board and disconnect the connectors with the wires.
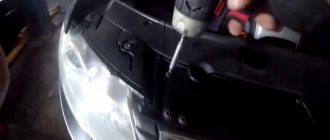
Replacing fuses in the engine compartment of Nissan Almera N16:
- Stop the engine, open the hood;
- On the right side, near the frill, there is a mounting block; it is packaged in a plastic case.
To access the modules, you need to unclip the plastic cover and find the fuse according to the serial number indicated on the back side. Then carry out the replacement.
Location and electrical diagram
In the Nissan Almera classic n16 there are several fuse blocks responsible for the operation of electrical equipment. One of them is located in the car interior, the other two are in the engine compartment. On the front side of the power supply unit, located in the vehicle interior, there are several fuses (hereinafter referred to as fuses) and relays. On the other side of the device there are three more main relays.
There are two power supplies in the engine compartment. One of them contains relays, and the other contains only fusible devices. Below are diagrams of all three blocks, as well as a description of the fuses in them.
PSU in the cabin
What are these elements responsible for? Below is a table with the designation of each PP.
Table of designations for each part of the unit located in the car interior
You may also have noticed several relays whose purpose is not described in the table. They should be highlighted separately, since the relays are designed for more powerful voltage consumers.
| Number | Purpose |
| R1 | This component ensures the functionality of the headlight lamps, that is, it is responsible for both low and high beam. |
| R2 | The second component by number ensures the functioning of the throttle valve. If it fails, the operation of the car will be incorrect or impossible. |
| R3 | Responsible for the operation of electric windows. |
| R4 | Ensures the functionality of the rear fog lamps. |
As for the device number 22, which is responsible for the functionality of the cigarette lighter. In Nissan Almera classic n16 models, cigarette lighter failure is a common problem. It can even be called a disease, since many motorists encounter this malfunction.
If you notice that the cigarette lighter is not working, first check the functionality of the fuse. Perhaps that is where the problem lies. However, many car owners use their cigarette lighter as a power source for various electrical consumers. In particular, these can be video recorders, special air fresheners, DVD players and laptops.
Of course, even with a voltage converter, the cigarette lighter is simply not able to cope with such a task. So if it is the PP that fails, then you can consider yourself lucky. Otherwise, you will have to change the cigarette lighter, even worse if this causes the mounting block itself to burn out.
As you remember, at the beginning of the article we mentioned that there are also several relays on the back of the power supply, which is located inside the car. If the block is completely dismantled, the relays will look approximately as shown in the photo.
Three relays located on the back side of the mounting power supply in the car interior
| Number | Purpose |
| R1 | Ensures the functioning of the ignition coil. If it fails, starting the engine will be impossible. |
| R2 | Responsible for the operation of the engine supercharger. |
| R3 | This device ensures the operation of additional voltage feeders, that is, in fact, all electrical accessories. |
PSU in the engine compartment
First, let's look at the diagram and description of the power supply with fusible devices, which is located in the engine compartment between the battery and the engine.
Maintenance Recommendations
- Systematically carry out a technical inspection of the car, replace faulty elements with new ones;
- Check the integrity of the insulating layer of the wiring, avoid damage, cracks, and breaks;
- After active driving through puddles or in the rain, check the mounting block, remove moisture if necessary, wipe with a rag;
- Install a new module with the same current rating in place of the faulty module. It is not recommended to exceed or underestimate the amperage. In both cases this leads to premature failure of the fuses;
- Purchase spare parts and consumables mainly from certified points of sale, official representative offices, and dealers;
- Check the integrity of the fuses using special equipment - a multimeter.
The average service life of modules, relays – switches is 50 – 55 thousand km.
Device and malfunctions
Before proceeding directly to the repair itself, it is advisable to understand the structure of the device being repaired. Otherwise, some problems and “inconvenient” moments may arise during a relatively simple operation.
A block is a system of fuses combined into one unit, each of which is built into the electrical circuit of a specific device. This element is necessary to protect the circuit from a number of unfavorable processes, including potential ignition of the wiring due to a short circuit. Such unpleasant phenomena occur due to excess current flow in the electrical circuit, which is associated, for example, with a malfunction of the device or wires. The fuse has a lower maximum current threshold, so it blows out first and immediately de-energizes the entire system. As you can see, a knot of this type is very useful and requires due attention.
Due to the specifics of its operation, a block or individual fuse can fail for a number of different reasons:
- malfunction of any device;
- electrical short circuit;
- too high current flowing into the system (often happens when the generator breaks down);
- incorrectly carried out repairs to the electrical unit of the car;
- manufacturing defect;
- excessive wear.
Having considered the above potential problems that caused the fuse to blow, we can conclude that sometimes it will be necessary to correct faults in some other components of the Nissan Almera. Of course, if you have a desire to achieve normal functioning of the car's electrical system and safe operation.
How to change the cigarette lighter itself
Replacing the cigarette lighter for Nissan Almera
If the problem is not in the fuse, then a global replacement is necessary. In this case, the following step-by-step recommendations will be useful:
- The negative battery terminals are disconnected. Now you will need to remove the lining from the floor tunnel.
- Pull out the cartridge.
- Pass the blocks with the wires of the parts and the lamps from the backlight into the holes made in the floor.
- Squeeze the lamp screen so that its claws can come out of the slots located in the cigarette lighter LEDs. Remove it.
- Press the socket latch so that it can disengage with the light guide.
- Push the nest outward - it should come out of the cladding.
- Remove the socket from the cigarette lighter - everything will work out if you thread the block with wires through the hole.
- Now heat the coil from the cigarette lighter for at least 20 seconds. The cartridge should then return to its original position with a click. If this does not happen, you should adjust it by straightening or bending its contacts.
- Squeeze the plastic latches on the light guide and push it outwards, thus pulling it out of the lining.
- Reassemble everything in reverse order. When the light guide is installed, it must fit into the slot made on the cladding.
Video on replacing blown fuses:
Previous article: Fuse box Nissan Almera n16 Next article: Electrical equipment Nissan Almera classic, n16, n15
Most consumable item
If you look at the diagram showing the fuses for the Nissan Almera n16, you can see that element number 22 is responsible for the operation of the cigarette lighter. In fact, this one turns out to be the most “problematic”, since it breaks down most often. In itself, it turns out to be incredibly relevant even for those who do not smoke because it is used to recharge and power a wide variety of consumers. These include both DVRs and laptops (the latter, however, work using special converters).
Cigarette lighter Nissan Almera n16
There are two options for failure here - either you will have to install a new “defender” (this will still be considered “small sacrifices”), or you will have to change the cigarette lighter itself. It's important to do it right.
In this regard, it would be useful to know what a burnt element looks like. This will help determine the problem visually, “by eye”: the damaged fusible part of the waste product is clearly visible. But there are cases when it does not work, and the thread will look like new. By the way, you can read about Nissan Almera errors on the instrument panel using the link.
The replacement process will be similar in both the cabin and engine versions. You can consider the process of replacing the salon version:
- The hood opens and the battery is disconnected.
- Next, remove the cover from the element where the block itself is located.
- Carry out an inspection to identify a failed cigarette lighter fuse.
- Remove using tongs if one is found.
- Install the new one and reassemble in reverse order.
- Don't forget to connect the battery.
Video on replacing the cigarette lighter fuse:
Repair activities
Nissan Almera has several blocks at once that contain either fuses themselves, or relays, or both. It is worth noting that regardless of whether you have a “Classic” or “N16”, the information below is relevant in any case.
So, let's look at how to get to the fuse boxes in Almere:
- The first block is located inside the car. It is located behind the removable front panel cover on the driver's side.
- The second and third devices are located under the hood. The first block is located next to the battery and is a “black box”, the second is on the left side of the engine (where the right wing is). It is worth noting that the device located next to the battery contains fuses, while the other only contains a relay.
Purpose, types and colors of electrical fuses
Almera G15 fuses are a protective element of various electrical equipment from the following phenomena:
- short circuits;
- current overloads.
Their circuit can be made in one, two or three blocks. Moreover, each of them is responsible for the operability of the equipment complex, and a separate element is responsible for the protection of a specific device.
The following types of fuses are distinguished:
Plug fuses
Plug-in - the most common, consist of two plugs, between which there is a fuse-link for a certain amount of current. It is closed with a plastic casing. When the maximum value of the current flowing through the insert is exceeded, it burns out.
Bimetallic - in the specified type of fuses, the fuse-link is replaced with bimetallic plates with silver-plated contacts that fit tightly to each other. If an abnormal mode occurs, the plates heat up and open. Their further contact will occur after the metal has cooled.
Plug and bimetallic fuses with spring
Spring bimetallic - the principle of operation is identical to the previous type. The difference is that the bimetallic plates do not return to their original position on their own. This is achieved by introducing an additional spring into the design, which holds the plate in the off position. To restore the electrical circuit, you will need to press a button that will release the spring.
Fuses are produced with different current ratings. At the same time, manufacturers give each denomination a specific color. In most cases, the following colors are used:
- black – 1A;
- gray – 2A;
- purple – 3A;
- brown-yellow – 5A;
- dark brown – 7.5A;
- red – 10A;
- blue – 15A;
- yellow – 20A;
- white – 25A;
- green – 30A;
- orange – 40A;
- blue - 60A;
- brown – 70A;
- light yellow – 80A;
- lilac – 100A.
Color shades may vary