Types of deflectors for car doors
You can find various windshields on sale, which differ in their shape, cost, manufacturer, the presence of additional accessories included, color and many other parameters. At the same time, the main criterion by which you should choose deflectors is the way they are installed on the car. The following types of windshields can be found on sale:
- Plug-in. These models are easier to install, but they perform worse in use. Wind deflectors are installed between the glass and the rubber seal, which is why they can cause inconvenience when opening/closing the glass on some car models;
- Invoices. This type of deflector is attached to the door frame and will take a little longer to install. Also, the installation of such windshields is somewhat more complicated, but if installed correctly, they will last longer and will not interfere with the car glass.
When buying windshields in a store, you need to choose models that are suitable specifically for your car. It is better to give preference to deflector options from well-known manufacturers. In most cases, such models are equipped with consumables that will be required to install the product.
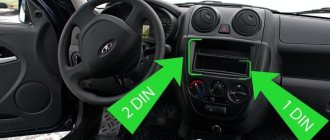
Installation options
I won’t dwell on how to choose a suitable deflector for myself. I can only say that it is better to buy designs that are suitable for your specific car. Also choose among trusted manufacturers, some of which I have already named. You can even use the product SKU to search online if you know exactly what you need.
There are many car accessories stores in Moscow, St. Petersburg and other cities. Don't forget about the tuning studio. They will help you with your choice and install a suitable deflector. If you want to do everything yourself, use video instructions and my recommendations as an assistant.
Since many people have coped with tuning the radiator grille, this task will also be feasible for you.
Installation of a chimney on the roof
There are two options for installing the deflector: connecting directly to the smoke duct and mounting it on a piece of pipe, which is later put on the chimney. The second method is considered the best in terms of convenience and safety, because the most troublesome stage of the work is performed on the ground, and not on the roof.
Standards according to GOST
Excerpts from current regulatory documents regarding the installation of a deflector on a pipe inform about the following:
- any nozzles on the smoke channel must be mounted in such a way that they do not block the path of fuel combustion products;
- on a flat roof, the mouth of the pipe should be placed above the fence;
- on a roof with slopes, the chimney head must be located above the ridge, if the space between them is less than one and a half meters, or at the level of the ridge, when the gap from the pipe to the highest point of the roof varies within three meters;
- the deflector must not be installed in an area where an aerodynamic shadow is created due to neighboring buildings;
- the device body must be well ventilated regardless of the wind direction;
- rotating deflectors are not suitable for chimneys of stoves located in houses built in areas with cold winters;
- installation of a round deflector on a brick chimney involves the use of special transition pipes.
Required Tools
To install the deflector on the smoke duct, you need to find some tools and fasteners:
- electric drill;
- open-end wrenches;
- threaded rods;
- nuts;
- clamps;
- two ladders (one for climbing to the roof, and the other for moving along the roof).
In addition, to install the device on the chimney you will need a piece of pipe. Its diameter should be slightly larger than the size of the smoke channel.
Deflector mounting
The chimney is connected to the pipe, performing certain tasks:
- On the prepared section of pipe, 10 cm from the edge, mark the points where you need to drill holes for fasteners. Similar marks are left on a wide area of the diffuser.
- Holes are made in the pipe section and diffuser with a drill. The parts are temporarily connected to each other, checking that the upper and lower holes match. If this is not observed, then the product is considered defective, because the fastening elements cannot be inserted smoothly.
- Pins are inserted into the holes. On both sides, both on the diffuser and on the piece of pipe, the fasteners are secured with nuts. They are twisted evenly to protect the product from deformation.
- With the manufactured device they are sent to the roof. The structure is placed on the smoke duct and tightened with clamps.
If you are installing a deflector on a brick chimney, you will have to arm yourself with nails and a hammer.
Proceeding as written above, you can mount any device except a weather vane deflector, since its design is rather non-standard.
In the case of using a device with a compass rose, 3 holes are created in the smoke channel with a drill. The holes are made at the same level so that bolts can be inserted into them a little later. These fasteners are immersed in the holes when the ring part of the deflector-vane is placed into the cut of the chimney. An axle is inserted into a bearing in the form of a ring, and a cylinder, a device blade and a cap are alternately attached to it. The elements of the weather vane deflector are combined with brackets or rivets.
Instructions for installing window deflectors without gluing
There are many ways to attach windshields, sometimes there are ones that do not have an adhesive strip or fasteners. On a number of VAZ car models, cutters can be installed without any fasteners. What it looks like: the plates are of such a size that when fixed, their edges rest against the corners of the window frames. At this time, the side is held in place by a glass seal or so-called velvet.
- Lower the glass a little before installation.
- Arm yourself with a thin plate of durable material.
- Pry up the seal on the outside of the window where the fairing will be attached and peel it off.
The rubber band does not stick on its own, but there is a possibility that it will stick to the anti-corrosion lubricant. It is used to treat the window frame after painting. Slightly bend the windshield in the middle part, insert the outer side into the gap between the door frame and the seal. Raise and lower the glass - if the cutter is installed correctly, it will fit freely into the seal groove.
How to install deflectors on windows
Depending on whether plug-in or surface-mounted deflectors are used, you need to know the features of their installation, as well as how the process of installing the accessory itself occurs.
Important: When installing deflectors, do not forget to monitor visibility from the car. They need to be mounted so that they do not block the view of the road
How to install plug-in deflectors
Plug-in deflectors are attached under the door frame - in the groove where the glass fits when lifted. To install them, you need:
- Lower the window;
- Insert the windshield, slightly bending it according to the shape of the door, if installed on the front door of the car. It is worth noting that on the front door the deflector is held in place largely due to this bend, while on the rear door it is held mainly by a gluing element;
- Make sure that the deflector has a sufficiently ground part that fits into the groove. If this is not the case, then the car window will not close completely and, moreover, will constantly scratch against the deflector. It is necessary that the glass does not touch the deflector when raising and lowering or does so minimally;
- Having tried on the windshield, you need to secure it. If there is adhesive tape on it, then use it. In the option where it is missing, you will have to use your own double-sided tape. Also, some deflectors have special rivets for fastening.
After installing the wind deflector, make sure that the glass closes smoothly and that the installation of the deflector does not affect the operation of the lifts.
It should be noted that plug-in deflectors can fall off at any time, and drivers don’t particularly like them for this. The fact is that at high or low temperatures the adhesive base loses its properties when connected to the groove.
How to install overhead deflectors
Installing overhead deflectors is a little more difficult and requires some tools. However, when installed correctly, surface-mounted deflectors will last much longer than plug-in deflectors, and they do not have any effect on the operation of the window regulator, also eliminating the risk of scratches on the glass due to wind deflectors.
To install overhead deflectors, you must:
- Clean the car well, and most importantly the places where the deflectors will be attached;
- When the car is washed, wipe dry again with a lint-free cloth (you should also not use a sponge) where the deflectors are installed;
- Degrease the places where the windshields are installed. It is best to use ethyl alcohol or regular vodka for this. To degrease, wipe the surface with alcohol applied to paper napkins, not sponges, for maximum effect;
- Next you need to choose a place to mount the deflector. To do this, attach it and roughly figure out how it should be positioned so that it does not block the view from the cabin and performs the functions assigned to it. Some drivers prefer to install deflectors in the lower or upper corner, others limit themselves to the middle option. Determine the optimal mounting location for yourself and make small marks on the car body with chalk or a pencil to make it easier to navigate where to attach the part during installation;
- After this, the protective film is removed from the tape, and the deflector is installed in the marked place. Experts and experienced drivers recommend doing one of the following before gluing the windshield:
- Warm up the adhesive tape and the attachment point a little with a hairdryer. The slightly melted adhesive base of the deflector will attach better to a warm surface, and it will hang longer;
- Add extra stickiness to the tape using quick-release adhesive. You need to apply a little Moment glue or something similar to the adhesive surface. In this case, it is better not to apply glue over the entire surface, otherwise later there will be difficulties with cleaning it if the deflector needs to be replaced. Apply a few peas of glue every 5 centimeters.
After installing the deflector, you need to give some time for the adhesive base to dry. It is better not to use the car for at least 3 hours, and you will have to refrain from washing it for 3-4 days.
(425 votes, average: 4.56 out of 5)
How to apply anti-gravel film
You can install the anti-gravel film yourself. If you are not sure of the quality of the result, we recommend contacting a service center for professional service.
If you decide to stick the film yourself, here’s what you’ll need to apply it:
- Use the spray bottle twice - the first with distilled water, the second with a soap solution.
- A rubber spatula (spatula) with which we will expel water from under the film.
- Degreaser (alcohol or vodka will do)
Sequencing:
- The part to which the film will be applied must be checked for chips, thoroughly washed and degreased. Apply a soap solution to the surface using a spray bottle.
- Peel the film off the base and cover it generously with soapy water. This is necessary in order to get rid of static electricity.
- Carefully glue the film onto the part. Using a spatula, remove the soap solution. If dust has managed to get under the film or air bubbles remain, peel off part of the film and rinse it with distilled water.
If all actions are carried out carefully, you will be able to reliably protect your car, and it will delight you with its original appearance for a long time, and the hood will be free of chips and dents.
Moscow Automobile and Highway State University, Moscow. Level of education: Higher. Faculty: AT. Specialty: Special engineer Cars and automotive industry. Experience in the automotive industry (master consultant...
Fly swatter installation procedure
Things to consider before installation
Before gluing the deflectors to the car, you should evaluate the condition of the hood edge.
Corroded areas should be cleaned, treated with a rust converter, puttied, primed and painted. The device should not be placed on rusty surfaces, as moisture almost always accumulates under the device. This will lead to the final destruction of the metal within several months.
The second factor to consider is the speed at which you plan to travel. On relatively low-speed vehicles, installation of deflectors can be carried out using adhesive tape or standard fasteners. For high-speed vehicles, additional fastenings should be made.
If installation is planned using glue or tape, the temperature in the room where the work is being carried out must be at least 10 °C. Otherwise, the fixing compounds will not stick to the paintwork and the deflector will fall off at the first shake. Installation using mechanical clips or bolts can be done at any temperature.
Instructions for installing deflectors on tape
How to install a deflector on a car hood without damaging the paint? Some car owners use double-sided tape for this. The installation procedure is quite simple.
The edge of the hood and the edge of the deflector, which will be adjacent to the car, are degreased with alcohol and dried. After this, a strip of double-sided tape cut to shape is glued onto the fly swatter. The prepared visor is carefully applied to the car and pressed tightly. The work is considered completed.
For clips
The hood visor usually comes with fixing clips, which are the standard method of fastening. To install the device using them, insert the corresponding bolts into the holes on the fly swatter, and then screw them into the wells using clips. The mounting devices themselves are fixed to the hood using clamping screws. The latter can damage the paintwork. To prevent this, a protective strip of thick tape or self-adhesive sound insulation is glued under them.
There is often a gap left between the deflector and the hood. While moving, the wind gets into it, which can lead to the lining being torn off. On older cars, the condition of the paintwork of which the owner is not too concerned about, this gap can be sealed with silicone sealant. The risk of losing the fly swatter will be significantly reduced.
Installation with internal spacer mounting
As an additional fastening when installing a hood deflector, the method usually practiced when installing window visors can be used - installation with fasteners using a spacer. After installing the device on the clips, specially prepared metal strips shaped like a cone are inserted through it.
The spacers should be installed so that they rest against the metal of the body and the inside of the deflector. Properly installed, this device slightly changes the angle of the deflector and allows you to adjust the direction of the air flow.
How to install a deflector on the hood without damaging the paint
How to install deflectors without damaging the varnish? To protect the coating, the area where work is being carried out can be covered with wax or covered with thin sound insulation. After installation is completed, the protective layer, which remains open, can be removed. The areas of the protective coating located under the deflector will continue to perform their function.
Anti-gravel film
The protective film sticker has a number of advantages:
- The physical protection is almost invisible (provided that a transparent material has been chosen). For each section of the car covering, a separate piece of film is cut out, corresponding to the size and shape of the part to be covered.
- The film is easy to stick and remove. This allows you to replace the protection that has become unusable within a short time.
- The film coating distributes the energy resulting from the impact of an object hitting the car over the entire area of the hood.
As for the disadvantage of using vinyl (or polyurethane) film, it is the loss of elasticity of the material when exposed to low temperatures. Which results in a decrease in the protective properties of the film.
When choosing a film, pay attention to the material from which it is made. Polyurethane protection is more durable and wear-resistant
However, over time it turns slightly yellow (which makes it noticeable on light-colored cars). In addition, polyurethane does not protect paint from fading in the sun.
Is it worth installing protection on the hood of a car? Each driver answers this question based on his own ideas about car care. Before installing protective devices, assess the expected budget for their purchase and the level of defects that will arise as a result of driving without protection.
If you have chosen a deflector to protect your car, you should pay special attention to the order in which the part is installed so that it subsequently reliably protects the car from damage.
How to glue deflectors to side windows
Attaching cutters to side windows has its own algorithm of actions. Remember it so that in the future you will know how to glue deflectors to machine doors. In this case, you will not have to tear off the plates, clean the places where they are attached, or re-glue the parts. Moreover, this will have to be done as quickly as possible so that the glue does not have time to set strongly.
Remove the fairings from the protective packaging - the plastic film that envelops the plates on both sides. The film is not removed from the adhesive strip. It will be more convenient to call someone for help - together the work will go faster, and it will be more convenient for you to do the installation. Try on the parts to the areas where you will install them. Do this simultaneously on the front and rear doors, determining the fixation points as accurately as possible. Clean the door edge where it is glued, degrease it using a rag soaked in solvent
Often, a set of windshields is equipped with a napkin soaked in a special solution. In the front and back parts of the windshield, remove the protective strips from the adhesive layer by approximately 3-4 centimeters. Lift the ends of the film, then carefully place the windshield in the desired place and press its edges. Make sure the part is installed properly. Remove any remaining protective film from the remaining adhesive strip. Gently press the cutter to the door edge along its entire length, press the parts and hold for 5 minutes. Move to the next door and apply the windshields in the same way.
How to remove deflectors
Putting a deflector on the hood or windows is more difficult than removing it. However, dismantling also requires certain knowledge.
From the hood
Removing the windshield from the hood is carried out in the reverse manner to installation. If the device was fixed with clips, the clamping bolts should be loosened. After this, you need to slightly pull the fly swatter towards you, and it will come off.
When fixed with tape, the visor is mechanically torn off, overcoming the resistance of the adhesive surface. After removing the lining, it is necessary to inspect the place where it was previously located. Minor damage to the paintwork and pockets of corrosion are often found here. These defects should be removed. Glue residues can be easily removed with alcohol-containing liquids.
From the doors
When talking about how to remove deflectors from side windows, we cannot fail to mention removing the internal struts. To dismantle them, you need to open the door, lower the glass and use a screwdriver to pry off the spacer, pulling it down. This should be done with all the clamps, after which the deflector will easily come out of the groove. The overhead visors are removed mechanically by carefully tearing them off.
Note: to remove windshields glued to tape, you can use a more correct method. To do this, the overlay is heated with a hair dryer, its edge is torn off, a string is threaded under it and the tape is cut off. In reality, this method is rarely resorted to, since it is associated with the need to find additional equipment. In most cases, the visor comes off perfectly without preheating.
Window deflectors (wind deflectors) are an excellent tool for preventing splashes from passing cars from getting inside, protecting the hood from stones and the windshield from insects.
Installation of such equipment takes several minutes, which makes fly swatters and window visors very popular equipment among car owners.
You probably won’t find a car enthusiast who doesn’t know what a hood swatter is. Opinions regarding the use of this tuning are often diametrically opposed.
p, blockquote 1,0,0,0,0 —>
p, blockquote 2,0,0,0,0 —>
Some people consider it purely a decoration, while others consider it an incredibly useful device. Let's try to figure out what it really is.
p, blockquote 3,0,0,0,0 —>
p, blockquote 4,0,0,0,0 —>
Functional purpose of windshields
The deflector is a compact pad that is mounted on the hood and side windows of the car. This device performs the following functions:
- protects the body and windows from dirt, stones, insects and other small particles that, together with oncoming air, hit the car;
- prevent the penetration of raindrops when the window is open;
- prevent the occurrence of drafts in the cabin, thereby improving the ventilation of the interior space;
- provide additional sound insulation of the cabin.
Wind deflectors are mounted in areas that experience maximum air pressure while driving. Therefore, deflectors must be fixed on reliable fasteners. Windshields come in plug-in and overhead types. The first option is suitable for those who do not want to waste time installing a deflector. However, this type of windshield is not suitable for all cars and is not securely fastened. Overhead deflectors are attached with glue and last longer.
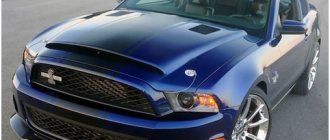
Hood spoiler Installation, Pros and Cons
Why install a spoiler on the hood?
- The hood spoiler protects against small stones and prevents chips on the front part of the bumper, which is why it is sometimes called a “stone breaker” or “stone cutter”;
- The spoiler on the front of the hood allows you to avoid collisions with midges (flies, mosquitoes, gadflies, etc.). A flow of air that lifts the spoiler upward and removes insects above the car, which is why its other name is “fly swatter”;
- The spoiler is the aerodynamic part of the car, so it reduces air resistance, and as a result reduces gasoline consumption, which is why some call it “air rub.”
How to correctly install the solenoid relay on a VAZ 2110
Deflector sticker
This method of fastening is much more reliable. Its only drawback is the more complex execution process. But, at the same time, there is no need to select the part by thickness. Typically, such windshields are universal, which allows you to use the option you like best for your car.
The work is carried out in the following order:
First you need to degrease the deflector mounting area on the front doors; We apply the visor and see how it stands up; Peel off the protective tape from the adhesive tape that is attached to the edges of the windshield and is intended for fastening it; Carefully attach the part into place. Don't press the windshield too hard right away. You must first evaluate the correctness of the fastening. If necessary, you need to adjust the deflector and secure it completely; It remains to install additional latches connecting the deflector and the door; Before installing the windshield on the rear door, try it on first.
You need to pay attention to its position relative to the front door. In some cases it may prevent doors from opening
Choose a position in which the doors will open without problems; Degrease the surface of the door, for example, alcohol is suitable for this; Otherwise, the steps described above are repeated.
Deflectors designed for gluing hold more firmly. This happens due to additional fastening in the form of latches.
Types of "fly swatter"
The fly swatter is exclusively a model device, so the number of varieties is equal to the number of car models. The corresponding deflector is required for the corresponding machine model.
When choosing, you need to pay attention to the characteristics. The advantages and disadvantages of the model depend on them
A good device is more expensive than cheap analogues, but it will have fewer disadvantages. It is also worth paying special attention to the types of fasteners for the hood deflector. Currently there are the following choices:
- Secure with bolts through the through holes.
- Glue with an elastic band.
- Install the deflector using clip fastenings.
- Screw it on using the technological holes (which are already in the car).
If you choose installation options, the first two have a serious drawback - damage to the paintwork during installation. And if you need to dismantle it, there will be holes left, as well as traces of glue and gum, which will be very noticeable. It is almost impossible to wash off or patch up these marks. But the last two mounting options are quite effective.
In the first picture there are bolts-retainers, and in the second there are clips-fastenings:
Preparing the surface and car for installation
In order to beautifully glue deflectors on car doors, you need dry, warm weather of at least +15°C. Place everything you need for work next to the machine:
- construction hair dryer;
- set of wind deflectors;
- adhesive tape, preferably SA-Plastik, AutoAx, SIM;
- dry rags;
- technical solvent.
Prepare the surface of the side windows:
- Wash your car, carefully going over the areas you will be working on.
- Wipe the fastening points of the windshields with solvent.
- If the body panel has previously been polished using wax or paraffin mastics, clean the areas where the fairings are glued more thoroughly.
What are deflectors used for?
As I already said, the main task is to change and deflect the air flow so that it does not interfere with the driver or, on the contrary, works for the benefit of the car. I will briefly list the main capabilities of windshields.
Protection from dirt and moisture
Some cars have rather poorly thought out aerodynamics; as a result, the car or some of its parts become very dirty in rainy or snowy weather. The task of the veterinarians is to correct this situation. For example, a hood deflector allows you to change the air flow so that all the dirt from under the wheels of the car in front flies just above the windshield of the car, thereby making your ride more comfortable and safe. In addition, it saves washer and wiper fluid on your car.
Side window deflectors also promote proper “swirl,” which means dirt and moisture don't fly as much onto the side windows. In addition, the side deflector prevents drops from flowing from the car roof onto the glass. The side window visors were also appreciated by those who like to smoke in the car. While driving, the oncoming air flow makes this activity unpleasant. The wind constantly knocks down the ashes, which fly into the car, and there are also frequent cases when the red-hot heat of a cigarette butt, instead of flying out the window, returned to the cabin, thereby creating big troubles...
Anti-fog
Among the many advantages, one can highlight good prevention of fogging of the side windows. Thus, the side deflector, forming the correct air flow, helps prevent fogging of the car windows.
Comfort while driving
Those who like to drive with the windows slightly open will also appreciate car window deflectors, as they create an even and soft barrier between the open window and the passenger compartment. The air does not hit your face and does not inflate everything in the cabin. In bad weather, deflectors prevent moisture from entering the cabin, you simply enjoy the fresh air.
Appearance
In addition to all the above advantages and disadvantages, deflectors are also a good way to stand out and make the appearance of your car more attractive. With the right approach, windshields emphasize the individuality and sophistication of a car's appearance.
Separately, I would like to highlight the hood deflectors, which are often installed individually, that is, without side visors. Deflectors of this type are also called “fly swatters”, because in the spring and summer, when there are a lot of insects, this device is a great help. By changing the direction of the oncoming air flow, it prevents the windshield from getting dirty. In addition to insects, small stones and sand fly into the car’s face, damaging the windshield and hood, so the benefits of a hood deflector can hardly be overestimated.
Before you buy a deflector, you should understand a few more things. First of all, you should clarify the method of attaching the deflector, as well as what material it is made of. Below we will talk about all this in more detail.
Based on the type of fastening, deflectors are divided into plug-in, adhesive, and those that are mounted on special brackets. As is already clear from the name, the first are inserted, the second are secured with glue, and the third are installed using special fasteners.
The first mounting option, as a rule, is typical for deflectors on car windows; it is good because it requires a minimum of effort and money. Installation is quick and easy; just insert the windshield correctly into the place where it is attached, after which it will lock into place. The disadvantages of this mounting option are that after some time the deflector may begin to dangle, creak, and even damage the glass or door seal.
The second type of fastening is more popular and occurs much more often. It involves attaching the deflectors with glue, the latter using high-quality double-sided tape, usually a product from 3M. The installation principle is simple and clear, we make markings, figure out how everything will look and fasten it. Next, we degrease the installation site and the wind deflector itself, after which we glue the tape onto the deflector and, with one precise movement, glue it to the place of further service.
The material from which the deflectors are made
Due to the purpose of the windshields, their design must be lightweight and at the same time durable. Therefore, polymer compounds, plastic and even carbon are most often used as materials. Polycarbonate windshields are the most common, most often they are transparent. Their cost and strength do not raise any questions, which is why they are very popular.
As for color, it's a matter of taste. The most common options are transparent, gray and completely black.
Installation methods: advantages and disadvantages
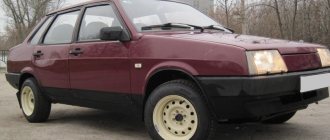
The following are instructions for installing a fly swatter on the hood of a VAZ 2107 using various methods with your own hands.
Installation on standard mounts
Standard fastenings - self-tapping screw and plate
Standard fasteners are mostly metal plates. These plates with holes are attached to the fly swatter, and the other side to ready-made mounts on the hood of the VAZ 2107. Therefore, if you are going to mount in this way, choose a deflector specifically for your model:
Often standard plates are made of galvanized sheet. Tin is easily bent by hands, and even more so by the flow of a headwind. So, in this case, the fly swatter will not justify its installation at all.
Because it is installed to protect the hood, but the fasteners will vibrate and themselves will scratch the hood so that it will then have to be restored.
Other fasteners can be made of metal that is quite thick and does not bend. But again, the holes for attaching the fly swatter may not match the holes on the hood, even if you choose the right fly swatter.
In view of the features listed above, many craftsmen install the fly swatter on the hood for the VAZ 2107 on homemade reliable mounts.
Installation on homemade mounts
Homemade fastenings can be either manufactured brackets or plates, or fastening with bolts. Now more details about each method:
Fly swatter specifically for VAZ 2107 hood
- It is advisable to make homemade plates from durable material.
- They will need to be secured tightly to the hood to avoid vibration from the fly swatter.
- It is necessary to make the plates so that it goes around the lower edge of the hood and is attached to it. You will need to drill holes.
- You will need to make 4 or 5 fastenings. Everything depends on the owner’s wishes.
Bolting:
- For this method, no brackets are needed at all.
- Simply place the fly swatter on the hood in the position in which it should be installed.
- Mark the places where the holes will be drilled.
- They are then drilled into both the hood and the air vent.
- After which the fly swatter is installed, secured with bolts and everything is ready.
The hood of the VAZ 07 does not look good without a fly swatter
Installation using double-sided tape
Again, no brackets or plates are required - all you need is double-sided tape:
The surface of the hood is thoroughly degreased. Then tape is stuck there
You can use the entire tape, or you can use small pieces. It is important to warm it up well before installing the fly swatter. You can use an industrial hair dryer for this.
This way, the plastic fly swatter will bend better and also stick to the tape better. Remove the protective film from the tape. Carefully press the fly swatter and hold it for a while until it sets.
Preparing the hood
The method is quite simple, but it has its drawbacks:
- The moisture that gets under the fly swatter will gradually peel off the tape. That is, this design will not last long and soon you will have to install the fly swatter again. Everything would be fine, but here comes the second minus.
- Double-sided tape leaves “good” marks on the area of the hood where it was located. It can be torn off, but you can easily remove a layer of paint. Not a pleasant moment.
Combined installation
You can use all available methods to ensure that the fly swatter is firmly attached to the hood of the VAZ 2107. The method of fastening with bolts or homemade plates, in principle, does not require any modifications. If you don’t want to fool your head by inventing and making fasteners, you can do the following. Combine installation with standard fasteners and double-sided tape. You won’t need to spend much money, time and effort, and the effect will be achieved, but don’t forget about the consequences of double-sided tape. Here is another example of a combined installation.
What is a fly swatter used for?
Combined method of installing a fly swatter
List of parts:
- 1- deflector
- 2- fastening hook
- 3- bracket
- 4- hood
- 5-button included
- 6- shock absorber included
- 7- double sided tape
- 8 - regular self-tapping screw
The photo clearly shows the possibility of combining installation options. With this option, the fly swatter will be installed firmly and reliably!
Price of car deflectors
The first thing to consider when choosing deflectors is their cost; it is unique for each car and, most often, good quality is not cheap. For example, simple wind deflectors from the manufacturer WeatherTec for the BMW X5 will cost from $50 to $100. The advantage of this manufacturer is that if one of the deflectors breaks, you can buy it separately, rather than buying the entire set.
Another manufacturer, Star, may offer chrome-plated deflectors made from durable steel. The cost of a full set will cost $140, and a pair will cost $70. Star also suggests buying a set in pairs if one of them breaks, rather than buying the entire set, thereby overpaying for unnecessary ones.
If you decide to purchase a budget option for a domestic car, then most often a set of four pieces will cost $10-20. It will not be difficult to find this type of windshields in the car market.
As a result, we can say that the deflector not only gives the car a better appearance, but also serves a practical purpose, protecting the interior and creating comfort.
Video of installation of car deflectors:
Why is this necessary?
The idea of creating the first deflectors was due to the fact that new cars became noticeably faster. The speed of movement has increased, so we had to think about the use of aerodynamics in civilian and sports cars.
In the same way, an air intake appeared at one time, and now we can buy magnificent bumper covers from Maxton Design.
The first car body models were angular and clumsy. The car had difficulty resisting the flow of oncoming air. Gradually the speed increased. Engineers realized that the cars needed to be made more streamlined and aerodynamic.
For example, do you know that even the current paintwork on cars plays not only a decorative role, but also helps reduce air friction? The car literally cuts air flow, which has a positive effect on speed, controllability and maneuverability. But due to the improvement in streamlining, oncoming debris, insects, pebbles and other nonsense began to actively fly into the car. Some bugs at least leave unpleasant blots, and pebbles can damage the windshield. And the hood itself also suffers from debris and insects. Scratches form and stains are difficult to wash off.
It is precisely to protect against such consequences that improvements in aerodynamics have proposed the use of deflectors. Their shape has an upward tilt at the back. This allows you to redirect the air flow slightly higher than the car. Thus, all debris and insects fly over the car and do not crash into the windshield and other body elements.
Advantages and disadvantages
The installation of the deflector, as well as the fastening of the lock and hinge for the hood, aerodynamic body kits or other tuning elements, has two sides.
Today we are talking about deflectors, so we will consider its strengths and weaknesses. You already understand why such an element is needed. Now it is time to know the pros and cons you get while installing a fly swatter.
Let's start with the advantages. I would include among them:
By placing a white deflector on a black car, or choosing a dark fly swatter for a light car, playing with contrast pays off. Chrome also looks very advantageous. You can look at different photos and roughly imagine what a Chevrolet Cruze, Renault Duster, Hyundai Solaris or Honda CR-V, for example, will look like.
But let's not forget about the shortcomings. They are also present here. The following disadvantages are highlighted:
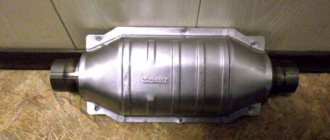
Can it be installed on a chimney?
By installing a deflector, unlucky homeowners are trying to solve the problem of lack of draft. This happens when the chimney pipe is made incorrectly - the head falls into the zone of wind support of the roof, is raised to a low height, or a neighbor has built a tall building nearby.
The best solution for insufficient draft is to raise the chimney to the required height. Why is it undesirable to jam various attachments onto the head:
- It is prohibited to place umbrellas and other exhaust devices on pipes that discharge combustion products from gas boilers. These are safety requirements.
- When burning, stoves and solid fuel boilers emit soot that settles on the internal surfaces of chimneys and caps. The deflector will have to be cleaned, especially the rotating one.
- At the bottom of a properly constructed smoke channel there is a pocket for collecting condensation and excess moisture. There is no point in covering the pipe from precipitation; it is enough to attach a nozzle at the end that protects the insulation of the sandwich.
The heads of stove flues can be equipped with umbrellas, but a turbo deflector is definitely not needed there. The topic of installing hoods on smoke exhaust ducts is covered in detail in a separate material.
Possible problems during installation/operation of deflectors
It is possible that the adhesive strip on the deflector, due to exceeding its shelf life, has completely or partially lost its adhesive properties. In such cases, you can use double-sided mounting tape, gluing it instead of the standard one. The main problem is to accurately cut the desired strip so that it does not protrude outward. As a rule, windshields glued with tape last no more than 5 years, eventually peeling off and requiring restoration measures. The procedure is simple, the deflector is removed by rocking, the old tape is removed, the surface is cleaned with a solvent, a new adhesive strip is glued on and the algorithm described above is repeated.
How to avoid installation problems
To ensure that no inconsistencies or troubles occur during the installation of side window deflectors, you must adhere to the following rules:
— When buying a kit, don’t be lazy to go through several options for deflectors, trying each of them on the car. Take those that are completely adjacent to the surface and the front ones are not too long so as not to block the rear view mirror.
— Installation of deflectors on a car in winter should be done in a warm, dry box.
- At any time of the year it is better to do this together. A second pair of hands will protect you from unexpected movement of the part while removing the protective tape and will make all stages of the work easier.
— If during installation the ambient temperature is less than +18-20°C, it is better to warm up the gluing area with a hair dryer:
- when heated to +60°C, the adhesive layer gains its design strength in a couple of hours;
- at +18-20°C this will take 2 days;
- at temperatures below +10°C, the bonding strength will not withstand the slightest impact.
— Based on the above, after installing the windshields, you should not get the car wet or use it for at least one day.
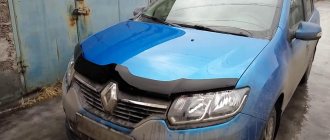
Hood deflector: why is it needed, pros and cons, do-it-yourself installation
Hi all! Since the topic of tuning is of interest to many, I propose to continue to analyze this section. Today we’ll talk about the hood deflector.
Not everyone understands why they are installed and whether there is any sense in such an element at all. But, as practice shows, these designs can be found everywhere on Renault, Ford, Subaru, Lada (VAZ) Priora, Rav 4, Ford Fusion, Nissan Tiida, Opel Astra, etc. That is, such a component can be installed on both the Chevrolet Niva and UAZ Patriot, as well as Toyota Prado or Mitsubishi Evolution. The type of car and its cost do not play a big role.
Disadvantages of using windbreaks
From the negative reviews about the deflectors, we can conclude that in some cases they really do not fit in with the design of the car, since they were clearly developed not by Giorgetto Giugiaro, but by Zhora Zharikov from a neighboring garage cooperative. A bad design is not so bad. It’s worse when the deflector blocks the working viewing area in the area of the A-pillars, significantly reducing the viewing angle. And this can lead to dire consequences, for example, when crossing an intersection.
Imagine for a moment that the A-pillars were twice as wide. These are the two biggest problems that deflectors can cause. The price of windshields, of course, will not make a significant dent in the budget unless you covet really expensive and high-quality accessories. For example, Polish Heco windshields will cost 1,200-1,400 rubles per set, depending on the car model, and Australian EGR will cost 3.5 thousand per set on average.
What is the correct name for the “fly swatter” on the hood of a car?
p, blockquote 5,0,0,0,0 —>
If you come to a store and ask for a “fly swatter”, the seller, without embarrassment, will ask what car it is for, since the colloquial name is firmly wedged into the mass consciousness. In fact, in the world of engineers and automakers, this device is called a deflector
.
p, blockquote 6,0,0,0,0 —>
The word itself comes from the Latin deflecto - to deflect and is an aerodynamic device, the purpose of which, due to its shape, is to redirect air flows.
p, blockquote 7,0,0,0,0 —>
Preparing the machine surface before installation
Most models of windshields are produced together with an adhesive base designed to fix this device. Otherwise, you need to purchase specialized tape, which is preheated with a hair dryer.
In addition to a hair dryer, you will need a dry rag and a technical solvent to fix the plastic pads. After preparing the specified components, you will need to perform the following steps:
Wash the car body and windows, paying special attention to those areas where you need to stick plastic covers. Treat the body and windshields with a technical solvent, removing the fat layer. Carry out additional treatment of the body coated with wax polish or paraffin mastic.
Which adhesive for laminate is better to choose, application features and selection criteria
If the car has old deflectors, then to dismantle the deteriorated linings you will need:
Open and lock the side door. Using a heat gun, warm up the junction of the deflector and the car body
This procedure must be carried out with extreme caution. Overheating will cause the paintwork to peel off from the surface of the body. Pry up one of the ends of the old lining and insert the fishing line. Run the fishing line along the entire deflector, thus detaching the trim from the body
During this procedure, you should also be careful to avoid contact with the surface of the body. After dismantling the old windshield, treat the surface with a solvent.
If the old windshield is plug-in, then dismantling is carried out in two stages. First you need to pry one edge of the deflector, and then pull the plate towards you. At the end of this procedure, it is also necessary to clean the surface of the body.
New deflectors can be installed provided that the ambient temperature is above +10 degrees. The procedure is prohibited in winter. In the cold, the adhesive composition does not set, which is why the deflectors will fall off a few hours after installation.
Anti-gravel film
The protective film sticker has a number of advantages:
- The physical protection is almost invisible (provided that a transparent material has been chosen). For each section of the car covering, a separate piece of film is cut out, corresponding to the size and shape of the part to be covered.
- The film is easy to stick and remove. This allows you to replace the protection that has become unusable within a short time.
- The film coating distributes the energy resulting from the impact of an object hitting the car over the entire area of the hood.
As for the disadvantage of using vinyl (or polyurethane) film, it is the loss of elasticity of the material when exposed to low temperatures. Which results in a decrease in the protective properties of the film.
When choosing a film, pay attention to the material from which it is made. Polyurethane protection is more durable and wear-resistant
However, over time it turns slightly yellow (which makes it noticeable on light-colored cars). In addition, polyurethane does not protect paint from fading in the sun.
Is it worth installing protection on the hood of a car? Each driver answers this question based on his own ideas about car care. Before installing protective devices, assess the expected budget for their purchase and the level of defects that will arise as a result of driving without protection.
If you have chosen a deflector to protect your car, you should pay special attention to the order in which the part is installed so that it subsequently reliably protects the car from damage.
Body protection accessories
Do not think that damage from road litter is harmless and is extremely rare. If the car is used and not parked in a garage, its body wears out and experiences harmful effects. Damage to the hood surface will subsequently be marked by a corrosion process. But a more unpleasant situation is when small stones hit the front window. The resulting chip or scratch in sunny weather will make itself felt by refracting light and blinding the driver. If this damage is left unattended, a gradually growing crack will appear on the glass. Thus, delaying restoration will entail more financial costs.
In order to reduce the risk of damage to the front part of the body, special protective devices were developed - deflectors. The design of this part follows the line of the hood edge. With its slightly bent upper part, the deflector prevents the flow of air with abrasive particles and directs it above the hood and windshield. Due to this feature, this protective element is called a “windbreaker”. There are also deflectors to protect the side windows and headlights.
Sometimes some car owners hesitate to install deflectors because they are not sure that they can install them correctly. Knowledge of the rules for fastening them and taking into account some of the nuances that you may encounter during the installation process will help in this matter.
How does it work
Drivers are wondering if a deflector is needed. This question has long become rhetorical. The benefits of it on any trip are undeniable. So, if you attach it to the hood, its body will be a constant barrier to the path of hard stones, objects, sand, other particles, as well as various insects flying into the “face” of the car. Such “bombing” is often fraught with hard contact with the varnish and its damage. The deflector will absorb their forceful blows, which can sometimes be quite impressive in strength and speed. As a kind of “wing”, it will also correct the trajectory of the oncoming air flow directed into the car, throwing away a trail of all kinds of midges from the hood and windshield. And this is a guaranteed basis that sensitive and very vulnerable to external interference parts of the car, especially the front of the hood, will not be subject to any unwanted contacts and will retain their attractive appearance.