VAZ-2107, like any other car, requires close and regular attention. However, all its components and parts have a limited service life and periodically require repair or replacement.
- VAZ 2107 body repair
Wing repair - Video: straightening the wing of a VAZ-2107
- Threshold repair
- Jack repair
- Cylinder head repair
- Overhaul of VAZ 2107
How to replace rear shock absorbers on a VAZ 2101-VAZ 2107
The rear springs on the right and left sides are replaced in the same way, so the entire replacement process will be shown on only one shock absorber!
1) Before you start, be sure to read the “Important!” section. at the very bottom of the article, maybe you will need it. 2) After reading, move on to substitution
First, drive the car into the inspection hole or lift it using a lift
2) After reading, we move on to the substitution. First, drive the car into the inspection hole or lift it using a lift.
If you do the work on a lift, then it is recommended to install some kind of support under the rear axle support, and then lower the car a little so that it rests on it. And all this is done so that the rear suspension is slightly loaded, otherwise removing the shock absorber will be very problematic!
Video on how to replace
rubber
bushings for rear shock absorbers of VAZ
classics. Subscribe
3) Next, holding the bolt with one wrench, use the second to unscrew the nut that secures the lower hinge bolt.
4) Then slightly remove the bolt from the hinge and thereby remove the spacer sleeve from it, which is indicated by the arrow.
5) Next, holding the lower part of the shock absorber with your hand, slightly move it away from the bracket and, as a result, remove the spacer sleeve from the bolt.
After these operations, completely remove the bolt from the lower hinge together with the washer!
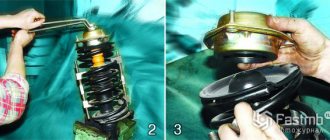
6) Now get to the top of the shock absorber, and then unscrew the nut that secures the upper hinge.
7) After unscrewing, remove the washer and the outer rubber bushing of the hinge, which is indicated by the red arrow, from the stud.
If the outer sleeve is very difficult to remove, then you can not touch it at all and move on to replacement!
 Next, pull the shock absorber with your hand, thereby removing its upper hinge from the stud and the outer bushing will be removed along with it.
9) Then remove the inner joint bushing from the stud.
10) Then, holding the shock absorber in your hands, remove the spacer sleeve indicated by the arrow from the lower hinge.
11) When the bushing is removed, remove in addition two rubber bushings that sit in the hinge eyes.
Replace all deformed and heavily worn bushings with new ones!
1) Install the new shock absorber in the reverse order of removal.
Tighten both nuts that secure the upper and lower shock absorber joints only at the moment when the suspension is loaded with the entire weight of the car!
Shock absorbers, as a rule, can be repaired, but if you do not have sufficient experience and tools, then it is best to repair shock absorbers in specialized auto repair shops, so to speak, give it to those people who have been doing this for a long time!
There is also a small nuance in replacing rear shock absorbers, and it lies in the fact that they need to be changed in pairs, that is, two at once. Why do this you ask? The thing is that the characteristics of one new shock absorber may differ significantly from the second, even if the second shock absorber is fully operational!
To help you understand in more detail the entire process of replacing rear shock absorbers, watch the video below:
Overhaul of VAZ internal combustion engines and diagnostics in the Eastern Administrative District of Moscow
In order for the VAZ 2101-2107 engine to remain in working condition, it is necessary not only to fill in high-quality oil and fuel, but also to monitor the general condition of the engine in order to avoid unstable operation and premature engine wear. Regularly undergo computer diagnostics of the internal combustion engine of the VAZ 2101-2107 Classic since 1980 in order to prevent expensive overhaul and restoration of the VAZ 2101-2107 engine in advance.
Complete price list for VAZ internal combustion engine repairs
All work on diagnostics and repair of the VAZ 2101-2107 engine is carried out using modern equipment, in accordance with the requirements of the automaker.
In what cases is it necessary and how much does it cost to overhaul a VAZ 2101-2107 Classic engine since 1980 in Moscow
Overhaul of a VAZ internal combustion engine is a process that requires a lot of experience and takes a lot of time. The very essence of overhauling VAZ engines is to bring and restore the engine to its factory perfect condition. If it is difficult to find a new or contract engine for replacement, or its price exceeds the cost of overhauling the VAZ internal combustion engine, then our service’s experienced mechanics have experience working with overhauls of VAZ 2101-2107. Overhaul may be necessary only after a thorough computer diagnostic of the VAZ engine, which will cost only 500 or 1000 rubles.
What's better? Should I replace the internal combustion engine of a VAZ 2101-2107 Classic since 1980 or carry out an engine overhaul?
Replacing a VAZ engine is a less labor-intensive process than a major overhaul, but it will require re-registration of the car with the traffic police, provision of a certificate-invoice and, in some cases, approval of the replacement of the internal combustion engine by NAMI, which can also cost a tidy sum. Of course, in particularly difficult cases, it is easier to replace the VAZ 2101-2107 engine in Moscow. After replacing the engine of a VAZ 2101-2107 Classic since 1980, we provide a guarantee for high-quality repairs, because We use only original and compatible spare parts. We will also help you select a contract VAZ engine and install it on a VAZ 2101-2107 Classic from 1980 with a guarantee.
How to replace rear shock absorbers on a VAZ 2101-VAZ 2107
Do-it-yourself replacement of rear brake pads on a VAZ-2110
Note! The rear shock absorbers on the right and left sides are replaced in the same way, so the entire replacement process will be shown on only one shock absorber!
Removal: 1) Before you start, be sure to read the “Important!” section. at the very bottom of the article, maybe it will be useful to you. 2) After reading, proceed to replacement
First, drive the car into the inspection hole or lift it using a lift
2) After reading, we move on to replacement. First, drive the car into the inspection hole or lift it using a lift.
Note! If you will be doing work on a lift, then it is recommended to install some kind of support under the rear axle beam, and then lower the car slightly so that it rests on it. And all this is done so that the rear suspension is slightly loaded, otherwise removing the shock absorber will be very problematic!
3) Next, holding the bolt with one wrench, use the second to unscrew the nut that secures the lower hinge bolt.
4) Then slightly remove the bolt from the hinge and thereby remove the spacer sleeve from it, which is indicated by the arrow.
5) Next, holding the lower part of the shock absorber with your hand, slightly move it away from the bracket and, as a result, remove the spacer sleeve from the bolt.
Note! After these operations, completely remove the bolt from the lower hinge together with the washer!
6) Now get to the top of the shock absorber, and then unscrew the nut that secures the upper hinge.
7) After unscrewing, remove the washer and the outer rubber bushing of the hinge, which is indicated by the red arrow, from the stud.
Note! If the outer sleeve is very difficult to remove, then you can not touch it at all and move on to replacement!
Next, pull the shock absorber with your hand, thereby removing its upper hinge from the stud and the outer bushing will be removed along with it.
9) Then remove the inner joint bushing from the stud.
10) Then, holding the shock absorber in your hands, remove the spacer sleeve indicated by the arrow from the lower hinge.
11) When the bushing is removed, remove in addition two rubber bushings that sit in the hinge eyes.
Note! Replace all deformed and heavily worn bushings with new ones!
Installation: 1) Install the new shock absorber in the reverse order of removal.
Note! Tighten both nuts that secure the upper and lower shock absorber joints only at the moment when the suspension is loaded with the entire weight of the car!
Important! Shock absorbers, as a rule, can be repaired, but if you do not have sufficient experience and tools, then it is best to repair shock absorbers in specialized auto repair shops - so to speak, give it to those people who have been doing this for a long time!
There is also a small nuance in replacing rear shock absorbers, and it lies in the fact that they need to be changed in pairs, that is, two at once. Why do this you ask? The thing is that the characteristics of one new shock absorber may differ significantly from the second, even if the second shock absorber is fully operational!
Additional video: To help you understand in more detail the entire process of replacing rear shock absorbers, watch the video you will find below:
Hello Damir! Gas shock absorbers are essentially rigid, so if you operate the car where there are few bumps and irregularities, then you can opt for them. But there is one But! As a rule, on older cars the body is weaker, I think you’ve heard the expression “Metal Fatigue”, so the old struts on older cars with such shock absorbers will quickly become unusable. But conventional hydraulic ones are softer, and therefore the car will roll more when cornering and sag more when overloaded. Hydraulic shock absorbers are also susceptible to temperature changes and are less reliable in themselves, but they are soft and therefore it is more preferable to use them on older cars!
https://vaz-russia.ru