Basic recommendations
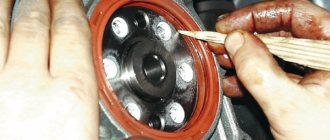
First of all, you need to clean the hole in the housing and the shaft. If dirt gets under the working edge, the seal will be lost. If the oil seal is installed without removing and disassembling the internal combustion engine, special mandrels will be required. This will prevent the spring from breaking or damaging the working edge. The latter should not fall into the groove formed by the old product on the shaft.
Old products must be removed carefully, without damaging the housing socket. If there are slots in the seal that are oriented in the direction of shaft rotation, these should be taken into account. Some designs provide reverse movement. Then the product must have slots that allow the shaft to rotate in both directions.
Purpose of the seal
Any car owner with specific technical knowledge understands why a seal is needed. It prevents oil leakage from the mechanism's oil system. In our case, the oil seals are located at both ends of the crankshaft. Each has its own size and cost. Accordingly, one of them is the front, the other is the rear. Let's look at how to change each of them.
If it leaks from the engine, then an experienced motorist’s suspicions instantly fall on the oil seals and cuffs. Their job is to seal rotating joints.
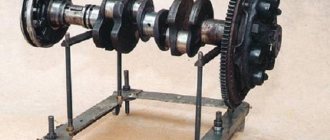
The crankshaft is an important component of a car. An engine block is always a rather complex structure. If a leak is detected, most likely the seal located at the ends of the crankshaft has leaked. The latter must protrude outward from the engine block on both sides.
The timing wheel is fixed on the crankshaft from the front flank, and the clutch elements are fixed from the rear flank (which in some way explains the unequal size of the shaft ends). Of course, no oil leak is appropriate in this case. The lubricant must always remain inside the engine block.
Why does the oil seal deteriorate?
The cuff is a kind of ring with a rigid outer ring and an elastic inner edge. The latter just comes into contact with the shaft. If the oil leaks through the seal, it means that the spring edge has weakened and does not compress the bushing more effectively. The seal needs to be changed.
An oil leak is always unpleasant and dangerous for the engine. Due to the fact that during operation the cuff loses its elasticity or simply deteriorates, the oil leak intensifies, creating an ocean of problems for the car owner. Knowing how to replace this element can make your life much easier.
Attention. You can change the rear and front oil seals yourself in different ways, since the seals differ significantly due to the structural features of the power plant. Of course, size also matters.
Cuffs or oil seals have been used in the automotive industry for a long time; they have a complex purpose and design features.
In more detail it looks like this. The seal itself fits tightly to the surface during shaft rotation. To ensure that the seal is always effective, special notches are provided on the gland. If the cuffs are new, the oil does not leak or leak anywhere.
Over time, the seal lips shrink and the elements become obsolete, so they are no longer able to provide the required seal. The result is a lubricant leak, which can happen both in front of the shaft and at the back.
Preparatory work
The basis of competent DIY repairs or replacement of any element is preparation. You must be able to prepare professionally and take into account all stages of the upcoming work.
- Clean up the machine and work area.
- Select a set of necessary tools.
- Buy consumables and spare parts.
The cost of crankshaft seals is not very high. As mentioned, the size of the seals is also not the same. After all, they have different design features.
It is necessary to take care of new gaskets at the preparation stage if they become unusable during the replacement process. Their cost is low and their efficiency is high. As a rule, if oil leaks, it is not only the oil seals that are to blame.
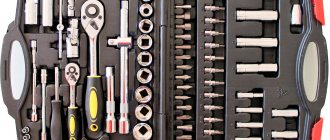
As for the tools, this is a standard set of screwdrivers, wrenches, as well as a set of special mandrels for installing seals yourself.
Note. Again, here you have to take into account the size of the seals. For example, on “nines”, to repair the front seal, you need to prepare a 27-mm end wrench; replacing the rear seal is carried out with a device with an outer diameter of 90 mm.
And finally, preparatory work always means the cleanliness of the work area. In this case, you will need to thoroughly wash the power unit, clearing it of dirt and traces of oil. There will definitely be grease stains if the seal is leaking.
What is a crankshaft oil seal?
The crankshaft of an internal combustion engine is constantly and generously washed with oil poured into the oil pan, as a result of which, due to continuous rotation during operation, lubricant can leak outside the housing. And many motorists know first-hand about oil leakage, as well as the problems associated with this process. However, at the boundaries, namely, in the outlet holes through which the shaft is connected to external components, there are usually seals, front and rear. It is easy to distinguish them; the latter is a slightly larger and more massive ring.
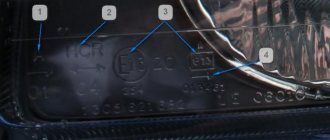
Due to the fact that these gaskets are subject to friction as long as the engine is running and the connecting rods are spinning the crankshaft at high speed, the oil seal material must have a certain heat resistance. Regular nitrile (nitrile butadiene rubber or NBR) will not work, as it will burn and crumble literally on the go. Fluorine rubber FPM or silicone are much better suited for seals. When choosing a crankshaft oil seal, you should also pay attention to factors such as shape and markings.
The inner edge should be sharp and the outer surface lettering should be easy to read.
Where is the oil seal installed?
The seal is installed on the engine block in the place where the crankshaft exits the block to the outside. This location may differ on different cars and internal combustion engine models. So, on classic rear-wheel drive VAZs, where the engine is located longitudinally and the timing chain drive is chain driven, the oil seal is installed in the crankshaft shield behind the support bearing. On front-wheel drive cars, the engine is located transversely, and the timing mechanism is often belt-based. The oil seal in such engines is installed in the cylinder block due to the fact that there are no crankshaft shields on such internal combustion engines.
Boats and motors in questions and answers
Rules of communication in the forum
Before you ask a question! How to correctly ask questions in the forum and use site materials.| Moscow time 17:06:37 | Your local time | Vladivostok time 00:06:37 |
| Author: Raskat (217.118.66.—) Date: 23-11-12 08:36 People, please tell me! Either I’m not in the know, or they didn’t set it up like that at the factory?! Moscow-M. Gearbox. Propeller shaft seal. When I disassembled the gearbox, the oil seal stood with a “spring” towards the screw. In quotes because the oil seal was ancient and had no spring. So how to install it correctly? For some reason, I want the spring to point towards the gears. |
| Author: Raskat (217.118.66.—) Date: 23-11-12 09:04 Could they really have messed up like that at the factory???!!! The motor is “zero”, definitely not disassembled, even untested! |
| Author: Kira (109.238.244.—) Date: 23-11-12 09:08 In this unit, the original oil seal was installed with the cuff facing outward. Because without a spring. The oil seal with a spring can be installed this way or that way. There will be no great sin. |
| Author: Tselpweb (—.vologda.ru) Date: 23-11-12 09:08 Raskat wrote: > Could they really have screwed up like that at the factory???!!! > The motor is “zero”, definitely not disassembled, even untested! ============Where did you get the idea that it is zero |
| Author: midl (—.pppoe.tmb.ru) Date: 23-11-12 18:46 Kira wrote: > In this unit the original oil seal was installed with the cuff facing outwards. > Because without a spring. The seal with a spring can be installed this way or that way. There will be no great sin. > There is no need to put it outside, I tried it. After some time, the spring either jumps off, or rusts and collapses, but literally 1-2 days on the water and there is water in the gearbox. In short, a spring to the oil, especially since modern oil seals are usually “double-lip”. |
| Author: Max43 (—.kubangsm.ru) Date: 23-11-12 18:58 The seal with a spring to the oil (seal from distributor 2108) has been used for a season, the flight is normal, there is no water in the oil. |
| Author: fedot68(Kaluga) (—.broadband.corbina.ru) Date: 23-11-12 20:03 Firstly, the correct oil seals have a stainless steel spring. Secondly, what do you prefer? a couple of drops of oil leaking from a heated gearbox? Or a couple of thimbles of water sucked into the cooling gearbox? There are two ways out: 1) double-lip seal (nowadays – not a problem). 2) the output of the gearbox “breather” to the top (there was once a report from a friend who extended the glass tube around the switch rod “to the very top”) Well, as for the native “Moskin” oil seal, I can’t even call it an oil seal. How did you travel with them before? . Compared to such a miracle, any modern oil seal with any installation method is already a step forward (even with the beloved spring. By the way, instead of a spring, some people put rubber rings....) |
How is the oil seal used?
Even if you know what an oil seal is, information about the nuances of its installation and operation will not hurt. In particular, some seals have inclined marks to allow oil to escape; when installing such rings, pay attention to the presence of an arrow indicating the direction of shaft rotation. This is especially true for non-original cuffs. By the way, about analogues. Sometimes it is very difficult to choose an oil seal by size, especially if it was imported, and only domestic ones are available for sale (of those, choose only red-brown ones, they are made of fluorine rubber).
In such cases, if you are sure that from now on you will use only available seals, if their sizes are too large, you can bore out the seat, and if they are too small, press an adapter ring into it. In terms of width, it is permissible to exceed the original by 2.5-3 millimeters, no more; the substitute can be narrower by the same amount. If the oil seal is too thin, you will have to install a spacer ring along the outer diameter to the missing width to the pressing pulley for the front seal and the flywheel for the rear.
Various special tools for ease of working with the fork.
Various manufacturers offer a variety of mandrels and pullers. As the name suggests, specialty tools allow you to effectively handle specific tasks, so they are useful to have in your arsenal (in this example, I used a Hasco specialty tool). After installing the oil seal and assembling the forks, oil is injected inside - its level (oil surface height) should be the same in the left and right stays. The most convenient syringe for adjusting the oil level in the fork is made by DAYTONA.
— A special oil seal remover will allow you to remove it cleanly.
— Scratches on the inside of the fork may cause oil leakage.
— When pressing the oil seal, hit it evenly over the entire plane, and not at one point on the circumference.
Crankshaft oil seal wear: causes and consequences
According to the regulations, the average service life of oil seals is about 100,000 kilometers, provided that the car was operated in normal conditions, and also undergoes maintenance in a timely manner, and the engine did not operate at a critical temperature.
What are the causes of oil seal failure:
- damage to the oil seal due to untimely oil changes or the ingress of foreign small particles that are transported by the oil and damage the surface of the oil seal;
- overheating of the engine or long-term operation at near critical temperatures. Here the oil seal begins to slowly “harden”, and when the temperature drops, it loses its elasticity and oil begins to leak;
- low quality product. This is often due to the quality of the material, the use of a weak spring, incorrectly applied notches and the deformed shape of the oil seal itself, which does not run around the crankshaft flange;
- due to increased pressure in the lubrication system (large amount of crankcase gases), as well as an excessively high oil level, the oil seals are squeezed out, since the oil has nowhere else to go, and the pressure comes out in the most vulnerable place, but if the oil seals are of high quality, then the oil can come out of the gaskets ;
- incorrect installation of the new oil seal. Before installation, you must read the installation instructions so that the inside of the oil seal does not become jammed. By the way, there are Teflon oil seals, the installation of which requires the necessary skills and special tools, but more on that later.
The main consequence of crankshaft seal wear is a decrease in oil level. If the oil seal only sweats, then you can operate the car for some time, otherwise an urgent replacement of the oil seal is necessary. In addition to the fact that an insufficient oil level directly harms it and reduces the life of the rubbing surfaces of parts, the oil pollutes the engine compartment, damages the service and timing belt, which can lead to serious consequences.
How to replace the oil seal yourself
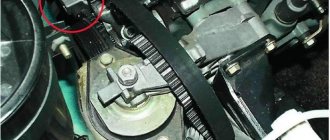
The front one is easier to replace, since access to it is not difficult. First, remove the casing of the camshaft timing belt. There may be no belt; sometimes transmission is carried out directly, using gears. In any case, the main pulley with a serrated edge will also need to be removed, for which we unscrew the mounting bolts (usually there are 6 of them). Then you need to remove the hub on which the pulley sat. To do this, unscrew another bolt and carefully knock down the hub with mounting blades; in extreme cases, if the part is pressed too tightly, you need to use a special puller.
To prevent the shaft from spinning while changing the gasket, it is recommended to shift the gearbox to fifth position and set the parking brake.
Description and functions of the crankshaft oil seal
So, for the normal functioning of a car engine, high-quality and constant lubrication of rubbing parts is needed. One of the main elements of the engine is the crankshaft, both ends of which protrude outward. The crankshaft is lubricated under high pressure, which means it requires high-quality sealing on both sides. Oil seals act as these seals. A total of two oil seals are used:
- the front one, usually smaller in size, is installed behind the crankshaft pulley in the front cover. Can be integrated into the oil pump;
- the rear one is usually large. Located behind the flywheel, sometimes replaced along with the aluminum cover, it provides a tight seal, preventing oil from leaking into the clutch or gearbox housing.
When is it necessary to replace the crankshaft oil seal and how to do all the work
During operation of the car's power unit, its parts and mechanisms are lubricated with engine oil. The lubricant significantly reduces the level of negative effects of friction force, thereby increasing the service life of structural elements. As you know, the crankshaft extends outward for subsequent connection with the flywheel. It is precisely to ensure that engine oil does not leak out of the system through the holes of the rotating shafts that a special sealant made of silicone or rubber was developed - the crankshaft oil seal. Replacing the crankshaft oil seal is an emergency job. Why is it important to respond to a problem with the seal in a timely manner, and how to fix the breakdown yourself? Next we will look at this issue in detail.
Inspection to identify oil leaks
If there is a suspicion that the presented device is operating incorrectly, the driver will first need to determine which oil seal is leaking. If a flaw is observed in the rear of the engine, you need to conduct a visual inspection of the pan and gearbox unit. In order to determine whether there is a leak of working fluid, you need to drop a little water onto the pan and observe: if transformer oil is leaking, it will spread over the surface, motor oil will stick to a single drop.
This is interesting: What is needed to deregister a car, how to do it correctly
Removing the Packing
• remove old packing and clean the stuffing box from dirt;
• clean and check for wear, as well as for damage, deformation or corrosion, the shaft (shaft protective sleeve) of the pump or the valve stem; if there are irreparable defects, the part must be replaced;
• check for chips, cracks and deformations of the bushings, pressure sleeve and thrust ring, as well as the lubricant (lantern) ring (if any), replace damaged parts;
• check the gaps between parts for compliance with tolerances and manufacturer’s recommendations; if not, replace worn parts.
Option with buckwheat
Using this recipe, you can prepare a flavorful dish that can be served not only for a family lunch, but also for a dinner party. To surprise your guests with hearty salami, try to stock up on all the necessary products in advance. This time your refrigerator should contain:
- Six hundred grams of beef liver.
- A couple of glasses of buckwheat.
- Four onions.
- Two fresh chicken eggs.
- One hundred and fifty grams of lard.
- A couple of cloves of garlic.
To prepare liver oil seals, the recipe for which will definitely appear in your home cookbook, you need to additionally stock up on a kilogram of natural fat mesh, salt and pepper.
Process description
To prepare real oil seals, the recipe for which is discussed in today’s article, you need to start by preparing the liver. It is washed and dried with paper towels. Then the offal is ground in a meat grinder and combined with chopped and fried onions. After this, rice, salt and pepper, boiled until half cooked, are placed in the same bowl. Mix everything well and put it aside.
Since the oil seals, the recipe for which is presented in this article, will be wrapped in a fat mesh, you need to start preparing it. It is washed, laid out on the table and cut into fifteen-centimeter squares. Each of them is stuffed with minced meat and rolled into cabbage rolls. The resulting semi-finished products are placed on a baking sheet and sent to the oven.