07/18/2021 6,677 VAZ 2115
Author: Ivan Baranov
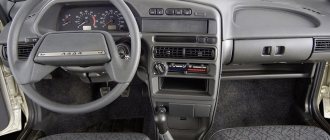
The purpose of the instrument panel (ID) on any car is to inform the driver about the operating status of the main components and mechanisms. Depending on the car brand, the purpose of the PP elements may be different. In this article we will talk about what the indicators installed in the instrument panel are responsible for in the VAZ 2115 and how to replace the device if necessary.
[Hide]
Instrument panel VAZ 2115
The controls of the VAZ-2115 passenger car are located in accordance with the UNECE norms and regulations. For greater ease of use of handles, buttons, switches and control devices located on the dashboard, they have graphic symbols indicating their functional purpose.
Does not work
If on a car on the instrument panel none of the indicators installed on it work (speedometer, odometer, tachometer, fuel level and coolant temperature indicators), then the first thing the driver will have to do is check the integrity of fuse F3, which is located in the mounting block . If it has burned out, then before replacing it, you need to find the reason why it burned out, otherwise the newly installed new fuse will have the same fate as the previous one. Most often, fuses burn as a result of a short circuit.
Even if the fuse is intact, then do not be lazy to take it out and check the condition of the contacts. There are cases when the contacts oxidize, and the electrical circuit in this place is interrupted. After making sure that the fuse is intact, the next step is to check the ignition relay, which is located inside the car to the left of the steering column. It is attached to a pin upside down. In the block where this relay is inserted, you can try to short-circuit the power wires using a jumper. If the instrument panel comes to life, the ignition relay will have to be replaced.
If the ignition relay is working properly, there are only two possible reasons for the instrument panel not working: the ignition switch and the mounting block. Before installing the ignition relay on the VAZ-2109 car, the lock contacts burned quite often, and they had to be cleaned by disconnecting the contact group from the lock itself. After changes were made to the principle of supplying voltage to the ignition switch, its contacts began to burn very rarely, but the likelihood of this phenomenon still remained. On the mounting block, in its board, tracks may burn out; in order to see this, the mounting block will have to be removed from the car.
In addition to the reasons listed above, which can lead to failure of the instrument panel, it is also necessary to check the reliability of fastening the ground wire.
There are many answers you can give to the question why the instrument lighting does not work. The most common:
— burnout of incandescent lamps or failure of the LED group;
— oxidation of connectors;
- faulty electrical wiring;
— failure of the fuse box;
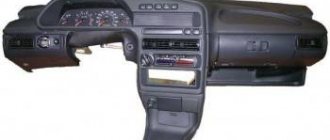
How to remove the instrument panel (dashboard) on a VAZ 2114
— damage to the common contact board;
— no weight on the body (minus) or damage to the dimensions system.
To find a fault, you must use diagnostic equipment, a tester or a voltmeter. If a breakdown is found, you can begin repairs.
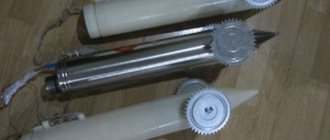
Replacing light bulbs
When the panel lamps stop lighting, you should immediately replace them with new ones. For this job we will need the following arsenal:
cross-head screwdriver for new light bulbs.
Let's get started
First of all, we remove the decorative trim of the radio (since the dashboard and radio are connected to each other, you will have to disturb the music system too), which is held on by fasteners; here it is better to use a screwdriver, threading it under the trim.
The main condition of work is caution. You need to start detaching the cover from the bottom edge
When the bottom edge comes off, you need to pull it towards you a little. Now detach the top edge. Further:
Europanel for VAZ 2110 instead of the old torpedo
— Disconnect the wire directed to the cigarette lighter.
— In the same way as we removed the cover from the radio, we remove it from the dashboard. Above the left and right edges we find two self-tapping screws. They need to be unscrewed. We unscrew the screws located at the top and bottom.
— We remove the trim with a little effort (since it is also held on by fasteners, so the decorative plate will have to be rocked a little).
— We disconnect all the wires: from the alarm system, from the clock, from the headlights and other things.
— We remove the control panel itself, for which we unscrew the four screws on which it is held. In order not to damage the wires, it would be better to disconnect them on the one hand.
- Now the most important thing. We remove the sockets of the light bulbs that have stopped burning. To remove the cartridges, you need to turn them counterclockwise with a gentle movement. We replace the defective lamps with new ones, wrap them and install the entire structure in the reverse order of disassembly.
VAZ-2115 dashboard diagram
The controls of the VAZ-2115 passenger car are located in accordance with the UNECE norms and regulations. For greater ease of use of handles, buttons, switches and control devices located on the dashboard, they have graphic symbols indicating their functional purpose.
Rice. 1.1 Instrument panel of the VAZ-2115 (diagram).
How to remove the instrument panel from a VAZ 2115
Since the instrument panels on the thirteenth, fourteenth and fifteenth models are the same, the procedure for dismantling the dashboard will be considered using the example of the VAZ 2115. But before you begin, you should stock up on everything you need.
Sequence of operations when removing the dashboard from a VAZ 2115
Using a Phillips screwdriver, remove the screws that hold the left side of the console.
The left side of the VAZ 2115 console is removed with a Phillips screwdriver
The dashboard of the VAZ 2114 does not work
After this, the lower edge of the sidewall is carefully removed from the bracket. The right side of the console is held on by five self-tapping screws, which are also unscrewed with a Phillips screwdriver. After this, the sidewall is carefully removed.
The right side of the VAZ 2115 console is attached to 5 screws
Now the handles installed on the stove damper levers are removed. This is done manually.
The VAZ 2115 heater handles are removed manually
Next, remove the handle from the fan speed control. To remove it, just pull it towards you.
Just pull the handle of the VAZ 2115 fan towards you
Use a Phillips screwdriver to unscrew the screws holding the dashboard to the brackets. There are 4 such screws (2 to the left of the panel, 2 to the right).
Self-tapping screws from the VAZ 2115 panel brackets are unscrewed with a Phillips screwdriver
Another 4 self-tapping screws are located at the window of the instrument unit (2 under the window and 2 above it). They can also be unscrewed with a Phillips screwdriver.
Self-tapping screws from under the instrument window of the VAZ 2115 are removed with a Phillips screwdriver
Above the instrument panel window, on the right, there is a small plug. It is pryed off with a flat screwdriver and removed. Under it there is another self-tapping screw, which can be unscrewed with a Phillips screwdriver.
The self-tapping screw plug on the VAZ 2115 dashboard is pryed off with a flat screwdriver and removed
After removing all the screws, the instrument block cover is removed. To do this, just pull it forward a little. Behind the cover there are wires that are removed from the sockets manually.
All instrument wires of the VAZ 2115 are disconnected manually
After disconnecting the wires, use a 13 mm wrench to unscrew the 2 bolts on the steering bracket.
The nuts on the steering brackets of the VAZ 2115 are unscrewed with an open-end wrench
Next, using a size 8 wrench, unscrew the nuts on the lower bracket mount.
The nut on the VAZ 2115 panel bracket is unscrewed with an open-end wrench
After this, the control unit is carefully removed from the panel, allowing access to the fastening nuts on the dashboard cross members. Next, using a Phillips screwdriver, unscrew the last external screw holding the dashboard to the left cross member.
The last screw holding the VAZ 2115 dashboard is located at the driver's door
After unscrewing the last screw, the dashboard is removed.
Torpedo VAZ 2115 is removed
Panel modifications, special parts
Every VAZ 2114 owner comes to a point when he gets tired of seeing the factory instrument panel every day and has a desire to install a new, improved modification.
This instruction will allow you to perform the task assigned to you with the highest quality possible without contacting technical service centers. If you want everything in your cabin to be of the highest standard, pay attention to modern torpedo models with digital speedometers. They are produced and sold, albeit at a very significant price,
However, the cost is justified by the unique external data, which allows the instrument panel to be designed in such a way that it meets all the requirements of modern style.
In the meantime, after you've removed the dashboard but haven't yet started installing a new one, consider decorating it to give it as much personality as possible.
Don't forget about the old panel that you removed with such care. If there are no visible cracks on it, you can sell it on the Internet for about 1/3 the cost of a new torpedo
Therefore, in this way you get back part of the money you paid for purchasing a new part for the car interior. If you're serious about making your panel stand out, add neon lighting or backlighting to add variety to the standard factory lighting.
Remember that when you are fixing the panel, special attention should be paid not only to the scale and arrows, but also to the buttons that are located on it. Of course, you shouldn’t sculpt the lighting wherever you have to, here you also need to maintain strict proportions, because bright lights will distract you along the way in any case
Especially if, if necessary, you have to repeatedly drive along difficult sections of the route.
If you want to make the panel perfect, start creating more thorough sound insulation. To carry out the work mentioned in a VAZ 2114 car, you will need to purchase special materials. But it’s best if you do this task in parallel with replacing the panel. After all, if you have already installed a new option, you will have to unscrew everything again.
Welcome, friends, to the DIY car repair website. Due to various situations, a moment arises when it is necessary to change the dashboard.
And in today’s article we will look at the example of the Russian automobile industry, how to change the instrument panel on a VAZ 2114, VAZ 2115.
Although replacing a panel is not such a complicated procedure, many car owners still prefer to turn to the services of specialists, that is, to a service station.
But many car enthusiasts, for various reasons, prefer to repair the VAZ themselves, so this article will describe detailed instructions for removing and installing the VAZ 2114 instrument panel.
As you know, the instrument panel conveys useful information to the driver while the car is moving or parked with the engine running.
Therefore, you need to take this process very seriously, so that during installation you do not forget to connect any important device.
It is also worth noting that it is within 15 thousand rubles, so here everyone decides for themselves whether it is worth making a replacement or not.
Although there are situations when you simply cannot do without a replacement, for example, the car was in an accident or there are some large cracks on it.
How to remove the dashboard on a VAZ 2110 with your own hands - step-by-step instructions + photo report
In order to remove a torpedo on a VAZ 2110, you must perform the following procedure:
- Unscrew 2 screws on the right and 2 on the left on the central tunnel.
- Next, remove the covers on both sides.
- Remove the plug near the handbrake.
- Unscrew the screws on the left and right of the central tunnel.
- Unscrew the screws at the back of the central tunnel.
- Removing the plastic of the central tunnel.
- Disconnecting the cigarette lighter wires. Mark so as not to get confused when connecting to the assembly.
- Remove the gearshift knob cover.
- Using a wrench, unscrew the interior heating air duct.
- Removing the air duct.
- Unscrew the fastenings of the central panel from the front.
- Unscrew the fastenings of the central panel at the back.
- We finally remove the panel.
- We unscrew the screws of the glove compartment.
- We remove the glove compartment.
- Disconnect the glove box light wires.
- We unscrew the screws inside the space in place of the glove compartment.
- Unscrew the remaining screws on the sides of the torpedo.
- Unscrew the torpedo bolts as follows as in the photo.
- Removing the air duct.
- Unscrew the nut on the dashboard under the air duct.
- We lower the torpedo from the pins.
- We disconnect the wires from the front panel and mark them so as not to get confused during assembly.
How to disassemble the instrument panel on a VAZ 2114
Before embarking on this complex process, the driver must carefully familiarize himself with the design and arrangement of the instrument panel on his car. When disassembled down to the cogs, it looks like this:
The device of the VAZ 2114 dashboard
Instrument panel and its accessories:
1 - VAZ 2114 torpedo, or - instrument panel, that is, the main part of the entire structure to which the instrument unit, on-board computer, stove control levers, key blocks and other linings and latches are attached;
2 — overlay on the instrument panel, has a decorative function, it also contains air duct outlets for blowing the windshield;
5 — ashtray body;
6 and 11 - right and left crossbars;
7 and 10 - right and left console screens;
8 — instrument panel;
9 — central bracket.
If you carefully study this diagram, it becomes clear how to remove the panel on a VAZ 2114. Having determined the order for yourself, you can begin the process.
Using a Phillips screwdriver, you need to unscrew the three screws holding the left console screen. For convenience, when doing this work, it is better to use a screwdriver with a short handle and blade.
Left screen of the VAZ 2114 console
When removing the screen, carefully remove the lower edge of the trim from the body bracket. The right console screen is secured with five self-tapping screws. Using a Phillips screwdriver, carefully unscrew all the screws while holding the trim with your hand.
Right screen of the VAZ 2114 console
remove the screen without allowing it to get caught in the wiring harnesses that are hidden behind it.
Disconnect the ground from the battery by disconnecting the connectors. If your car has a radio, disconnect it from the main bundle of wires by pulling out the connecting connector. If there is no radio installed on the car, then simply pull the wires out of the panel; they should be closed with a plug. Be sure to turn off the cigarette lighter and remove the socket with the ashtray light bulb.
Remove the handles from the heater damper control levers. To make the process easier, pry them off with a flat-head screwdriver.
Removing handles and levers from the dashboard of a VAZ 2114
Despite the apparent simplicity of this item, removing the handles from the levers can take a lot of time. To do this, a clear example is given of how this should be done on a removed unit.
There is a special protrusion on the lever; when installing the handle, it engages with the lever through a hole made for this protrusion. To do this, when removing the handle, you need to use a flat, thin screwdriver to pry and lift the latch on the handle, freeing it from the protrusion.
Removing the handle using a VAZ 2114 screwdriver
Remove the electric heater fan handle by simply pulling it towards you.
Removing the handle of the electric fan VAZ 2114
Unscrew the cross-head screws securing the instrument panel to the brackets on the right and left with a screwdriver.
Self-tapping screws on the dashboard brackets of VAZ 2114
in the window on the instrument panel where the instrument unit is located there are two screws on top and two on the bottom - under the window. It is necessary to turn them out, loosening the cover (2) and the shield (8).
Releasing the lining and shield of the VAZ 2114
pull out the plug and unscrew the screw located behind it.
Self-tapping screw under the plug VAZ 2114
- remove the two screws from the bottom holding the trim and remove it.
- Having marked the wires suitable for the switches, disconnect them.
Disconnecting wires from VAZ 2114 buttons
Unscrew the bolts from the steering wheel bracket.
Bolts on the VAZ 2114 steering bracket
Using the “8” key, unscrew the screws of the lower bracket fastening.
Lower mount on the VAZ 2114 bracket
- Unscrew the self-tapping screw and remove the light guide.
- remove the fasteners of the heating control unit and remove the cartridges from the back of the unit.
Cartridges from the reverse side of the VAZ 2114 block
- remove the decorative insert, removing all external parts.
- Unscrew the nuts with a key to “21”.
- remove the hydraulic corrector illumination.
- Unscrew the top and bottom fastenings of the panel, remove the fastening to the cross member on the left side.
Upper mount on the left side of the VAZ 2114 panel
Now you can remove the VAZ 2114 torpedo.
Removing the instrument panel of VAZ 2114
Installation is in the reverse order.
In order to clearly see the whole process in motion, you can watch a video on how to remove the dashboard on a VAZ 2114.
https://youtube.com/watch?v=F-FEZZiQ31Y
Instrument panel tuning
Many owners of domestic cars strive to make some improvements to their design in order to give the car a more modern and, at the same time, more individual look. An excellent option in this case would be tuning the dashboard.
You can do it in two ways - replace the “native” panel with a Europanel or make changes to the backlight on the basic version.
In the first case, to replace you will need:
- unscrew the 3 screws securing the center console;
- remove the cover;
- unscrew the 5 screws located on the right side of the console and remove the screen;
- disconnect the ground terminal from the battery;
- remove the radio (if installed);
- disconnect the wiring harness going to the cigarette lighter and dismantle it;
- remove the handle from the levers using a narrow blade or screwdriver;
- remove the handle;
- disconnect the wires from the block;
- unscrew the mounting bolts;
- unscrew the bottom bracket fastening;
- unscrew the light guide screw, remove the light guide;
- unscrew the heating unit fasteners;
- remove the hydraulic corrector lamp (in order to unscrew it, you will need a 21 key);
- remove the sockets of all lamps;
- remove the decorative insert;
- unscrew all remaining fixing nuts;
- remove the dashboard.
After installing the europanel, assembly is carried out in the same order, but in reverse order (when connecting electronics, the diagram of the VAZ 2114 instrument panel is taken into account).
A more budget-friendly tuning option is to install LED instrument lighting on the panel. In order to make it, you will need to purchase a set of new light bulbs and sockets for them. Having removed the panel, the old cartridges are dismantled by unscrewing them counterclockwise, after which new ones are installed. After all the cartridges have been replaced, LEDs are installed in them.
LED light bulbs should be installed strictly taking into account the polarity (if necessary, it can be found out by measuring the voltage at the socket contacts with a multimeter). Failure to comply with this condition can lead to immediate failure of the light bulbs.
After all the LEDs are installed, you should search for errors using the on-board computer. If they are found, you should check whether the electronic components are connected correctly (the pinout of the VAZ 2114 dashboard must exactly correspond to the actual connection diagram). If no errors are found, you can reinstall and reassemble the dashboard.
How to disassemble the instrument panel on a VAZ 2114
Before embarking on this complex process, the driver must carefully familiarize himself with the design and arrangement of the instrument panel on his car. When disassembled down to the cogs, it looks like this:
The device of the VAZ 2114 dashboard
Instrument panel and its accessories:
1 - VAZ 2114 torpedo, or - instrument panel, that is, the main part of the entire structure to which the instrument unit, on-board computer, stove control levers, key blocks and other linings and latches are attached;
2 — overlay on the instrument panel, has a decorative function, it also contains air duct outlets for blowing the windshield;
5 — ashtray body;
6 and 11 - right and left crossbars;
7 and 10 - right and left console screens;
8 — instrument panel;
9 — central bracket.
If you carefully study this diagram, it becomes clear how to remove the panel on a VAZ 2114. Having determined the order for yourself, you can begin the process.
Using a Phillips screwdriver, you need to unscrew the three screws holding the left console screen. For convenience, when doing this work, it is better to use a screwdriver with a short handle and blade.
Left screen of the VAZ 2114 console
When removing the screen, carefully remove the lower edge of the trim from the body bracket. The right console screen is secured with five self-tapping screws. Using a Phillips screwdriver, carefully unscrew all the screws while holding the trim with your hand.
Right screen of the VAZ 2114 console
remove the screen without allowing it to get caught in the wiring harnesses that are hidden behind it.
Disconnect the ground from the battery by disconnecting the connectors. If your car has a radio, disconnect it from the main bundle of wires by pulling out the connecting connector. If there is no radio installed on the car, then simply pull the wires out of the panel; they should be closed with a plug. Be sure to turn off the cigarette lighter and remove the socket with the ashtray light bulb.
Remove the handles from the heater damper control levers. To make the process easier, pry them off with a flat-head screwdriver.
Removing handles and levers from the dashboard of a VAZ 2114
Despite the apparent simplicity of this item, removing the handles from the levers can take a lot of time. To do this, a clear example is given of how this should be done on a removed unit.
There is a special protrusion on the lever; when installing the handle, it engages with the lever through a hole made for this protrusion. To do this, when removing the handle, you need to use a flat, thin screwdriver to pry and lift the latch on the handle, freeing it from the protrusion.
Removing the handle using a VAZ 2114 screwdriver
Remove the electric heater fan handle by simply pulling it towards you.
Removing the handle of the electric fan VAZ 2114
Unscrew the cross-head screws securing the instrument panel to the brackets on the right and left with a screwdriver.
Self-tapping screws on the dashboard brackets of VAZ 2114
in the window on the instrument panel where the instrument unit is located there are two screws on top and two on the bottom - under the window. It is necessary to turn them out, loosening the cover (2) and the shield (8).
Releasing the lining and shield of the VAZ 2114
pull out the plug and unscrew the screw located behind it.
Self-tapping screw under the plug VAZ 2114
- remove the two screws from the bottom holding the trim and remove it.
- Having marked the wires suitable for the switches, disconnect them.
Disconnecting wires from VAZ 2114 buttons
Unscrew the bolts from the steering wheel bracket.
Bolts on the VAZ 2114 steering bracket
Using the “8” key, unscrew the screws of the lower bracket fastening.
Lower mount on the VAZ 2114 bracket
- Unscrew the self-tapping screw and remove the light guide.
- remove the fasteners of the heating control unit and remove the cartridges from the back of the unit.
Cartridges from the reverse side of the VAZ 2114 block
- remove the decorative insert, removing all external parts.
- Unscrew the nuts with a key to “21”.
- remove the hydraulic corrector illumination.
- Unscrew the top and bottom fastenings of the panel, remove the fastening to the cross member on the left side.
Upper mount on the left side of the VAZ 2114 panel
Now you can remove the VAZ 2114 torpedo.
Removing the instrument panel of VAZ 2114
Installation is in the reverse order.
In order to clearly see the whole process in motion, you can watch a video on how to remove the dashboard on a VAZ 2114.
https://youtube.com/watch?v=F-FEZZiQ31Y
Designations of light bulbs, indicators, icons and buttons on the instrument panel of VAZ 2114, 2115
First, let's look at the descriptions and meaning of the panel icons and buttons, regardless of whether the car is equipped with an injector or a carburetor.
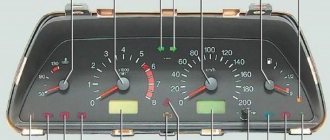
Instrument panel diagram VAZ 2114, 2115
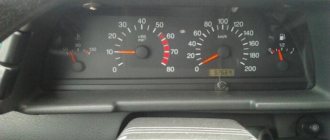
1 - Control sensor that measures the temperature of the coolant in the engine cooling system. During normal operation of the power unit, the antifreeze temperature should not exceed 90 degrees. But minimal deviations are sometimes acceptable. If you notice that the engine begins to overheat frequently, be sure to contact a car service center for help. Sometimes the sensor itself may give incorrect results.
2 - A device such as a tachometer processes information that comes from the crankshaft and displays it on the panel. The tachometer readings indicate the number of engine revolutions.
3.4 - Turn indicators. If the indicators flash simultaneously, but slowly, this may indicate a possible problem with the bulbs themselves or in the electrical wiring network.
5 — The most basic element of any instrument panel is the speedometer. Thanks to it, the driver can determine the speed of movement. A slight error in the indicators is allowed, but it should not exceed the indicator by more than 5 kilometers. If such readings differ significantly from the real ones, then most likely the problem is in the speedometer.
6 — Fuel level sensor in the fuel tank. When the level in the tank drops to 6-7 liters, a red light comes on, indicating that the car needs to be refueled.
7 - Low fuel level indicator.
8 — Symbol indicating the light is turned on. It is triggered when the low beam and parking lights are turned on.
9 — The brake light indicates that the vehicle’s brake system is not working correctly. Most often it lights up if there is not enough brake fluid in the car.
10 - A blue light indicates that the high beam headlights are on.
11 — Button for resetting the daily mileage. The total mileage of the car is shown at the top, and the daily mileage at the bottom.
12 - on-board computer display with mileage indicators.
13 — Alarm activation symbol (light). When the emergency light is turned on, the light begins to flash red.
14 — “Check” symbol. It is triggered in case of possible problems with the car’s power unit. There can be many reasons for this, from problems with mixing the combustible mixture with air, to breakdowns of various engine power components. In any case, you need to contact the service for computer diagnostics or repairs.
15 — External air temperature sensor and time indicators. The daily mileage reset button allows you to scroll from the temperature readings to the time readings when scrolling.
Injection VAZ 2107
16 - Battery charge sensor. Most often it lights up when the battery is almost completely discharged. If the indicator light is very weak or, on the contrary, bright, then the problem may be in the generator.
17 - Handbrake activation icon. It lights up both when the engine is on and vice versa.
18 — Icon showing engine fluid pressure. Usually its appearance indicates an insufficient amount of lubricating mixture. In such a case, be sure to check the oil level. Sometimes the problem can be caused by the oil pump not working properly.
19 - If the engine is equipped with an injector, then there is a reserve icon on the dashboard. Well, if the engine is carburetor, then this is a suction indicator.
Buttons on the instrument panel
- Dimensions switch
- dipped headlights
- Front fog light button
- Rear fog lights
- Heated rear window
The dashboard diagram (Fig. 1.1) includes controls:
1 – lever-switch for headlight or turn signal modes.
2 – nozzle for blowing the front door glass.
3 – instrument cluster.
4 – steering wheel.
5 – button to turn off sound signals.
6 – button to turn off the alarm. Pressing the button causes the warning light and direction indicators to flash.
Photo 1. Hazard switch off button
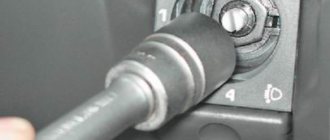
7 – ignition switch combined with an anti-theft device. Never turn off the ignition or remove the key from the lock while driving, otherwise the steering will be blocked and the vehicle will lose control. The ignition key can have three positions:
- 0 – “disabled”. Consumers are disconnected, the key can be easily removed. When the key is removed, the closing mechanism of the anti-theft system is activated. To guarantee the steering shaft block, turn the steering wheel left or right until it clicks. To turn off the anti-theft device, you need to insert the key into the ignition and, turning the steering wheel left and right, turn the key to position “I”;
- I – “ignition”. The ignition is on, the key is not removed, the steering is unlocked;
- II – “starter”. The key cannot be removed, the steering is unlocked. The position is achieved by turning the key to overcome the elastic force of the spring. The key is not locked in this position; it must be held by hand for the starter to operate. The ignition switch is also equipped with a starter activation unit while the engine is running.
To repeat turning on the starter after a failed start attempt, you need to move the ignition key from position “I” to position “0”, and then again to position “II”.
8 – switch lever for windshield washer and windshield wipers.
9 – immobilizer sensor, transmits a special code from the code key through the immobilizer to the engine control unit.
10 – set of signal lights for the on-board control system. The complex contains (Fig. 1.2): 1 – oil level drop signal; 2 – low level signal in the windshield washer tank; 3 – low coolant level signal; 4 – door open signal; 5 – signal of malfunction of the brake light and side lights; 6 – signal of wear of the linings on the brake pads; 7 – the signal indicates that the seat belts are not fastened.
11 – external lighting switch.
12 – block of keys for turning off fog lights, fog lights, heated rear window.
13 – trip computer, installed on some vehicles, designed to display one of the parameters: current fuel consumption (or average total fuel consumption), average speed, distance traveled, current time, time on the road.
14 – plug.
15 – control lamp for anti-lock braking system (ABS). Installed in place of the plug, if equipped with an anti-lock braking system.
16 – airbag control lamp. If the pillow itself is present, it is installed in place of the plug.
17 – central nozzles of the ventilation and heating systems of the cabin.
18 – cover of the glove box (upper). To use the upper glove compartment while the lower glove compartment lid is open, press the upper lid lock lever. The lock lever is located in the niche of the lower glove compartment on top.
19 – side nozzle of the ventilation and heating systems of the cabin.
20 – glove box cover (lower). To open it, you need to press the lock handle to the handle. If the external lighting is turned on, a special illumination of the inside of the box will automatically work.
21 – magazine shelf.
22 – control panel for interior ventilation and heating systems.
23 – socket for audio equipment. It is planned to install audio equipment that meets international standards in size and mounting principle.
24 – ashtray.
Watch a video of testing the dashboard of a VAZ-2115 passenger car here:
How to remove the instrument panel from a VAZ-2114
Before you finally remove the dashboard on the VAZ-2114, you need to understand the specific components that will have to be dismantled:
- a key component on which the BC is attached, a block of various devices, as well as all kinds of keys, switches and other components;
- a trim that is installed on the VAZ-2114 mainly for beauty, but also has air duct outlets;
- plugs;
- brackets;
- ashtray body;
- crossbars;
- shield;
- central bracket;
- console screens.
If you are going to remove the instrument panel from a VAZ-2114, you will have to remove all these elements separately. Moreover, each of them has its own fastening features and you will need to use different tools, since you will need to remove the shield and, for example, the brackets in different ways.
Tools and materials
To remove all the necessary elements, it is not at all necessary to have any expensive tools or special equipment. It is enough that the garage has a standard set of screwdrivers, as well as instructions for working with the VAZ-2114.
Sequence of operations when removing a torpedo from a VAZ-2114
In order to remove the instrument panel from a VAZ-2114, it is enough to do everything in accordance with the simple instructions given below:
- Using a Phillips screwdriver, remove the 3 screws securing the left console screen to the dashboard. It is recommended to get a short tool, as it is much more convenient.
- Carefully remove the lower part of the trim from the body bracket, removing the screen.
- Remove all screws securing the console screen to the panel. At the same time, do not forget to constantly belay the pad with your hand.
- Remove the screen. At the same time, be sure to ensure that it does not cling to any kind of cords.
- Disconnect the connectors to disconnect ground from the battery. If a radio is used in transport, then in this case it should also be separated from the main wires by removing the connecting block. If it is not in the car, it will be enough to remove the wires from the dashboard, making sure that they have a plug. Be sure to turn off the cigarette lighter and also remove the socket with the light bulb that illuminates the ashtray.
- Remove the handles from all levers that control the heating dampers. It is recommended to pry them off with a flathead screwdriver to make the procedure easier. There is a special protrusion on the lever, and when the handle is installed, it is combined with the lever through a special hole. That is why, when removing it, you should use a thin screwdriver to pick it up and lift it, freeing it from this protrusion.
- Remove the electric fan toggle switch (you just need to pull it out of the connector).
- Unscrew all the screws securing the VAZ-2114 dashboard to the brackets on both sides.
- Release the shield and trim by removing two self-tapping screws located in the window near the instrument unit;
- Take out the plug and remove the screw located behind it.
- Remove the two screws that hold the trim in place at the bottom, then pull it out.
- Label the wires to identify which switches they go to, then unplug them.
- Remove all bolts from the steering bracket.
- Unscrew the screws holding the lower bracket mount.
- Remove the light guide.
- Remove the element securing the heating control unit, and then remove the cartridges that are located behind it.
- Remove the decorative insert, removing any external components.
- Remove the hydraulic corrector lighting.
- Loosen all the fasteners of the panel, then remove the bolt with which it is secured to the crossbar, located on the left side.
- It remains to remove the VAZ-2114 torpedo.
You can clearly see how to remove the instrument panel of a VAZ-2114 in the video:
Removing the VAZ 2114 panel, noise and vibration insulation, additional fuse box
What do the tidy indicators do?
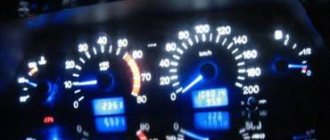
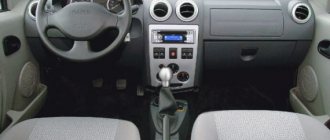
The control panel on the VAZ 2115 is located in the center console directly in front of the driver.
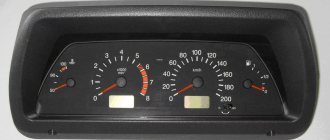
Descriptions of instrument cluster symbols are given below:
- Coolant temperature sensor, if the controller arrow moves into the red zone, this indicates that the power unit is overheating.
- A tachometer informs the driver about the crankshaft rotation speed; if the arrow falls into the red zone, it is necessary to reduce the engine speed.
- Left turn signal.
- Right turn signal.
- A speedometer that tells you how fast a vehicle is moving.
- Fuel level sensor in the tank.
- The light indicator, made in the form of a gas pump on the instrument panel of a VAZ, usually lights up if no more than 7 liters of fuel remain in the gas tank.
- Optics indicator, activated when the side lights are turned on.
- In accordance with the instructions, an indicator in the form of an exclamation mark lights up on the instrument panel if the brake fluid level has dropped and reached a minimum.
- High beam activation indicator light.
- This is a button designed to reset the daily mileage on the odometer and set the clock.
- An odometer that records the mileage of a vehicle.
- Light alarm, when turned on, this indicator will blink.
- On the VAZ 2115, the icon scheme includes one important indicator - Check Engine. This symbol always flashes when the engine starts, but disappears after it starts. The indicator may appear if the control unit detects certain problems in the operation of the power unit.
- The display showing the outside temperature and time is switched using button 11.
- The battery icon appears when the ignition is turned on; if it is constantly on, then most likely the on-board computer has detected problems related to the battery charge. But if it occurs, the problem may also be caused by a malfunction of the generator, loosening of the strap, or breakdown of the unit.
- The letter P in a circle - the indicator appears when the car is setting the parking brake.
- This symbol lights up when the engine fluid pressure is too low.
- Reserve indicator (the author of the video about tuning the control panel at home is the Studio Pandora channel).
VAZ 2114 dashboard - how to remove and replace
In the process of driving a car, the VAZ 2114 dashboard plays a very important role. It is a set of instruments that display many vehicle parameters. Among them: speed, number of crankshaft revolutions, coolant temperature, remaining amount of gasoline. Many panels are equipped with voltmeters, oil pressure gauges and even an electronic thermometer. In addition, the dashboard contains a large number of controls for the electrical part of the car. In this article we will tell you how to remove the dashboard of a VAZ 2114, replace it and tune it, as well as how to replace the backlight bulbs.
WHY IS THE INSTRUMENT PANEL REPLACED?
Most often, the reason why the driver takes this step is an accident. After it, the dashboard becomes unusable: it cracks and loses its original appearance. There are situations when the shape of the product has not changed, but rather ugly cracks have appeared on it, which violates the overall aesthetics of the car.
There are many difficulties in this operation. The first of these is connecting electrical receivers. The fact is that many drivers forget to insert a plug and the device simply refuses to work. In this regard, everything has to start all over again. The second difficulty is dismantling. Most often, during disassembly, drivers accidentally break some fastener or device. All this forces the driver to turn to the services of auto repairmen and pay considerable sums for the work performed.
In fact, everything is much simpler than it seems
It is enough to strictly follow the instructions and be especially careful. Then you will save a lot of nerves and effort
We study and change the controls of a VAZ 2115 passenger car - instrument panel
The purpose of the instrument panel (ID) on any car is to inform the driver about the operating status of the main components and mechanisms. Depending on the car brand, the purpose of the PP elements may be different. In this article we will talk about what the indicators installed in the instrument panel are responsible for in the VAZ 2115 and how to replace the device if necessary.
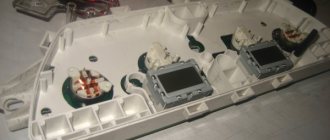
Malfunctions and repairs
Instruments or indicators may fail. This could be part of the indicators or even the entire speedometer. VAZ 2110 owners rarely encounter this situation, since the dashboard works properly, especially in domestic cars. Before changing the instrument panel or repairing individual parts, you should make sure that the sensors are working properly - we use the on-board computer.
Inaccurate installation leads to failure of elements. On the instrument panel board, the parts are attached using simple rivets, hence the negative result. The body is constantly subject to vibrations, so the installation simply “falls apart” and breaks appear in the circuit. Repair in this case involves soldering the rivets and thoroughly cleaning the contacts.
After soldering is completed, the instrument panel can be returned to its place. If you have free time, you can go through the contacts using sandpaper. On older cars they usually oxidize, which can prevent the devices from functioning properly.
You can see how to remove the dashboard in the video below.
Probably, hardly anyone will argue with the fact that the VAZ “ten” is not the pinnacle of design thought. However, there is nothing surprising here, because this car was designed back in the last century. At the same time, the compensator, and quite a serious one, in this case is the price. In other words, a certain compromise is proposed - the imperfection of the car in exchange for an acceptable cost. Well, the choice is ultimately made by the car owner himself, deciding whether this option is suitable for him.
You can talk about the advantages and disadvantages of this model for quite a long time. However, this is not what we are talking about now. Those who decide that the “ten” is a suitable option in terms of the ratio between price and quality often want to somewhat refine their iron horse during operation, making changes to both the exterior and the interior.
If we talk about tuning the car interior, then one of the main objects of improvement here is the dashboard. Many people simply don’t like the native version, which, frankly, doesn’t look very attractive. Yes, after the “Zhiguli” this is an undoubted step forward, but it’s already the 21st century outside the window, and I want something more beautiful and pleasing to the eye.
Possible faults
The instrument cluster of the VAZ 2115, like any other component of the car, is a device susceptible to various malfunctions.
In this case, there are not so many of them and they are all connected with the electrical part:
- If the instrument panel does not work, there may be several reasons. Either this is poor contact between the device and the ECU, which can be solved by replacing the plug or cleaning the contacts, or a malfunction of the control panel itself, or “glitches” in the operation of the control unit. Typically, the device’s inoperability appears after the PCB has been dismantled and installed in place. In this case, the reason, most likely, is a poor connection of the contacts, so all connectors need to be reconnected, taking into account the pinout.
- Some devices do not work - tachometer, speedometer, fuel level controller. The problem can be either electrical and consist of poor contact, or mechanical (breakage of the speed sensor, fuel level in the gas tank, etc.). Usually replacing the regulators will solve the problem.
- The backlight of the VAZ 2115 instrument panel does not work. If all the bulbs immediately refuse to work, the reason, again, needs to be looked for in the electrical part - maybe a wire has simply come loose somewhere. If only one or several lamps have burned out, then they simply need to be replaced (a video about the installation of a tuned device in a dozen VAZs was made by Pavel Ksenon).
INSTRUMENT PANEL TUNING
If you want to somehow improve the appearance of the dashboard or make it functional, you can tune it.
The most common type of dashboard tuning is installing new lamps in the instrument lighting or installing additional lighting. Most often, lamps are replaced with lamps with a different color of luminous flux (for example, green or blue). The color selection should be such that it does not irritate the eyes, especially in the dark. Additional lighting is used mainly for the lower part of the panel at the feet. To do this, you can buy a ready-made set of LEDs and connect them to the car’s on-board network.
Another tuning method involves changing the appearance of the instrument scale. To do this, you can print ready-made solutions on a color printer, glue them to hard cardboard and install them instead of the old scale. It is worth considering that the lighting of the new scale may differ slightly from the factory one. Therefore, important criteria will be the color of the scale and the material to which it will be glued.
A more serious modernization involves changing the appearance of the panel itself. To do this, it can be painted or covered with new material. If you decide to cover the panel, then use only approved materials. Ordinary fabric and fur are prohibited, as they are flammable. The color of the upholstery should be chosen in accordance with the general background of the interior. A combination of two colors at once (for example, beige and brown) looks great.
If you decide to paint the panel a different color, it must be removed. After this, it is cleaned with sandpaper and degreased. First of all, a special sealant is applied, and then car paint. Do not use paint materials that are highly sensitive to high temperatures. If you paint the plastic with any other paint, then when the car is left in the sun for a long time, the paint will melt and simply come off. Another trouble may await you when washing the panel - ordinary paint tends to be washed off with ordinary water, or even better - with soap. Be prepared for the fact that at first the salon will smell like paint.
Didn't find the information you are looking for? on our forum.