The design of the gearbox of classic domestic cars suffers from low reliability and inability to withstand high loads. Repairing a VAZ 2107 5-speed gearbox is a rather complex procedure that requires a responsible approach and extensive experience. However, if you know the procedure and are technically trained, you can perform the maintenance yourself. As a rule, cars begin to have problems with the inclusion/deceleration of speeds and the loosening of the rocker. With such symptoms, surgical intervention in the structure will be required.
Signs and causes of box malfunctions
Among the most popular reasons for visiting a service station are:
- the appearance of specific noise while driving;
- extraneous sounds during acceleration;
- one or more gears do not engage, it is knocked out.
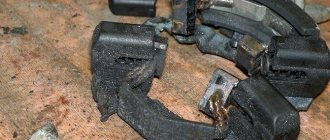
The symptoms are a clear sign of wear on the gears and synchronizers. Mechanics are often cited as the cause of the breakdown.
- Overly aggressive driving. Stock transmissions are not designed for such driving conditions. Acceleration before the cutoff, too high a pace of movement on dirt or low-quality asphalt roads.
- Natural wear and tear. Some cars are equipped with a frankly weak transmission. Such devices rarely survive the 200,000 kilometer mark.
- Mechanical damage. Impacts against stones and curbs can damage the crankcase of the device, which causes lubricant leaks and dry operation.
- Using low-quality oil or neglecting to service the device. If you pour a surrogate lubricant into the gearbox, the reaction can be unpredictable. Similarly, the mechanism responds to the lack of replacement of the working fluid.
VAZ gearbox malfunctions
On VAZ classics and front-wheel drive VAZ models, the gearbox may fail for various reasons:
- There is not enough oil in the crankcase, or there is no oil at all (it has leaked);
- the car is operated in violation of the operating rules (for example, the driver switched from fourth gear directly to first gear);
- transmission parts have exhausted their service life;
- The gearbox repair was carried out in violation of technology and was performed poorly;
- The box was repaired using defective, low-quality spare parts.
There are signs that indicate that the manual transmission is faulty:
- under load one of the gears slips out (in some cases several gears can slip out);
- noise appeared in the gearbox (crunching, howling);
- speeds (one or more) have become difficult to switch, in some cases one of the gears does not engage at all;
- transmission oil is leaking (the gearbox housing has burst, increased pressure is created in the crankcase, the gasket in the connection has broken).
If the defect is not related to the gearshift lever or linkage, repair of the VAZ manual transmission is carried out with the removal and installation of the unit. To determine the cause of the malfunction, after disassembly, troubleshooting is carried out - by external inspection and measurements, the parts to be replaced are determined.
When and how often should a gearbox be repaired?
The manufacturer does not set a strict time frame for repairing the device. The only recommendation is a scheduled oil change.
The company recommends changing the fluid after 2,000 kilometers for the first time and after 60,000 kilometers for the second time. Further maintenance is limited to maintenance every 20,000-30,000.
Box faults
There are several types of symptoms of breakdown or wear of the VAZ 2107 gearbox.
- Lack of response to the inclusion of a position.
- The speed takes off at full speed.
- Increased noise, howling or grinding coming from inside the mechanism.
- The gears are stuck in tightly.
- Oil leaked.
The transmission does not start
The reason for the lack of an adequate response to the driver’s manipulations is:
- wear of gears and gears;
- abrasion of synchronizer bushings;
- mechanical damage to the guide bushings;
- synchronizer spring wear.
Knocks out gear when driving
The next trouble is the gearshift lever clicking out immediately after engaging the gear.
The reasons are:
- the lever joint is jammed;
- physical breakdown of the direct lever - the part is changed;
- the shift forks in the gearbox are bent;
- The clutch is not working properly.
Crunching and grinding in the box while driving
The following breakdown is caused by the following factors:
- wear of bearings on shafts;
- gear splines are worn out, parts are replaced;
- There is not enough oil in the crankcase of the device, it is recommended to add lubricant.
Increased noise
The consequence of the following problems is increased noise emission.
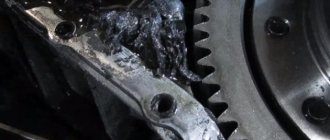
- Lack of lubrication in the gearbox housing. The mechanism runs dry, which provokes the appearance of extraneous sounds.
- The fluid hasn't been changed for too long. After the lubricant wears out, a large amount of thick ointment consisting of soot, acids, and metal shavings forms inside the mechanism. The mass clogs the channels and oil starvation occurs.
- Wear of gear teeth and bearings.
Difficult gear shifting
In this case, you will need to check the clutch - the device may not work correctly. Damage to the basket or disk is also relevant. Separately, the cause may be pouring an excessively thick lubricant or a malfunction of the synchronizer.
Oil leak
Lubricant leakage can be caused by factors.
- Mechanical damage to the crankcase when it hits or hits another surface.
- Wear of oil seals and seals caused by natural aging of rubber.
- Overflow of liquid and, as a result, its displacement from the mechanism.
Replacing the bearing of the input shaft of the VAZ 2107 gearbox
Remove the bell and retaining rings from the dismantled box. No further disassembly is required. The procedure is as follows:
- Using a powerful screwdriver, pick up the bearing of the input shaft of the VAZ 2107 gearbox by the annular groove . Serious efforts will be required, so you need to choose a screwdriver that is as strong as possible so that it does not break or bend.
- Push the transmission input shaft forward using the shaft bearing as a support.
- Slowly pull the bearing off the input shaft by tapping it with a hammer. Between hammer blows, the shaft must be rotated slightly to avoid bearing misalignment.
Knocking out a bearing takes from 5 minutes to half an hour. It all depends on the skill of the mechanic and on how closely the bearing is “affined” with the shaft.
The new bearing is pressed onto the shaft using a light hammer. The blows must be applied to the inner ring of the bearing. This should be done carefully and evenly, pulling the input shaft forward.
The advantage of this method is that there is no need to sort through the insides of the box, risking unbalancing it. Also, replacing a bearing without disassembling the entire gearbox significantly saves time.
After replacing the bearing, all that remains is to install the gearbox in place. Given its weight, it is advisable to carry out the work together. The operations are carried out in the reverse order of removing the box and do not cause any difficulties.
Diagnostics of box bearings
To check the condition of the gearbox bearings, the device must be disassembled and access to the parts must be opened. This method is the most accurate and effective.
After dismantling and disassembling the unit, you should check the shafts for play, the integrity of the seals and sealing rings. Additionally, the condition of the seats is checked. In normal condition, the formation of backlash and damage to rubber seals is unacceptable. If this is found, the part should be replaced.
Gearbox disassembly and repair
ATTENTION ! If during the repair of the gearbox at least one of the following parts was replaced: clutch or gearbox housings, differential housing or differential bearings, then it is necessary to select a differential bearing adjusting ring.
| 4. Unscrew the remaining four nuts securing the rear cover. | ||
| 5. Use a screwdriver to hook the boss on the cover and remove the back cover. | 6. Unscrew the bolt securing the 5th gear fork (a spring washer is installed under the bolt head). | 2. Secure the gearbox shafts from turning. To do this, engage 5th gear by moving the synchronizer clutch down along with the fork so that the coupling splines engage with the gear, then engage 3rd or 4th gear by moving the gear selection rod. |
| 2. Unlock and unscrew the nut securing the input shaft. To do this, you need to apply a lot of force, since the nut is tightened with a large torque. | 9. Having previously unlocked it, unscrew the nut securing the secondary shaft. To do this, you need to apply force, since the nut is tightened with a large torque. | 10. Using screwdrivers, lift the 5th gear driven gear (thereby pressing the synchronizer hub from the shaft), remove it together with the synchronizer and fork from the secondary shaft. At the same time, make sure that the synchronizer clutch does not come off the hub: the spring-loaded synchronizer retaining balls may fall apart. |
| 11. Remove the thrust plate from the synchronizer. Then remove the fork from the groove of the synchronizer clutch. | 12. Remove the 5th gear from the synchronizer with blocking ring 1. Mark blocking ring 1 relative to clutch 2 and remove it. During operation, the teeth of the ring are worn in to the teeth of the coupling, so during assembly the ring must be installed in the same position. If you do not intend to disassemble the synchronizer, tie it with wire or rope to prevent it from falling apart. | 13. Remove the bushing from the secondary shaft. |
| 14. Remove the 5th gear drive gear from the input shaft. Pay attention to how it is installed. | 15. Using an impact screwdriver, remove the four screws (there are spring washers underneath) securing the bearing plate and remove bearing plate 1. Then remove thrust washer 2 from the secondary shaft. | 16. Remove the retaining rings from the bearings of both shafts while lifting the shafts by hand. |
| 17. Unscrew the three clamp plugs and carefully remove the clamp balls with springs. | 18. After unscrewing the reverse lock plug, remove the O-ring, and then remove the lock spring. | 19. Tilt the box and remove the locking ball. |
| 20. Unscrew the twelve nuts and bolt securing the gearbox housings. Pay attention to which nuts holder 1 and eye 2 are installed under. Spring washers are installed under the nuts and bolt. Remove the process plug | 21. By inserting a screwdriver into the grooves (three special grooves along the perimeter of the crankcases), separate the gearbox housing from the clutch housing. | 22. Lift the gearbox housing slightly, turn it counterclockwise so that boss 1 of the housing comes out from under the gear, and remove the gearbox housing from the clutch housing. |
| 2Unscrew the bolts securing the 1st–2nd and 3rd–4th gear shift forks. | 24. Slightly lift the 1st–2nd gear shift rod so that it comes out of support 3, and turn it counterclockwise so that its head 1 disengages from the locking bracket 2. Remove the rod fork 4 from the groove of the synchronizer clutch and remove the rod with a fork. It is not recommended to remove the forks from the rods unless necessary, so as not to mix them up during assembly. | 25. By turning the 3rd–4th gear shift rod, disengage its head from the gear selection lever. Then lift the rod slightly so that it comes out of the support, and, moving the rod fork out of the groove of the synchronizer clutch, remove the rod with the fork. |
| 26. By turning the 5th gear shift rod, disengage its head from the locking bracket. Remove the rod by moving it out of the support. | 27. Remove the reverse idler gear shaft. | 28. Slide the reverse idler gear all the way into the gear selection mechanism, turn it 30–40° and remove the idler gear from under the shaft gears. |
| 29. Using a slight rocking motion, remove the input and output shafts at the same time. | 30. Remove the differential from the clutch housing. | 31. Unscrew the three bolts securing the gear selection mechanism (spring washers are installed under the heads of the bolts). Remove the gear selector mechanism. |
| 32. Remove the magnet from the clutch housing. | 3After unscrewing the fastening nut, remove the housing with the speedometer drive gear. Replace a torn or loose housing O-ring. | 34. Unscrew the reverse light switch from the gearbox housing. There is a metal O-ring installed underneath it. |
| 35. There is a special puller for pressing out the front bearing of the secondary shaft. If it is missing, press out the bearing using a screwdriver. | 36. Remove the oil pan located under the bearing. | 37. There is also a special puller for pressing out the front input shaft bearing. If it is missing, bend the device into the shape of a hook made of stiff wire. Insert the tool into one of the two grooves in the crankcase and place the hook under the bearing. Then, using a screwdriver (placing a wooden block), press the bearing out of the crankcase, applying force to the opposite end of the screwdriver with hammer blows and alternately moving the hook in the grooves. |
| 38. Press the new front shaft bearings all the way into the clutch housing using a suitable mandrel. | ||
| 39. Using a screwdriver, use a screwdriver to hook the edge of the protective boot on the gear selector rod and slide it off the rod support sleeve. | 40. Remove the gear selector lever mounting bolt. Slide the rod and remove the gear selector lever. Then remove the gear selector rod from the clutch housing. | 41. If it is necessary to replace the rod hinge, slide the protective cover off it and unscrew the hinge mounting bolt. The bolt is fixed with special glue TB-1324. Before tightening the bolt, clean it of old glue and apply new one. Replace the torn or lost elasticity protective cover of the rod hinge. |
| 42. To replace the clutch housing, remove the bearing and clutch release fork from it (see here), press out the seals. | ||
| 4 Inspect the clutch and gearbox housings, as well as the rear cover. There should be no cracks or chips on them. There should be no nicks, scratches, dents, etc. on the mating surfaces. Remove minor damage with sandpaper. In case of severe damage, replace the defective parts. | ||
| 44. Check the bearing seats in the clutch housing and in the gearbox housing. These surfaces must show no signs of wear or damage. Otherwise, replace the crankcases. | ||
| 45. Check the condition of the roller bearings. If the raceways, cage or rollers are damaged and if play is detected in the bearing, replace it by installing it on the shaft (the radial play in the bearing should not exceed 0.07 mm). | ||
| 46. Check the condition of the gear shift rods. Replace bent rods, with burrs, burrs or worn out holes for clamps. Replace the forks if they are bent or their tabs are worn. | ||
| 47. Check the axle seals. The seals must not be warped or have tears. The working edge must be smooth, without holes, dents or rubber sagging. The oil seal spring must not be broken or stretched. Replace defective seals. | ||
| 48. Also check and, if necessary, replace the input shaft seal and the selector rod seal. | ||
| 49. Clean the magnet from particles of wear parts. If the magnet is cracked or its magnetic properties are weakened, replace the magnet. | ||
| 50. Thoroughly clean the mating surfaces of the clutch and gearbox housings and the rear cover from old sealant. Reassemble the gearbox in the reverse order of disassembly, taking into account the following. | ||
| 51. Before installing the shafts, engage the teeth of their gears and, in this position, install them in the clutch housing. | ||
| 52. Pay attention to how the forks are installed on the gear shift rods: 1 – rod with the 1st and 2nd gear shift fork, 2 – rod with the 3rd and 4th gear shift fork. | ||
| 5 Liberally lubricate all rubbing parts with transmission oil. | ||
| 54. Don't forget to reinstall the magnet. | ||
| 55. Before installing the gearbox housing on the clutch housing and the rear cover on the gearbox housing, sealant is applied to their mating surfaces along the entire perimeter. | ||
Rules for disassembling and assembling the gearbox
If the user has never encountered the repair of such a complex unit, the procedure should be carefully prepared.
- Disassembly of the mechanism is carried out only after it has been completely cleaned of dirt.
- All the tools required for disassembly are pre-prepared - keys, squeezes, pliers, lock ring pullers. It is also advisable to have a separate container for storing small bolts, nuts, and washers.
- It is necessary to dismantle the mechanism parts by first treating the bolts with an anti-boiling agent.
- When disassembling, the units are folded in the dismantling sequence.
- Human memory is extremely unreliable - a photograph of a disassembled mechanism before its reassembly is the best reminder.
- All gaskets without exception must be replaced. Recycling of seals is strictly prohibited.
- No one has canceled the abundance of the cleaner. When washing the structure, you should not skimp on the cleaning material; the better you wash it, the more fun it will be.
- Assembly of the unit is carried out exclusively in the reverse order.
- If after installation there are excess parts left (which is not uncommon), the entire gearbox is completely rebuilt.
It is also necessary to maintain maximum cleanliness during work. Dust, metal shavings, or foreign objects can cause serious damage to the gears.
Repair process
When starting to repair or tune the gearbox, try to wash all accessible surfaces with kerosene as thoroughly as possible.
Next, you should carefully unscrew all the fastening bolts, sequentially releasing the parts.
Each gear is disassembled separately, and it is important to carefully check not only the gaskets, but also the seals. Correcting and diagnosing breakdowns includes replacing gaskets, this is a prerequisite; oil seals are usually changed if they are very worn.
The disassembled VAZ 5 mortar box must be washed again, after which all parts are checked again for faults and, if necessary, replaced with new ones. Most often you have to replace a worn gear or bearing.
To replace parts, you can buy a ready-made gearbox repair kit, designed taking into account the most frequently occurring faults in five-speed gearboxes. Also, before disassembling the transmission, prepare the necessary tools: an impact driver, a three-jaw puller, wrenches of different diameters and a torque wrench. Also for maintenance you will need fixing glue, a set of gaskets and seals, preferably a repair kit.
It should be noted that, like any gearbox, the VAZ 2107 5 mortar requires periodic maintenance to prevent malfunctions while driving.
After all the parts have been checked and replaced, you can begin assembling the gearbox, carrying out all the steps in the reverse order. If the parts have undergone too much wear and replacement of individual components no longer helps, a complete replacement of the gearbox on a VAZ 2107 may be necessary.
5-mortar repair
The above procedure involves complete disassembly of the unit as a preventative measure. However, it happens that the manual transmission unit knocks out or slips during driver manipulations. Moreover, the VAZ five-speed transmission suffers from such things all the time. The reason for the repair may be one of the following factors:
- the rocker lever gets stuck;
- extraneous noise when driving;
- one of the gears falls out;
- Positions are difficult to switch on.
For a more accurate understanding of the process, you can watch video master classes of the process from experienced specialists.
4th gear slips out
On a five-speed VAZ 2107 gearbox, fifth speed overshoot can provoke wear of the gear, synchronizer, and related parts.
During the repair, the 3/4 clutch, the damaged element and a complete set of seals that are subject to separation during disassembly are replaced.
Note! Some mechanics claim that in 40% of cases, replacing the driveshaft mount and clutch fork saves the day.
5th gear slips out
The five-speed gearbox of the “seven” periodically gives out vagaries to the user due to insufficient gear lubrication. It is recommended that in case of knockout or tight engagement of a position, completely change the synchronizers, gear, fork and bushings - this will ensure stable operation of the unit.
Note! Before purchasing spare parts, it is necessary to troubleshoot them. Some stores sell "crooked" parts.
Repair of gearbox lever (backstage) VAZ 2107
If the gearbox linkage (handle) becomes loose, repairs can be carried out even without removing the unit from the car. However, some experts recommend using “garage” repair parts. For the convenience of the reader and a clearer explanation of the process, it is better to complete the description in pictures.
- Dismantle the cover and remove the locking bar from the rocker bushing.
- After release, the lever axis is removed; for convenience, you can push the insert with a screwdriver or a pusher.
- Usually the bushing itself wears out; you can replace it with a new insert or a standard M10 bolt.
- Next, fasten everything in the reverse order and tighten the structure.
Old style gearbox repair
Before repairing an old-type VAZ gearbox, it is advisable to study the user manual or technical documentation. The main nuance is the absence of 5th gear - the classic system has only 4 positions. Therefore, the reverse gear is located separately. This should be taken into account during repairs.
Step-by-step replacement instructions
- The car must be driven onto a pit or overpass. The most important requirement will be that he must be immobilized for safety reasons. To do this, install wheel chocks under the wheels or block the wheels using the hand brake.
- Prepare the gearbox for removal. Without this operation, replacing the oil seal and bearing is impossible. First, disconnect the ground or negative terminal of the battery. Now find the shift lever inside the car, push it down and use a screwdriver to release the locking sleeve. The lever should come out. After this, release the remote plastic sleeve using two screwdrivers, which need to be used to release the special fastening tabs. Then, go down under the car and remove the exhaust pipe, as it will interfere with further removal of the gearbox.
- In the same place, on the gearbox, disconnect the special block of the two wires that are responsible for turning on the reverse lights. Unscrew the universal joint drive mount, the starter mount, release the clutch release hydraulic cylinder, but do not unscrew the hose from it to avoid subsequent bleeding of the clutch, and remove the flexible speedometer cable.
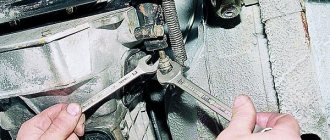
- Now the most important thing: unscrew the fastenings of the cross member holding the box at the back, and place any support under the gearbox so that it does not collapse when unscrewing the fastenings to the engine. Unscrew the corresponding fasteners and remove the gearbox from the support.
- Disassemble the gearbox, but before doing this, all the oil must be drained from it. Once the transmission is completely disassembled, locate the bearing mounted on the shaft and press it out using a puller. After this, install a new bearing in the same way and change the oil seal.
By the way , the oil seal can be replaced without removing the gearbox; to do this, just unscrew the crosspiece and simply replace the rubber seal with a new one. Don't forget to also drain the oil before carrying out repair work.
- Reassemble the gearbox in reverse order and install it on the car.
At this point, the replacement of the oil seal and bearing of the secondary shaft of the VAZ 2107 gearbox is completed. If you are not fluent in tools and do not understand the structure of a car transmission at all, then it is best to entrust this task to professionals from the field of car maintenance.
Replacing bearings
It is impossible to repair the bearings - when they wear out, the non-separable structure changes entirely.
Main shaft bearing
For dismantling you will need:
- clamp the input shaft into a yew;
- Using a special puller, remove the bearing from its seat.
The removal procedure is accompanied by slight tapping of the part. The installation procedure is performed in reverse order.
Secondary shaft bearing
The only difference between the procedures is the use of different sized bearings.
Replacing the intermediate shaft bearings
The procedure is carried out similarly with the intermediate element. Using yews and a special puller
Main shaft bearing
The “Seven” gearbox has amazing “survivability”: for example, the gearbox can “survive” one or even two engine overhauls, after which the car owner will have to repair it. However, there are a lot of small parts in the design of the box, which, unfortunately, cannot boast of their service life. Most often, the driver has to slightly modernize the gearbox design by replacing the bearings.
Open type metal bearings with the following characteristics are mounted on the input shaft of the VAZ 2107 gearbox:
- manufacturer - VPZ 23 Vologda;
- article - 2107–1701033/2101–1701068;
- length - 120 mm;
- width - 95 mm;
- height - 95 mm.
The main function of the input shaft bearing is to act as a rolling support, that is, to allow the shaft to move easily along its axis.
When Vologda bearings reach the end of their service life, drivers sometimes purchase products from other Russian companies. As practice has shown, imported bearings are distinguished only by their higher cost, and not by their high quality, so there is no point in overpaying for them. And the domestic manufacturer fully meets all the quality and durability requirements that motorists place on them.
When choosing a manufacturer, you should keep in mind that a higher price per unit of goods does not mean impeccable quality. However, four Russian factories already have a reputation as a supplier of reliable and affordable products:
- VPK plant - the approximate price for 1 bearing is 270 rubles;
- GPZ plant - the cost of the product is 190–200 rubles;
- the SPZ plant (3 gas processing plants) produces the most expensive analogue of Vologda bearings, price from 450 rubles;
- SPZ-4 plant - the pricing policy is quite loyal, a bearing for the input shaft will cost 220 rubles.
Replacing oil seals
Structurally, the oil seal is a sealing device that closes the passage to oil. When a part wears out, the housing stops holding liquid and an oil leak occurs.
To dismantle the part, you will need to perform a certain sequence of actions.
Input shaft oil seal
The procedure is performed like this:
- completely disassemble the gearbox to open access to the oil seal;
- pry off the seal ring with an awl;
- remove the oil seal itself from the shaft;
- Installation of the new part is carried out in the reverse order.
Secondary shaft oil seal
Disassembling the secondary shaft oil seal is more difficult.
- Remove the centering device from the shaft flange.
- Use a special puller to pull the flange off the secondary shaft along with the washer;
- Use a screwdriver to pry the oil seal out of its socket.
- Carefully install the new seal.
Replacing the bearing and oil seal of the secondary shaft of the VAZ 2107 gearbox
The bearing of the secondary shaft ensures free rotation of its end in the place where the shaft already leaves the gearbox. From the inside, the bearing is filled with a lubricant, which facilitates the rotation of the part.
The gearbox secondary shaft oil seal is installed in the same place. The oil seal is a rubber O-ring that fits onto the shaft and fills the gaps between the shaft and the transmission housing. The oil seal is designed to prevent oil leakage and ensures the tightness of the system.
Over time, both the seal and the bearing are subject to natural wear. Parts of the bearing are destroyed and begin to loosen the shaft. Gradually, the friction between the parts increases, and the bearing begins to disrupt the shape of the shaft. The balancing of the shaft becomes unbalanced over time and it begins to vibrate. The very first to suffer is the oil seal, which will lose its shape and will no longer be able to hold oil in the gearbox. The oil gradually disappears and the lubrication of gearbox parts is disrupted. In addition, the oil seal may fail due to wear, which occurs in any case. The fact is that a rubber product has a certain service life, which is determined by mileage and the oil seal begins to crack and also lose its sealing properties.
You can diagnose a seal malfunction visually. To do this, it is enough to look from time to time at the junction of the cardan and the secondary shaft. If traces of transmission oil are found there, then we can confidently say that the oil seal has become unusable and needs to be replaced.
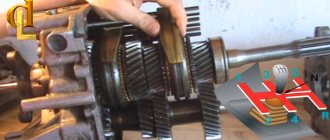
How to replace gears and synchronizers
Initially, it is recommended that if replacement is necessary, contact a car service center. However, if you are confident in your abilities, you can perform the operation yourself. For this you will need:
- yews;
- special puller;
- flat head screwdriver.
Next, the procedure is performed as follows.
- Remove the shaft from the gearbox and clamp one side of it into a yew, having previously wrapped it with a soft lining.
- Using a screwdriver or awl, remove the retaining rings and all bearings.
- Then rest the shaft against the double support and remove the gears from it in direct sequence.
Transmission repair without removing the box
In case of emergency, you can repair the VAZ 5th transmission without removing the housing from the car. When performing the procedure, the car is driven onto an overpass or inspection hole. All manipulations are performed upside down, which complicates the process. Therefore, experienced auto mechanics prefer to first dismantle the unit from the car.
Replacing the bearing of the input shaft of the VAZ 2107 gearbox
The easiest way to replace a worn element is on the removed box. On the VAZ 2107 it is possible to remove the bearing from the input shaft directly from the gearbox in the car, but this procedure is very labor-intensive and time-consuming.
A bearing is a device that cannot be repaired or restored. Therefore, in case of breakdowns and wear, it is necessary to replace the bearing with a new one.
To work, you need to prepare the usual tools for any driver:
- screwdriver with a powerful flat blade;
- hammer;
- puller if necessary.
How to remove the old one
With the gearbox already removed from the car, you need to remove the bell (casing) and retaining rings. There is no need to completely disassemble the box:
- Use a screwdriver to pry up the special groove in the input shaft bearing. (it looks like a ring).
- Pull the shaft towards you, using the bearing as a support for pressure.
- Carefully pull out the bearing, periodically hitting it with a hammer.
- After each hammer blow, it is recommended to rotate the shaft a little to avoid dents or distortion of the bearing.
- As a result, after these actions, the bearing can be easily removed from its support.
The work can take from 5 to 30 minutes, depending on the effort and skill of the driver. In some cases, it is necessary to use pullers, since the bearing is very rigidly seated on the shaft.
How to install a new one
Next, you will need to install a functional one in place of the old bearing. For this:
- Press the new bearing onto the shaft using a hammer.
- Use a hammer only on the inner ring of the bearing, otherwise it may become deformed.
- When pressing, it is necessary to pull the input shaft slightly forward so that the bearing fits in more easily.
Video: replacing the input shaft bearing on a VAZ classic
To summarize all of the above, we can say that the owner of a VAZ 2107 can carry out all the necessary work on the gearbox and input shaft himself. However, if you have doubts about your skills, it is better to turn to auto repair specialists. We also note that the VAZ 2107 gearbox rarely requires any intervention and usually serves for many years without a hint of a problem.