Instructions for replacing brake discs on a VAZ 2110
The service life of the front brake discs on VAZ 2110 cars and other models of this family is quite large and they can often last more than 150,000 km.
But in any case, nothing lasts forever, and someday they will have to be replaced. The maximum permissible brake disc thickness is 17.8 mm. If this limit is reached, then it is necessary to immediately replace the parts with new ones. The replacement procedure is quite simple and, if you have the necessary tools, will not be difficult. For this we need:
- Jack
- Socket head for 7 with small collar
- Head for 13
- Rozhkovy on 17
- Balloon wrench
- Hammer
- Flat blade screwdriver
So, first of all, lift the front of the car on one side and remove the wheel:
Then you need to use a flat screwdriver to bend the washers that secure the caliper mounting bolts:
After this, unscrew the upper and lower bolts securing the brake caliper, as clearly shown in the photo below:
Then, when the upper and lower bolts are unscrewed, you can move it to the side by removing it from the disk:
Now unscrew the bolts securing the guide bracket:
When they are unscrewed, remove the bracket so that it does not interfere with the removal of the brake disc:
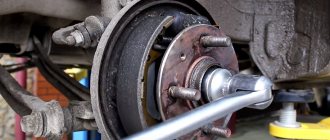
Next you will need to unscrew the two guide pins of the disk:
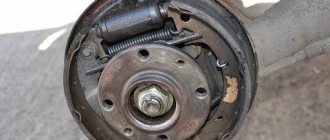
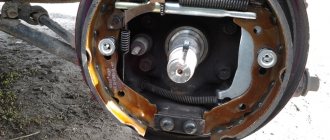
Now it’s up to the small person to knock down the brake disc from the back side with a hammer using a wooden block. If it is not possible to remove it in this way, then you will need a special puller with grips, but in most cases this can be done using improvised means.
New brake discs for the VAZ 2110 can be purchased at prices ranging from 1,200 to 3,000 rubles per pair. Of course, the price depends on the manufacturer and type of part. Installation is carried out in the reverse order, after which it is necessary to replace the brake pads.
Signs you need to replace drives
Not all car owners pay attention to the condition of their brake discs, which is why the problem of their failure occurs at the most inopportune moment. We recommend learning from the mistakes of others rather than making your own.
To determine whether the condition of the brake discs is close to the need to replace, it is recommended to do the following:
- Check the thickness of the brake disc. The normal size is 17 millimeters. This is when we are talking about ventilated discs;
- Non-ventilated elements have their own indicator, and it is 10 millimeters;
- Check runout. This parameter is normally 0.15 millimeters and does not exceed it;
- Runout indicators should be measured at professional service stations that are equipped with appropriate equipment. Independent measurements do not always give accurate results;
- Examine the surface of the brake disc. If you find any damage, defects, chips, or cracks, be sure to replace parts immediately;
- As for choosing new items, purchase them exclusively from certified stores that have permission to provide the appropriate services. Buying on the market can lead to fakes that do not meet strict safety standards. Alas, there are now more than enough such discs;
- You should buy ventilated discs, the shelf life of which is significantly longer than their non-ventilated counterparts, plus their efficiency is better. The air flow that cools the brakes approximately doubles the lifespan of a simple non-ventilated brake system.
Replacing a brake disc on a VAZ 2110
First, we need to take the key to “thirteen” and carefully unscrew the bolts that hold the bolts securing the front wheels.
In front of the car, the next step is to carefully lift it.
The next step is to unscrew the bolts completely.
We rotate the steering knuckle so that it comes out.
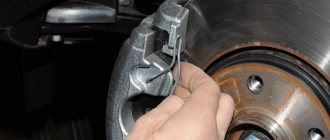
Next, we’ll use a metal brush and clean the caliper from dirt, etc.
You need to carefully push the pads apart using a screwdriver; a mounting spatula will also work.
Then take a screwdriver and unlock the washer; they hold the bolts that hold the caliper.
Let's take a socket wrench and unscrew the upper and lower fastening bolts; a "thirteen" head will also work.
We need to remove the brake hose from the bracket. Scroll the brake caliper clockwise and remove it
Tie the caliper, you need to do this in such a way that the hose is not too tight.
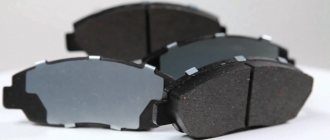
Next we take out the brake pads.
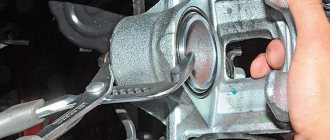
Using a 17" wrench, unscrew the caliper bracket that holds the part.
Remove the bracket, we need to remove it in order to get to the brake disc.
To ensure that the disc can be removed well, take lubricant and treat the parts.
The screws that secure the disc often become stuck; in order to unscrew them, you need to knock around the brake disc for a long time.
We take the socket head at “seven” and unscrew a couple of screws.
To avoid damaging the hub, we need to carefully tap the disc and then remove it.
If you can’t remove it, you can use a special puller. Of course, not everyone has it; many use improvised means.
Carefully clean the surface of the hub.
Now you can take a new disk.
Then you can install it.
Screw in and tighten the bolts thoroughly. Well, after that you can assemble and install the parts in reverse order.
VAZ 2110 | Front brake caliper
9.4. Front brake caliper
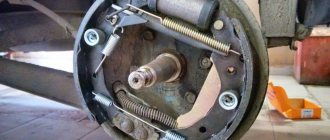
| GENERAL INFORMATION |
| 1. Dust cover 2. Pad holder 3. Anti-noise pad 4. Inner brake pad (with wear indicator) 5. Pad mounting plates 6. Outer brake pad 7. Anti-noise pad 8. Anti-noise spring 9. Pad mounting plates | 10. Mounting ring 11. Cylinder boot 12. Piston 13. Seal 14. Brake caliper 15. Gasket 16. Air release valve 17. Bushing 18. Pin |
| 1. Brake disc 2. Pad holder 3. Brake pad wear indicator 4. Mounting plates 5. Outer brake pad 6. Internal anti-noise pad 7. Anti-noise pad 8. Brake pad mounting plates 9. Inner brake pad 10. Anti-noise pad | 11. Cylinder boot 12. Retaining ring 13. Seal 14. Piston 15. Bushing 16. Dust cover 17. Gasket 18. Air release valve 19. Brake caliper 20. Dust cover |
Dust resulting from brake pad wear contains asbestos, which is hazardous to health. Do not blow it out with compressed air or inhale it.
If it is necessary to rebuild the caliper (usually due to a brake fluid leak), first find out the price of spare parts or the cost of an already rebuilt or new caliper. Before you start rebuilding, purchase a repair kit. Always repair both calipers together - never repair just one of them.
| EXECUTION ORDER |
| 1. Unscrew the wheel nuts, lift the front of the car and place it on supports. Remove the wheel. |
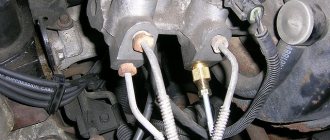
| 2. Unscrew the bolt (indicated by the lower arrow) and disconnect the brake hose (indicated by the upper arrow) from the caliper. |
| 3. Using a piece of rubber hose of the appropriate diameter, cover the hole in the hose to prevent dirt or moisture from getting inside and to reduce the loss of brake fluid. |
| 4. Following the instructions given in subsection 9.3, remove the caliper (removing the caliper is part of the operation to replace the brake pads). |
Bulkhead
| EXECUTION ORDER |
| 1. To rebuild the caliper, remove the boot mounting ring and boot. Before removing the piston, place a block of wood or some rags between the piston and the caliper to protect against damage during removal. |
| 2. To remove the piston from the caliper, connect an air hose to the brake hose connection to the caliper and press out the piston using compressed air. Do not apply too much pressure, just enough to push the piston slightly out of the cylinder. |
| Warning Be careful that your fingers are not between the caliper and the piston, as the piston may press them. |
| 3. Inspect the surface of the piston and the walls of the caliper cylinder. If they are scratched or show signs of corrosion or wear, replace the caliper along with the piston. |
| 4. If these items are in good condition, remove the piston seal from the caliper cylinder using a wooden or plastic tool. Metal tools may damage the surface of the cylinder. |
| 5. On the PD51 caliper, press the bushing out of the caliper and remove the dust covers on both sides. |
| 6. Clean all components using brake cleaning fluid. |
| 7. To assemble the caliper, you need to purchase a repair kit suitable for your car model. |
| 8. Dip the new piston seal and piston into brake fluid and install them into the caliper cylinder. Do not force the piston into the cylinder, check that it is installed correctly and push it firmly into the cylinder (do not use too much force). |
| 9. Install a new piston dust cover and mounting ring. |
| 10. Lubricate the bushings with silicone grease (included in the repair kit) and insert them into the caliper holes. Install dust covers. |
Installation
| EXECUTION ORDER |
| 1. Installation of the caliper is carried out in the reverse order of removal. Be sure to replace the copper sealing washers (gaskets) at the brake hose connection (new washers are usually included in the repair kit). |
| 2. Bleed the brake system circuit, following the instructions (see subsection 9.12). Check that the brake hose connections are not leaking. Check the operation of the brakes before normal operation of the vehicle. |
We change the front brake discs on a VAZ-2112 with our own hands
If during operation of the VAZ-2112 a deterioration in braking is noticed, then the driver should carefully inspect the brake system on the car. The condition of the brakes should be checked and if there is a knocking sound in the area of the front suspension when driving.
Replacing brake discs on a VAZ-2112
To replace brake discs you will need:
- Place one side on a jack and remove the wheel.
- Bend back the caliper locking plate.
- Unscrew the two caliper bolts with a 17mm wrench.
The diagram shows two brake caliper bolts
Getting ready to unscrew the brake disc guide pins
The brake retaining pins are marked with arrows.
Removed the brake disc
Brake problems
Failure of the brake system can cause various problems. Wear, if sensors are not installed on the car, can only be checked by visual inspection.
Discs need to be replaced only when they become heavily used. The reason for replacement may also be a crack in the disk.
Replacing a disk is not that complicated. Therefore, it can be produced on your own if you adhere to the rules given above.
Brake disc standards and thickness
Brake disc thickness measurement
The thickness of the disk on a VAZ-2112 should not be less than 10.8 mm. If this indicator is less, then it is worth replacing the disk. Also, axial runout should not exceed 0.15 mm.
When the surface of the disc becomes scuffed or cracked, braking performance will also deteriorate significantly.
Grinding old brake discs
The service is gradually becoming obsolete. It was popular during times of shortage of spare parts, but now there is no shortage. This is more than a half-measure, which allows you to slightly extend the life of the brake discs.
These brake discs have been sharpened several times. Please note that after grinding they were almost even, the steering wheel did not hit when braking, but the working surface was almost completely erased
In this case, it is imperative to replace the wheels on the car. Some service stations can provide the driver with a grinding service. But here we must remember that the thickness of the disk should not be less than the recommended one.
Selecting brake discs
- With perforations and grooves.
- Collapsible.
- With gas outlets.
- Ventilated.
- Not ventilated.
Ventilated
A ventilated disk is an element that consists of two disks connected to each other. Due to the blades, heat is removed. Also, the weight of the disk is significantly reduced.
Ventilated brake disc
Discs with gas outlets
When the discs heat up, they cannot fit tightly to the pads due to the gases. In such cases, disks with gas outlets .
Perforated discs
Perforated discs are designed to allow you to independently remove a layer of carbon deposits from the working surface, thereby increasing the braking effect. Here you also need to remember that such discs will wear out quickly.
Brake disc with perforation and grooves
Also, using the grooves on the disc, dirt, dust and water are removed from it.
Non-ventilated brake discs
Appearance of non-ventilated brake discs
Non-ventilated brake discs are the cheapest, they help the worst when braking.
Collapsible disk
A collapsible disc is a standard disc that can be bolted together. In this case, these discs will not heat up very much, since the temperature from them will be transferred to the hub.
Video of replacing a brake disc on a VAZ-2112
Results
At this point the work can be considered completed. If the instructions are not enough, you can watch the video above.
Types of brake discs by design
To answer the question of which brake discs are better, it is necessary to take into account the characteristics of the car, as well as the recommendations of the car manufacturer, who will use certain original spare parts. Depending on their design, it is customary to distinguish between solid and composite brake discs, ventilated and non-ventilated. During the operation of the car, the discs begin to quickly heat up when braking; accordingly, it is necessary to ensure their high-quality cooling, which will directly affect the safety of driving the car. The most popular today are ventilated compound brake discs, which provide effective vehicle deceleration while maintaining their effectiveness for a long time.
Non-ventilated
Non-ventilated monolithic brake discs are made in the form of a homogeneous plate, which may have small notches to improve cooling performance. These are the simplest types of brake discs, used with inexpensive cars, on which the brakes do not bear significant loads during the operation of the car. The advantages of such non-ventilated solid brake discs include their simplicity of design and affordable cost of spare parts.
Ventilated
Composite ventilated brake discs are made of two plates, the surface of which is notched or specially perforated. Such plates are connected to each other using reinforced elements made of a durable alloy, and the presence of an internal cavity allows for effective cooling of the brake discs. The safety of driving a car depends on the temperature stability of the brake discs, as well as the absence of a decrease in the efficiency of slowing down the car, depending on the style of driving the car. A specialized service center will tell you what the minimum acceptable thickness of brake discs is, and if necessary, they will carry out all repair and service work.
Sports brake discs
Sports brake discs can be made with grooves, slots or holes; they provide high-quality cooling of the braking system, preventing a decrease in its effectiveness. The best brake discs designed for sports cars are made of ceramic; this is an extremely strong, durable material that is also resistant to high temperatures. The only drawback of such brake discs is their high cost, which is often beyond the means of many car owners.
VAZ 2110 replacement of brake discs
If the braking distance of your car is rapidly increasing every day, if during a stop you constantly hear whistling and grinding noises from under the wheels, then it’s time to replace the brake discs of the VAZ-2110. Diagnostics of these parts is a visual inspection that allows you to easily identify the following problems:
- microcracks or deep burrs;
- other mechanical damage;
- reducing the thickness of the disk to a critical value.
| Brake system repair | Price, rub |
| Brake drum - removal/installation | 300 rub. |
| ABS sensor - removal/installation | 300-600 rub. |
| Brake disc (rear) - removal/installation | 800-1000 rub. |
| Brake disc (front) - removal/installation | 800-1000 rub. |
| Brake pads (rear drum) - removal/installation | 800 rub. |
| Brake pads (rear disc) - removal/installation | 500 rub. |
| Brake pads (front) - removal/installation | 500 rub. |
| Caliper guide - removal/installation | 800 rub. |
| Parking brake cable - removal/installation | 1000-3000 rub. |
| Brake pipe (main) - removal/installation | 500-1000 rub. |
| Brake pipes - removal/installation | 2000-5000 rub. |
| Brake cylinder (main) - removal/installation | 1000-3000 rub. |
| Brake cylinder (working) - removal/installation | 800-1000 rub. |
| Brake hose - removal/installation | 500 rub. |
| Overhaul, overhaul of calipers (replacement of cylinders, boots, seals) without materials | 1500 rub. |
The price is subject to change due to unforeseen labor costs of the work order.
To replace the front brake discs on a VAZ 2110, it is best to contact a specialized company that repairs all systems of domestic cars. Here there are all the necessary conditions for dismantling the wheel, removing the disk, and checking the serviceability of the pads, which work in constant contact with it.
In our car service center you can select the most suitable spare parts for replacing brake discs on a VAZ 2112 and other models, and receive detailed advice on the specifics of their selection. Our technicians have all the necessary tools at their disposal, so replacing brake discs in 2110 will be done with high quality and in the shortest possible time.
We strongly recommend that you refrain from repairing the brake system yourself, since the slightest error in its installation or the use of low-quality spare parts will inevitably lead to a decrease in the operating safety of your car.
What does it look like
There are two main types of brake discs. The first type is ventilated, consisting of two rotating parts with special blades that allow excess heat to be removed from the wheel. The second option is with gas outlets. There are also perforated wheel rims, equipped with holes to allow water and dirt to escape from the wheel, as well as collapsible rims.
New brake disc VAZ 2110
The manufacturer installs ventilated structures on the front axle of the “tens”, since the front wheels of this car are driven and therefore receive a higher load. The ventilated disc cools faster, resulting in more efficient braking.
The disc is fixed to the hub, and the wheel is screwed on top of it. During its operation, it heats up and is simultaneously cooled by the incoming air flow. The design of the disc brake system is shown in the diagram.
Diagram of the VAZ 2110 disc brake system
Replacing brake discs on a VAZ 2114
Replacing brake discs VAZ 2114
Usually, together with the brake units, they look at the condition of the pads, which they also try to change together with them. There may be a thousand and one reasons for replacement, but a special symptom indicating the replacement is in effect is the knocking (or beating) of the brake pedal when you actually brake.
The beating of the pedal is a kind of pranking, jolting. Feels good at high speed (during hard braking). If you suddenly decide that the brake discs will last a little longer, or wait for the fourteenth to simply stand up, you are making a big mistake! Such expectations will lead you straight to the emergency room.
If the pedal is acting up, there may be several reasons for the breakdown:
- The brake disc of the VAZ 2114 is warped - this is the most common fault. Such a misfortune happens to it due to temperature changes: sudden heating and cooling when braking, natural wear. The unit needs to be replaced, and it must be paired with another, even if the second one feels fine.
- The front pads may break, which also cannot be restored.
- Most often there are drum brakes at the rear (since it is front-wheel drive, it is not entirely reasonable to shell out for discs at the rear), and they fail.
It is important to understand that all manufacturers who make brake discs for the VAZ 2114 cannot guarantee a certain shelf life. Failure of an important part of the brake mechanism is almost always an unexpected situation. Their health directly depends on the quality of components and the quality of roads. The best thing you can do is to check their condition periodically.
Checking the wear of discs and pads in the brake system
There are certain dimensions below which it is unacceptable to drive on existing brake units:
- Brake disc thickness – 10.8 mm
- Axial runout on the surface – 0.15 mm
- Overlay on the block – 1.5 mm
- Brake drum diameter – 201.5 mm
You cannot determine such dimensions by eye. Therefore, we jack up the fourteenth wheel, clean the entire unit from dirt, after removing the wheel, of course, and use a simple caliper to measure the thickness of the disc, pads and drum brake at the rear (if you have them). We compare all indicators with acceptable numbers.
Another important step is to check how the pads move: poke them with a screwdriver, if they move too hard, then they can clamp the disk, you need to change them, otherwise you will ruin them.
In general, it is good to remember the following parameters that require replacing the brake disc on a VAZ 2114:
- Invalid thickness value (erased)
- The pad linings are oily
- There is a gap between the pads and the base
- You hear a squeaking sound when you brake
- Hit the brake pedal
- If you have drum brakes at the rear, they can stick to the pads, which can lead to double replacement and expense.
- The brake cylinders (front and rear) may become damaged - there is an option to revive them with a WD tool, but this will only temporarily delay the replacement
As soon as any of the above happens, the brake discs need to be replaced.
It also happens that all the main brake components have been changed, including the brake pads, but the situation has not changed for the better. Then look at the accompanying components and adjacent spare parts: hub bearing, front wheel arms (they are also called daisies). It is not necessary, but it is very advisable to do a wheel alignment.
Replacing disks
Now let's talk about how to change brake discs on a VAZ 2114. The removal and installation process are directly proportional to each other. The main thing in this whole event is to take into account the human factor - inattention. Remember what went where and check yourself carefully.
How to remove a brake disc:
- We place the car on a flat surface, having previously put the handbrake on
- Jack up and remove the wheel
- Loosen the brake cylinder fasteners
- Use a screwdriver to pry out the boot from the upper guide of the brake pad
- We remove the pads and caliper (for the caliper you will need a 17mm wrench; before unscrewing it, you need to remove the brake hose fasteners. But the pads are a separate matter, if you don’t know how to remove them, there is a separate material for enlightenment)
- To prevent the brake fluid from escaping, place a container under the hose (when you put everything back together, don’t forget to add the leaked fluid back into place!)
- Next, we do some general cleaning - we remove dirt and traces of rust on the surface of the brake disc (don’t even think about scratching its working surface!)
- Then everything needs to be treated with WD (pay special attention to the hub bearing)
- Using a size 8 wrench, you need to unscrew all the wheel pins, but the disk should not turn during this action.
- Before removing the disk itself, knock on it (knock on the plane, not on the working surface)
- Let's take it off.
As already mentioned, we put everything in reverse order. The main thing is that before installing all parts of the brake system, lubricate the hub itself, and the working surface of the disc must be lubricated with a special product that will degrease it. Another point, if you have replaced the brake cylinders, you must bleed the brake pedal.
Price
If we talk about the current price of VAZ 2114 brake discs, then we need to estimate the region of the country. On average, from 1000 to 2000 rubles. Having found out how much brake discs cost on a VAZ 2114, it would be logical to take into account the average cost of installing them, as well as a summary of prices for installing components (by the way, do not forget a simple regularity: installing a spare part on the fourteenth is almost always equal to or slightly less than the cost of the spare part itself parts). This understanding will be the most justified argument to figure it out yourself and save money.
Service professionals are ready to take on work at the following prices (on average):
- Removing and installing a brake drum - from 300 rubles
- Removing and installing rear brake disc – from 800 rubles
- Removing and installing the front brake disc – from 1000 rubles (they change it more often, that’s where the cost comes from)
- Replacement of drum pads – from 800 rubles
- Replacement of disc pads – from 500 rubles
On a note
Due to the fact that regular standard discs warp due to temperature changes during braking, car owners often install ventilated brake discs. It must be borne in mind that they are wider than usual and require additional purchase of components: calipers, pad guides, protection. So that customers don’t bother, ours have learned to sell everything as a set. All together it will cost a little more than a regular purchase of discs, but there are a number of opinions that it is worth it.
Replacement steps
The entire replacement process can be divided into several stages:
- Removing wheels;
- Removing the old brake pad;
- Frame disassembly;
- Cleaning the hub and checking it;
- Removing coating from new disks;
- Runout check;
- Installation of new brake system elements.
Now let's talk about this in more detail.
Removing the wheel
In fact, dismantling the wheel for subsequent replacement of the brake elements is not difficult.
But a certain sequence of actions will have to be followed.
- Place a jack under the car.
- Lift it up so that it doesn't tip over, but still allows you to easily remove the wheels.
- Unscrew the wheel fasteners.
- Remove the hubcaps and the wheels themselves.
As you can see, the procedure is really simple, but it requires attention and accuracy.
Removing the pads
- Try to move the piston as far as possible from the brake mechanism. But do not exceed the distance beyond that which will allow you to comfortably remove the brake pads.
- Take out the block.
- To make the job easier, you can disassemble the brake frame. To do this, unscrew the two bolts securing the block and disconnect the device.
Hub
It must be cleaned, since all accumulated debris, dirt, and rust will negatively affect the effectiveness of the new brakes.
Dirty
For cleaning, alcohol-based solvents and metal brushes are used. If cleaning is not performed, the operation of the brakes will be accompanied by beating - this should absolutely not be allowed.
Be sure to check the hub for runout. Normally it does not exceed 0.1 mm. There is a special tool for checking. If the indicator is within normal limits, then a full assembly is performed.
Working with new disks
Many owners of the “Ten” are interested in which brake discs are best to choose for the VAZ 2110. The question is quite logical.
Choose certified replacements from reputable manufacturers such as Bosch, or stay true to factory parts. These are the two best options in terms of quality and compliance with the car itself.
New
Some take similar discs that partially fit the “ten”, sharpen them, and adjust the design. This is a dubious undertaking, since it requires serious skills in such a matter, additional time and financial costs. At the same time, it is far from a fact that such brakes will work better than those offered by the AvtoVAZ plant.
You've already figured out how to remove the brake element, so it's time to work on a new one. It’s not enough to just buy another brake disc and put it in place. First, it is prepared and a runout check is performed. Let's talk about this in more detail.
- The coating must be removed from a new disc.
- This coating serves as a kind of preservative.
- The layer is removed using any solvent.
- Clean thoroughly and wipe the part dry after finishing work.
- Now you can put the disk in a new place and check the runout.
- The permissible runout is no more than 0.15 millimeters.
- If the value is exceeded, this can lead to an increase in the sensitivity of the brake pedal, as well as the formation of vibrations during braking.
Installation and testing
Before changing brake discs, make sure that the problem with the brake system lies precisely in them. There are a number of other problems that are typical for the “ten” and all cars in general. A full diagnostic will be required so that the replacement is not in vain.
Adjustment
In fact, installation is performed in the reverse order of disassembling the brake discs. Therefore, there should not be any special problems.
But checking functionality is a more important and, to a certain extent, complex issue.
The first thing that experts advise is a full running-in of new discs. To do this, you need to travel about 500 kilometers. In this case, you need to brake smoothly, without making sudden impacts on the brake pedal. If this is not done, defects may form on the disks, and the cause will be simple overheating.
How to change the brake disc on the front wheels of a VAZ 2110, 2111, 2112.
An article for everyone who needs to independently replace the brake disc on the front wheels of cars of the tenth family
Attention! The thickness of a non-ventilated brake disc must be at least 10.8 mm, and a ventilated one 17.8 mm. If the thickness of the brake disc is less, it needs to be replaced.
The axial runout of the brake disc surface should not exceed 0.15 mm.
If there are chips, scuffs, or grooves on the surface of the brake disc that interfere with effective braking and increase pad wear, then it needs to be replaced. You can also sharpen and polish the disc. This is done in a specialized workshop. The groove is carried out on both sides of the disk to the same depth. In this case, you need to ensure that the thickness of the disk is not less than permissible.
Withdrawal procedure
1. Remove the desired wheel and brake pads.
2. Unscrew the 2 bolts securing the shoe guide to the steering knuckle and remove the brake mechanism assembly. At the same time, we do not disconnect it from the wheel cylinder.3. We hang the removed brake mechanism to the front suspension spring. Do not twist or strain the brake hose.
4. Clean the disk from dirt and apply WD-40 to the connections between the disk and the hub and to the guide pins.
5. Unscrew the 2 guide pins and remove the brake disc. You can knock it down with a rubber hammer.6. Install the brake disc in reverse order. If you are replacing an old disk, you need to use a file to remove the beads that have formed during wear.
Video on replacing a brake disc:
How long does it last
Typically, the first replacement of discs coincides with a similar procedure for brake pads. The wear of a disc is judged by its thickness, and how quickly the discs become unusable depends on your driving style. As a rule, this takes not even months, but years. There is also a dependence on which manufacturer the pads are installed. Some of them wear out discs faster.
The permissible wear of the brake disc on the “ten”, according to the manufacturer, is 17.8 millimeters for ventilated ones and at least 10.8 for regular ones. Disc wear can be determined visually by the presence of abrasions or by hearing (suspicious noise begins in the wheels). Experts recommend immediate replacement of discs if scratches or cracks appear on their surfaces, and the thickness of the discs becomes less than acceptable. The main thing is that brake discs are replaced only in pairs, since they wear out approximately equally on both sides. Failure to comply with this rule is fraught with loss of vehicle controllability (the car will noticeably drift to the side).
On the VAZ-2110, wear on the front axle discs occurs faster than on the rear ones, since this car is front-wheel drive, and most of the energy during braking is transferred to the front wheels. In addition, as standard, the rear brakes on the “ten” are not disc, but long-outdated drum ones. They are outdated, since most automakers in other countries install brake discs on all wheels. It is worth noting that there is no specific wear and tear time frame for them, so their condition must be monitored by the owner of the car himself. They are supposed to be inspected during scheduled technical inspections. There is nothing difficult about this, since, unlike brake drums, it is easier to inspect the disc on the rear axle; you just need to remove the wheel. It makes no sense to change disks early, and not changing them when the need arises is dangerous.
Replacing front brake pads on VAZ-2110, 2111, 2112
The brake system is responsible for stopping or reducing the speed of the car; it is a rather complex mechanism, the most important part of which is the brake pads.
The pads are responsible for the quality of braking, and, therefore, for the safety of the car. That is why it is so important to change them on time, because otherwise, an accident cannot be avoided.
This article will tell you what the pads are and how to change them.
Brake pads and their types
The brake pad, or as it is also called, the wheel chock, is an element of the brake system that interacts with the sphere of the brake disc, by pressing which the process of reducing speed occurs.
Pads have come a long way in development. They were first used at the end of the 19th century, for manually driven carriages.
Over time, mechanical engineering developed, and the braking system also evolved. Today, there is a wide range of wheel chocks, each with its own pros and cons, and technical features, which we will discuss further.
The block consists of a durable metal base, resistant to mechanical and other damage, to which a special lining is attached. There are several types of pads:
- resins
- synthetics
- rubber
- ceramics
- Other materials.
It is the composition of the lining that determines its quality; manufacturing companies try to keep the secret of the composition in the strictest confidence, but in any case, the lining must have the following properties:
- good wear resistance
- the lining must not deform the brake disc
- the ability to withstand high temperatures, which is especially important during emergency braking, when parts become red-hot and the temperature inside the system reaches prohibitive levels.
The main task of the stops is to make the braking system more reliable and the braking distance shorter.
To achieve this task, manufacturers create unique technologies, offering the buyer new types of products.
So at the moment the following brands of pads are the most popular:
- Original Equipment Manufacturer OEM. A company operating in this market segment has been offering high-quality friction stops for many years. The products have a one-year warranty, the cost starts from 1,800 rubles, the price varies depending on the type of pads.
- One of the largest manufacturers producing stops is the Wagner company. Most motorists prefer this particular brand, because the Wagner brand itself already speaks of the excellent quality of the products. The price of Wagner products varies from 1,750 to 3,500 rubles. depending on the type of pad.
- Raybestos Raybestos is considered a favorite brand of auto mechanics who prefer practicality, reliability, and durability. The product comes with a 1 year warranty. The advantage of the product of this brand is also its reasonable price, which starts from 1,500 and ends at 3,820 rubles.
- The undisputed leader in the market is the company GENERAL MOTORS, known as a reliable manufacturer of all components for cars. The products here are, of course, excellent, but the price makes you think twice; it starts at 3,500 rubles. and ends with a price of 17,500 rubles.
How to remove front pads yourself
Due to the frequent interaction of the stops with the disc, the linings are deformed, which leads to failure of the pads. The service life of the pads is approximately 30-50 thousand km, or with a friction lining thickness of 1.5 mm. You can determine that the pads need urgent replacement by the following signs:
- Sharp sound when braking.
- Slow or, conversely, too fast braking process.
- The brake pedal goes down.
If you are convinced of the presence of at least one of the listed symptoms, you need to immediately change the stops. In order to make the replacement, you need to prepare the following tool:
- jack
- knob for 19
- hammer
- pliers
- screwdriver (no more than 70 mm.)
- a little patience and free time.
- First of all, we dismantle the old pads. To remove the stops, we take the car to a perfectly flat area, put stands under the wheels to prevent the possibility of rolling, and put the car on the parking brake.
- Now you need to lift (using a jack) the side from which dismantling is being done. Since the topic of our article is replacing the front pads, we raise the front of the car.
- Loosen the wheel fastenings and remove it. Using pliers, we pull out the cotter pin from the upper rod, and then with a screwdriver we begin to knock the rod itself out.
- Having completed this work, we will begin to remove the clamp, which holds the caliper in a static position. Only by getting rid of the retainer will it be possible to remove the caliper, which is done by rotating the part around the circumference of the second fastening. To keep the part out of the way, it can be moved to the side.
- Now the deformed pads are not difficult to pull out, which is what we do.
How much brake fluid is in the VAZ 2112 system
In modern cars, as you know, the braking system is equipped with a hydraulic drive. This helps make her more perceptive. But the working chemical elixir ages as it is used. Therefore, an inevitable change of brake water is necessary. To make it clearer why this is so necessary, we will simply list what exactly happens to an obsolete chemical.
- It is filled with dirt particles from the friction of parts.
- Absorbs air pockets.
- The components absorb water through compensation holes, the composition is supplemented with water, which significantly worsens its quality.
- Additives lose their chemical characteristics.
All this leads to a sharp decrease in braking efficiency.
Next, we will look at several fundamental issues related to the hydraulic drives of the mentioned systems. Specifically, let’s figure out what the frequency of changing brake water is. We will also study the process of changing it on a car.
As for the period after which it is necessary to update the working environment, its average value ranges from 40 to 60 thousand kilometers. In general, this depends on the brand of the car. But in almost all cases, manufacturers prescribe that the brake water should be changed after two years - if this period occurs before the specified mileage.
Now let’s talk about how to change brake water with your own hands. For example, let's take several different brands. First, let's turn to VAZ cars, and then to foreign cars.
Our brand
General advice in all cases of work when changing water on a car with your own hands:
- Do not allow the chemical to come into contact with your hands, inside the body, or on wires or paintwork;
- you need to use exactly the chemical specified by the manufacturer of the car brand;
- Store leftovers in containers tightly closed.
So, as an example, let’s look at the operation of changing the brake water on a VAZ 2110 car. We’ll describe what you need to have on hand below:
How much water we need is shown by the car's passport. For VAZ 2110 this is 0.55 liters. Let's get started.
- Open the system reservoir.
- We lift the back of the car, unlock the rear brake pressure regulator - insert a screwdriver between the piston and the plate.
- We release the air release valve of the right rear brake from the rubber cap, insert a hose, the end of which is connected to a container.
- The partner must sharply press the pedal 5 times, while leaving it pressed for the last time.
- At the same time, unscrew the valve with a wrench - just make three quarters of a turn, and the spent medium should begin to flow out. After the leak stops, tighten the valve, while your partner should not release the pedal until the fitting is tightened.
- You need to add the new medium when the tank is empty to the bottom mark. When clear liquid flows out, the operation stops.
- We repeat everything completely on the left front brake mechanism.
- Then we repeat the manipulations again for the second circuit - first we move to the left rear mechanism, and at the end to the right front one.
- We install the caps back, remove the screwdriver from the pressure regulator, and check the efficiency of the system.
This is how the brake water is changed on a VAZ 2110. Dividing the system into two independent circuits for greater safety should not be a surprise - just remember the driving school lessons.
The change for the VAZ 2114 is carried out in a completely similar way. If we talk about the Lada Kalina, then there are no differences either. Changing Kalina's water is done according to the same instructions. The only thing worth paying attention to is how much brake water Kalina needs for a complete change. The volume here is 0.45 liters.
How much brake fluid is in the VAZ 2112 system
On the Lada Priora we act identically. Changing Priora also does not cause any particular difficulties. The volume of the newest medium is also 0.45 liters. For all these cars, it is recommended to use DOT 3. The replacement frequency for front-wheel drive VAZs is from 2 to 3 years or from 50 to 60 thousand km. mileage
Not our brand
Now let's move on to foreign cars. To change the brake water on a Ford Focus 2, we will prepare the following:
- set of wrenches;
- rubber hose;
- capacity.
Also find out why oil appears in the air filter of the VAZ 2109 and the oil pressure lamp on the VAZ 2114 glows.
We proceed as follows.
- Unscrew the cap of the system reservoir.
- Remove the cap from the valve of the working cylinder of the right rear wheel. We put on the hose. The end of the hose is connected to the container.
- The assistant presses the pedal 5 times, holding it pressed for the 5th time. With all this, unscrew the valve - three quarters of a turn is enough. The spent medium begins to flow from the hose. After the leak stops, immediately close the valve.
- We top up the tank until the old chemical reaches the bottom mark.
- We continue the operation until a clean, brand new medium flows out of the valve.
- We repeat the manipulations for the left front wheel, also for the second circuit, similarly to how it was described earlier.
Next, let's see how the change is done in the Skoda Octavia A5. Here, in general, as in the previous case, the manufacturer recommends a subsequent period - 2 years or 30 thousand kilometers. To implement the procedure, exactly the same things are used - keys, a hose and a container.
The annotation for this vehicle will be one hundred percent identical to the previous annotation. Therefore, we will not focus on it here.
Let's move on immediately to another popular foreign car. For owners of Renault Logan, the manufacturer gives the opportunity to avoid updating the brake operating environment for a long time. The period here is as much as 90 thousand kilometers or 6 years. Changing brake water in Renault Logan is done according to the same scenario, with the same tools. We will just add a few additions to it.
After point 1 of the annotation for Ford, many experts advise adding another point, let’s call it this:
- We pump out the old chemical from the tank with a syringe until the level drops to the bottom mark, then we replenish the tank with the newest medium.
- Next, remove the cap from the cylinder valve of the right rear wheel.
THIS IS INTERESTING: Nissan laptop won't start
We repeat what is to come according to the instructions for Ford.
If we recall another popular car - Chevrolet, we are unlikely to find any differences in its braking system from the cars described. The Chevrolet Lacetti is also replaced along the previously described path. Let's repeat it briefly.
But here we take for work not counting the wrenches:
- We open the hydraulic drive reservoir, use a blower to pump out the old product to the bottom mark, then fill the reservoir to the top with the newest medium.
- Remove the bleeder fitting from the rear right mechanism from the cap and insert the hose with a container.
- With the help of a partner, we pump the system with the pedal, unscrew the fitting, according to previous instructions, and drain the liquid.
- In this car - this is how all cars are designed in general - the contours are placed exactly as in the previously described cases. We repeat the operations at all 4 points.
Don't forget to put the caps back in place.
We saw that the contours are always placed identically, because in another car under the Chevrolet brand, the well-known Chevrolet Niva, work is done in the same way. But there is one aspect. You need to refer to the very first annotation we described for the VAZ 2110. It needs to be controlled. The only change is indicated below.
It's on the 2nd Fri.
- We unlock the brake pressure regulator. To do this, insert a screwdriver between the bracket and the screw.
- Then we repeat everything as for the VAZ 2110.
We looked at several different car models. There is only one conclusion - everywhere this repair is done according to the same principle. As for systems equipped with ABS, more on that below.
Service cost
Note that there is a special device for completely changing brake water. It is used by car service technicians. It is also very necessary when there is an Abs system! It is not profitable to take it for independent work, although if you ask someone, the principle of action is this.
The device has a set of adapters. The adapter is put on the neck of the tank. Next, a faucet with a hose belonging to the installation for a complete change of brake water is inserted.
No need for a partner right now. We follow the same path - we start from the right rear wheel. When we unscrew the fitting, we start the device by opening the tap, and it itself pumps the new working medium instead of the old one. In this case, the Abs pump must be turned on, in other words, the ignition is on. But this is not suitable for all models. Many cars with ABS also require a special shield.
Let's see how much servicemen charge for all this. The table below shows average data for various Russian towns.
Source: https://top-geer.ru/skolko-tormoznoj-zhidkosti-v-sisteme-vaz-2112/