Design and location of the hand brake cable for the LADA Granta
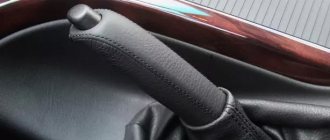
The purpose of the LADA Granta handbrake cable is to transmit force from the lever in the cabin to the rear brake pads. It is enclosed in a multi-layer protective shell and has tips for attaching to the handbrake lever and the rear wheel brake drive. The adjusting nut on the cable allows you to adjust the length of the drive, and the return spring returns the system to its original state after lowering the drive lever. The handbrake cable is located under the bottom of the car and is partially covered by the muffler thermal shield.
General questions about the parking brake on Grant
Let's look at a few basic questions about VAZ 2190 brakes.
Operating principle of the Granta handbrake
When raising the handbrake lever in the passenger compartment:
- the drive brake cable is tensioned;
- through the equalizer he pulls the cables going to the rear brake pads;
- The pads are pressed against the brake drums through expansion bars, stopping the wheel from moving;
- When the tension is loosened (removed from the handbrake), the tension of the cables also weakens, and the wheels move freely.
Lever 1 pulls cables 3 through cable 2. Those, through levers 4 and strips 5, push the brake pads apart.
Why is it necessary to tighten the parking brake?
When the cable tension is loosened, there is a danger of the vehicle rolling away .
The Granta mechanical handbrake has a conventional device without self-adjustment. The same instructions apply to Lada Kalina, Priora.
This means that as the rear pads wear out, the original parking brake setting will lose effectiveness.
Crib
Instead of a conclusion, let's summarize :
- Carry out work on a lift, pit or overpass;
- Tools: open-end wrench 13, ratchet with heads 10 and 13 (preferably long);
- It is not necessary to remove the heat shield - just move it forward as the vehicle moves;
- The ideal stroke is 3-4 clicks of the handle until the rear wheels come to a complete stop.
If you've already started adjusting the brakes, maybe change the rear pads too? Detailed instructions with description and photos are here.
Have something to add to the article, share your opinion or recommend? Write in the comments!
The parking (hand) brake in a car is one of the important parts of the safety system. In extreme situations or during traffic accidents, the handbrake can save the health and even the life of the driver, passengers or pedestrians. This is why the handbrake system must always be maintained in perfect condition and ensure that the parking brake is always in full working order.
How to change the handbrake cable on a LADA Granta
Replacing the handbrake cable on a LADA Granta is first done as follows:
- install the car on a viewing hole or lift;
- lower the handbrake lever all the way;
- loosen the tension on the handbrake cable by releasing the adjusting bolt;
- unscrew the pins holding the brake drum and guiding the wheel disc during installation;
- if necessary, use a metal brush to clean the place where the brake drum fits on the hub;
- treat the drum landing area with WD-40;
- press the drum from its seat, evenly screwing the M8 bolts into the threaded holes;
Attention: to prevent the pistons from coming out of the brake cylinders, do not press the brake pedal with the drum removed.
- disconnect the thermal shield of the muffler, opening access to the handbrake cable;
- remove the muffler and resonator from the cushions, lowering the exhaust system down;
- Using a 13mm wrench, unscrew the locknut and the handbrake adjusting nut; remove the equalizer from the rod;
- remove the end of the parking brake cable from the equalizer;
- pull out the end of the cable sheath from the bracket on the body;
- Use pliers to bend the cable fastening brackets;
- Using a screwdriver, move the parking brake drive lever forward in the brake mechanism and remove the cable end from it;
- loosen the nut holding the cable on the rear axle beam;
- pull the cable out of the holder;
- remove the cable from the bracket on the body;
- remove the Grant handbrake cable from the brake shield.
Then the cable must also be removed from the other wheel. Installing a new parking brake cable is done in the reverse order. Now you know how to change the handbrake cable on a Grant. But after installing the new cable, it is necessary to adjust the hand brake drive.
Adjust or change?
To determine whether the parking brake can be adjusted or whether it is better to install a new one, remember how long ago you replaced the brake pads and drums on the rear. On average, replacing rear pads is necessary every 50–80 thousand km, but the frequency also depends on driving style. If the pads are worn too much, the parking brake will not be effective (as will the braking system of the car as a whole) . Inspect the pads: if their thickness is less than 1.5 mm, urgent replacement is needed. Also, try opening the pads manually with a screwdriver. They should be separated without excessive force.
If the thickness is within acceptable limits, pay attention to the brake drum. Measure its diameter with a caliper. If the value is above 20 cm, the drum must be replaced with a new one.
If you notice scuffs, cracks, or severe corrosion on the pads or drum, replace the damaged parts. It is not recommended for an inexperienced motorist to try to restore components.
If all the inspected components of the car are in order, but the parking brake still does not work, the problem lies in the cable. If it breaks, the handbrake will lift without any effort - in this case, the part definitely requires replacement. You can tighten the cable with your own hands, but if it is already raised to the maximum and tightening is impossible, you should go for a replacement.
How to tighten the handbrake on a Grant
Step 1. It is necessary to install the car on a pit or overpass, since the adjustment unit is located under the bottom of the car.
Step 2. Determine the current travel of the parking brake lever - raise the lever all the way up and count the clicks. If there are only 2 clicks or less, then it is necessary to lengthen the drive; if there are more than 4 clicks, then shorten it.
Step 3. Raise the parking brake lever 2-3 clicks.
Step 4. Remove the cushions from the additional muffler brackets (position 1).
Step 5. Using a socket wrench, remove the four nuts that secure the shield (item 2).
Step 6. Pull the additional muffler away from the bottom, place a wooden block under it and remove the protective shield.
Step 7. Hold the adjusting nut with one wrench at “13” and loosen the locknut.
Step 8. We adjust the length of the drive using the adjusting nut. When turning it, the length of the drive is shortened and the handbrake is tightened; when turned away, the length increases (if you need to loosen the handbrake on a Lada Granta).
Step 9. During the adjustment process, we periodically check the handbrake movement.
Step 10. After adjusting the lever travel, you need to hang up the rear of the car and check that the wheels rotate easily when the handbrake is released and that they are securely fixed when the handbrake lever is raised.
Step 11. If the brake pads are working correctly, you can check the adjuster and secure the protective shield and additional muffler in place.
Precautionary measures
Several rules will help you avoid the problem of the parking brake freezing. In winter, try not to leave the car on the handbrake for a long time. If the car is in “automatic”, put it in “P” (parking), in “manual” - first or second gear. If you need to leave the car on a slope, place a reliable support (stone, brick) under the wheel.
Simple precautions will help you avoid serious problems.
If you really need to use the parking brake, then dry it before using it. Make a few quick stops. The brake pads will heat up and the moisture in them will evaporate. Do not tighten the handbrake all the way. If the brake freezes, it will be somewhat easier to dislodge the ice.
Try not to leave your car on the handbrake for long periods of time in winter.
Adjustment process
Required tool:
• Two 13mm wrenches. It is advisable that one of them be a socket one.
• Head for 8. • Partner, but you can do without it. The truth is it’s more difficult without him. 1
.
It is necessary to install the car on a pit or overpass, since the adjustment unit is located under the bottom of the car. 2
.
We determine the current travel of the parking brake lever - raise the lever all the way up and count the clicks. If there are only 2 clicks or less, then it is necessary to lengthen the drive; if there are more than 4 clicks, then shorten it. 3
.
Fully lower the parking brake lever. 4
. We climb under the car and find protection above the muffler. The photo shows 4 nuts that need to be unscrewed. Unscrew the nuts with a 10mm socket. Tip: before unscrewing the nuts, spray them with WD40. Otherwise, the studs may break off.
5
. We unscrew all the screws and hang the protection on the muffler.
6
. Closer to the front of the protection you will see a rubber pad that attaches the muffler to the body. Remove the bottom part of the pillow from the mount.
7
. After this, we move the protection forward, in the direction of the engine. The protection should go over the cushion mounting hook. We move the protection all the way forward.
8
. After the protection is removed, you will see 2 adjustment bolts. Right locking, left for adjustment. Loosen the first nut and use the second nut to adjust the handbrake force. We periodically check the tightness from the interior using the handbrake.
9
. Using a 13mm wrench, hold the left nut and tighten the fixing nut. After that, tighten everything using a 13mm socket.
The entire adjustment process took us about 20 minutes. The location of the adjusting bolts on the Lada Granta is not the best. After all the work, we check the operation of the handbrake on an incline. If the handbrake does not brake, you need to replace the rear brake pads.
How does the handbrake work and what is needed to adjust it?
Next you will learn how to tighten the handbrake on the Lada Grant, but first we will figure out how this system works. It should be said that on all modern vehicles the parking brake has a similar design and differs only in details. So, on Grant this mechanism consists of the following basic elements:
- handbrake lever with rod and two nuts (adjusting and locking nut);
- cable equalizer and spacer bars with brake pad drive lever;
- left and right cables for driving the pads of the left and right wheels, respectively.
As you can see, the parking brake has a fairly simple design and includes a minimum number of elements. Thanks to this, having information on how to adjust the handbrake on a Grant, even an inexperienced car enthusiast can cope with such a task without much difficulty. Moreover, for the job you will need a simple set of tools, consisting of two open-end wrenches with a size of “13” and a socket wrench with a size of “8”. In addition, given that the adjustment work will be carried out under the bottom of the car, you will have to use a jack or install the car above the inspection hole.
Adjusting the handbrake cable on the LADA “Granta”
To carry out the work, access to the cable from the bottom is necessary, so the adjustment of the Grant handbrake cable after replacement is carried out while the muffler heat shield has not yet been put in place. Next you should do the following:
- lower the handbrake lever all the way;
- loosen the locknut on the adjusting device (if it is tightened);
- screw the adjusting nut onto the cable shank until the latter is tensioned;
- make sure that the free play of the lever in the cabin is from 2 to 4 clicks;
- if necessary, adjust the cable tension;
- tighten the locknut while holding the adjusting nut with a wrench;
- Install a muffler heat shield.
Pull up the handbrake
Adjusting (tightening) the handbrake on a Lada Granta car is a rather troublesome process.
But if you really know how to tighten the handbrake on a Lada Granta standard, this procedure will not take you much time and effort. The only thing that is required for its implementation is a jack or an inspection hole, because access to adjustable components and assemblies occurs from below and you will have to work under the car. To tighten (adjust) the handbrake you will need 3 tools:
- two open-end wrenches for 13, one of them is preferably a socket one;
- one key head for 8;
- a faithful assistant (although in desperate situations you can get by alone).
The process of directly adjusting the manual braking system of a Lada Granta car is carried out in nine main stages:
- We lower the handbrake lever inside the car.
- We climb under the car, unscrew the rubber cushions (brackets) from the resonator, and remove the muffler from its attachment to the body.
- We remove the protective screen of the parking brake adjustment mechanism. To do this, use a socket wrench to unscrew the 4 nuts from the fastening bolts.
- We remove the protective screen or move it to the side behind the muffler - in this case, the necessary space for work is also quite enough. In this case, the muffler can be pulled back with something, for example, by pushing a block of wood under it.
- We take two 13mm wrenches - the first one is to slightly loosen the locknut, holding the adjusting nut. Then vice versa - hold it, and secondly turn (also loosening) the adjusting nut.
- Actually, we adjust the hand brake as follows: tighten the handbrake cable, for which we tighten the adjusting nut (move the key clockwise).
- Next, you should check the travel of the handbrake lever - this is why you need a partner, or you will have to do it yourself. The lock nut can be tightened when the handbrake stroke is 2-4 clicks (see above).
- Then we test the operation of the parking brake mechanism as a whole. To do this, lift the rear wheels and check how freely they rotate when the handbrake is lowered and how completely they lock when fully raised (in this case they should not rotate at all!).
- If the handbrake is working properly, tighten the locknut and replace the protective screen and muffler. The handbrake adjustment is complete!
As the mileage and life of the vehicle increases, the handbrake becomes less and less adjustable. It happens that even after adjustment, the manual braking system does not work properly and does not “hold” the car. This indicates that the wear on the brake pads is too high or the cable stretch is irreversible.
Sources
- https://ladaservice.info/lada-granta/raznoe-lada-granta/zamena-i-regulirovka-trosika-ruchnika-lada-granta/
- https://vgrante.ru/?cat=40&pcat=6
- https://car-fact.ru/marki-i-modeli/otechestvennye/lada-granta/granta-kalina-ruchnik.html
- https://Remladavaz.ru/zamena-trosov-privoda-stoyanochnogo-tormoza-lada-granta
- https://carfrance.ru/podtyagivaem-ruchnik-na-lada-granta-regulirovka-i-podtyazhka-trosa/
- https://new-granta.ru/regulirovka-ruchnika-na-lada-granta/
- https://24techno-guide.ru/regulirovka-ruchnogo-tormoza-lada-granta.php
- https://ubs-rus.com/rukovodstva-po-remontu/granta/granta-zamena-trosov-privoda-stoyanochnogo-tormoza/
- https://ladaautos.ru/lada-granta/kak-pravilno-podtyanut-ruchnik-na-lade-granta.html
Instructions for tensioning and replacing the drive
Since the parking brake system mechanism is located under the bottom of the car, an inspection ditch, overpass or lift is needed to perform the work. In extreme cases, you can do without them, but then you will have to hang out the back of the car and lie under it, which is not only inconvenient, but also dangerous. Before tightening the cable, securely secure the front wheels of the vehicle with wheel chocks.
Then act in the following sequence:
- Set the handbrake lever to the down position.
- Jack up any of the rear wheels.
- Armed with two open-end wrenches that fit the tensioner nuts, go down into the inspection hole.
- While holding the main nut located on the stud near the rocker arm, loosen the locknut.
- Tighten the tension nut, periodically checking the rotation of the suspended wheel by hand. To prevent the pin from spinning, it must also be held with pliers or a wrench.
- Stop tightening the cable as soon as the pads begin to grip the wheel. Make 1-2 turns of the nut back and check the operation of the handbrake. It should fire after the second click.
- Tighten the locknut, lower the jack and test the handbrake on a slope.
Replacing the cable drive will require more time, especially to disassemble the drum brake system. To hang both rear wheels, prepare wooden blocks, and to replace them, use a standard set of tools; no special devices are required. The algorithm of actions is as follows:
- Place the car on the pit and loosen the cable completely, as described above. Unscrew both nuts and remove it from the rocker arm.
- Lift the rear of the car, place it on blocks and remove the wheels.
- Remove the drums and unscrew the bolts securing the cable to the rear casing.
- Remove the brake pads and spacer bar. When you reach the lever, remove the cable loop from it. Remove it from the casing and repeat the operation on the other side.
Install the new cable drive in the reverse order, starting with the wheel mechanisms. At the end, tighten it and check the operation of the handbrake.
In accordance with the regulations on the operation of vehicles, every car must have a working parking brake system. This mechanism usually does not require special maintenance, but over time, the cable drive of the handbrake can stretch, resulting in an increase in the number of clicks until the car is securely locked. The norm is when the car is reliably held on a slope of 23 degrees with three clicks of the handbrake handle. It is permissible to operate the vehicle when the vehicle is locked at the sixth to eighth click, but then it will be necessary to either tighten the handbrake cable or replace it if the tension life is completely exhausted.
To tighten the hand brake, we need a socket for “10” and “13”, or a spanner for “13”, a pit or an overpass.
We go down under the car and unscrew the four “10” bolts that hold the heat shield of the exhaust system resonator.
It will not be possible to remove it at all, since the exhaust system is in the way, and according to the assembly standards, this shield is installed before installing the exhaust, so we will need to move it closer to the engine shield. To do this, disengage the exhaust system resonator mounting hook from the fastening rubber band.
The handbrake cable drive system uses two nuts, one for tightening, the second acts as a locknut that prevents the mechanism from unwinding on its own over time. Using a “13” wrench or a head of a similar size, unscrew the locknut of the tension plate and tighten the adjusting nut with a similar wrench until the car is securely fixed with 2-4 clicks of the handbrake system handle.
Thanks for subscribing!
Before returning the locknut to its place and reassembling the heat-resistant casing, check that the rear pads do not interfere with the free rotation of the wheel. To do this, jack up each wheel individually and, releasing the handbrake, spin the wheel. It should rotate freely without any extraneous sounds from the brake pads. Before releasing the handbrake, place wheel chocks under the front wheels or the opposite rear wheel.
If there is interference when the wheel rotates, loosen the handbrake cables until the wheel begins to rotate freely. Interference during wheel rotation will have a detrimental effect on the service life of the brake drum due to its overheating and, in general, on the safety of the rear axle braking system, and will also lead to increased fuel consumption due to the increased load.
If no interference was noted during the rotation of the wheel, we assemble everything in the reverse order.
A properly functioning and properly adjusted parking brake system of a Lada Granta ensures reliable wheel locking. In this way, spontaneous movement of the vehicle is prevented. But over time, the question of how to tighten (adjust) the handbrake on a Lada Grant becomes relevant for every car enthusiast, since the brake pads wear out and are pressed against the brake drums with insufficient force. Also, during operation, the handbrake cable itself stretches and adjustments are no longer necessary.
Since over time the brake pads wear out and are not pressed tightly against the brake drums, it becomes necessary to adjust the handbrake
There is a handbrake lever located inside the car, by pulling which the driver activates a mechanism that acts on the rear brake pads, which leads to the wheels blocking. According to the manufacturer's recommendations, when installed in the working position, the lever should move from 2 to 4 clicks of the ratchet mechanism and no more. If the number of clicks is six or more, then the Granta handbrake needs to be tightened.