How to adjust the clutch on a VAZ 2107
A correctly adjusted VAZ 2107 clutch ensures normal operation of the vehicle and long-term operation of the machine’s components and parts.
It is recommended to check the correctness of the adjustment at every vehicle maintenance. During operation, incorrect adjustment can result in two types of malfunctions:
- The clutch slips - when the pedal is fully released, the disc slips and does not transmit the full amount of engine power to the transmission;
- The clutch drives - when the pedal is fully depressed, the disc does not move away from the flywheel, which does not allow normal gear changes and makes the car move when it is not needed.
In addition, the clutch may engage too early or late, making it difficult to control the vehicle.
The adjustment process itself consists of two parts. The first is carried out in the cabin, the second - under the bottom of the VAZ 2107, from the inspection hole. Tools you will need:
- Key for 8 or 10, depending on the model of the clutch slave cylinder;
- Open-end wrench 13;
- Open-end wrench 17.
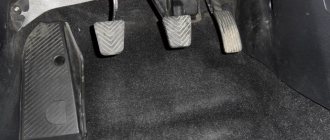
The first adjustment involves setting the clutch pedal travel. It is performed from the interior, under the steering column. To limit the full stroke, use a special adjusting screw secured with a lock nut. By tightening or unscrewing it, we achieve normal pedal travel, which should be approximately 140 mm. Usually there is no need to adjust the full stroke; it is set from the factory and is changed very rarely.
The second part of the adjustment is to set the pedal free play. In normal mode it should be 30-35 mm. However, some car enthusiasts adjust the freewheel to suit their individual habits and preferences. This approach is quite acceptable provided that it does not affect the performance and durability of the parts of the VAZ 2107 car.
So, to check and adjust, we go down into the inspection hole. The clearance is checked by pulling the fork away from the pusher.
The free play distance should be 4-5 mm. If the gap differs significantly from the standard, it must be adjusted. For this:
- Remove the spring that pulls the clutch fork to its original position;
- Loosen the locknut on the pusher;
- Holding the pusher with a 8 (10) wrench, screw or twist the thrust nut until the required clearance is achieved;
- Fix the thrust nut with a locknut;
- Checking the gap;
- We install the spring in place.
At this point the adjustment procedure can be considered complete. However, in order to ensure that the result obtained is correct, it is necessary to check the clutch in action. To do this, start the car, engage the gear and gradually begin to release the pedal. When adjusted correctly, the car should move off at approximately half the pedal stroke. Adjustment is allowed, including the clutch lower or higher, but engagement at the very top or bottom is unacceptable, as there is a risk of the above malfunctions occurring.
Basic rules for working with the clutch pedal
– The left foot should always be ready to change gears, that is, to move to the clutch pedal. Most cars have a special area designed to rest the left foot. Or you can place the heel of your left foot on the floor and lean your foot against the body of the car in a position that is comfortable for you.
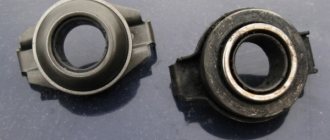
– Do not constantly keep your foot on the clutch pedal: your foot gets tired, the clutch gets tired and fails faster. The clutch release bearing, although it is designed to operate in constant rotation mode, is under increased load even when the pedal is lightly pressed and its service life is reduced.
As soon as the desired gear is engaged, the left foot is freely placed in a convenient place next to the clutch pedal. While in a traffic jam, if you do not have to move away immediately, it is better to turn on the neutral speed and release the clutch pedal.
– Always release the clutch completely when changing gears, for which the pedal should be pressed all the way.
– The left foot is intended for only one pedal – the clutch.
– Press the clutch pedal quickly, “all the way” and without jerking, in one movement.
– Smooth release of the pedal is ensured by pressing on it with the middle part of the foot, with the balls of the foot. In this case, the heel of the foot should be lifted off the floor and the entire leg should be lifted up, not just the foot, that is, the shin and knee work.
– When releasing the clutch smoothly, as soon as you feel the car’s pull to move, hold your foot in this position and let the car drive 2-3 meters. This delay of the leg will be exactly at the “moment of starting the car.” If you pass this “moment” quickly and abruptly, the car will jerk and stall.
– Before starting the engine, you must disengage the clutch (press the pedal all the way) and only then turn on the starter.
– When engaging 1st, 2nd and reverse gear, release the clutch pedal gently and smoothly.
– When engaging the gears following 2nd, the clutch pedal is released quickly, but without jerking or sudden movements.
– The clutch pedal is only used to start driving, change gears and come to a complete stop.
How to adjust the clutch of a VAZ-2107
During vehicle operation, an incorrectly adjusted clutch is expressed as follows:
- The clutch drives. When the clutch pedal is fully depressed, the disc does not move away from the flywheel, making it impossible to change gears normally. Thus, the car can start moving even when it is not necessary.
- The clutch is slipping. When the clutch pedal is fully released, the disc begins to slip. As a result, it does not transfer all the engine power to the transmission in full.
In addition, problems with the clutch sometimes result in it setting too early or, conversely, too late. As a result, driving may become significantly more difficult.
What does freewheeling mean?
What does this concept mean? It characterizes the freedom of movement of the clutch pedal until it is activated. You can feel it when you press it. At the very beginning, as soon as you start pressing the pedal, it will move quite freely. That is, you don’t feel much resistance.
After activation, you will notice the appearance of greater rigidity when pressing. It is this interval, while you press without much effort, easily, that is called a free stroke.
How do you know when it’s time to check this indicator? Everything is very simple! Just pay attention to how the car behaves when you change gear.
If you encounter shocks or slight jerks at the very beginning of the movement, or if the gear shift is accompanied by noise, then you should definitely check the free movement of your car. So, start the engine and slowly release the pedal.
If the car begins to move as soon as you start to let go, your car does not have free movement. If the car does not move and the pedal is completely lowered, the norm has been exceeded.
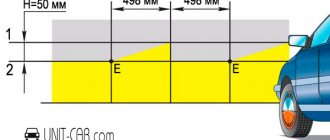
Find a regular ruler in your arsenal. With it you can measure the distance from the floor to the rubber pad on your pedal. The average norm is 160 mm. If your measurement results in more, you need to make an adjustment. Press the pedal carefully. Then, using a ruler, measure the distance when it moves freely until resistance appears.
Check the resulting value with the technical requirements of your car. This figure must fall within the acceptable limit. If it differs from the standard indicators, then it’s time to work a little in the garage.
Clutch adjustment
The entire clutch adjustment process consists of two parts.
One of them takes place directly inside the car, while the second is performed from below the car while it is either on the inspection pit or on a lift. To adjust the clutch you will need the following tools:
- open-end wrenches for 13 and 17;
- a key for 10 or 8 (it all depends on which model of the clutch slave cylinder).
The first adjustment also involves setting the clutch pedal travel. This stage of work is performed directly from inside the car, under the steering column. There is an adjusting screw that serves to limit the full stroke. It is secured with a locknut. By turning the screw first to one position, then to another, you can achieve normal pedal travel, which, according to the instructions, should be 14 cm.
But, as a rule, there is no need for this, since the pedal travel is set at the factory and can spontaneously change only in very rare cases.
The second stage of adjustment is to set the pedal free play, which in normal mode should vary in the range from 30 to 35 mm. Nevertheless, quite often car enthusiasts prefer to adjust the pedal free play to their personal preferences.
Practical Guide to Adjustment
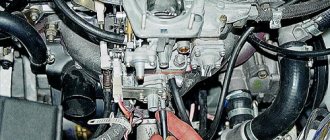
The mechanical clutch is adjusted using its drive. To do this, you should find a cable in the engine compartment, at the end of which there is a bolt with a lock nut. By turning the adjusting nut, you need to ensure that the free travel of the pedal is 12-13 cm. To increase the stroke of the PS, the nut should be tightened; to decrease the stroke, the nut should be unscrewed. Then you should press the PS three times and measure the distance between the pedal and the floor. The clutch is adjusted until the required distance is reached.
Adjusting the drive cable
If the procedure is performed after replacing the unit, then it is necessary to ensure that there is no air in the hydraulic drive system. If present, it must be removed by purging the system. The essence of regulation is to establish the necessary clearances between the rod and the piston of the main cylinder of the unit. In addition, the required distances are established between the friction ring of the pressure plate and the release bearing.
In order to adjust the hydraulic drive, it is necessary to remove the spring from the master cylinder bracket and fork. Next, measure the gaps between the pusher and the release fork. This distance should be approximately 5 mm. By unscrewing or tightening the adjusting nut on the cylinder rod, you need to ensure that the free play of the fork is 5 mm.
This procedure is carried out on simple systems and is given as an example. There are other clutch drive systems. To correctly adjust the unit, it is better to refer to the vehicle's operating instructions. The quality of vehicle movement depends on the correct adjustment.
When to adjust the clutch drive
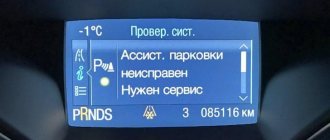
- Gear shift violation - positions are engaged with knocking, crackling or extraneous sounds.
- The clutch switch response threshold has been violated. A dip of 25 to 35 mm is considered optimal.
- Increased fuel consumption. If the mechanism is faulty, excess gasoline consumption can be up to 20% of the reference value.
- Knocking out positions. During acceleration of the vehicle, the gears “fly out”.
- Dissonance when revving the engine. When you press the gas pedal, the internal combustion engine spins up, and the car lags behind.
- Clutch lever failures, this also includes an increase or absence of operating play in the system.
- Early or late operation of the mechanism when the pedal is pressed.
Do-it-yourself clutch adjustment on a VAZ 2107
This procedure is performed similarly for all classic models VAZ 2101-07 and 21214. The essence of the procedure is to adjust the clutch or play of the clutch working cylinder rod if it takes at the very end or with minimal pressure.
- standard open-end wrenches;
- screwdriver or pliers;
- ruler;
- ticks.
Basically, the calibration process looks like this.
- The car is driven onto a viewing hole or lift.
- The battery terminals are disconnected, and the car is blocked from accidentally rolling away (relevant for a pit or overpass).
- The clutch pedal stop is located under the steering column. This element is responsible for setting the working gap between the rod pusher and the pedal. A backlash of 1-2 millimeters is considered normal; if the condition is met, no calibration is needed.
- Next, you need to check the backlash of the working cylinder. To do this, unscrew the pusher rod from the clutch fork and check the existing gap.
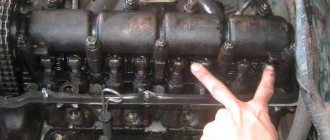
Setting up the clutch of an injection VAZ 2107
Fundamentally, the repair procedure differs from the carburetor by the presence of an additional dirt-proof sheet. The structure is dismantled in this way.
- Using a socket head, 12 shield mounting bolts (A, B, C) are removed.
Next, you need to unscrew the rear screws using a Phillips screwdriver or wrench No. 8.
- Reverse installation is carried out in mirror order.
- Otherwise, the sequence of actions does not differ from the standard procedure.
Adjusting the clutch of a carburetor VAZ 2107
Step-by-step instructions for adjusting a carburetor model look like this.
- The car is jacked up or driven into an inspection hole.
- The nominal free play position of the clutch pedal is set.
- Adjusting the release bearing play.
- Reverse fixation of the structure.
- Checking completed work.
Adjusting the clutch pedal free play
To set the required clutch pedal travel, the following procedure is performed.
- Inside the car, you need to find the clutch piston pusher (located under the corresponding pedal).
How to finally adjust the clutch on a VAZ 2107
After all manipulations, it is necessary to check the functionality of the system. To do this, you need to start the engine and let it warm up. Then, with the engine running, you need to depress the clutch and, without accelerating, engage the rear rocker position. In this case, the presence of extraneous sounds and rattles is not allowed. The position is turned on easily - without additional effort.
Next, you can start moving at first speed and then increase the position to maximum (5). When driving, the presence of extraneous sounds or grinding noises is strictly unacceptable; the pedal is pressed evenly, without dips or jerks.
The last stage is acceleration at each gearbox speed, while the set of engine speeds fully corresponds to the acceleration of the car. If there is dissonance, the clutch disc slips and recalibration is required.
Clutch adjustment on a VAZ-2107 - detailed instructions for a beginner
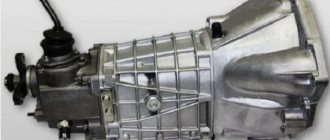
The main purpose of the clutch mechanism is to combine the crankshaft with the gearbox and transmit torque from the engine to the wheels of the car. This device is used on the car when switching to a lower or higher gear, as well as when turning on neutral. In order for gear shifting to be carried out easily and smoothly, you will need to properly adjust the VAZ 2107 clutch, which every owner of the 7 should be able to do.
Clutch, what it is and how it works
Imagine a vehicle in which the motor is directly connected to the gearbox. Do you think we started the car and drove off? No. The car will start to move away jerkily, it will be impossible to change gear, and when stopping, the engine will have to be turned off completely. After such a ride, the box will last no more than three days, and the resource of the power unit will be reduced several times as a result of overloads. The clutch helps to avoid such consequences.
Its purpose is to smoothly connect the engine flywheel to the transmission input shaft when driving from a standstill and when changing gears. In other words, the clutch is a torque switch.
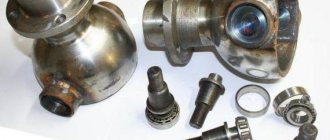
How does the clutch work? Currently, the most common is the always-on, dry single-plate clutch. Its principle of operation is to tightly compress the surfaces of the flywheel, the pressure surface of the “basket” and the clutch disc linings.
The design of the clutch mechanism on the VAZ 2107
Although the clutch performs a simple task, it consists of many component parts. All parts have a corresponding lifespan, so sooner or later the clutch needs repair and adjustment. Before setting up the clutch on the VAZ 2107, you need to understand its structural elements.
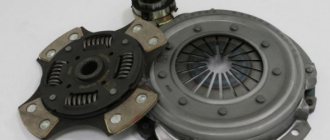
Classic cars of the VAZ family are equipped with a dry closed-type clutch mechanism. The device consists of the following elements:
- The driving part is a driven disk that has splines for transmitting the moment of movement to the gearbox shaft. This rotation is transmitted by friction that occurs between friction linings with the flywheel and the pressure plate.
- Non-separable mechanism - this unit is called a basket, which is fixed to the flywheel.
The clutch mechanism on the VAZ 2107 is activated by the leftmost pedal in the car's interior. The device is driven by a hydraulic drive. The basis of the hydraulic drive consists of the following components:
All classic VAZ models, as well as carburetor and injection VAZ 2107, are equipped with a similar clutch design. The only difference is the presence of an auxiliary shield on injection models, the purpose of which is to protect against dirt. To give you an idea of what we're talking about, below is a diagram of the device in question.
How to adjust the clutch on a classic
The clutch adjustment on the seven should be done after the work on installing the mechanism is completed. If the setup procedure is correctly completed, you can continue to operate the machine without worrying about premature failure of the unit. Before the adjustment process, you will need to check the hydraulic drive for the presence of air in it. The air must be removed by bleeding the system, and if necessary, replace all the fluid.
This is interesting! If, after replacing the clutch parts, the adjustment of the mechanism was carried out incorrectly, then continuing to further operate the machine with an unadjusted device is not only inconvenient and dangerous, but may risk repeated repairs.
If there is a need to adjust the mechanism in question on the VAZ 2107, then detailed instructions are presented below.
What you need to know about clutch malfunctions
- If, during the operation of the car, the PS gradually begins to move upward, most likely the lining of the driven disk is worn out.
- When the clutch slips, the interior smells of burnt linings (ferodo). Checking the wear of the linings is quite simple: put the car in “handbrake”, start the engine, squeeze the clutch, add gas, and smoothly release the throttle. If the engine barely slows down, the disc pads are worn out. If the internal combustion engine stalls, the clutch is fine.
- Slipping can occur not only due to worn friction linings of the disc, oil can get on the basket and disc. To check your guess, you need to place the car on a lift or pit and perform an external inspection of the engine and gearbox from below. Oil enters the clutch through the gearbox input shaft oil seal, through the rear oil seal of the internal combustion engine.
- If the PS is stuck, then it could be: the fork has become sour, the piston has jammed in the working cylinder, the fork has flown off the release bearing hub (on ZMZ-402, UMZ engines of various models).
- If the PS has become “wobbly”, and in order to change gear normally, you need to depress the clutch pedal twice, it means that the master cylinder valves have begun to bypass. In this case, repair of the main circulation system or its replacement is necessary.