Purpose and principle of operation of the oil pump
An internal combustion engine is a complex mechanism consisting of many metal parts that interact with each other during operation. The result of this interaction is the friction force that arises at the points of contact of the rubbing mechanisms.
To reduce it, the car is equipped with a lubrication system, the main element of which is the oil pump.
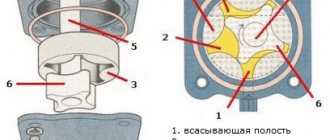
The pump consists of a casing, inside of which a pair of gears is installed. One gear is pressed onto the drive rod, and the second is loosely mounted on the central axis. The mechanism operates via a gear mounted on the engine crankshaft.
When the drive device rotates, the contacting teeth capture fluid from the oil receiver, move it along the walls of the housing and feed it into the oil filter, from where the purified emulsion enters the channels of the vehicle's lubrication system.
The oil pump is designed to ensure uninterrupted circulation of oil fluid and maintain constant pressure in the system.
Checking the condition of the oil pump
To check the condition of the oil pump, remove the cover from it. The gears and housing are checked for scoring. If the working surfaces of the housing and gears are heavily worn, the pump must be replaced. If there is slight wear, it is necessary to measure the gaps in the pump - the gap between the gears and the walls of the housing, the gap between the opposing teeth of both gears and the gap between the side surfaces of the gears and the pump cover. Typically these measurements are made using a feeler gauge. The clearance between the flanks of the gears and the pump cover can be measured using a plastic gauge tape. If excessive play or scratches are found, the pump must be replaced.
Rice. Oil pump showing signs of severe wear, most likely due to heavily contaminated engine oil
Rice. An inspection of the oil pump revealed severe wear on its cover (a). A foreign inclusion was found on one of the gear teeth - this pump is only suitable for scrap metal (b)
For most engines, the oil pump must be replaced when performing any repairs, especially if the repairs involve problems with engine lubrication.
The oil pump is the "sink" of the entire engine. All the engine waste is often “squeezed” between the gears and the oil pump housing.
Rice. Checking the gap between the tooth and the oil pump housing
Rice. Measuring the gap between the gear flank and the oil pump cover
The pictures above show how to check the clearances in the oil pump. Always use the manufacturer's technical specifications when checking oil pump wear. The clearances in the oil pump usually have the following values:
- End clearance (between gear flanks and pump cover): 0.0015 in (0.04 mm);
- side clearance (rotor): 0.012 in (0.30 mm);
- clearance between petal tips and rotor wall: 0.010 inches (0.25 mm);
- end clearance (gear play): 0.004 inches (0.1 mm).
It is necessary to carefully check the wear of all parts. Check the relief valve for scoring and the condition of the spring. When installing the oil pump, it is necessary to apply mounting grease to the surfaces of all seals - this will make it easier to draw oil from the oil sump when the oil pump is first started.
Location of the oil pump in VAZ cars
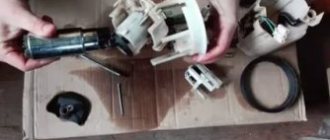
The oil pump in VAZ cars is part of the engine, so you won’t be able to see it just by opening the hood. To get to the oil pump, you need to place the car on an inspection hole, remove the crankcase protection from it, and then remove the pan.
To get to the oil pump, you will have to remove the pan and crankcase from the VAZ car
Oil Pump Repair Tools
To repair the oil pump, use a set of wrenches, a soldering iron, pliers and an impact screwdriver. It is also recommended to use special technical products containing oil and surfactants when cleaning oil pump elements. These products do not pollute the surface and are not aggressive.
Oil pump VAZ 2109
After using these products, there is no need to wash the part, since they have properties that create protection on the surface of the part from the influence of air on the metal. Note that repairing an oil pump is a delicate matter that requires concentration, so for correct diagnosis you will also need good lighting.
Signs of a broken oil pump
It is not difficult to understand that the oil pump has failed. We list the symptoms that clearly indicate a breakdown of this device:
- The oil pressure light on the dashboard is constantly on. This usually occurs due to a clogged or broken pressure relief valve in the pump. As soon as this element breaks, the oil pressure in the lubrication system increases sharply, which is indicated by a light that lights up even at idle;
Constant burning of this light indicates a breakdown of the oil pump.
- engine knock. If for some reason the driver does not pay attention to the light bulb, the engine begins to knock. The characteristic knocking noise becomes louder as the rubbing parts of the engine that are not supplied with oil wear out. Repairing a motor after such a breakdown is very difficult.
Checking the oil pump for wear using dipsticks
- The oil pump is removed from the car and disassembled. The pressure reducing valve and the inlet pipe are separated. All pump parts are thoroughly washed in kerosene.
- After washing, it is necessary to inspect each part for cracks or deformation. Damaged parts will have to be replaced. If no damage is detected, measurements can begin.
- First, using a feeler gauge, the gaps between the pump housing and the gear teeth are measured. The gap should not exceed 0.2 mm.
The distance between the teeth and the oil pump body is measured with a special feeler gauge
- Next, the distances between the gear teeth are measured. They should not exceed 0.5 mm with a permissible error of 0.05 mm. If this condition is not met between any pair of teeth, the gear is worn out and should be replaced.
Video: how to check the oil pump
Diagnostics of the oil pump on the stand
Large car repair shops have universal stands for quickly checking almost any type of oil pump. The procedure for checking oil pumps of VAZ cars, as a rule, consists of two stages:
- checking the pressure relief valve;
- checking the assembled oil pump.
The first stage of testing is as follows: the pressure reducing valve, previously removed from the pump, is installed on a stand and kerosene is supplied to it through a system of pipes. The kerosene pressure is gradually increased with the help of special regulators.
Causes of oil pump failure
The reason why the oil pump has failed can be determined by diagnostics. There are at least 8 main oil pump faults. These include:
- Clogged oil pickup strainer. It is located at the inlet of the pump, and its function is to coarsely filter the engine oil. Like the system’s oil filter, it gradually becomes clogged with small debris and slag (often such slag is formed as a result of flushing the engine with various means).
- Malfunction of the oil pump pressure reducing valve. Usually the piston and spring included in its design fail.
- Wear of the inner surface of the pump housing, the so-called “mirror”. Occurs for natural reasons during engine operation.
- Wear of the working surfaces (blades, splines, axles) of the oil pump gears. It happens both over time of long operation and due to rare changes of (very thick) oil.
- Using dirty or unsuitable engine oil. The presence of debris in the oil can be for various reasons - careless installation of a pump or filter, use of low-quality lubricating fluid.
- Careless pump assembly. In particular, various debris was allowed to get into the oil or the pump was not assembled correctly.
- Drop in oil level in the engine crankcase. Under such conditions, the pump operates at excessive capacity, which causes it to overheat and may fail prematurely.
- Dirty oil filter. When the filter is very clogged, the pump has to make significant efforts to pump the oil. This leads to its wear and partial or complete failure.
Regardless of the reason that caused the partial failure of the oil pump, it is necessary to carry out a detailed check of it and, if necessary, make repairs or complete replacement.
How to check the oil pump
Before troubleshooting the unit, it must be checked. The simplest method is on-site diagnosis (without removing the part). This method is similar for all types of cars, with the exception of operating pressure (each engine has unique indicators). The sequence of actions looks like this.
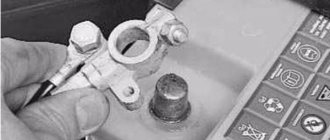
- Unscrew the oil pressure sensor from its socket.
- Using an adapter, install a liquid pressure gauge, ideally a mechanical one, into the hole.
- The first stage of testing takes place cold. The pressure is measured at idle speed and when the load increases to 5000-5600 rpm. The obtained results are compared with the standard.
- The second part is performed after the lubricant has been warmed to a temperature of +90 degrees Celsius. The measuring sequence remains the same.
Recommended thresholds and values for different modifications of internal combustion engines differ. However, if the difference is more than 10%, the mechanism is definitely subject to repair.
Important! It is not recommended to use the pressure standards of other cars as a standard. Exact information and tolerances can be found inside the vehicle's service manual or technical documentation.
Checking with a pressure gauge
Every car owner should know how to check the pressure of the oil pump on a car - this will allow it to avoid dangerous consequences for the engine in case of malfunctions.
A pressure gauge is installed instead of an oil pressure sensor. This is the only way that allows you to reliably verify the serviceability or malfunction of oil pumps. In this case, the pump itself does not need to be removed from the engine. You can purchase ready-made kits for measuring pressure in the lubrication system or make the device yourself.
[custom_ads_shortcode2]
Types of Oil Pumps
Depending on the control method, pumps come in adjustable and unregulated designs. Unregulated ones control the operation of the lubrication system using a pressure reducing valve.
In adjustable ones, the pressure of the oil fluid is regulated by changing the productivity of the device. Depending on the internal structure, they are divided into rotary and gear type pumps.
Gear oil pump
Gear pumps are non-adjustable devices based on their operating principle. Based on the type of gear placement and the method of oil supply, they are divided into 2 types:
- With external gear connection.
- With internal clutch.
The external gear design consists of a housing that houses the driven and driving gears. The liquid from the sump is fed through the suction valve into the working chamber of the device, from where it is pressed into the filter and then enters the oil line.
The performance of the mechanism depends on the crankshaft speed. When the speed increases above the set value, the pressure reducing valve opens, which dumps some of the oil into the engine crankcase. According to this scheme, the lubricant pressure in the system is regulated.
An internal gear pump is a mechanism consisting of a metal casing, inside which a pair of gears rotate, located one above the other and offset relative to the central axis.
The diameter of the driven gear is smaller than that of the drive gear. Due to this, a cavity is formed between them, inside which a vacuum is created. The liquid is sucked into the working chamber and, using a gear transmission, rises into the oil channels.
Rotary oil pump
Rotary-type devices, according to their design features, can be divided into adjustable and non-adjustable mechanisms. The principle of operation of a rotary unregulated pump resembles the operation of a gear device, only instead of gears there are two rotors with a small number of blades.
The liquid is pumped into the working cavity, captured by the blades and supplied to the outlet. At the right moment, the pressure reducing valve is activated and regulates the pressure in the channels of the cylinder block.
The most advanced mechanism is considered to be an adjustable type of oil pump, which maintains constant pressure at any crankshaft rotation speed. The rotary pump received this advantage by adding a movable stator with a variable spring to the design.
Pressure control is carried out by changing the size of the free space between the driven and driving element by turning the movable rotor.
As the engine speed increases, the oil pressure in the system decreases. The adjusting spring straightens and takes the stator along with it. At the same time, the size of the working cavity increases, and the amount of captured liquid increases proportionally, and at the same time the productivity of the device increases.
Diagnostics and adjustment of the oil pump
The first sign of a pumping mechanism malfunction is a decrease in oil pressure. The reasons causing this defect can only be determined if a thorough diagnosis of the device is carried out.
Basic parameters of the pump and sequence of work:
- Remove the oil pump.
- Check the pump housing for deformations, chips, and cracks.
- Carefully remove the casing cover and inspect the sealing gasket.
- Visually examine the condition of the gears, and if defects are found, replace them.
- Using a special probe, measure the contact density of the teeth of the rotating parts. Average values should be within the range of 0.1–0.35 mm (check with technical instructions).
- The gap between the walls of the housing and the outer surface of the gears should not exceed 0.12–0.25 mm.
- The gap between the working shaft of the device and the casing should be 0.15–0.05 mm.
- Upon completion of the repair work, install the pump, start the engine and check the tightness of the connections.
For each oil pump model, there are individual parameters that are usually reflected in the car’s service certificate.
How to measure correctly?
How to check the engine oil pump? The technology is the same for all motors. But, if you lack some equipment for the service station, then it is better to buy it in advance. There is a slight difference only in the values of the threshold pressure level - it is different for different engines. You can find out about the minimum permissible pressure and its level for the valve to operate in the instructions for the car.
Using a classic VAZ as an example, we will look at how to check whether the oil pump is working. Measurements should be made in two modes - on a cold and hot engine.
Purpose and types of automobile oil pumps
The purpose of the oil pump is to create the necessary pressure in the engine lubrication system. Under high pressure, oil flows through special channels to all rubbing parts of the engine, intensively reducing their friction against each other, thereby preventing premature wear.
Oil pump for VAZ car, adjustable, with pressure reducing valve
Advantages of adjustable rotary oil pumps
Almost all modern VAZ cars (starting from VAZ 2114 and higher) are equipped with adjustable rotary-type oil pumps.
Main design elements of the VAZ adjustable rotary oil pump
Here are the main advantages of these devices:
- When using an adjustable oil pump, engine power increases by 30%. This occurs due to a decrease in the power factor taken from the motor by third-party devices;
- with an adjustable oil pump, the oil has to be changed less frequently, since the crankshaft speed decreases, which means the number of revolutions decreases;
- The adjustable oil pump practically does not foam the oil. The problem that is relevant for unregulated gear pumps has been successfully solved in rotary pumps.
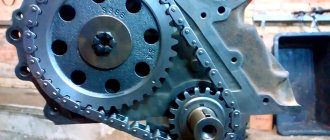
Removal from engine for disassembly
The video demonstrates the process of checking the VAZ 2104 oil pump. But measuring the gap between the housing and the gears, assessing the output of the drive and driven gears, the oil pump housing cover and many other subtleties are relevant for all types of oil pumps. Before disassembling, we recommend studying the structure and operating principle of the oil pump.
For a preliminary check, remove the distributor and remove the oil pump drive gear. If you find deep scuffs on the axle, you will most likely encounter knocked-down splines. Wedging of the drive gear is extremely dangerous, as the splines can be licked off. The consequence of a breakdown will be oil starvation, which for the engine ends at least with the crankshaft liners turned. You can also visually assess the play of the oil pump rod. On a working pump, the gap between the rod and housing pair should not exceed 0.1 mm.
Article on the topic: How to diagnose a car engine yourself
The oil pump on classic VAZ cars is unscrewed from the crankcase. Therefore, to check, you will have to drain the oil and remove the pan, having first loosened the engine mounts (the engine needs to be raised a little).
To fully check the oil pump, arm yourself with a set of dipsticks. Don’t just try to judge by eye the production of parts with pretentious fitting requirements.
Troubleshooting
- Unscrew the oil receiver cap with pressure reducing valve. Be careful not to lose the original spring thrust washer. Also note that one of the bolts will be shorter. Therefore, be sure to remember the location of its seat.
- Using a caliper, measure the length of the spring at rest (should be at least 38 mm).
- Remove the cover on which you can remove the wear marks left by the gears. Deep scoring is a clear sign that the oil pump is worn out. Repairing the cover involves leveling the mating plane.
- Remove the oil pump drive gear from the housing. Check the condition of the teeth and shaft. Scratches and abrasions indicate wear. In the driven gear, additionally evaluate the condition of the fixation axis hole.
- Check the walls of the oil pump housing and the driven gear axis. Furrows and potholes indicate that debris has entered the work area.
Cold engine measurements
In order to measure the pressure, before starting the engine, you need to make sure that the oil temperature is equal to the ambient temperature. The emergency sensor in the VAZ is configured to trigger at a pressure of 0.33 kgf per square centimeter. If the measurement result turns out to be like this, then it is necessary to dismantle the pump and troubleshoot it. With a gradual increase in the crankshaft speed, the pressure should increase to 4.5 kgf per square centimeter. The pressure relief valve should work, so the pressure will not increase further.
Checking pressure with a pressure gauge
Screwing in a mechanical pressure gauge instead of the oil pressure sensor is the only reliable way to check the oil pump without removing it from the engine. You can buy a ready-made kit for measuring pressure in the oil system or assemble the device yourself. For this you will need:
- liquid mechanical pressure gauge. The device can be easily found in almost every auto parts store for domestic equipment and tractors. Any industrial pressure gauge with an adequate measuring scale will also work;
- an adapter that will be screwed in instead of the standard oil pressure sensor. The mating part must have a fitting for a hose or a thread with a landing cone for screwing in a flexible tube. Any turner can turn such an adapter. You will need to measure the diameter of the mounting hole, the thread pitch and make a sketch of the adapter. An alternative option is to bring a standard oil pressure sensor to a turner so that he can make an adapter in its likeness. Some drivers, in order to check the oil pump, drill out the insides of the old oil pressure sensor and use improvised means to make an adapter from it. It is much easier in this regard for owners of VAZ cars, for which ready-made tees are available for sale. You can simultaneously screw in both a standard pressure sensor and a mechanical pressure gauge;
- a piece of hose that will connect the pressure gauge and adapter.
The diameter of the hose and the type of connection of the flexible tube should be selected taking into account the type of outlet fitting on the pressure gauge. It is important that during the measurement process there are no oil leaks at the joints.
Measuring technique
The method for checking oil pressure will be identical for all cars. The only difference is the threshold minimum value, upon reaching which the low oil pressure warning lamp lights up on the dashboard. Information about the response threshold of the pressure relief valve and the minimum operating pressure in the engine lubrication system can be found in the repair and maintenance manual for your vehicle. The data below is relevant for VAZ classic models (2101, 2102, 2103, 2104, 2105, 2106, 2107).
- Cold pressure. Before starting, the engine and oil in the sump must cool to ambient temperature. The response threshold of the emergency oil pressure sensor is 0.33 kgf/cm2. With this value, the engine must be turned off and disassembled to troubleshoot the oil pump. When the speed increases, the pressure gauge needle should rise to 4.5 kgf/cm2. At this pressure, a serviceable pressure relief valve is activated, so no further increase should occur.
- Measurements on a warm engine. As the oil temperature decreases, its viscosity increases, which has a positive effect on the performance of the oil pump. Therefore, it is best to check the oil pump when it is hot. Since the oil warms up more slowly than antifreeze, let the engine run for another 5 minutes after the coolant temperature gauge shows 90°C.
Article on the topic: Full and partial automatic transmission oil change - which is better?
In the lubrication system of a serviceable VAZ 2101-07 engine at 5600 rpm there should be a pressure of 3.5-4.5 kgf/cm2. If the obtained values differ significantly from the nominal values, the engine will experience oil starvation in certain modes. The low oil pressure light on the instrument panel will come on. In this case, we recommend disassembling and checking the oil pump.
You should not rely on the standard pressure indicators of VAZ and UAZ cars. In 90 out of 100 cases they show anything but the actual oil pressure in the engine.
On a hot engine
As the oil temperature drops, its viscosity rises. This is good for efficient pump operation. To obtain adequate measurement results, it is best to measure pressure on a warm engine. Since the oil heats up much more slowly than the coolant, the engine is allowed to run a little longer after reaching operating temperatures.
In the lubrication system of a working engine with a working pump, the pressure should be in the range of 3.5-4.5 kgf per square centimeter at a crankshaft speed of 5600. If the measurement values differ from the nominal value, then the engine will experience a lack of lubrication in some modes.
VAZ 2106 engine lubrication system
The lubrication system of any engine is a complex of various elements and parts that allow high-quality maintenance of the power unit. As you know, the key to successful engine operation is proper lubrication so that the moving parts do not wear out for as long as possible.
On VAZ 2106 cars, the lubrication system is considered combined, since the rubbing parts of the engine are lubricated in two ways:
- through splashing;
- under pressure.
The minimum oil pressure in the system at an engine operating temperature of 85–90 degrees should be 3.5 kgf/cm2, the maximum - 4.5 kgf/cm2.
The total capacity of the entire system is 3.75 liters. The lubrication system on the “six” consists of the following components, each of which consumes or conducts its own part of the oil:
- fluid sump;
- level indicator;
- pumping unit;
- engine oil supply pipe;
- oil filter element;
- valve;
- oil pressure sensors;
- highways.
The oil pump plays a vital role in the operation of the entire lubrication system. This device is designed to ensure continuous circulation of oil throughout all components of the system.
Troubleshooting and repair of a removed element
Let's look at how to test a removed oil pump. The check consists of visual inspection, measurements and comparison of the measurement result with the nominal dimensions.
Unscrew the oil receiver cap together with the pressure reducing valve. It is worth making an effort so that the spring thrust washer does not get lost. Next, note that some bolts will be smaller than others. This bolt should then snap back into place.
Use a caliper to measure the spring. At rest, it should be at least 38 millimeters in length. Then remove the cover, which will have marks from the wear of the gears. If the scoring is deep, then the oil pump has a lot of wear. The cover can be repaired - its plane should be leveled.
Next, remove the drive gear and visually check the condition of its teeth. If there are abrasions and burrs on the teeth, this indicates a lot of wear. The driven gear should also be checked. The main thing about it is the hole in which the fixation axis is located.
Then check the walls of the device housing and the axis of the driven gear. Potholes, grooves, and various defects indicate that debris has entered the working area inside the pump.
VAZ 2107 Oil pump
Oil pump
Removing and installing the pump
|
Oil pump overhaul
Injection engine oil pump parts
The illustration above shows the oil pump of an injection engine. A carburetor engine uses the same parts, only the gears have a different design.
Measuring the axial clearance of the pump gears using a steel ruler (1) and a feeler gauge (2). |
- Insert a narrow feeler gauge between the outside of the outer gear and the housing hole. The gap should not exceed 0.20 mm. The illustration below shows the measurement. Also, as shown in the illustration, measure the gap between the teeth lying together. The gap should be less than 0.18 mm.
| Measuring the gaps between the external pump gear and the hole (1), as well as between the pump gear teeth (2). |
- The carburetor engine pump has a crescent-shaped liner inserted into the housing. For such a pump, measure the clearances between the liner and the teeth of the corresponding gear and compare with the data given in the Specifications.
- If the measured values exceed the wear limit, either the pump gears or the camshaft cover must be replaced. Reassembling the oil pump is carried out in reverse order. Insert the gears according to the markings. On an internal pump gear on a carbureted engine, the side of the gear with the outer groove must be visible before installing the pump cover. Before installation, lubricate the pump gears well so that the pump does not jam when the engine is first started. If the pressure reducing valve parts have been replaced, the condition of the valve piston hole should be checked. Screw in the plug with a new gasket and tighten with a force of 50 - 70 N•m (for an injection engine) or 40 - 60 N•m (for a carburetor engine).
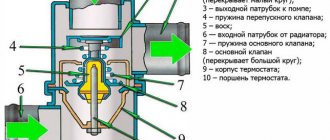
Pressure reducing valve
There are practically no methods that allow you to check the oil pump pressure relief valve without the need for dismantling. But you can check it with your mouth - even experts recommend using this method. A cloth is applied to the valve fitting, through which air passes well. Next, take a sharp breath. If there is strong resistance, then the valve is working.
Bottom line
Self-repair of a car is allowed only after studying the mechanism. Having learned how to check the oil pump, you can independently determine the cause of the pressure drop inside the system. However, it is better to entrust complete repairs and troubleshooting of the device to a qualified specialist.
Sources
- https://autoexpert174.ru/vidy-ustrojstvo-masljanogo-nasosa-dvigatelja-diagnostika/
- https://FB.ru/article/402092/kak-proverit-maslyanyiy-nasos-sposobyi-proverki-remont-sovetyi-spetsialistov
- https://masladvig.ru/kak-proverit-maslyanyy-nasos-diagnostika-i-sovety/
- https://carnovato.ru/zamena-maslyanogo-nasosa/
- https://autolirika.ru/soveti/kak-proverit-maslyanyj-nasos.html
[collapse]