What is a thermostat, device, service life
Every modern car has a thermostat. This is the same consumable as a timing belt, oil or filters. Therefore, the service life of the part is short, as a rule - no more than 2-3 years or 30-45 thousand km of vehicle mileage.
The main purpose of the thermostat is to maintain the desired temperature in the closed circuits of the cooling unit. Essentially, it is a valve that responds to a certain temperature. Its task is to first open the small cooling circuit so that during startup the engine heats up faster to 80-90 degrees. The valve then opens a large circuit, protecting the engine from overheating. Thus, the principle of operation of this element is very universal. In addition, thanks to it, the car consumes less fuel and reduces the amount of harmful substances in the exhaust.
The thermostat is designed simply:
- durable body;
- copper or brass reservoir with wax-based liquid;
- rod (rod);
- oil seals (seals);
- spring;
- valve.
The liquid inside the part is special. It is heat-sensitive, and when heated above 82°C, it begins to expand and squeeze out the rod, which is supported on the back side by a spring. This opens the valve through which antifreeze enters the large circuit. And when the degree drops, the wax hardens and the spring pushes the rod back. The valve closes, the liquid flows only in a small circle.
How to replace a thermostat
The best way to perform repair work - if this is your first time replacing the part yourself - is to use the service manual for your specific make and model of vehicle.
However, the following ten tips may be sufficient for replacement in many models since the unit is easily accessible and you may not need to remove components other than some parts from the air filter assembly.
If you still need help, the manual provides a step-by-step procedure for replacing this item for your specific model, how to handle components that may block access to the thermostat housing, torque specifications, and the bleed process for your vehicle if necessary.
Buy an inexpensive, secondary copy online, like this Haynes Guide, from Amazon. It comes with many step-by-step procedures for many maintenance, troubleshooting and replacement tasks to help you in the future. Thus, the management pays for itself in a few days.
When following the service manual, pay attention to the following important tips to avoid potential repair problems associated with its replacement.
In what cases is replacement necessary?
Replacement of the thermostat is required in cases of its malfunction. There are several types of valve problems:
- jammed (stopped) in the closed position - the liquid circulates exclusively in a small circle, which leads to rapid overheating of the engine and increased wear of the pistons, liners and other internal elements;
- working only in the open position is the opposite situation, when the antifreeze constantly circulates in a large circle, which is safer in terms of overheating, but the engine does not warm up to operating temperature (in winter this is generally not acceptable and the engine is again under attack, since it can lift the walls of the unit’s cylinders ).
There are several reasons for failure. As a rule, the product's lifespan ends. It is also possible that the heat-sensitive filler will lose its original properties. It is not uncommon for the seals to be damaged, which causes the valve to not close tightly.
Subtleties of installing a new device
Doing the installation yourself is not difficult. When connecting the thermostat, you must follow a sequence similar to removing the thermostat, only in reverse order. During installation, it is important to avoid distortions and debris.
Control of nominal thermostat temperature
Before purchasing a new product, you should make sure that its parameters match the factory recommendations. Information about the thermostat is present on its body. It must match the previously installed thermostat.
Replacing the thermostat in a timely manner will save you from troubles on the road, so the car owner should be attentive to signs of overheating. Otherwise, he will soon have to undergo a major overhaul of the power plant.
If you have any questions, leave them in the comments below the article. We or our visitors will be happy to answer them
Symptoms of a problem
Overheating of the power plant is the main sign by which a thermostat malfunction is determined. The coolant temperature arrow rises to the red zone; other sensors on the dashboard can also signal overheating. In winter, the stove will take longer to warm up the interior of the car.
On the other hand, overheating can be caused by other reasons:
- low antifreeze level;
- violation of the tightness of the system;
- low timing belt tension;
- damage to the radiator, pump or other related elements.
Fault diagnosis
It turns out that if the engine quickly overheats or its temperature does not reach 80-90 degrees, the thermostat is faulty? You could say this. However, to confirm the symptom it is necessary to conduct a full diagnosis. Below is how they do it.
- Start the engine.
- Feel all the highways. The pump hose must be hot. On the contrary, the pipe that goes to the radiator should be cold.
- After heating the engine to 90 degrees, turn it off, recheck the hoses, as well as the bottom of the radiator. This time all surfaces should be hot as a large cooling loop opens. Replacing the engine thermostat will be required if, as the internal combustion engine warms up, the temperature of the lines coming from the valve is approximately the same.
And of course, if it is not possible to warm up the engine or it takes too long, the valve again needs to be replaced.
Another way to check the device involves removing the thermostat. Then you need to lower it into some container, fill it with cold water and put it on the stove to heat up. As soon as the liquid begins to boil, a working valve should make a loud click, indicating that it is opening. If this does not happen, you need to install a new part.
Installing a thermostat
It is important not only to choose the right model correctly, but also to install it correctly. The heating system must continue to operate when the coolant supply to the radiator is stopped. For this:
- In a one-pipe system, a special jumper is additionally connected - a bypass. The valve is mounted on the upper pipe. To replace or repair the battery or thermostat, ball valves are installed on the upper and lower pipes.
- In a two-pipe system, only shut-off valves at the inlet and outlet of the radiator are sufficient.
USEFUL INFORMATION: Calculation of the number of heating radiators by area and volume of the room
It is better to carry out work in the warm season, since you will have to drain the water from the heating system. In apartment buildings, mandatory coordination of this event with the management company is required.
The algorithm for further actions is as follows:
- After draining the coolant, cut off the pipes leading to the radiator.
- With a single-pipe connection, a bypass is installed.
- Ball valves are installed on the supply and return pipes.
- Install the thermostat.
Due to their low cost and simplicity, bellows thermostats are the most commonly used. They are installed as follows:
- The device is oriented according to the arrow marked on its body. It shows the direction of movement of the coolant. First, its stationary part is mounted, onto which the rotating head is then put on.
- The valve is attached to the supply pipe using an “American” coupling (coupling with a union nut): this makes it easier to remove it if necessary.
The valve must be installed horizontally! Otherwise, the warm air rising from the pipe will heat the bellows, which will lead to incorrect operation of the device.
- Connection to the battery is made via a threaded connection. Tightness is achieved using sanitary flax or special sealing tape.
- After removing the protective cap, install the bellows head. It is fixed with a nut, which is tightened with a spanner. Another option is snap-on heads. They can be easily put on by turning them to the maximum opening position and pressing until they click.
At the final stage, the piping is fully assembled and the entire system is checked for leaks, filling it with coolant.
The installation steps are shown in the video.
Replacement process
The thermostat cannot be repaired, since the part is not repairable. In rare cases, replacing the thermostat valve may help. Therefore, in case of any malfunctions, it is better to install a new one. And this consumable is not expensive, it costs only 1000 rubles. Below are details on how to do it yourself. Before the procedure, be sure to drain the antifreeze and cool the engine.
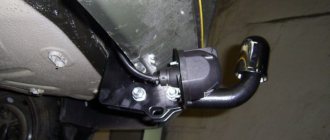
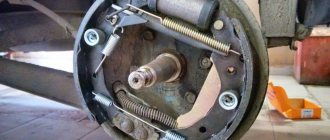
where is the device located
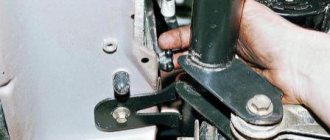
If the part is located in the section of the pipes:
- Remove the battery with the platform.
- Loosen the clamps.
- Pull off the pipes.
- Dismantle the device.
- Check hoses for cracks and other damage.
- Install a new valve, also replacing the clamps.
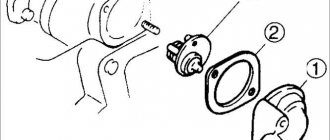
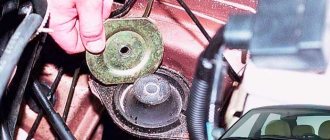
Replacement option when the device is located in the cylinder head:
- Unscrew the fasteners on the top cover using a wrench or sockets.
- Pull out the device.
- Cover the opening on the engine with a clean rag to prevent debris from getting inside.
- Install a new consumable, be sure to replace its gasket or apply a fresh layer of sealant (pre-clean the seat using a knife, fine sandpaper or a regular plastic scraper).
That's all - all that remains is to fill in new antifreeze in a volume corresponding to the engine model.
Attention! To quickly determine the location of the thermostat, you need to walk your hand along the upper radiator hose, towards the engine. On some cars, to do this, you will have to remove the air filter.
How to change a thermostat
If you know it's broken, replace it using these tips. However, if you don't know if it's faulty, refer to this other article on thermostat troubleshooting.
| Index |
| Some tools you may need and the sequence of replacement work |
| 1. Cool the engine |
| 2. Drain some coolant |
| 3. Gain access to the case |
| 4. Use appropriate tool to remove screws |
| 5. Remove the housing |
| 6. Check its functionality |
| 7. Clean adjacent surfaces on the motor housing |
| 8. Buy a new one |
| 9. Use the appropriate model for your car with the same temperature readings |
| 10. Install new |
Warning!
When replacing, always operate on a cold engine to avoid serious skin burns.
| Some Tools You May Need |
| * Floor jack if necessary |
| * Set of ratchets and hexagon |
| * Standard slotted and Phillips screwdriver |
| * Rags (rags) |
| * Plastic scraper |
| * Fresh coolant |
| * Wrench |
A stuck thermostat can overheat and seriously damage your car's engine.
After replacing the thermostat: recommendations
The expansion tank should be filled until the fluid level reaches the maximum level. You need to pour slowly, through a funnel - this will prevent airing in the system.
It is recommended to then run the engine in test mode so that it runs for about 5 minutes at high speeds (1500-2000). If the antifreeze level drops, you need to add it in the required amount. After this, replace the expansion tank cap and warm up the power unit until the fan turns on. It is important to do this right away in order to bleed any air that may have entered the system with antifreeze.
Choosing places to install thermostats
The operation of these devices is adversely affected by:
- Direct sunlight.
- Devices that generate heat during operation.
- Difficult air circulation: the thermostat should not be covered with curtains, drapes or decorative grilles.
It is not always possible to install thermostats on all heating radiators in an apartment. Where to put them first in this case:
- In private multi-storey buildings - for batteries on the upper tiers. Warm air in a room rises, so the temperature on the second and third floors will be higher than on the first.
- In apartments and one-story houses, first of all, thermostats are installed on batteries located closer to the heating boiler.
If access to the device is difficult, it is covered with interior items, then choose a product with a remote temperature sensor.