Experienced motorists can give thousands of examples when mud, ice or deep snow prevent the successful completion of a trip. The power of the driving wheels is powerless in such situations - only a tug or a winch. After such unpleasant moments, some owners refuse to travel in bad weather, while others decide studded tires . However, there is another category of drivers who prefer to independently manufacture additional equipment to increase cross-country ability.
Design features of homemade chains for car wheels
The basic design is a simple structure that consists of a set of steel links or reinforced wire. Uniform distribution of components over the entire tire area is the key to successful operation of the product.
Classic DIY snow chains in the video look like two elements that are located longitudinally along the radius of the wheel on the outer and inner sides. They are connected to each other by transverse parts, the so-called lugs. The manufacturing method is not difficult even for novice motorists. The arrangement of parts is carried out according to three schemes:
Each of the above types has its own disadvantages and advantages. The first option with a “ladder” is the most affordable in financial terms, as well as in terms of labor costs. No less interesting is the solution with bracelets, which are also convenient when installed on a wheel.
Things to remember
The use of anti-slip chains is prohibited when driving on hard-surfaced roads (concrete, asphalt). In conditions of loose snow or soil, it is recommended to maintain a speed of 10-20 km/h. Wheel slip must not be allowed.
After installing the anti-slip device, after driving the first 100 meters, you should stop and check the reliability of its fixation, as well as the tension around the entire perimeter. A poorly tensioned chain can cause damage to suspension and steering components.
What is needed to make homemade car snow chains for wheels?
The inability to purchase factory-made devices that increase cross-country ability, as well as their high price, push car enthusiasts to solve the problem on their own. It should be noted that this is a completely reasonable choice - the necessary components can be found in any hardware store, and every self-respecting driver has a minimum set of tools.
It should be said that information on how to make snow chains with your own hands and videos include a list of design elements. Let's focus on the simplest model, made according to the “ladder” scheme. To implement it you will need:
- chain with a cross section of at least 5 mm made of steel;
- carabiners with a threaded coupling;
- tension mechanism;
- washers, bolts and nuts;
- hooks, carbines.
On average, about 15 meters of chain ; more accurate figures will be known only after specific measurements.
It is recommended to use stainless metal hardware as chains. The preparatory process ends with the collection of tools:
What are snow chains for?
Anti-slip chains will turn an average car into an all-terrain vehicle. They increase the car's grip on any road surface. With such chains, the car is not afraid of any obstacles : neither dirty slurry, nor slippery ice, nor high snowdrifts.
The main advantage of such devices is that they can be used in case of urgent need . For example, you went fishing. At first we moved along an asphalt road, and then drove onto a country road. Then an unexpected obstacle arose - the road was washed away by rain. In this case, simply remove the snow chains and fasten them to the wheels . Now you can go.
Always keep these devices in the trunk of your car for use in an emergency. They will be useful to owners not only of jeeps and SUVs , but also of ordinary cars .
Caution: Use chains in exceptional situations when it is necessary to increase the vehicle's maneuverability. Do not use such devices on a regular basis - this will negatively affect the condition of the car.
We study the process: how to make snow chains for cars with your own hands and video of working moments
Experienced motorists assure that at critical moments a cable or even simple rigging comes to the rescue. You can simply wrap them around a wheel, another question is that such things are not always at hand. Moreover, this method is strictly contraindicated for cars equipped with a disc brake system. Therefore, it is better to be patient in advance and make a “chain body kit” yourself.
When making snow chains with your own hands using available videos, where the footage of the blanks is not always indicated, it is important to make accurate measurements of the radius and width of the tire. Based on the results obtained, calculate the parameters of the future product. The number of transverse elements ( lugs ) is also selected individually for each car model. Experts recommend focusing on the fact that there should be two transverse parts at once in the plane of the contact patch of the coated rubber.
The procedure for assembling a device to increase cross-country ability consists of performing the following points:
- cut longitudinal and transverse chain blanks with a grinder;
- secure the first transverse element to the 6th link of the longitudinal part using bolts and washers, hooks or welding;
- mount all subsequent crossbars every 8-9 links;
- in the center of one longitudinal element, install a segment consisting of 6-8 links and a tension device to securely fix the product;
- Install carabiners with a diameter of at least 5 mm at the ends of the longitudinal sections.
If you have certain skills and tools, the operation will take about 40-60 minutes. It will be useful to have experience in welding work, which will allow you to avoid threaded connections in practice, which will have a positive effect on the quality of the device.
Making snow chains: sequence of actions
Many car enthusiasts value their work, so they resort to solving the problem of lack of lugs on their own.
Required tools and equipment
Before carrying out the relevant work, you must first make sure that you have the appropriate materials and tools. You can watch the process of making snow chains on video, but the disadvantage of videos is the lack of information about the necessary equipment.
To make a simple “Ladder” type chain, you will need the following materials:
- Steel chain. The thickness of the reinforcement must be at least 5 mm.
- Carabiners with a coupling and thread. Products with latches are not suitable for making lugs.
- Chain tension device.
- Bolts, nuts and washers.
- Hooks.
For the manufacture of snow chains, carabiners with a coupling and thread are required
The main material is a chain, the length of which for two middle wheels with a diameter of R15 must be at least 15 meters. Buying a chain separately and making a lug from it yourself is much cheaper than purchasing a finished product.
To make lugs, you will also need a set of tools:
- Vise;
- Grinder with a circle for metal;
- Roulette;
- Hammer;
- Wrenches for tightening bolts and nuts.
As you can see, the supply of materials and tools is insignificant, so after preparation, you can begin making snow chains.
Step-by-step instruction
The manufacturing procedure involves performing the following steps:
- Measuring the circumference of a tire. This is necessary in order to make two rings from a chain of the appropriate diameter. There is one important point here: the length should be such that the chain lies at half the width of the tire, as shown in the photo below.
To determine the length of the chain, it is necessary to close the chain at the imaginary center of the wheel
To determine the width of the cross links, you need to take measurements using a tape measure
If there are no carabiners, the links can be secured with bolts, nuts and washers
To use chains effectively, the distance between adjacent links should be approximately the same
To simplify the procedure for installing chains, elastic bands with hooks at the ends are used
If you follow the instructions correctly, you should get the following circuit design
Such a homemade device does not take up much space in the trunk, and its production will take no more than 2 hours. By analogy, a chain is made for the second wheel. For all-wheel drive SUVs, chains must be placed on all wheels. On single-wheel drive vehicles, the chains are located exclusively on the drive wheels.
Details: which locks on homemade snow chains are better and why?
When making traction control devices in garage conditions, drivers most often use the following types of locking mechanisms to secure them to the tire:
- S-shaped;
- hook-shaped;
- with ratchet mechanism.
Some homemade wheel chains are equipped with an S-shaped lock structure, which is locked with a four- or hex key. However, many complain about unreliable fixation and lack of adjustments for this option. In addition, installing such equipment is a complete inconvenience.
The second option for fixing the chain device is more common and holds quite well. If the chain is correctly laid, fastening can be done with a screwdriver without any problems. For a complete guarantee, car enthusiasts advise tying the contact point with 1-3 mm soft wire. Disassembly of the equipment also occurs quickly without much effort.
The ratchet lock model was previously used on trucks. It is characterized by high reliability and ease of operation. The sample provides fixation without the use of additional materials.
Chains vs bracelets
In Moscow and other cities, people rarely see a car whose wheels are enclosed in chains. They are not intended for flat areas and asphalt. This is the prerogative of trophy fans.
Snow chains are a braid of chains that cover the tires in several rows and are combined into a pattern. This is basically a ladder or honeycomb. With its help, the vehicle's cross-country ability is increased.
If the driver knows about a difficult section of the road ahead, he takes the chain out of the trunk, takes a jack, lifts the car, hangs the wheel, puts the anti-skid structure on it and drives off.
Many believe that chains have better grip compared to bracelets. Here I agree only partially. Yes, on a long trip, if everything is icy or is completely off-road, the chains feel at ease. Bracelets are not capable of this. They are used for periodic use and covering 5-10 kilometers.
Objective arguments
Although chains work better than bracelets in certain situations, the latter have objective advantages over their competitors.
In order not to be unfounded, I will present these arguments. And you write in the comments whether you agree with them or not. Let's begin.
- The chains cannot be put on when the car is already stuck. To do this you need to jack up the wheel. For a bracelet this is not a problem;
- When they get into the mess, chains with solid patterns begin to dig a hole. The car ends up hanging on its belly. Bracelets are also capable of this, but the degree of risk is much lower due to the smaller adhesion area;
- The bracelets are universal and fit different cars of the same category. Chains are ordered individually, depending on what model of car you have;
- Owners of bracelets can more easily figure out how to put on devices. Plus they take up less trunk space than a chain;
- If a chain link comes off, it poses a threat to the body and wheel arches. The paintwork deteriorates, the corrosion process begins, you have to buy rust converters and perform minor body repairs.
Now we can draw conclusions. If you plan to drive far through a swamp, deep snow, or icy roads that have not been cleared, then it is logical to take chains.
For main use in the city, with rare trips outside of it and with certain risks of getting stuck somewhere, definitely take a bracelet.
How to install snow chains on a car with your own hands and video operation
Experts recommend installing traction control equipment on all wheels, and not just on the drive ones. Incorrect installation can lead to damage to ABS sensors, brake system components and wheel arch liners, as well as side tire cuts . On SUVs with a plug-in second axle, the device is installed primarily on the pair that is constantly in operation. The installation operation is performed in two ways:
- With jacking.
- On a stationary car.
Alternative options
Automotive stores sell traction control bracelets - a worthy alternative to chain equipment. They are distinguished by the possibility of quick installation and low price. But even here the engineering thought of our motorists does not stand still; they have skillfully learned to copy factory copies.
Bracelets are the same homemade snow chains , but without longitudinal elements, their advantages are as follows:
- Ease of manufacture.
- Quick installation.
- High efficiency and reliability.
To make it you will need a modest kit:
- VAZ muffler mounting element made of rubber;
- bolts 40-60 mm long, washers and nuts;
- a tube with a diameter equal to the diameter of the bolt;
- steel chain with a diameter of at least 5-6 mm.
To equip wheels with standard sizes 195 and 205 mm, 4-5 meters of hardware products will be required. Stores also sell ready-made kits for self-assembly of bracelets, with the exception of Chinese kits, they are of fairly decent quality and inexpensive. It consists of:
- blanks;
- fastening accessories;
- sling;
- clamp lock.
The kit is easy to use, transported in a special case and does not take up much extra space. An important advantage of metal bracelets is the possibility of installation on wheels with disc brakes. And if you take into account the reviews, then owners of expensive foreign cars do not hesitate to use such devices, which also says a lot.
Important to remember
Any traction control equipment adversely affects the safety of tires, as well as the condition of the chassis. You need to be especially careful when choosing locks for homemade chains on car wheels , since the trouble-free operation of the car depends on them.
Moving on hard surfaces is unacceptable. When driving on loose snow or mud, you should maintain a driving speed of 20-30 km/h; it is not recommended to allow wheels to slip. Experienced drivers advise periodically checking the tension of the equipment along the entire inner and outer perimeter of the tire while driving.
Varieties and classes
The products differ in several ways.
Types by material type
There are 2 groups:
- hard;
- soft.
In the first, each element is a metal chain. Materials used:
- steel, incl. stainless steel (expensive option);
- aluminum;
- titanium (elite body kit, made to order).
Advantages of rigid equipment:
- durability;
- increased cross-country ability.
Flaws:
- significant wear of tires and vehicle mechanisms (suspension, steering column, gearbox, etc.);
- ban on movement on asphalt;
- speed limit (no more than 40 km/h);
- loud noise;
- heavy weight;
- increased requirements for reliability (if the chain breaks, it can seriously damage the car and cause an accident).
The soft body kit is made from the following materials:
- rubber;
- plastics;
- polyurethane.
The product is reinforced with wire. There are models with metal spikes. They do not have the disadvantages of hard chains (they harm tires less, are quiet and allow you to accelerate to 80 km/h), but are inferior in cross-country ability and last only a few years.
Types according to the picture
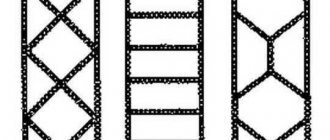
The most common 3 types:
- "Ladder".
- "Rhombus".
- "Honeycombs".
Advantages of the "ladder":
- simplicity of design;
- low cost;
- high traction force.
Flaws:
- vibrations while the vehicle is moving, causing overloads of the transmission, suspension and other mechanisms;
- poor grip in the transverse direction;
- difficulty getting the car out of a rut.
“Rhombus” is more complex and costs more. Its advantages:
- confident way out of a rut;
- good handling.
Flaws:
- weak grip in the transverse direction;
- low traction force;
- vibration loads on the chassis.
The most expensive and difficult to manufacture are “honeycombs”. They are also the most practical. A car with the following equipment:
- confidently gets out of the rut;
- moves smoothly on dense soil;
- easy to operate;
- does not slide to the side (due to good adhesion in the transverse direction).
There is only 1 drawback: the “honeycomb” is somewhat inferior in traction force to the “ladder”.
How to make snow chains for the wheels of a passenger car and crossover: 3 schemes
The draft version of the manual included a step-by-step description of the manufacture of three types of chains: ladder, honeycomb and diamond. The material turned out to be quite voluminous and we were struck by the idea of presenting the information in a compiled form. Considering that a number of operations in the manufacture of each of the three patterns are the same, you can roll out detailed instructions for one of the weaving technologies, and only make notes on the rest. They decided to take a “rhombus” as the basis, and describe the manufacturing process of the “ladder” and “honeycomb” on the basis of the “diamond”.
DIY "Rhombus"
The difficulty of making a homemade chain is that a number of simple things are unknown. For example, it is not clear how long each of the components of the future product should be; how long to make the same cable or chain located on the sides of the wheel... We suggest that all experiments be carried out in relation to a specific car. Then the percentage of errors is lower and the result is obvious.
Our colleague Alexander M. happily agreed to share the developments that he implemented in his Jeep Grand Cherokee. The car is equipped with 245/75 R16 tires, the pattern of the future chain is “diamond”, the connection of the sections is cable. We remove one of the wheels and begin:
- We lay out the chain on one side of the tire. This will help to roughly estimate the number of links included in each of the elements of the diamond-shaped pattern. For ease of marking, use rope and electrical tape. You can use a rope to tie the product along the contour of the side part, and with insulation you can wrap the outer links to be connected with a cable on the sides and rings in the middle.
- We make the mirror part of the resulting circuit. The snow chain conventionally consists of two parts: front and rear or left and right. In point No. 1 we designed the front part. To obtain the back one, it is necessary to mirror the already obtained section or, more simply, measure the same segment of the chain, marking the boundary connection points on it.
- We connect the resulting two halves together. The easiest way to do this is with jump rings. If these are not available, then you can use one of the chain links by disconnecting it. The reverse fixation of the link must be permanent, so welding is indispensable.
- Place the chain on the wheel.
- Measure the required length of the cables located on the sides of the tire. To calculate the exact footage, use a rope to tie the chain front and back.
- Place the turnbuckle eyelet on the front cable.
- Process the ends of both cables by putting thimbles on them and clamping them tightly with clamps.
- Try on the resulting structure again, tying the junction of the ends of the cables with a rope and using a lanyard.
- Replace the rope with a shuckle if the lanyard provides a secure hold, and the homemade version is ready for combat use.
Important! The lanyard must be tied diagonally.
Homemade "honeycomb"
Diamond shapes alternating with straight sections are made by analogy with a diamond-shaped snow chain. First, try on the outer part, which consists of half-diamonds and straight sections on the tire tread. If connecting rings are not used, the outer pattern will consist of a continuous piece of chain. The mirror part here is not solid - it includes small sections that, together with the upper semi-finished product, form a diamond-shaped structure.
The separation point is still located at the peripheral vertices of the diamond. If you want to use chain ties instead of cable ties, you need to stock up on 10 brackets, in three different configurations. In a budget option, the brackets can be replaced with bolts with large washers. And if you are pursuing the goal of creating an indestructible design based on Soviet snow chains, then replace the lanyard with a full-fledged square lock. From the photo it is clear that in design terms this solution is simple: two disks (aluminum can be used) are riveted together. On the same axes there are whiskers (only steel ones).
"Ladder" at home
We left the most traction performance, as they say, for a snack. For two reasons. The ladder is the easiest option for self-production and at the same time the least popular off-road weaving scheme according to known prerequisites.
During manufacturing, it is important to follow a number of rules. For example, it is customary to connect transverse sections here not with a cable, but with a chain. The fact is that the cable tie greatly complicates the installation, to the point that the wheel must be removed, and even lowered, otherwise there is no other way. Otherwise, everything is extremely simple. It is enough to cut 13-15 equal pieces of chain, fasten them with a chain, make a lock or use a lanyard (again, only in the diagonal direction), and the device is ready for use.
Any experienced car enthusiast has had unpleasant moments when the driving wheels of the car began to slip in mud, ice or deep snow.
It is often almost impossible to get out of such situations on your own - only with the help of another vehicle. What are our colleagues doing? Some people buy tires with studs after such incidents, others simply park their car during natural disasters. But there is another category of motorists who use homemade wheel chains and, I must say, quite successfully.
Snow chain test
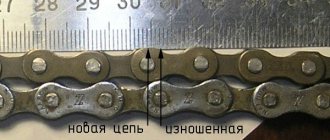
The manufactured device must be tested in action to ensure its reliability and effectiveness. It is worth remembering that the effectiveness of the product depends not only on the number of links available, but also on the size of the chain used. The larger the chain size, the higher the vehicle's cross-country ability.
To test your snow chain, all you have to do is wait for bad weather and then rush to an area where there is no traffic. After installing the chain on the drive wheels, it is necessary to overcome various obstacles in the form of snow slides, icy sections of the road surface, and swamps. After overcoming each obstacle, it is necessary to check the location of the product on the wheels.
It is important! During testing, damage to chain links may occur, so be sure to regularly check their condition.
If after testing the results are pleasing to the eye, then you can try to overcome obstacles without chains on the wheels. The result is sure to amaze, and snow chains will become an indispensable attribute in the trunk of your car.
As a conclusion, it should be noted that snow chains are not installed so that the car stands out on the road. In addition to improved cross-country ability, the chains ensure the safety of the driver and passengers on the road in adverse weather conditions. With the presence of such devices on the wheels of your car, you have a chance to overcome an obstacle or escape from a snow drift.
Experienced motorists can give thousands of examples when mud, ice or deep snow prevent the successful completion of a trip. The power of the driving wheels is powerless in such situations - only a tug or a winch. After such unpleasant moments, some owners refuse to travel in bad weather, others install studded tires . However, there is another category of drivers who prefer to independently manufacture additional equipment to increase cross-country ability.
Design and types of anti-skid means
These devices are based on a simple design consisting of steel links or reinforced wire. A successful application is to distribute the elements evenly over the entire radius of the tire. Failure to comply with this condition may result in rupture of the product and loss of anti-slip properties. The classic scheme, tested by more than one generation of motorists, consists of internal and external components that run along the entire circumference of the tire. They are connected to each other by transverse parts, the so-called “lugs”. The technology for making a chain for wheels with your own hands is accessible even to beginners. Depending on the arrangement of structural elements, there are three types of devices :
- in the shape of a ladder;
- in the form of a honeycomb;
- in the shape of rhombuses.
Each type has its own advantages and disadvantages. In terms of labor costs, the first option is the most accessible - “ladder”.
Varieties of lugs according to geometric pattern
Depending on the geometry of the pattern, there are three types of snow chains:
Each option has its own advantages and disadvantages, so we will consider them in detail.
"Ladder"
The “ladder” is a base in the form of longitudinally arranged branches. These branches are evenly distributed around the entire circumference of the wheel. To secure the chain on the wheel, the appropriate type of locks are used. Externally, this type of lug resembles a ladder, which is where the name comes from.
This lug option is one of the most popular, effective and in demand. Among the disadvantages of this type of chain it is worth noting:
- parallel arrangement of chains on the wheel, so the car will dig in when overcoming snowy or soil areas;
- low lateral stability, which is also due to the parallel arrangement of the chain branches;
- heavy load on the transmission.
Despite the high raking properties, ladder-type chains are practically useless on snowy ground
It is recommended to use chains of this type only when it is necessary to overcome a risky section of the route. This option is one of the cheapest, so when the need arises, most drivers prefer this option without delving into its features.
The diamond lug design is a modernized "Ladder" design. For this purpose, there are longitudinal branches that form a diamond-shaped pattern, eliminating all the negative factors that are characteristic of the “Ladder”.
The geometric shape in the form of a diamond is intended for the use of lugs when it is necessary to overcome a snowy or swampy area. The diamond shape is shown in the photo below.
Diamond-shaped chains have increased strength and high traction characteristics
The diamond-shaped shape of snow chains is popular among SUVs and crossovers, since this type of pattern on the lug increases the vehicle's cross-country ability several times. This is especially true for snow-covered and icy road sections.
An analogue of a rhombus are “honeycombs”, which have transverse branches similar to a rhombus, but are additionally connected by straight connectors. Diamond and honeycomb are improved types of lugs, in which the products are in constant contact with the road surface. This is a big plus for both rubber and transmission, so when making lugs it is recommended to pay attention to the last two models.
“Honeycombs” ensure constant contact with the road, therefore giving the car a high level of lateral stability
It is also worth noting that when purchasing snow chains, you need to consider their size. The lugs produced in production are divided not only by size for wheels, but also depending on the type of car.
Making a simple homemade chain for car wheels
It is not always possible to purchase an anti-skid device - the high price and lack of availability of the required size forces car owners to solve such issues on their own. I must say that this is a pretty good choice - all the necessary components are always available in hardware stores. In a critical situation, you can simply try to wrap the tire with a cable or a piece of metal rigging, but not everyone carries such a kit with them. Moreover, for a disc brake system this option is absolutely contraindicated - such a design will disrupt the operation of the mechanisms. Therefore, it is worth preparing homemade wheel chains in advance, for which you will need :
- steel chain with a cross-section of at least 5 mm;
- hooks;
- carabiners with a screw-on coupling;
- tension device;
- bolts, nuts and washers.
The dimensions of the blanks depend on the dimensions of the tire used, so it is important to first measure the required indicators. The number of transverse parts is also individual - craftsmen recommend making sure that there are two “cross members” at once in the plane of contact of the tire with the ground. Thanks to this scheme, the traction characteristics and reliability of the entire product will increase. The process of preparatory actions and assembling chains on wheels with your own hands consists of the following points:
- cutting longitudinal blanks;
- cutting of transverse parts;
- securing the transverse element to the 6th link of the longitudinal chain;
- installation of subsequent “crossbars” every 9 links using rings or hooks;
- In the middle of one longitudinal workpiece, fasten a segment consisting of 6 links and a tensioning device with a hook.
As can be seen from the description, if you have certain skills and tools, the operation will take no more than 40 minutes. Those with experience in welding can put it into practice and abandon threaded connections, which will certainly affect the quality of the equipment.
After checking the reliability of the finished product, all that remains is to install it on the car.
Project of an anti-skid device for a car
Choosing a chain weaving pattern
Before purchasing and making anything, you need to have a project in hand: this principle underlies any serious invention and the tire chain is no exception.
When designing wheel attachments that improve your vehicle's ability to maneuver in snow, it is important to choose a weaving pattern that suits your needs. Ladder
Rhombus
Link size
Not just a drawing. The caliber of chain links also determines a number of important characteristics, including cross-country ability and durability. This way, a thin chain won’t last long, but a larger option may not fit into the wheel arch. Strictly speaking, in this matter you should not focus on just one parameter:
Accessories
When you see branded kits, it becomes clear that the anti-skid device does not consist of one chain at all. The design also provides:
What exactly can serve as one or another component is determined by the budget and range of equipment available. Here are examples for each of the three groups of fittings:
The listed accessories are the backbone of the anti-slip device. Depending on the manufacturing technology, a number of mandatory parts are selected:
How to install chains on wheels with your own hands
The anti-skid device is mounted primarily on the leading pair and this is done using two methods :
- directly on a stationary car;
- with jacking up the desired side.
The choice of method is up to the driver, but it is worth focusing on one recommendation - you need to think about installation in advance, even before entering a difficult area . This is the only way to avoid annoying mistakes and save a lot of time.
Installation method without jacking the car
Before you begin installing a homemade chain on car wheels , you should carefully lay it down, preventing the links from twisting. Next we proceed point by point:
- Drive the drive wheel onto the product.
- Put the car on the handbrake.
- Place the chain so that the tensioning device with hook and carabiner is on the outside.
- From the inside, connect the hook and the last link of the longitudinal element.
- From the outside, place the carabiner coupling onto the tensioning mechanism and secure it.
- Distribute the transverse parts and tighten them.
Installing a chain on car wheels with your own hands using a jack is similar to the technology described above, its only advantage is that it makes the task easier.
For a better installation, you must first reduce the tire pressure, but after the operation do not forget to restore normal parameters. This procedure will allow the product to fit as tightly as possible to the tire.
Features of installation on a car
Making chains is only half the battle. Now you need to install them correctly on the car. There are several ways to do this. The first of them involves jacking up the car. To do this, the driver should perform the following manipulations:
- Before an obstacle, you need to stop on a hard surface, then set the car in first gear and squeeze the handbrake;
- Using a jack, you need to hang up the part of the car on which you plan to install the chain;
- As soon as the wheel is hung, you should begin installing the lug;
- This process usually takes about 10-15 minutes for one wheel. In this case, you need to make sure that the chain is securely fastened.
The product is installed in a similar way on the second side and, if necessary, for all four wheels. The second option involves installing a chain without lifting the wheels:
- You need to stop, and then place chains on both sides in front of the wheels.
- Drive the chains to the middle of their size.
- Secure the product from the inside with a hook or carabiner.
- Straighten each link, then connect the tension adjuster.
If there is no jack, it is possible to run over chains lying on the ground
This option seems simple, but in reality it is not. After installing the chain on the wheel, you need to drive a few meters and then adjust the tension. Then you can storm the obstacles.
Alternative solutions
The thoughts of folk craftsmen do not stand still - and now they are offering an alternative solution: anti-slip bracelets . In principle, these are the same homemade metal chains for wheels, only with the difference in the absence of longitudinal elements . The advantages of bracelets are:
- ease of manufacture;
- quick installation;
- high reliability and efficiency.
So, what is needed for production:
- rubber mounting element for the VAZ muffler;
- metal chain with a diameter of at least 6 mm.
Tires with a width of 195 and 205 mm will require about 4 meters of chain. As you can see, the costs are minimal and you only need to cut the material to the required length. Another alternative option is kits for making DIY wheel bracelets using chains, which are quite affordable and of good quality (with the exception of Chinese ones).
The set consists of:
- chain blanks;
- fastening accessories;
- sling;
- clamping mechanism.
The kit is very easy to use and does not take up much space. An important plus is the possibility of use on cars with disc brakes . Judging by the reviews, owners of expensive SUVs do not hesitate to use it, which once again speaks of the practicality of the device. For more information on how to make snow bracelets with your own hands, watch the video:
Types of anti-slip chains according to the picture
Depending on the weaving pattern of the chain links, there are several types of devices. Their properties differ , so be careful when choosing.
Ladder
These are two circles of chains connected to each other by transverse segments . They got this name because from the outside these devices are very similar to a ladder.
This is the most inexpensive and easiest to manufacture option for snow chains. They also have some disadvantages :
In such devices, circles from chains are connected by segments not in a straight line, but diagonally crosswise. This produces a characteristic diamond-shaped pattern.
These anti-slip chains are ideal for driving in wetlands or deep snow . They are very durable and provide good grip .
Perfect for SUVs and off-road vehicles . They increase the vehicle's many times over
They are deprived of almost all the disadvantages of their “ladder” counterparts.
This pattern is obtained by connecting hexagons from chains together at the corners. There are hexagons in the center, and pentagons at the edges. Such devices have all the advantages of diamond-shaped ones , plus they add even greater lateral stability .