Outdoor temperature sensor
On the display of the instrument cluster, whether it is a dashboard manufactured by Avtopribor, there is such a parameter as “ambient air temperature”.
Many may think that the function is not particularly important, but in fact it is not. The outside temperature sensor performs its most useful function at the moment of the first frost. Having set out on the road during the day at above-zero temperatures, in the evening you can already get on ice on the street, of course, under certain circumstances. And it is by this sensor that you can be guided about possible problems with the road surface. It is worth noting that if the threshold of this value approaches the minus mark, then the display will automatically first show the temperature, and not the current time, fuel consumption or other parameters.
Problem with outside temperature readings
Hello, comrades! The climate was changing. More precisely, one of the temperature sensors. Here's what we have: - the temperature in the climate hangs at one value. For example, in the morning it was +13, he showed me that much. But during the day it became +27, and in the climate it was still +13. - the temperature may suddenly change to the real one. But the morning one can hang all day. — due to incorrect temperature, the climate control does not work correctly and the air conditioner does not start. — vag-com does not show any errors.
How can I determine which temperature sensor is faulty? Surely two of them are at least responsible for the exterior? Is the readings freezing - is it a sensor glitch, or could the wiring be faulty?
Help, friends, the question is urgent. Thank you.
Pointer Registration 01/24/2013 Address St. Petersburg Age 60 Messages 51
| Thank you: |
| Received: 1 Sent: 1 |
Replacing the air temperature sensor on a Priora
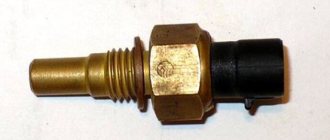
You can change the sensor yourself without any problems and will require a minimum of tools. But for greater convenience, you can remove the front bumper, although you can get by with less labor. So, we figured out where the street temperature sensor 2170 is located, now about the rest of the details.
Next, you need to remove the sensor from its seat in the radiator frame, applying a little force, since it sits on peculiar latches. Then you need to disconnect the block with the power wires from the air sensor. To do this, press the latch, as shown in the photo below:
And by slightly pulling to the side, we remove the block, which is clearly visible in the photo below.
The result is something like this:
Does fuel consumption increase with air conditioning?
In order to drive air inside the device, cool it and release it outside, you need to take energy. What contributes to energy production? Of course the engine is running. The harder it works, the more devices can receive stable “recharge”, and, accordingly, the higher the engine consumption becomes.
Initially, Lada is not ready for the air conditioner to operate, so it has to use additional resources in the form of fuel. Consumption from 100 km increases by 1 liter. By the way, to be fair, we note that the dynamics of the car do not decrease.
Where to buy a new temperature sensor for Priora and the price of the part
Of course, little things like the sensor described in this article can be found without problems in almost any auto parts store. If you are unlucky and find it difficult to find a new part, then you can go to a dismantling shop, there is often enough of this goodness! As for the price, it may differ, but slightly, depending on the manufacturer and place of purchase:
Usually, if you notice problems with the readings or they do not agree with the real ones, that is: the environment is -10, and the display readings say -2 degrees, then there is clearly a problem that needs to be solved. Fortunately, on VAZ cars, and Priora is no exception - failure of such a sensor is extremely rare.
Leave a reply Cancel reply
You must be logged in to post a comment.
source
Air conditioner malfunction
A Conder can break down; the reason for this is not always the negligence of manufacturers towards their product. Most often, a small component fails, which can be easily replaced and then continue to use the Conder. If the air conditioner does not turn on, then:
- There is damage in the wiring;
- Thermostat is faulty;
- The fuse has blown;
- Lack of freon in the system;
- Pressure sensor malfunction;
- Excessive system pressure.
Lada Granta Seli › Logbook › Installing an outside temperature sensor
Greetings to everyone who came here. The thought of installing this sensor haunted me; it seemed like an unnecessary thing and I could live without it, but I really wanted to install it. Initially, I wanted to write in the form of a detailed FAQ, but then I decided to do little and only clarify some quite controversial issues, or add something that was not indicated in other sources. And yes, if you decide to install this sensor, then think about it - do you need it? You will curse everything, waste half a day and scratch all your hands (if you have thick ones, then I sympathize with you). Well, let me begin: First of all, you will need a sensor (there seems to be one for all models) and preferably a chip (I didn’t find the necessary terminals, and it’s easier to buy a chip anyway). By the way, you can install firmware 090 and higher on all models (so that people don’t ask “Can I have 095?”). To get started, remove the air filter box and battery (this makes it easier to drag the wire). The sensor itself is mounted in a special place under the bumper; if you look into the lower cutout, you can see this strip. It is stuck simply by sticking, and not by squeezing the antennae and trying to push it in.
What kind of device?
- Thanks Don't like it
3A%2F%2Fi.lada-forum.ru%2Fpublic%2Fstyle_images%2Fmobile%2Fprofile%2Fdefault_large.png" /% lokotcy Dec 17, 2009
- Thanks Don't like it
profy Dec 17, 2009
Although I don’t have a priory, I think it’s the cabin air temperature sensor. Through it, the heating system regulates the temperature in the cabin. There is a small fan in this sensor, and it makes noise.
- Thanks Don't like it
Sergey_62 17 Dec 2009
Well, I changed my fifteen-swallow to a Priora. First impressions - Super, power + dynamics, and besides, it’s quieter than the tag, although I myself made a total noise with it. Unfortunately, there were some mistakes left, in the form of a rattling rear parcel shelf and the left driver's window. But I’m talking about something else, priorovods explain what this socket with holes near the eyeglasses is, which begins to quietly grumble when the ignition is turned on. The sound is somewhat similar to an old radio at low volume. Tell me that this sound in general is normal or that I already have something short.
Installation
You will need : buy a temperature sensor (catalog number: 21150-3828210-00, 21150-3828210-02 or 21150-3828210-03, approximate price - 200 rubles), protective corrugation 3 meters and 3 meters of wires. Find out the model and firmware version of the instrument cluster, it should be 2190-3801010-20 (firmware 90 or 91) or 2192-3801010-20 (firmware 06 or 07). On other versions, the operation of the sensor is not guaranteed (it needs to be flashed).
Procedure:
- We attach the outside air temperature sensor to its standard place behind the bumper, slightly above the towing eye (it is not necessary to remove the bumper).
- We stretch the wires from it along the hydraulic corrector hoses, fastening the corrugation with the wires with plastic clamps.
- From the engine compartment to the passenger compartment we pull the wiring through the hole in the engine panel. Inside, the wires will appear above the clutch pedal.
DECORATION FOR THE INDEX ON THE INSTRUMENT PANEL
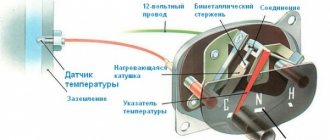
The operating principle of this sensor is to change the resistance when the internal element heats up. Passing through the indicator on the instrument panel, the current flows through a single wire to the device. And here the principle of induction in coils comes into play. Simply put, the higher the resistance, the more the needle on the indicator rises, due to the circulating currents in the coil located inside the indicator.
POSSIBLE MALFUNCTIONS OF THE PRIORA COOLANT TEMPERATURE DISPLAY SYSTEM
Most motorists, having discovered that the engine temperature gauge needle does not rise, believe that it is necessary to change the sensor. However, you should first make sure that this is the case. After all, there are several reasons for this state of the panel:
- Failure of the pointer on the instrument board.
- Break in the wiring.
- Direct failure of the sensor.
Therefore, it is better to conduct a small check on your own.
LOCATION AND CHECKING SERVICEABILITY OF DTOZH
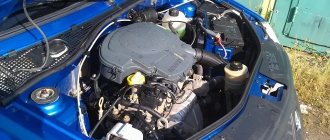
This device is located directly above the Priora flywheel housing. The sensor is embedded in the engine block near the thermostat. It is connected to a single wire with a female connector. The test method for this device is very simple. And it has been used by drivers for a very long time. You need to do this:
- Turn on the ignition.
- Disconnect the connector from the sensor.
- Connect the wire to the block body.
If the DTOZH itself is faulty, the indicator arrow will rise to its highest position. But if no changes occur on the instrument panel, then the reason must be looked for elsewhere. Maybe the circuit is broken, the pointer is broken, or the whole combination.
HOW TO REPLACE THE PRIORA COOLANT TEMPERATURE SENSOR
This is a fairly simple operation. It is available to any driver.
Important! Many people believe that this requires draining the coolant. But this is not necessary if you act quickly and skillfully. Otherwise, it’s better to drain it anyway. So. Just in case, drain the antifreeze. To do this, unscrew the cap in the radiator. It is located near the generator, below. And a plug-bolt in the engine block. First place the container under the bottom.
To access the right place, it is better to dismantle the air filter. Then the work area will be completely accessible. Prepare a new temperature sensor.
Using a 21 key, unscrew the old one and quickly screw the new one into place. Pour in antifreeze, making sure that no air pockets form. Replace the filter and start the engine. Wait for the fan to operate. At this time, watch the arrow. When you turn on the ignition, it should rise by 2-3 millimeters. And then, according to the degree of heating, smoothly enter the working zone of 92-98 degrees. If this is what happened, then the operation to replace the coolant temperature sensor for the Priora instrument panel can be considered successfully completed.
Connection
Procedure:
- We insert one wire into the black block of the dashboard between the pink and black and white wires.
- We connect the other wire to ground using a screw under the panel.
We check the presence of outside temperature readings on the display when switching modes. We perform assembly in reverse order. In the comments, leave the versions of your panels on which you managed to install a temperature sensor.
The installation of DTNV is also shown in the video:
Do you know how easy it is to change the interior of your car using vinyl film?
source
How to refill - instructions
We must not allow a decrease in the volume of freon - this will have a detrimental effect on the system. To independently fill freon into a car, you will need a test connector (a set of tools for manually filling refrigerant). Using it, you need to do the following:
- Attach the freon cylinder to the Conder valve and turn the test connector valve. Press the gas pedal a couple of times.
- Freon will be evenly distributed throughout the system. The main thing is not to overdo it, because if it is overloaded, the system will not work better.
- Disconnect the cylinder from the system and close the valve.
This method of refueling the air conditioner is suitable for almost all VAZ cars - for example, the Lada Vesta can be refueled in the same way.
Air conditioning is a necessary condition for comfort in the summer. Previously, it was not so necessary, because a person was unlikely to stand in car queues for several hours, under the scorching sun, and it was possible to ventilate the interior after parking in the heat by opening all the doors. If Conder has become accessible as a benefit, it means that it is possible and even necessary to use it.
Source
Lada 2110 OneTen › Logbook › Assignment of contacts SAUKU “PANASONIC” LADA PRIORA
Good afternoon. Today's topic is of a very private nature and will not be useful to everyone. This question arose a long time ago; I encountered it when installing a Panasonic SAUKU in my car. I never redrew the complete scheme from the rough sketches. Yes, and it will only fit my wiring configuration, because all the harnesses in the car were redone! Despite this, most of the useful information is there, and you can use it for your own purposes. At first they asked a lot of questions, then there was a short pause, but now I’m receiving messages in PM again. The reason for contacting is tuning, repair, diagnostics of the system. Now I don’t always have time to answer, so I post the most necessary things here. Automatic climate control system for cars of the Lada Priora family.
Information taken from the document “TI 3100.25100.12037 Diagnosis of Panasonic climate control faults”
It contains the numbering and assignment of contacts, as well as diagrams of individual nodes.
The system includes:
— controller of the automatic climate control system
(SAUKU)
– 21720-8121020-00;
— gear motor for air flow distribution (MRVP)
– 21700-8127100-00;
— air mixing damper gearmotor (MZVS)
– 21700-8127200-00;
— solenoid valve for the recirculation damper drive (EKZR)
– 21700-8119130-00;
— rotation speed controller (RFV)
– 21703-8127025-00;
— evaporator temperature sensor (DTI)
– 21700-8121030-00;
— heater radiator temperature sensor (DTRO)
– 21700-8101250-00;
— ambient temperature sensor (DTOS)
– 21720-8121210-00;
— cabin air temperature sensor (DTVS)
– 21720-8128050-00;
— pressure sensor (PD)
– 21700-8127310-00. Abbreviations are useful for understanding the diagrams.
The SAUKU controller is located in the instrument panel console. The assignment of contacts of the SAUKU controller connectors is given in Table 1.
An indicator light on one of the buttons indicates the presence of errors. Located on the button for turning on the “windshield blowing and heating” mode. If there is a malfunction in the system, the indicator flashes when the air conditioner is turned on. List of fault codes
SAUKU controller is given in Table 2.
Air conditioning of the Lada-Priora interior
In the warm season, to cool the car interior, it is necessary to set the climate control controls to the following positions:
- The fan switch 5 is set to one of the “sector zone” positions (Panasonic - 16 positions; Halla CCC - 4) or the AUTO position.
- The air conditioner switch button 6 is pressed.
- The air flow direction regulator 7 sets the desired direction (recommended position).
- Knob 9 sets the desired air temperature in the car interior (it is recommended to set knobs 5 and 7 to the AUTO position).
IMPORTANT!
The air conditioner operates only when the engine is running (the outside air temperature must not be lower than -5°C) and when the fan switch 5 is set to any position other than off. If the air direction control is set to
, then at least one of the nozzles supplying air to the breathing zone of the driver and passengers (located in the central part of the dashboard) or the nozzles blowing the side windows must be open, otherwise the evaporator may freeze up and cut off the air supply to the car interior.
To speed up the process of cooling the air in the car interior, it is recommended to turn on the air recirculation mode with button 4 for a few minutes, but no air will flow from the outside environment. You should not use the recirculation mode for a long time, as this will cause the air exchange in the car interior to stop with the outside air and excess moisture will be carried away - this will cause the windows to fog up and can cause the driver to drowsiness.
Top of page
Source
How is the replacement made?
Finding this element of electronics is not so difficult. It is located directly above your head, in the area of the ceiling. To remove it, you must do the following:
- Remove the rear view mirror cover.
- Remove the mirror itself, which is secured with 2 mounting screws.
- Remove the upholstery container, which is also secured with two Phillips screws.
- Disconnect the cable block from the lighting fixture and temperature sensor.
- Remove the sensor by twisting the fasteners.
Fault diagnosis is carried out using a multimeter. It is necessary to measure the resistance, which should not deviate from the standard values. If you notice too much value for this indicator, get ready to buy a new device. Reassembly after replacement is carried out in the reverse order.
Source