Signs of a malfunction of the ignition switch contact group
The ignition switch contact group is a device that, when the key is turned, closes different contacts, thereby connecting the necessary electricity consumers. Signs of its malfunction can manifest themselves in different ways, so we will analyze them all.
Different contact groups have different modes. That is, with fixed key positions in the lock, different sets of devices are connected in different cars. For example, on a “classic”, with the key in the minimum position (when it can be pulled out), all external lighting can fully work, but on a VAZ-2110, in the same position, only the dimensions can be turned on. Thus, the sets of symptoms of malfunctions in the ignition switch contact group for these vehicles are also different. But in all cars in the world, these faults still have much in common.
The most important sign of a faulty lock contact group is the simultaneous failure of an entire group of electrical devices. This happens because within the group several electricity consumers are powered through each contact. For example, low and high beams, turn signals and reversing lights turn on only when the ignition is on. If the contact through which power is supplied to these consumers, say, burns out, then current will not be able to pass through it and the above-mentioned lighting devices will “fail.”
When several devices, seemingly unrelated to each other, stop working, the problem is almost always in the contact group of the ignition switch. Another “bottleneck” point is the fuse box, where several consumers can also be “suspended” to each socket. However, the same headlights are too powerful consumers, so even in the classics they are separated into separate fuses, and their failure together with the reversing lights clearly indicates a malfunction in the contact group of the ignition switch.
Based on this main principle for diagnosing a contact group, other signs can be easily derived:
— The starter is not working , when neither the solenoid relay nor the control relay even clicks (they are simply not supplied with voltage through the contact group in the lock)
— Failure of electrical consumers, which, at first glance, are not connected in any way, but must work together in the same position of the ignition key.
— Restoring the functionality of devices when moving the key in the lock within one position (the contacts of the group are still in contact with undamaged areas and still pass current to consumers)
If there is at least one of the above symptoms, then with a high degree of probability we can talk about a malfunction of the ignition switch contact group. As a rule, the group cannot be repaired, so it is better to replace it. However, if there are some malfunctions or deviations from normal electrical parameters in your car, the new group may suffer the same fate - it will break and will have to be replaced again. To prevent this from happening, you need to know why the ignition contact group may fail .
In most cases, changing the group is not difficult. After all, it is located in the ignition switch, and access to it is limited only by the steering column cover. The instructions for replacing the contact group are different for each car, depending on the design of its lock, so look for information about removal and installation in the repair manual for your particular car.
Source: russia-avto.ru
Ignition switch 2114 and the procedure for replacing it yourself
In what cases is replacement required?
There are several situations when replacement of the seal is necessary:
- malfunction of the unit itself;
- loss of keys;
- mechanical damage to the protection during theft;
- contact group malfunction.
3Z device diagram
A unit malfunction can be detected when the engine starts. When the starter does not spin, the solenoid relay does not click, and electrical equipment does not work. Failures can be mechanical or electrical.
How to determine the malfunction?
The visual method is to check the behavior of the machine at different key positions. First, the key is set to the right position - “ignition”. If the unit is working properly, then all electrical equipment works. If there are any problems with the electrical system, either all or part of the electrical equipment does not work.
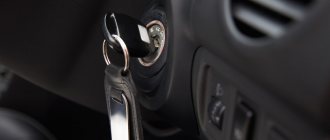
Turning the key in the lock
In the second position of the key, the starter should start. If it does not spin and you cannot hear the click of the retractor relay under the hood, then it is possible that either the starter or the starter is faulty. More specific information can be obtained using diagnostics. This is done with a multimeter set to ohmmeter mode. To carry out diagnostics, you need to remove the steering column cover.
Next you need to do the following:
- Disconnect power from the 3Z.
- Next, find pins 4 and 7 coming from the node. They correspond to pins “30” and “15”, and connect the multimeter terminals to them.
- Then the key in the 3Z turns to the first position. If the unit is working properly, the resistance should be zero.
- Then the operation of the unit is checked when the key is turned to position II. Likewise, the multimeter should show zero resistance if the circuit breaker is working properly.
Once you are convinced that the protection device is faulty, it must be replaced (the author of the video is Region 4253).
Preparation
First of all, you should prepare for the replacement procedure by preparing an electrical circuit diagram and the necessary materials and tools:
- new node;
- 4 assembly mounting screws;
- chisel;
- a set of keys;
- Phillips screwdriver;
- hammer;
- pliers.
ZZ for a VAZ car
For ease of operation, remove the cover from the steering column and switches.
Dismantling the casing is carried out step by step:
- First of all, the car is de-energized by disconnecting the negative terminal from the battery.
- Use a Phillips screwdriver to unscrew the screws securing the casing.
- Then the self-tapping screw is unscrewed, with which the housing is secured.
- Now you need to remove the screws holding the lower part of the housing to the steering column.
- At the next stage, the lever is lowered down, with the help of which the steering column is fixed at the angle, and the steering wheel.
- Next, the lower casing is dismantled.
- After disconnecting the power supply, you can remove the upper part of the casing.
- To remove the steering column switches, press the locking elements and remove the elements from their standard places.
- The switches should also be disconnected from the power supply.
Removing a faulty device
Having opened access to the protection zone, you can dismantle it. The difficulty of dismantling is that there are no heads on the 4 bolts that secure the ignition switch to the steering column on the VAZ 2114. The absence of heads prevents criminals from stealing a car without a key.
Dismantling with hammer and chisel
Dismantling of the protection zone is carried out as follows:
- you need to loosen the bolts using a hammer and chisel;
- then the loosened bolts are removed with pliers;
- then the bracket is removed from the steering column;
- the power supply is turned off;
- Now you can dismantle the unit.
The node connection diagram is simple. If it is purchased assembled, then it is not difficult to understand the diagram in order to connect the wires correctly.
Installing a new lock
The procedure for installing the ignition switch on a VAZ consists of the following steps:
- first you need to install the key in the new unit in position “I”, then the latch, thanks to which the steering wheel is locked, will hide;
- then the protection is mounted and the actions are performed in the reverse order of removal;
- After tightening the 4 bolts, you need to tighten them a little.
After installing the new unit, you need to check the steering lock. To do this, remove the key from the lock and turn the steering wheel to a small angle. If the steering wheel does not lock, you must install the unit correctly: the latch must fit into the groove located on the steering column. If the locking function works, all you have to do is tighten all the breakaway bolts until they stop. You need to tighten them until the heads are broken.
Sorry, there are no surveys available at this time.
Signs of a broken ignition switch
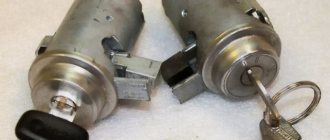
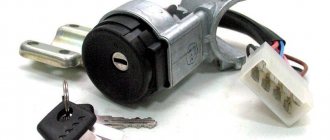
Ignition switch removed for repair
Naturally, as with any automotive device, the ignition switch has signs of malfunction. Unlike other components, the contact group will disable several devices at once, which will cause the malfunction. So, let's look at what signs can be used to determine the failure of the ignition switch:
- The starter does not work . It does not click, and the solenoid relay does not operate. This happens because they are not supplied with power that passes through the ignition switch.
- Failure of electrical appliances . These elements may not be connected in any way, but they all turn on only when the contact group is working.
- When you move the key in one position, the operation of electrical appliances resumes. The contacts simply close and the power supply is restored.
Causes of malfunction of the ignition switch on the VAZ-2114
Ignition switch device diagram
There are only two known causes of malfunction of the ignition switch on a car, namely: electrical and mechanical. Both of them arise due to wear of certain parts and assemblies. So, it’s worth considering each malfunction in more detail.
Electrical fault
The primary reason for the failure of the contact group is overloading the electrical equipment of the car.
Thus, installing additional lighting devices and power-consuming devices may lead to the lock not being able to withstand the load. Due to the large load for which the contact group is not designed, carbon deposits appear, which form inside the metal, and not outside.
Disassembling the ignition switch to troubleshoot
To avoid overloading the ignition switch, all additional devices must be connected through a relay, which will relieve part of the load. As practice shows, this particular solution to the problem becomes optimal.
Of course, another reason that can cause the ignition switch to fail is a short circuit, which occurs quite often in Ladas.
How to Replace the Ignition Switch on a VAZ 2115
It is impossible to start the engine, its systems and other main devices of the Samara family without the ignition key. Those motorists who have encountered a malfunction of this device know what causes its sudden breakdown. Particularly if it becomes a pass.
Further in the text of the article we will talk about what the VAZ-2114 ignition switch is, consider its main malfunctions and ways to eliminate them. In addition, we will try to figure out how to change this ourselves and connect correctly.
In VAZ-2114 cars, the ignition switch, unlike the “classic” one, is located not on the dashboard, but on the right, on the control column. The top is covered with a plastic shell, so in our opinion only the highest part of the “larva” is exposed.
The VAZ-2114 ignition switch consists of 5 main parts:
- iron body;
- locking mechanism;
- blocking device;
- contact Group;
- key.
The device is housed in a metal case, which is designed to protect against burglary. As for the locking mechanism, it is practically no different from a regular door lock.
The locking device allows you to lock the control shaft in the absence of a key. In this simple way, it protects the car from theft. The contact group is the element responsible for starting the engine and its systems. The VAZ-2114 ignition key is used to unlock the locking device and activate a group of contacts. Without it, starting the engine makes it impossible to disassemble the device.
This is how the lock works. When the key is in the well, its locking mechanism is disabled. This is due to the reverse movement of a special rod. Turning the key to position 1 will give contacts “15” and “30”. This will prevent (unfortunately, not enable) the following:
- ignition system;
- headlights;
- external light signal;
- electrical equipment of the dashboard;
- windshield washers and washers;
- lighter;
- heated rear window;
- field generator winding.
In this case, turn the ignition key to position 2 in the VAZ-2114, in addition to the listed equipment, the starter will start. As you can see, a lot depends on the performance of the device.
What are the symptoms of a broken ignition switch? The first issue is that its failure can be either mechanical or electronic. At the beginning it is:
- lock jamming in one of the positions;
- inability to unlock the control shaft;
- turning on the ignition with a non-original key in accordance with another object.
READ How to Install an Ignition Switch on a VAZ 2106
If you have electronic faults, you can easily see the following symptoms:
- Warning lights on the dashboard do not light up, do not light up and sometimes go out;
- the starter does not start;
- some do not work, or our clients are left with electrical devices whose circuit is powered by ignition (cigarette lighter, lights, washer, windshield wipers, etc.).
My device got stuck due to wear on the larvae in a different way due to problems with the contact group. When faced with a problem like this, you don't need to use force to turn the key in the right direction! There is no need to “rip” the steering wheel if it cannot be unlocked in the aisle. The best thing to do is to carefully disassemble the lock and find out why. Unfortunately, this is one step later.
Having noticed that the ignition in the car, of course, is turned on at least with the help of some kind of key or foreign object, hurry to replace the “cylinder” or assembly of the device. This way you will protect your car from possible theft.
Content
Quick replacement of VAZ 2108 2109 2110 2114 2115 ignition switch. Or simply change the contact group.
If the ignition switch works normally on a VAZ-2114, but when turned on the unit panel does not light up, the starter does not start, the instruments do not work, which means that, most likely, the group of contacts has failed. This problem can occur due to normal wear and tear. The contacts are erased after some time, which leads to an open cycle. Burning caused by overvoltages and constant overloads can also occur due to the use of additional electrical appliances and improper connection.
In principle, if you want to install additional electrical equipment in your car, connect it only to the on-board network via a relay!
Diagnostics of the contact group consists of measuring the resistance between certain terminals on the wiring harness of the unit.
To check this you need:
- Remove the plastic cover of the control panel (to do this, unscrew three screws).
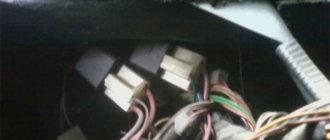
- Disconnect the VAZ-2114 ignition interlock wires (disconnect the unit).
- Turn on the ohmmeter (if you have a multimeter, set it to resistance mode).
- Connect the device sensors (polarity does not matter) to terminals “4” (top right) and “7” (2nd from bottom right), corresponding to terminals “15” and “30”.
- Turn the ignition key to position 1.
- Read the ohmmeter.
- Turn off the ignition, connect the device sensors to terminals “3” (2nd from the right) and “7”, corresponding to terminals “50” and “30”.
- Turn the lock to 2nd.
- Measure the resistance between the terminals.
READ How to Insert a Cylinder into a VAZ 2109 Lock
If the VAZ-2114 ignition key (injector) is working, the resistance between the contacts will be zero. Otherwise, the contact group of the device may be faulty.
What if the ignition switch is faulty? There is such an option, try turning it on. Unfortunately, this is only in a situation where, of course, you have some experience here, the device is relatively new, and you suspect it is a contact wear error. Otherwise, it is better to replace the lock. Fantasy is not that expensive. no more than a thousand rubles, well, this procedure will not keep you waiting long.
When planning to replace the ignition switch, be sure to choose the right one. Part number for Fourteen. 2114-3704010. However, other modifications are also suitable, for example, for the ninth model of Samara. 2109-3704010 or for VAZ-2110. 2110-3704005. By and large they are all interchangeable, the only thing that matters is that the device is of good quality and can last a long time.
Before changing the ignition on your VAZ-2114, iron it so that you need tools at home. Because it's good for you:
- Phillips screwdriver;
- wrench set to “10”;
- small hammer;
- bit;
- pliers.
Now let’s figure out how to remove the ignition switch on a VAZ-2114. The procedure looks like this:
- We de-energize the on-board network by disconnecting the negative terminal from the battery (loosen the screw on the terminal using a key 10).
- Remove the plastic housing of the control column by unscrewing the three screws securing it.
- For convenience, you can remove the control wheel with switches, but many do without it.
- Disable the emergency shutdown button of the wiring block.
- Disconnect the ignition interlock unit.
- Inspect the retaining bolts. If you are changing a lock for the first time, you might be surprised that they don't have a head. This is such a typical concept of complete theft.
- Using a chisel and hammer, loosen these bolts and loosen them with pliers.
- Remove the lock.
- Remove device.
READ How to Remove the Door Lock of a UAZ Bukhanka
Removing the ignition switch, VAZ 2114.
The method for installing the lock and connecting it to the on-board network is as follows:
- We insert the key into the well and return it to the first place. This way we hide the rod that blocks the control shaft.
- Install the new lock on the column by throwing the shackle.
- Tighten the lock mounting bolts, but not completely. You will need to adjust the position of the device.
- Check the operation of the locking device. To do this, remove the key from the “larva” by pulling it to the side. The steering wheel must be locked. If there is no lock, adjust the control shaft lock position. The shaft should simply fit into the groove on the control shaft.
- After this, insert the key and return it to the 1st position. The steering wheel must be unlocked. We will check a couple of times to make sure the device is working correctly.
- Now we usually tighten the locking bolts. Rotate until their head falls off.
- Connect the ignition unit to the handle.
- Connect the wires of the alarm button.
- We connect the “negative” terminal to the battery. We test the device in numerous possible modes.
- Install the plastic housing onto the control column.
If you still decide not to take the entire castle, the best solution is for working “larvae”. this is to change the contact group. This is done as follows:
- After removing the ignition, we remove the retaining ring from the end of its housing, which holds the core of the device.
- Remove the contact group from the housing.
- Install the last part in the old place. In this case, the position of contacts “15” and “30” must correspond to the position of the rod that closes the control shaft.
- Make sure that the wide protrusion of the contact group is inserted into the wide groove in the housing.
- Produce and test the device as described above.
Kalina! Replacing the ignition switch from and to.
Source
conclusions
There are many reasons and signs of malfunction of the VAZ-2114 ignition switch, but you need to know them. Also, it is worth noting that in order to prolong the operation of this unit, it is necessary to remove the load from the passing current circuit. To do this, additional electrical appliances must be connected via a relay.
I encountered this problem myself. The contacts were worn out, it’s good that they were not on the road, they managed to fix it, but I spent a very long time looking for the cause, I advise you to immediately pay attention to the contacts in the event of a breakdown.
21099 why do the lights not go out? The reason may be the ignition switch. Tell me, who knows?
Agree. It is better to replace such a unit immediately than to look for something that can be replaced in it. If you are experienced, then you can, but if you are a beginner, then it is better to just buy a new one.
It is difficult for a beginner to immediately figure out what the problem was, especially without instructions like here. In general, it is easier to change, but if you like to understand, then it is better to disassemble and find the reason according to the instructions.
Source: carfrance.ru
Replacing the ignition switch on a VAZ 2115, 2114
Replacing the ignition switch of a VAZ 2114, VAZ 2115 may be necessary in the event of a malfunction of the contact group, jamming of the mechanism, or simply wear.
The procedure is not complicated, so let's get started.
Before the replacement itself, it is necessary to purchase bolts with break-away heads. It is not recommended to replace them with regular ones with M6 thread, because... In addition to you, car thieves can easily remove the lock.
Before replacing the lock, turn the key to the “I” position so that the latch locking the steering shaft mechanism can enter the lock body.
- It is necessary to disconnect the battery by removing the wire from the “—” terminal
- Next, remove the steering wheel. To do this, remove the decorative trim on the steering wheel and unscrew the horn cover.
- Then, having unscrewed the steering wheel fastening nut not completely, we knock the steering wheel off the splines. After this, finally unscrew the nut.
- Remove the plastic covers from the steering column.
- Disconnect the block with the ignition switch wires.
- Use a chisel to knock the heads off the old bolts holding the ignition switch in place.
- Remove the old lock and install a new one in its place. Before installation, press the locking tab into the new ignition switch.
- Check that the steering shaft is locked correctly.
- Once you have completed adjusting the position and checking the functionality of the locking mechanism, tighten the bolts until the heads are completely free. Do this using the 10 key.
- Connect the wiring harness of the new ignition switch.
- Start the engine, make sure that the ignition switch is working correctly and that there are no problems with starting. If everything is in order, then we can conclude: the replacement of the ignition switch of the VAZ 2114, 2115 was carried out successfully!
Previous posts from the category: VAZ 2114
If engine oil or coolant appears around the perimeter of the connection of the cylinder head with the cylinder block itself, it is necessary to replace the cylinder head gasket of the VAZ 2114, VAZ 2115. A leak can also occur due to a change in the shape of the cylinder head after the engine overheats.
After prolonged use of a VAZ-2114, VAZ 2115, for no particular reason, an extraneous sound may arise from the front axle area in the form of a whistle.
Typical malfunctions of VAZ 2114, 2115 injectors: -difficulty starting the engine; — unstable engine operation; — the engine stalls at idle; — increased crankshaft rotation speed at idle; — the engine does not develop full power; — jerks and dips in engine operation when the car is moving; — increased fuel consumption; - increased content of CO and CH
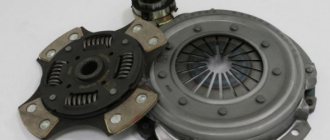
The clutch briefly disconnects the engine and transmission and then smoothly connects it to start moving and change gears.
Replacing the stove fan of a VAZ 2114, 2115 may be necessary if it completely fails, or if it constantly operates only at 3rd speed.
*Add article to bookmarks:
Source
https://remontysvoimirukami.ru/remont-vaz-svoimi-rukami/remont-zamka-zazhiganija-vaz-2115-svoimi-rukami.html
Ignition switch and features of its replacement
ZZ plays an important role in the vehicle's SZ, both for an 8-cl and 16-cl engine. It is activated when the starter is working, thanks to it the lighting, turn signals, and power windows work.
Scheme ZZ VAZ 2115
Replacement or repair of the VAZ 2115 ignition switch may be required if:
- lost or broken keys;
- the lock was damaged during an attempted theft;
- the 3Z cylinder is faulty;
- The contact group does not work.
Ignition switch VAZ 2115
To replace you will need: a set of keys, a hammer, screwdrivers, a thin chisel.
The replacement procedure consists of the following steps:
- The car's power is turned off by disconnecting the negative terminal from the battery.
- We remove the steering wheel.
- Next you need to remove the steering column switches.
- Then you need to loosen the bolts securing the clamp that holds the ZZ on the steering column. If the heads are cut off, the bolts should be carefully knocked out using a hammer and a thin chisel.
- Now you need to disconnect the wiring harness.
- Next, you need to completely unscrew the bolts from the 3Z housing and you can remove it.
- A new device is installed in place of the old one.
- Assembly is carried out in reverse order.
After assembly, you should start the engine and check the operation of the switch (the author of the video is the MY LADA channel).
Instructions for replacing the ZZ
Replacing the ignition switch on a VAZ 2114 injector takes place in stages. At each stage certain actions are performed.
Preparation
First of all, you should prepare for the replacement procedure by preparing an electrical circuit diagram and the necessary materials and tools:
- new node;
- 4 assembly mounting screws;
- chisel;
- a set of keys;
- Phillips screwdriver;
- hammer;
- pliers.
The VAZ 2114 ignition switch should be purchased assembled.
ZZ for a VAZ car
For ease of operation, remove the cover from the steering column and switches.
Dismantling the casing is carried out step by step:
- First of all, the car is de-energized by disconnecting the negative terminal from the battery.
- Use a Phillips screwdriver to unscrew the screws securing the casing.
- Then the self-tapping screw is unscrewed, with which the housing is secured.
- Now you need to remove the screws holding the lower part of the housing to the steering column.
- At the next stage, the lever is lowered down, with the help of which the steering column is fixed at the angle, and the steering wheel.
- Next, the lower casing is dismantled.
- After disconnecting the power supply, you can remove the upper part of the casing.
- To remove the steering column switches, press the locking elements and remove the elements from their standard places.
- The switches should also be disconnected from the power supply.
Removing a faulty device
Having opened access to the protection zone, you can dismantle it. The difficulty of dismantling is that there are no heads on the 4 bolts that secure the ignition switch to the steering column on the VAZ 2114. The absence of heads prevents criminals from stealing a car without a key.
Dismantling with hammer and chisel
Dismantling of the protection zone is carried out as follows:
- you need to loosen the bolts using a hammer and chisel;
- then the loosened bolts are removed with pliers;
- then the bracket is removed from the steering column;
- the power supply is turned off;
- Now you can dismantle the unit.
The node connection diagram is simple. If it is purchased assembled, then it is not difficult to understand the diagram in order to connect the wires correctly.
How to check the ignition coil?
Before diagnosing the ignition coil (SC) on an 8-valve engine, you should check whether there is voltage on the coil. To do this, you need to disconnect the wire block and check it with a tester. The voltage should be 12V.
VAZ short circuit diagram
Typical unit malfunctions
Signs of a faulty short circuit in VAZ engines with 8 valves, UAZs and other cars are similar:
- power is lost, it seems that the engine does not pull;
- the appearance of failures in engine operation;
- unstable operation at idle;
- Cylinders 2-3 and 1-4 do not function in pairs, there is no spark.
If the listed symptoms appear, you first need to check the spark plugs and crankshaft position sensor. Fuel injection into the injectors is regulated based on sensor readings, so if there is excessive fuel consumption, they require checking. The short circuit should be checked last.
You can check the ignition module (IM) on an 8-valve engine in one of three ways:
- The easiest way is to replace the module being tested with a known-good device. True, you need to find a suitable module. Before checking, be sure to make sure that the high-voltage wires are in good condition.
- The second method is to move the module. If, when you move it and the wire block, changes in the operation of the motor are noticeable, then there is a problem with the contacts. In this case, you can do the repair yourself. If repair is not possible, the device should be replaced.
- The third method is to check using a multimeter set to ohmmeter mode. It is necessary to measure resistance at the paired terminals of coils 2-3 and 1-4. It should be the same and be about 5.4 kOhm.
Why you may need to replace the ignition switch
There can be several reasons for this problem, the most common of which are:
- The lock is broken; after all, it is constantly subject to wear and tear.
- Lost keys.
- Damage caused by attempted theft.
- Malfunction of the connector with wires.
The malfunction can be easily determined when the engine is turned on, if the sound of the starter is not heard, the relay clicks, or the electrical equipment simply does not turn on. There are several ways to determine the source of the problem:
- diagnostic;
- visual.
First you need to check the car's reaction to different positions of the key in the lock. To begin with, the key must be set to position number one, which is also the ignition. If the module is in order, all the car's electrics should work. However, in the case when all or part of the electrical system does not work, we can conclude that the lock is damaged.
In position number two of the key, the engine starts, for which the starter is turned on. If, when you turn the key, you do not hear the sounds of the starter operating (rotation), as well as the sound of the relay clicking, then either the ignition switch or the starter itself is broken. In this case, you need to run a diagnostic to get other details about the problem.
In this case, you will need a multimeter set to ohmmeter mode. Also, before removing or installing the lock, you need to remove the steering column cover.
- +12V comes for the inserted key sensor microswitch;
- the mass comes when the driver's door is open;
- +12V goes to the starter (pin 50);
- +12V goes out after turning on the ignition (pin 15);
- +12V goes out when the key is inserted to pin 5 of the BSK;
- comes +12V to illuminate the lock cylinder;
- +12V comes from the battery (pin 30);
- not used.
- The first thing to do is disconnect the ignition switch power connector.
- After this, connect the multimeter to wires four and seven, and then do the same with wires fifteen and thirty, respectively.
- Turn the key in the lock to position number one. If during testing the node is not damaged, the multimeter should show a zero resistance value.
- Next you need to turn the key to position number two. The resistance on the multimeter screen, as in the case described above, should have a zero value.
In a situation where, after checking the lock with a multimeter, the resistance value in at least one of the cases was not equal to zero, it needs to be replaced. Otherwise, the lock is working properly and other components of the car should be checked for malfunctions. It is necessary to prepare spare parts and other equipment for work.
A new ignition switch will be needed. It is quite easy to find original parts and analogues on the Internet, but it is worth considering that it is advisable to purchase the lock “assembled”.
Catalog number of the original VAZ 2114 ignition switch: 21103704010. Approximate price: 500 rubles for a used part and 1200 for a new one.
As a replacement, you can use analogues with numbers: 09401, 24370407. Approximate price: 1000 rubles (new part). In addition to the lock itself, you will need the following tools:
- spanners;
- chisel;
- pliers;
- screwdriver.
Before you begin, you must also remove the steering column cover and steering column switches.
Instructions for repairing and replacing the ignition coil
Replacing short circuits on valves 8 and 16 in an engine represents a sequence of steps:
- The module can be easily found by the high voltage wires coming from the SZ spark plugs.
- Before starting work, you must turn off the negative voltage on the battery.
- The next step is to disconnect the wire block from the short circuit and high-voltage wires.
- Next, you need to unscrew the bolts securing the MZ to the engine, and you can dismantle the device.
- Now you need to install a new or repaired device and perform the steps in reverse order.
When connecting, follow the connection diagram in the manual.
How to set the ignition yourself?
Precise ignition adjustment on the VAZ 2115 injector is performed using a special strobe light. If this is not possible, you can set the ignition on the VAZ by spark.
To do this, follow these steps:
- First of all, the engine is warmed up until it reaches operating temperature.
- The distributor does not need to be removed, but only relaxed.
- You need to remove the central wire from the distributor.
- The piston in the 1st cylinder must be at TDC (the marks are set differently on 8 and 16 valve engines).
- Now you need to hold the short-circuit wire with your left hand and turn on the ignition.
- Use your right hand to adjust the distributor counterclockwise, while keeping the high-voltage wires above the metal.
- Then similar actions are performed, turning the distributor clockwise until a spark appears.
- At this point, the alignment ends, and the distributor is fixed in its regular place.
With the ignition set correctly, the car will operate without interruption with optimal fuel consumption and maximum power.
What are the signs to recognize a bad contact in the ignition switch?
To understand the causes and recognize the symptoms of a faulty ignition switch contact group, you need to have a general understanding of what it is, the features of its operation and possible causes that could lead to a malfunction.
The ignition switch contact group itself is the central link in the system responsible for starting the car. The moment you turn the key, the group helps close the corresponding contacts, as a result of which certain electrical consumers receive the necessary connection to the system.
What can happen to the ignition switch
Depending on the type of contact group, its modes will differ. For each car model, at a certain key position, the connection of a given set of devices will be characteristic.
Actually, this causes a number of certain inconveniences, since the differences relate not only to the operation of the ignition switch contact group, but also to its characteristic failure symptoms. However, there is a certain list of what can happen to the ignition switch.
Mostly, failure occurs due to oxidation or burning of contact groups. The latter occurs due to frequent and severe voltage drops when starting a car engine.
Most common defects
If your car's ignition switch won't turn on, there's a good chance you're dealing with one of the most common problems:
- the battery is low;
- the battery terminals are not in good contact with each other;
- switch malfunction;
- security system error;
- solenoid malfunction;
- When cranking the engine it still won't start.
The groups of defects we have identified can be divided into 2 groups - mechanical and electrical. They will differ in negative receptors that lead to breakdowns.
Electrical fault
The main causes of this type of breakdown include overload of the contact system, when high-power equipment is installed with a current level not provided for by it.
As a result, carbon deposits form that cannot be removed. To avoid this situation, install auxiliary elements via a relay. The second, no less compelling reason for an electrical type malfunction is a short circuit. Here you also cannot do without replacing the burnt elements of the group.
Signs of a malfunction of the ignition switch contact group
A malfunction in the ignition switch contact group can be recognized by a number of characteristic signs:
- the tape recorder did not start when turned on;
- in addition to the sound signal, the car is completely de-energized;
- periodically resetting the speedometer data on daily mileage, after which it was restored again and began to work properly;
- normal functioning of the car is possible only if you hold the key;
- restarting the engine after a short-term stop;
- the key or ignition switch heats up;
- no backlight on the dashboard until the car is started;
- absence of a characteristic click of the main sub-panel relay.
Any of these symptoms may indicate a serious malfunction of the ignition switch contact group.
In order not to be caught off guard by such problems, you need to determine in advance where to order a replacement contact group. For example, if you are in Kharkov, an excellent option would be the Duplicator workshop on Moskovsky Prospekt 46. Specialists can perform tasks of any complexity, make duplicate keys, repair the ignition lock cylinder, fix a faulty contact group, etc.
Source: dublikator.com
Replacing the ignition switch contact group
You will need: chisel, hammer, screwdriver.
2. Disconnect the wire block from the backlight lamp socket.
3. Using a screwdriver, unfasten the latch on one side.
4. Then unfasten the two latches on the other side...
5. ...and remove the plastic cover from the lock body.
6. Using a screwdriver, unfasten the two latches on both sides of the cover...
7. ...and remove the contact group and light guide from the cover.
8. Clean the oxidized or burnt contacts of the plate on the light guide with fine-grained sandpaper.
9. If the contacts are severely damaged, replace the contact plate on the light guide. To do this, rotate the contact plate so that its internal protrusions fit into the slots of the light guide...
10. ...and remove the plate along with the return spring. Replace a broken or cracked return spring.
11. Install the spring and slip ring onto the light guide in the reverse order of removal. In this case, pay attention to the fact that the protrusions on the inner surface of the light guide should be opposite the wide outer protrusion of the plate.
12. Clean oxidized or burnt contacts with fine sandpaper. If the contacts are severely damaged, replace the contact group. To do this, you need to unsolder three wires from the contacts.
13. When assembling the lock, first install the light guide with the contact plate on the base of the contact group so that the long protrusion of the plate is opposite the stop on the base.
14. Place the cover on the base so that the top of the light guide fits into the hole in the cover. Secure the base to the lid with latches.
15. Install the cover with the contact group on the lock body in the reverse order of removal. Please note that the protrusion on the lock cylinder must be between the two protrusions on the inner surface of the light guide.
Source: www.vazbook.ru