Starter relay VAZ 2115
The most likely cause of starter failure is not mechanical damage, but electrical damage. The mechanical part of the starter of the VAZ 2115 car is a retractor mechanism, which works properly throughout the entire operation of the car, only in rare cases does it break down, and only on cars with high mileage. Electrical faults in the starter can be caused by relays, oxidized wire connections, short circuit and other factors.
Where is
If I haven't forgotten, the right one is the starter interlock relay.
Retractor
Self-test of the starter relay
To begin with, before checking the solenoid relay, you need to check the starter itself, since these checks have their own nuances and they must be performed in order to figure out what exactly is not working.
To do this, turn on the ignition switch and turn the key; if the starter does not work, but characteristic clicks are heard, then the relay is working, but the starter is not.
Without removing the starter, if you can get to it, of course, you can check it by jumping the two contacts (copper bolts) on the back cover of the traction relay. If the mechanism spins, the retractor is faulty.
When independently checking, disassembling or repairing various parts, be careful and careful, as this can lead not only to parts breaking, but also to various injuries.
If for some reason you were unable to check it on site, then you will have to dismantle it. When checking, be careful, since the rotation of the mechanism is quite strong, so that it does not break out and cause injury.
Place it near the battery, or preferably on the ground, and use a wire to connect the relay contact terminal to the positive terminal. Using another wire, connect the battery ground to the starter ground.
After the wires touch the terminals, the relay should operate, making a sharp and quick click. If you feel that the relay operates too slowly, then the contacts may be burnt.
Replacement
Before starting work, it is necessary to turn off the power from the battery, because while the electrical circuit is being created, it is prohibited to remove the starter, since you can completely burn out the entire wiring of the car.
— Clean the surface of the starter from dirt and dust;
— Unscrew the nut from the relay bolt and remove its contact;
— Unscrew the screws that secure the relay to the starter body;
— Remove the nuts from the end and divide the starter into 2 parts;
— Remove the old core and put a new one in its place;
— Reassemble all components in reverse order and check serviceability by connecting to the battery;
— Install the starter with the replaced relay on the car engine and check the operation.
Before checking the starter on the VAZ car itself, it is necessary to check that all the contacts that are present in this design are in their correct position and ultimately do not lead to a short circuit, because whatever one may say, we are dealing with current. The operation of the relay is checked first at idle, then while driving, more precisely during sudden braking.
Where is the starter relay on the VAZ-2114: photo and location + video
If for some reason your car has stopped starting (turning the engine - approx.), then first of all you need to pay attention to the condition of the starter relay. However, there are two of them in this device, which are radically different both in design and in their purpose.
In this article we will look at each of them in detail, talk about their purpose and location in the car.
Starter relay (retractor) for VAZ-2114
This type of relay is located directly on the starter housing, and is controlled by supplying current from the ignition switch.
This type of relay is directly involved in starting the engine, regulating the clutch reaction between currents of different magnitudes (since the ignition voltage is less than the current supplied from the battery - approx.).
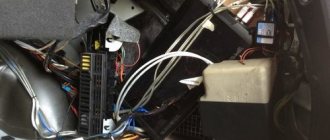
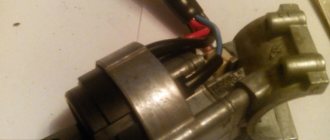
Solenoid relay location
It is not difficult to determine the location of the retractor; it is located directly on the starter and has two wires, the first, the smallest in size, comes from the ignition switch, and the second, the largest in size, comes from the battery.
The location of the wires is indicated by arrows.
The relay is located directly on the starter housing.
Relay operating principle
The operation of this relay is as follows:
- When the battery supplies current to the starter coil, due to the magnetic field, the coil acts on the armature.
- When the armature moves, it clamps the spring, from which the bendix is connected to the splines.
- When the contacts close together, the engine starts, and all connections return to their places, disconnecting the fixation points.
Solenoid relay malfunctions and their symptoms
You can first see if there are problems with the solenoid relay visually, since there may be traces of corrosion on the wires, and as a result, the incoming current may simply not pass to its destination. If cleaning these contacts does not lead to anything, then we move on to inspecting the 4-pin relay, usually located on a bolt in the engine compartment.
Lada 2115 Silver Dream › Logbook › Installing the starter relay
Good morning and evening everyone!
For almost a year, I was periodically tormented by problems with starting the car, especially when it was hot, the solenoid relay kept clicking, the charging sagged and the car, as usual, refused to start. After self-diagnosis, I naturally decided that it was a solenoid relay.
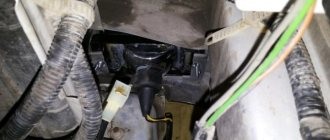
Unscrew the air filter mounts
Then we bend it to the side and hook it onto a pre-prepared wire tied to the hood loop!)) (a critically convenient thing, the former owner of the car suggested this to me).
Then, after spraying a little with WD, we unscrew the starter mounting nuts, I no longer had the lowest nut, it’s likely that the starter had already been removed and so as not to worry about hemorrhoids associated with unscrewing the lowest nut.
Why do you need an ignition relay?
This part was also installed on previous models of VAZ cars. However, on early versions of 2115 it may be absent. It is present in the starter circuit on VAZ-2115-01, 20, 21, 22 (injector, carburetor).
There are different names for this part: ignition relay, starter relay, starter interlock, ignition switch or lock relay, main relay.
But in any case, its purpose is the same - to facilitate engine starting and protect the starter from wear and damage. It turns off the power to the electric starter after starting the engine, limits the currents flowing through it, and protects against caking of contacts in the ignition switch or turning the key while the engine is running.
Signs of a faulty retractor relay on a VAZ 2114
Remember the basic rule of electricians in a timely manner. There are two faults in electricity:
- lack of contact at the required point;
- presence of a connection in an unnecessary place.
The essence of the problem. There was a suspicion of a problem with the starter. Symptoms of inoperability of the components of the starting mechanism are similar. The search for the weak link must be performed consistently during comprehensive testing.
- Use a load plug to measure the battery voltage. Indicators are below normal - charge.
- Remove, clean, lubricate the power wires and battery terminals. Connect, secure.
- Check the contact group of the ignition switch. Touch the terminals with an insulated wire with cleaned ends to simulate the operation of the key. The process has begun - replacing the lock.
- The next multifunctional part is the ignition relay, covered with a protective steering column cover. In addition to participating in connecting the starter, the switching element performs a number of other operations: turning on the windshield wipers and heating the windows. Current overloads cause overheating and breakdown. There are several verification methods:
- replace with a known good part.
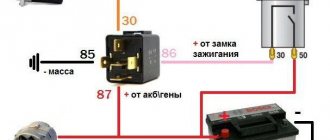
- test with a multimeter in resistance measurement mode. When 12 volts are supplied to contacts 85, 88, the device between points 30, 87 should show 0 ohm. The absence of tension is infinity.
- Briefly bridge the sockets of the block 30, 87.
- apply “+12 volts” directly to the red screw of the solenoid relay (focus on the traditionally connected standard red wire). A positive result indicates a defective part. The repair method is replacement.
- Solenoid relay testing. If the event from the previous paragraph did not trigger the response, perform contact prevention.
- Disconnect the negative terminal. Using a size 10 wrench, remove the nuts, remove dirt and oxidation. Treat with lubricant. Collect. Restart. A negative outcome casts a shadow on the traction relay. Using a screwdriver with a plastic handle, briefly close the contact bolts. The starter spun - the culprit has been discovered.
- Possible insulation breakdown, breakage of the pull-in winding turns does not allow creating a sufficient field. Interturn short circuit and ground penetration are checked with a megger. Desperate craftsmen use wires with a 220 volt light bulb, an alternating power supply network. The tester can show a break.
- If the jumper fails to achieve a positive result, you need to remove and repair the starter.
- A situation occurs: the relay is pulled in, the starter starts to turn on, and the starter stops rotating. The holding winding is assumed to be in poor condition. It is tested in the same way as the previous coil. Summary - replacing the traction relay.
- Another violation of the starting mechanism functioning algorithm is detected when the engine is turned on. The crankshaft ring with the starter gear does not disconnect. There are knocks. A working overrunning clutch does not allow turning the starter into a generator. It is urgent to turn off the engine. In addition to wear and distortion of the metal parts of the mechanism, stuck contact pins of the solenoid relay can cause problems. The solution is clear. Dismantle the unit. Disassemble, find defect. Replace the worn component, clean, lubricate. Assemble, check, install back. It is preferable to entrust complex starter repairs to a specialist.
Where is
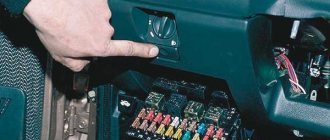
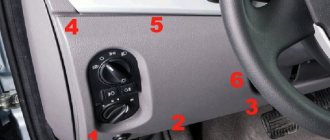
Where is the VAZ-2115 ignition relay located? It is located in the car interior, to the left of the steering column, under the instrument panel. In order to see it, you need to dismantle the instrument panel. Nearby, to the left of it, there is a relay for turning on the rear fog lights. They are screwed onto the car body stud with a “10” nut and located in special blocks.
The relay also controls the vehicle's washer, heater, rear window defroster, and some other low-current electrical circuits. If these vehicle components are not operating properly, the serviceability of this part should be checked.
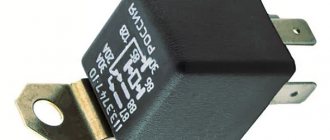
The type of electric ignition relay is 90.3777-10, it has four contacts, the control voltage is 12 volts. When buying a new relay, be careful: five-pin analogs designed for 24 volts have a similar appearance. Self-repair of this part is unprofitable due to its low cost.
Video: “Ignition relay VAZ-2115: where is it located?”
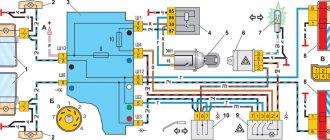
Where is the ignition relay for VAZ 2115
Description: 1 — headlight unit VAZ 2115; 2-gear motors for headlight cleaners*; 3 — fog lights*; 4 — ambient air temperature sensor VAZ 2115; 5 — sound signals of VAZ 2115; 6 — engine compartment lamp switch; 7 — electric motor of the VAZ 2115 cooling system fan; 8 — VAZ 2115 generator; 9-sensor for low oil level indicator VAZ 2115; 10-washer fluid level sensor; 11 — front brake pad wear sensor; 12 — wire tips connected to the common windshield washer pump**; 13 — windshield washer pump VAZ 2115; 14 — headlight washer pump*; 15 — wire ends for connecting to the rear window washer pump on VAZ 2113 and VAZ 2114 cars; 16 — low oil pressure indicator sensor; 17 — lamp for illuminating the engine compartment of the VAZ 2115; 18 — wire lug for connection to the wiring harness of the engine control system or to the wiring harness of the ignition system on carburetor VAZ 2115 vehicles; 19 — windshield wiper gearmotor; 20 — starter VAZ 2115; 22 — coolant temperature indicator sensor VAZ 2115; 23 — switch for reversing lights VAZ 2115; 24 — low brake fluid level indicator sensor; 25 - battery; 26- low coolant level indicator sensor; 27-relay for turning on fog lights VAZ 2115; 28-mounting block VAZ 2115; 29 — brake light switch; 30 — plug socket for a portable lamp; 31 — lamp for illuminating the hydrocorrector scale of the VAZ 2115 headlights; 32 — parking brake warning lamp switch; 33-block for connecting the backlight; 34 — switch for instrument lighting lamps; 35 — steering column switch; 36 — alarm switch; 37 — relay for the heating element of the front seats of the VAZ 2115; 38-ignition switch VAZ 2115; 39 - rear fog light circuit fuse; 40 - fuse for the circuit of heating elements for the front seats of the VAZ 2115; 41 - door lock circuit fuse; 42 — front ashtray illumination lamp; 43 — ignition relay VAZ 2115; 44 — cigarette lighter; 45 — glove box lighting lamp; 46 — glove compartment lighting switch; 47 — electric motor of the VAZ 2115 heater fan; 48-additional heater motor resistor; 49-heater fan switch VAZ 2115; 50-heater switch illumination lamp; 51 — illumination lamp for the heater levers of the VAZ 2115; 52 — gear motors for electric windows of the front doors; 53 — right front door power window switch (located in the right door); 54 — gearmotors for locking front door locks; 55 — wires for connecting to the right front speaker; 56- gearmotors for locking rear door locks of VAZ 2115; 57 — wires for connecting to the right rear speaker; 58 — control unit for blocking the door locks of the VAZ 2115; 59 — wires for connecting to radio equipment; 60 — switch for headlight cleaners VAZ 2115*; 61- switch for heated rear window element of VAZ 2115; 62 — relay for turning on rear fog lights; 63 — block for connection to the heating element of the right front seat of the VAZ 2115; 64 — switch for the rear fog lights of the VAZ 2115: 65 — switch for the heating element of the right front seat of the VAZ 2115; 66 — fog light switch VAZ 2115*; 67 — switch for external lighting lamps; 68 — switch for the heating element of the left front seat of the VAZ 2115; 69 — block for connection to the heating element of the left front seat; 70 — wires for connecting to the left front speaker; 71 — left front door power window switch (located in the left door); 72-left front door power window switch (located in the left door); 73 — wires for connecting to the left rear speaker; 74-side direction indicators VAZ 2115: 75-light switch on the front door pillars; 76 — lamp switch on the rear door pillars; 77 — lampshade; 78-lobe of individual interior lighting; 79-block for connecting to the wiring harness of the VAZ 2115 electric fuel pump; 80 — trunk light switch; 81 — instrument cluster of VAZ 2115: 82 — trunk lighting lamp; 83 — display unit of the on-board control system of the VAZ 2115; 84 — trip computer VAZ 2115*; 85 — block for connecting the wiring harness of the engine control system; 86 — rear external lights of VAZ 2115; 87 — rear internal lights of VAZ 2115; 88 — block for connection to the rear window heating element; 89 — license plate lights; 90 - additional brake signal located in the spoiler of the VAZ 2115.
The order of conditional numbering of plugs in the blocks : A - block of headlights and headlight cleaners for VAZ 2115; B - cigarette lighter; B - VAZ 2115 mounting block, instrument cluster, VAZ 2115 ignition switch, windshield wiper and other electrical components (for blocks with a different number of plugs, the numbering order is similar); G — relay for turning on the rear fog light; D — alarm switch; E — gear motors for power windows and gear motors for locking door locks; F — interior lamp. In the instrument panel wiring harness, the second ends of the white wires are brought together into one point, which is connected to the instrument lighting switch (except for the white wire, from plug “4” of block “X2” of mounting block 28 to display block 83 of the on-board control system). The second ends of the black wires are also brought together to points connected to ground. The second ends of the yellow wires with a blue stripe are brought together to a point connected to plug “4” of the “X1” block of the VAZ 2115 mounting block. The second ends of the white wires with a red stripe are brought together to a point connected to plug “10” of the “X4” block of the VAZ mounting block 2115. And the second ends of the orange wires are also brought together to a point connected to plug “3” of the block “X4” of the VAZ 2115 mounting block.
If you installed it yourself
The previous owner of the car, in the absence of such a standard part, could install it himself. Such installation kits are sold in car dealerships. In this case, the electric relay can be located not only in the “standard” location. Finding it without calling the previous owner will not be so easy.
If a breakdown of this part occurs on the way, then you can start the car by closing contacts 87 and 30 (the location and circuit diagram are printed on the top of the relay housing). In this case, you are allowed to use the machine without any restrictions. But at the first opportunity, be sure to fix the breakdown. The operation of the VAZ-2115 ignition system directly depends on the relay.
VAZ 2115 starter relay: breakdown and replacement method
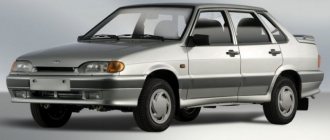
VAZ 2115 is one of the most worthy creations of the Volga automobile industry. In common parlance, this car is called a tag; it is truly considered one of the most popular and inexpensive cars on the domestic market, produced since 1997. The car earned its popularity quite honestly, since operation and repair do not pose any particular problems to the car owner. However, there are breakdowns that everyone who owns this wonderful car should know about. We will talk about the starter relay, its breakdowns and how to repair it.
What do you need to know about the starter relay for the VAZ 2115?
The starter itself is a four-pole DC motor that is powered by electricity from the battery. A technical inspection of the starter must be done every 100,000 km. Based on the principle of its operation, the starter consumes quite a powerful current, so even minor fluctuations in resistance can significantly reduce its performance and lead to complete breakdown. In order to make sure that the failure is in the relay, it is necessary to do a check. However, before performing this type of check yourself, be very careful to avoid possible injury. We turn on the ignition and turn the key, if the starter does not work, but you can hear some characteristic clicks, this means the relay is working, but the starter itself will have to be disassembled. If the situation is the opposite and when you bridge the contacts on the back wall of the starter without removing it from the engine you will hear the mechanism spinning, then the whole problem is in the relay.
The principle of operation of the VAZ traction relay
The starter coil, which receives power from the battery, creates a magnetic field that acts on the armature. It starts to move, compressing the return spring, which engages the bendix, which connects to the splines of the flywheel crown. The contacts of the elements close, the retracting winding remains without power, but the armature remains inside the coil, as it is held by a strong magnetic field. After the engine starts, the coil loses its power and the armature accordingly returns to its original position. In this case, the bendix itself disengages.
Starter relay malfunction
There are several options for checking the relay, which can be used to determine whether it is faulty.
- When starting the engine, the starter does not turn off on its own. This can easily be determined by the fairly loud and sharp buzzing that can be heard in the interior of the VAZ 2115;
- When you turn the key in the ignition switch, a click is clearly heard, but nothing happens and the starter does not start;
- When you turn the key, the starter allegedly starts working, but the engine does not start.
In most VAZ cars, the relays are similar to each other, differing only in the way they are attached to the starter. And unfortunately, breakdowns that specifically affect the relay in 95% of cases end in its replacement. But still, before making this diagnosis, you need to make sure of one more serviceability, namely the functionality of the contacts at the place where the wire and terminal are soldered. Often, due to oxidation, the contact is lost, and by soldering it again, you can get rid of the problem of the starter relay breaking, provided that after this procedure the car is fully operational.
For a VAZ 2115, it is more cost-effective to replace the relay than to repair it to the point where it works properly.
Any service station will help you perform such a replacement, but this pleasure is relatively expensive. A much cheaper way would be to do everything yourself. If the owner of the car knows his ward 2115 inside and out, then such a replacement can be made independently without much effort, knowing the specific sequence of actions.
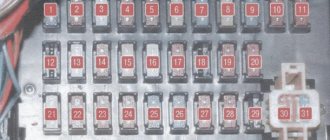
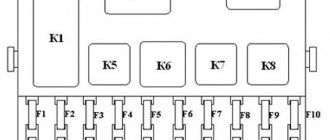
Fuse box diagram and location on VAZ-2114, 2115 and 2113
Remember one important thing, before you start disassembling the stove, wiper, headlight or anything else - make sure that the fuse responsible for this circuit has not blown