Fuel pump fuse VAZ 2115
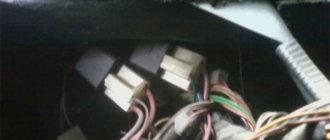
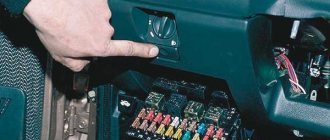
The fuel pump relay is located under the dashboard. On the passenger side, a side panel is opened that covers the beard on which the radio, on-board vehicle, and heater controls are mounted. We see a strip with three relays and fuses.
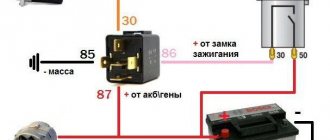
The pump relay is the lowest. Its fuse is also at the very bottom. When you turn the key, the relay turns on for 5 seconds in order to pump up pressure in the system and turns off. After the engine starts, control of the pump passes to the computer.
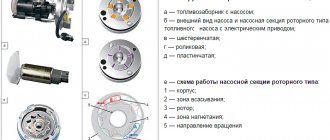
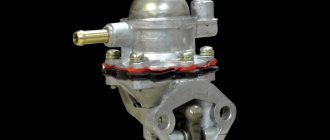
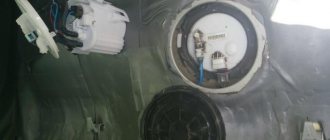
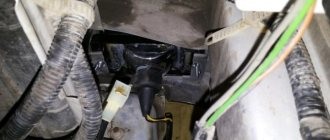
The mass of the pump (and fuel level sensor) is attached to the stud securing the handbrake to the body under the carpet. To get to it you need to remove the vestibule between the passenger and driver seats. There are 3 wires coming to the fuel pump: the first is +, the second is minus, the third is the fuel level sensor.
Where is
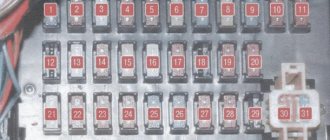
If we describe them from top to bottom, we get the following:
1. The fuse that controls the fuel pump. Its current strength is 15 amperes.
Lit
A fuse is a small element whose task in the design of electrical circuits is to melt in the event of an overload. The device melts and the current-carrying circuit opens.
Using the example of a solution from the popular VAZ Priora model, we can superficially examine the design and operating principle of the fuse. The device is small, the outer casing is made of plexiglass.
There is a conductive element inside. Such an element is based on several plates, which are made of different materials. Between these plates there is a special low-melting material. Electricity passes through this material, which allows the fuse to be an integral part of the electrical power circuit of the fuel pump. Fuses have a special marking in the form of the letter F. This designation indicates that the fuse element belongs to a circuit whose power is not large. To calculate the current that certain devices are designed for, you need to divide the power by 220. The result will be a figure in amperes.
If the fuse is blown, then such a malfunction is often caused by the following reasons:
— short circuit in the electrical circuit;
— failure of the fuel pump relay;
- low quality of the fuse itself;
In other words, more often the fuel pump fuse blows due to faults in the electrical circuits or as a result of failure of the components of the pump power circuit. Note that situations also arise when the fuel pump fuse burns on its own, but this phenomenon occurs much less frequently with high-quality elements.
How to identify a malfunction
The fuel pump relay turns on the fuel pump and delivers fuel to the injectors. The safety relay is activated when the engine is not running and the ignition is on (the control unit does not receive speed signals). This relay is switched off in the control unit via a safety switch and interrupts the power supply to the pump. For example, in the event of an accident, gasoline cannot flow into the engine. Checking the fuel pump is a job most likely reserved for service centers. In this regard, to find errors, we will limit ourselves to the following points:
— disconnect the fuel supply line at the distributor, while preparing a rag for spilled gasoline;
— even when the engine is turned off, a certain amount of gasoline may come out, since the system is under pressure;
— turn on the ignition for a short time without turning on the starter;
— if the pump does not start working, check the fuse or safety relay again;
— if fuel does not flow, check the pump relay;
Methods for solving the problem
Now that the main causes have been sorted out, you can move directly to elimination methods.
It is worth warning that if the motorist does not understand the design or is not sure that he can repair the fault on his own, then it is recommended to turn to a professional car service center.
So, let's look at what ways to deal with the malfunction.
Fuse
Disassembled dashboard while searching for fuse and cigarette lighter faults.
The most common cause of malfunction or inoperability of the electrical circuit of individual elements is the notorious fuse.
This is where you need to look for the cause first.
The fuse box socket – F4 – is responsible for the radio and cigarette lighter. The fuse marking in it should be 20A.
But it does not always withstand the load placed on it. Thus, frequent and large use of additional devices can lead to frequent burnout of this element. Therefore, to check it is worth removing and inspecting the fuse itself. If necessary, the element is replaced with new ones and if everything works, then the reason has been found. But if the problem does not go away, then you should look for it in other places.
Contacts
Checking the contact group of fuses for malfunction
A contact group is another common cause of a non-functioning electrical circuit. In most VAZs, the connecting contacts of the fuse with the block or in the circuit of the wire block oxidize or burn out, and molten plastic can interrupt the contacts.
To troubleshoot the problem, you need to check all the contact blocks of the wires that go from the radio and cigarette lighter to the fuse box. So, it is oxidation and insufficient contact that can lead to the inoperability of the elements.
Wiring
Another reason could be broken power wires. So, in order to find and fix the fault, you will need a tester that will test the wiring and find a broken wire . It is recommended not to fasten the wire using the old “old-fashioned method” using electrical tape, but to replace it with a new one. This will take little time, so it’s better to do everything in such a way that you get a short circuit and cause big problems.
Short circuit
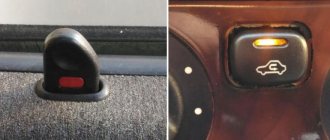
Location of frequent failure of the cigarette lighter socket.
The worst thing that can happen is a short circuit. The reason for this phenomenon is that frequent use of the cigarette lighter loosens the socket and this can lead to the contacts crossing and causing a short circuit.
The standard cigarette lighter is just a disaster for the VAZ-2114.
Here, the treatment for the malfunction is quite simple - replacing the socket. But, often motorists take a low-quality and cheap product, which repeats the procedure after a short time.
Bulb
Cigarette lighter illumination at night VAZ-2114.
The backlight bulb is located in the same electrical circuit, so the burnout of this element causes a malfunction of the radio and the cigarette lighter at the same time. So, if you replace the element, you can correct the situation.
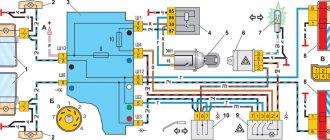
Relay and fuse block diagrams for VAZ 2115
The Lada 2115 was first released in 1997 and finished production in 2012. Over such a long period of time, the electronic components of the car have changed significantly. It is not surprising that modifications of the mounting blocks have changed more than once, and with them the fuses of the VAZ 2115.
An old-style car with a carburetor required one installer in the engine compartment. With the advent of a new 8-valve injector, a second unit was needed, installed in the cabin under the dashboard. Some of the new relays were placed under the steering wheel during the 2007 and 2008 upgrades.
The design of the mounting block box has become more modern over time. To make life easier for drivers, a diagram was placed on the lid and tweezers were attached for replacing elements.
Troubleshooting the cigarette lighter and radio
The main list of factors that can immediately damage the radio and cigarette lighter on this Lada model is as follows:
- wire short circuit;
- loss of contact on the safety block;
- blown backlight bulb or fuse;
- oxidation or disconnection of contacts from long-term use.
In principle, any of the listed problems can be solved on your own, without resorting to the help of services or specialists. A number of simple manipulations that take no more than 15 minutes are sufficient in the vast majority of cases.
So, first you need to take care of checking the safety block, for which you need to remove it from the cavity under the hatch to the left of the steering wheel. On this block, you need to find the fuse numbered F4 and evaluate its external condition - at this stage, sometimes you can already see the malfunction.
Relay under the hood
The main one is the fuse box near the engine. The vast majority of fusible protective elements and almost all relays are located here. During the existence of the model, its modifications changed several times. The most common modern block was presented in 2008. In this release, the arrangement of individual elements has changed slightly and new ones have been added.
You can find the block in the engine compartment above all the devices in the engine compartment. It is protected by a cover that can be easily opened by pressing two latches.
Malfunctions and their elimination
The cause of radio failure in a car is a failure of the fuse or a contact failure due to burning or oxidation of the contacts. To replace the fuse link, you need to open the cover of the distribution box. Removing the fuse from the mounting socket is done with special plastic tweezers, which are stored inside the relay box. The tweezers are placed on the body of the fuse-link, then the element is pulled out with a gentle upward movement. Spare fuse links are stored in the mounting block in separate cells.
If a new fuse fails immediately after an attempt to turn on the head unit or other consumers connected to the circuit, then the cause of the malfunction is a short circuit in the design of the products. A common defect is a loose cigarette lighter socket or a shorted heating coil. The damaged element cannot be repaired; a new cigarette lighter must be installed together with the socket.
In VAZ-2115 cars there is a defect associated with the destruction of conductive paths in the mounting block. The malfunction occurs as a result of moisture getting inside. The repair consists of restoring the circuit by soldering the track; it is recommended to replace the module with a new one.
At the same time, you should check the condition of the water drainage channels and rubber hood seals.
The cause of a blown fuse may be a short circuit that occurs due to a broken cable or rubbing of the insulation on the metal edges of the body. Searching for the break point is carried out visually or using a test light (or multimeter). It is possible to temporarily connect the wires by twisting, but then you need to replace the section of the cord with a new element. If such a replacement is not possible, then the cable fragment is fixed using metal connection sleeves, which are covered with a heat-shrinkable tube.
To adjust the radio settings, buttons are used that are exposed to dirt or moisture. Because of this, contact is broken and the equipment stops responding to key presses. The repair consists of drying the front panel or head unit assembly. To remove dirt, you need to disassemble the panel and wash the contacts with a special solution. If the rubber gasket is destroyed, a new element must be installed.
The microswitch, which is located on the printed circuit board, may be damaged; the part must be changed at a service center.
The built-in CD player is equipped with a precision electronically controlled drive, which fails due to contamination of the mechanisms or oxidation of the contacts. Restoration of functionality is carried out in a workshop; it is recommended to purchase a new head unit.
If part of the image on the display disappears, you should also contact a service center. Failed backlight diodes can be replaced independently at home if you have soldering equipment and electronics repair skills. To carry out the work, it is necessary to dismantle the radio and disassemble the front panel. Damaged elements are desoldered and replaced with parts with identical color and electrical characteristics. During installation, it is necessary to take into account the polarity of the diodes.
The reason for the deterioration in radio reception is a damaged cable connecting the antenna and the head unit. To restore functionality, you need to replace the cord that runs under the plastic interior trim and the ceiling panel.
VAZ 2115 fuse diagram
The most common models are 3722010 (since 2004) and 21150 3722 010 10. The set of protective elements of electrical equipment in them is not very different from each other, but there are differences, and they are reflected in the decoding of the diagrams below.
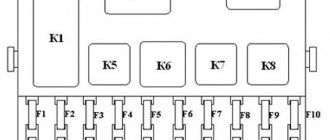
The main mounting block under the hood of the car.
| Item no. | Power, A | What protects |
| 1 | 10 | Lamps for rear fog lights and PTF turn-on indicator |
| 1* | 10 | Headlight cleaner motor and relay (contacts). Headlight washer activation valve |
| 2 | 10 | Turn signals, breaker relay and hazard warning lamp |
| 3 | 7.5 | Interior lighting front, center, trunk Ignition switch Engine management system Brake lamps On-board computer |
| 3* | 7.5 | Rear lights (brake light) Body interior light |
| 4 | 20 | Cartridge for connecting a portable lamp Heated rear window (contacts) |
| 4* | 20 | Cigarette lighter Socket for portable lamp |
| 5 | 20 | Horn Cooling fan motor |
| 6 | 30 | Power windows Power relay (contacts) |
| 7 | 30 | Heater motor Windshield washer Headlight wiper motors (in operating mode) Cigarette lighter Glove compartment lamp Rear window heating relay (winding) |
| 7* | 30 | Headlight wiper motor Winding Heater motor Window washer Rear window wiper motor Windshield and rear window washer activation valve Cooling system fan activation Rear window heating relay coil Indicator lamp Glove compartment lighting |
| 8 | 7.5 | Right PTF |
| 8* | 7.5 | Left PTF |
| 9 | 7.5 | Left PTF |
| 9* | 7.5 | Right PTF |
| 10 | 7.5 | Left dimensions License plate lamps Engine compartment lamp Instrument lighting switch Illumination lamps for switches, instruments, cigarette lighter, ashtray, heater control levers Illumination panel for heater levers |
| 11 | 7.5 | Right dimensions |
| 12 | 7.5 | Right low headlight |
| 13 | 7.5 | Left |
| 14 | 7.5 | Left high beam headlight High beam indicator lamp |
| 15 | 7.5 | Right high beam |
| 16 | 15 | Turn signals, relay-breaker for turn signals and hazard warning lights (in turn signal mode) Reversing light lamps Lamp health monitoring relay On-board monitoring system display unit Instrument cluster Insufficient oil pressure lamp Parking brake activation lamp Brake fluid level lamp Battery low warning lamp Trip computer ( if installed) Generator field winding (in engine starting mode) |
| 17 | — | Reserve |
| 18 | — | Reserve |
| 19 | — | Reserve |
| 20 | — | Reserve |
Additional recommendations
First of all, you need to avoid the temptation to solve the problem quickly by replacing the faulty fuse with something that comes to hand that can close the necessary contacts in the block.
For the same reason - in order not to provoke a more serious breakdown (fire, short circuit or melting) - you cannot get by with simply twisting the wires: you should definitely use a soldering iron with solder.
You should be careful when buying a new fuse or, especially, a cigarette lighter - low-quality counterfeits or uncertified products can fail immediately, so they should be checked in the store with a tester under load.
Finally, before starting work on repairing electrical appliances, it is strictly recommended to turn off the power to the car by removing the terminals from the battery. If you are unsure of your abilities, it is better to contact a professional car service center, or at least carefully study the relevant instructions (you can find them for any VAZ model, including 2114, on the Internet).