The Lada Kalina car has been popular among car enthusiasts from the first days of production to the present day. Among them there are craftsmen who can make repairs themselves or connect a new electrical device. Consequently, drivers will need an electrical circuit, both in general and for some components of the car. Knowing the location, purpose and method of connecting the elements, you can detect a failed part. The pinout or pinout provides a description of all contacts, microcircuits, and connectors.
The structure of the general electrical equipment diagram of the Lada Kalina car
Kalina's electrical equipment contains all devices that generate, transmit and consume electricity. Of course, all components and assemblies of the car are connected to each other by wires. Wire harnesses are a structure of two or more rods that are connected into a bundle. Sometimes car enthusiasts call them “pigtails” among themselves. The general diagram consists of four main cable bundles interconnected by connectors:
- The harness located in the front part connects the battery to the mounting block and the instrument harness. Next: assembly block with optics unit; starter and generator; reverse breaker at the gearbox.
- The instrument panel bundle combines the front and the rear harness with the “pigtail” of wires of the electronic engine management system, fuses and the instrument panel itself.
- The rear harness connects the instrument cluster with power windows, lock solenoids and other consumers in the doors, as well as the outputs of the rear dimensions, cargo compartment lid, and license plate lights.
- The engine control system bundle is configured to connect to fuses and relays, sensors and instruments. The ECU harness is connected to the dashboard cable bundle.
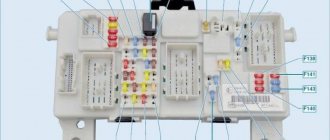
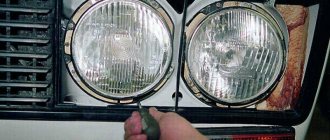
The connecting connectors of the harnesses, namely the front, rear and tidy, are located under the front console on the left. The heater shaft houses the connecting connectors of the console wire bundle and the “pigtail” of the ECU wires.
Designation of elements on the general electrical diagram
All elements on the diagram have the same pictogram, regardless of brand. Electrical wiring is indicated in one or two colors. Wires of the same color are connected in a separate bundle; a black wire is used for ground connections.
1 — right headlight assembly; 2 — hood locking device sensor; 3 - beep; 4 - starter; 5 - battery; 6 - generator; 7 — electric motor for wipers; 8 — block of contacts for the left headlight ; 9 — power window of the front right passenger door; 10 — gear motor for the right door glass lift; 11 — connections to the driver’s door speaker; 12 — locking the left driver's door; 13 — electric drive of the windshield washer reservoir; 14 — outside air temperature sensor; 15 — connection block to the “pigtail” of wires” of the ECM; 16 — electric drive for locking the passenger door; 17 — brake fluid level sensor in the expansion tank; 18 — connections to the speaker of the right door; 19
— passenger door window lift switch, which is located on the driver's door;
20 — switch for lowering and raising the glass of the left door; 21 — blocking the door locking device; 22 — power supply to the front passenger door lift gearbox; 23 — mounting block input; 24 — immobilizer control unit; 25 - similar for security alarm; 26 — instrument cluster pinout; 27 — right direction indicator; 28 — lighting of the “glove compartment”; 29 — glove box lighting switch; 30 — brake light key switch; 31 — ignition switch of the anti-theft system; 32 — external optics control module; 33 — power steering column lever; 34 — left turn indicator switch; 35 — connection block for the right rear speaker; 36 — rear right door lock; 37 — rear window heating unit; 38 — reverse breaker; 39 — reverse switch; 40 — heater fan switch; 41 — additional heater resistor; 42 — electric motor of the stove; 43 — connection block to the left rear speaker; 44 — electric drive for locking the left rear door; 45 — power supply to the fuel pump and float; 46 — reverse light switch; 47 — brake light switch; 48 — cigarette lighter power supply; 49 - power supply for reverse lock; 50 — pads for connecting to a sound reproduction device; 51 — illuminator of the heater ventilation control unit; 52 — power supply to the electric power steering control unit; 53 — power supply for the car interior lighting unit; 54 — right rear lamp; 55 — locking the locking device of the cargo compartment lid; 56 — luggage compartment lighting drive; 57 — license plate illumination; 58 — additional brake lamp; 59 — power supply for heated rear window; 60 — cargo compartment lighting lamp; 61 - rear left headlight.
Fuel system problems
Hi all. In this note I will describe what problems I had with the fuel system on Kalina.
It all started when, after buying a car, I decided to change all the filters (a mandatory step, in my opinion), including fuel ones. So, when I tried to replace the barrel, I broke its latches. As a temporary solution, I tightened it with nylon ties and installed a new Pekar filter.
After 90,000 km maintenance (here is a recording of 90,000 km maintenance).
I went to the gas station and filled it up to full. I arrived home and there was the smell of gasoline. But since it was pouring until it was full, I thought maybe gasoline from the neck of the tank got onto the wing and basically clogged it up. The next day in the morning when starting the engine there was again a persistent smell of gasoline. I was thinking about the adsorber. However, having arrived at the destination, after some time I saw a puddle of gasoline in the snow under the car in the area of the right rear wheel.
Since my fuel filter (barrel) is a little stuck on plastic ties, I thought that either the ties had cracked in the cold, or had broken somewhere on a rut and was leaking from under the filter. Hoping to detect a leak under pressure, I started the engine and what I see: the filter is dry, there are no leaks, and the tank below is filled with gasoline.
We lift the seats, unscrew the 4 screws of the tank access hatch and find that gasoline is spraying out from under one of the latches.
The old latch is skewed because I pulled it out. The fasteners seem to be in good condition. Why she didn't hold the fitting, I don't know.
You can buy new fittings, remove the latches from them and replace the old faulty ones with them. In the fall I bought a couple of fittings and they came in handy.
You can, of course, replace the fitting itself, but I read on the drive and heard from local craftsmen that it’s not a fact that it will hold. Yes, and the fuel pipe can be broken off. And since the tube assemblies were not available when I asked, there is a possibility of turning the car into real estate for a while.
In general, I limited myself to just replacing the latch.
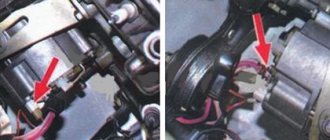
Once again, sensing the smell of gasoline, I raised the back seat again, thinking that another latch had become loose, but no. There is no leakage from under the filter either. And then I remember that VAZ once carried out a recall on viburnums due to the fact that the fuel pipe was rubbing against the clutch cable. I open the hood, and there it is, in the contact area everything is filled with gasoline. It would be possible to remove the tube and cable into the corrugation in advance, especially since I once read about the problem, but I didn’t think that this would happen to me.
But I read on the Internet that this problem was not solved at LK-2 either. I leave links for those who are interested, in more detail here https://www.zr.ru/content/articles/914003-lada-otzyvnye-kompanii/ and here https://www.zr.ru/content/news/905920-avtovaz -otzyvaet-bolee-106-tys/.
Meanwhile, I’m disassembling the car to pick up the phone. I snapped it off from above without any problems, but from below the latch did not want to snap off at all. The fuel filter puller also did not help, since the latches are not the ones for which it was designed. After suffering for about an hour, I decided to break the latch.
Then everything was quite interesting. Having visited almost all auto shops in the area, the required tube was nowhere to be found (!) Yes, the trees are green, is this TAZ or a Rolls-Royce?! All sellers only offered fuel pipes that go around the fuel filter at the fuel pump. I had to take such a kit and use it to assemble the needed one.
I picked up the phone number 1118-11-04243-30. They are the same length as the factory tube, plus or minus, but this tube has fittings with latches on both sides (the latches are interchangeable with the one I broke), and the factory tube has such a “weeper” at the end that goes towards the ramp.
I cut off the part with the fitting from the new tube, but the “weeper” didn’t want to go into the tube.
I watched a video on YouTube on the channel of the magazine “Behind the Wheel” “How to repair a fuel system pipe?”, where the presenter Gennady Emelkin says and shows that with the help of warm water the tube can be heated enough to insert the fitting. Either I didn’t heat it right, or my water wasn’t right, but I didn’t get anything out of it. A hair dryer saved the day. The “pisyun” entered the tube he heated normally, but when the tube cooled down, it shrank. I drove it for a couple of days, no gas flowed, the pipe didn’t break, so it was done normally.
I also bought a corrugation with a diameter of 16mm and wrapped the fuel pipe and clutch cable at the points of contact. There is no such thing as too much security.
Since this tube was not available anywhere, I bought a set of tubes that go near the tank and made the necessary tube from one of them. But during the collective farm process, it was not very successfully bent in one place. There was no deformation of the tube, but since they later brought me a new tube from Rostov, I now decided to install it. Naturally wrapped in corrugation to avoid chafing. The new tube seems to be slightly shorter, and has a Grant part number 2190-1104220. My native one had the article number 11180-1104220-00.
Since about May, the following problem has appeared: after a long period of parking (for example, after an overnight stay), the car did not always start the first time. Moreover, if it didn’t start from the first, then from the second with half a kick. It doesn’t seem to be critical, but it’s unpleasant when something doesn’t work as it should. There was a period when, within two weeks, the car always started the first time and I already thought that the problem had self-liquidated, but that was not the case. Of course, one could assume that due to a kinked tube, the pump does not pump enough fuel the first time, but this seems unlikely to me, although I changed the tube just in case.
I decided to start with the fuel pressure regulator. I removed the pump, took out the regulator, and went to the store with a sample. The new one looks a little different, but fits well.
On the new regulator, the male terminal is attached to the regulator itself, on the old one it was on a half ring.
But even after replacing the regulator, the sound somehow changed when pumping gasoline. Either this is due to the new RTD, or the pump is about to retire. But so far so good, I've been driving for six months already.
So I drove for a year with a fuel filter secured with zip ties without any problems. Of course, I could continue to drive like this, but I don’t like it when something is snotty and not according to Feng Shui.
I wanted to change the pipes in the summer, but I couldn’t find it all the time, and while there were the last warm days of this year, I decided that it was time to change it, and at the same time give up the fuel filter before winter. And in the spring, the latch on one of the fittings loosened under the rear seat, and I decided that I needed to replace this part of the fuel line with a new one, although, in principle, it was possible to replace the fittings with the latches separately, but this is a pain.
I bought fuel pipes back in the summer, an SCT filter back in that year, so everything was there, I just had to do it.
I went to the garage to see a mechanic because I couldn’t change it myself, or it would have taken all day.
Set of new tubes
Condition of old fitting latches
New SCT fuel filter. I wanted to install it that year, but I lost it and Pekar bought it. After installing Pekar, SCT was found :-D. This year, before installation, the SCT disappeared again, was purchased by Fortech, but after its purchase, ironically, the SCT was found. I decided to install it already so I don’t get lost anymore 
The previous Pekar fuel filter lasted just under a year and exactly 14,010 km. Quite dirty gasoline was leaking from it. If we live until next autumn, we will need to change the mesh in the tank again; apparently, we have a lot of dirt and debris in the gasoline.
Well, according to good tradition, summing up this entry, I will write when what changed and how much it cost.
mileage - part/work - price
87259 km - Pekar fuel filter - 230 rubles
87259 km - Work on replacing the fuel filter - 200 rubles
90007 km - Latch of the fuel fitting of the gas tank - 70 rubles (price per fitting)
94737 km - Fuel pipe (the one that rubbed against the clutch cable) - 200 rubles
94737 km - Fuel pressure regulator - 550 rubles
101269 km — Set of fuel pipes around the tank — 530 rubles
101269 km - Work on replacing fuel hoses - 600 rubles
101269 km - SCT fuel filter - 175 rubles
Electrical circuits of various car parts that are most often in demand
There are often situations when the general diagram does not show the pinout of small car components. Separate graphic images of each, for example doors, foglights, etc., are intended for this.
Pinout of wires of the left driver's door
1 — output to the rear harness: 2 — output for connecting a loudspeaker; 3 - door locking device; 4 — door regulator switch; 5, 7 - supply voltage to switch wiring harnesses; 6, 8 — block of the wire bundle of the switch block; 9 - power supply to the gearbox of the device for lowering and raising the windows.
Passenger's front door wire pinout
1 — output to the rear wiring harness; 2 — output to the right speaker; 3 — door locking device drive; 4 — electric motor of the device for raising and lowering the windows; 5 — bundle of wires for the window regulator control unit terminals; 6 — power window switch key; 7 —gearbox of the glass lifting device.
What is a fuel pump
The gasoline pump is a key component of the power system; its job is to ensure an uninterrupted, timely supply of fuel to the system.
In each model, the design and location of the fuel pump is unique; for the Lada Kalina, this device is located on the opposite side of the power unit.
On the one hand, this arrangement allows you to benefit from the technical capabilities of the machine, but on the other hand, the device requires more powerful operation than models in which the fuel pump is located closer to the engine.
In order for Kalina’s fuel pump to cope with its job, it is presented in an electric version. Its advantages are:
- simplicity of design;
- good fuel supply;
- safety.
But, as one might expect, Kalina’s electrics are not yet a strong point; they often break down, which is the main disadvantage.
In addition, the disadvantages of the Lada Kalina gas pump include increased noise levels, sensitivity to the quality of gasoline, and the fact that it requires cooling.
The issue of high-quality gasoline in our country, unfortunately, still remains unresolved; this is one of the reasons why the fuel system of the Lada Kalina fails.
Filters become clogged, which disrupts the operation of the entire mechanism and ultimately leads to pump failure.
This is why filters, or meshes as they are also called, need to be changed regularly.
We’ll talk about this, but first, let’s figure out what malfunctions happen with the Kalina fuel pump?
Types of faults:
- One of the most common pump malfunctions is a rapid decrease in pressure after the engine starts. This fact indicates serious violations that can be caused either by a valve defect or a breakdown of the pressure level regulator; it is quite possible that the injectors are also clogged. A sharp drop in pressure leads to problems in starting the engine , which, if the breakdown is not corrected, can even lead to engine failure.
- It also happens that the engine loses power, or the engine does not start at all, even when cold or hot. All this happens when a membrane or spring breaks, a rod wears out, or filters become clogged, and the latter happens more often than anything else.
- In any case, having discovered that there is something wrong with the fuel system, you should first check the condition of the filters, because, due to low-quality gasoline, they become clogged quite quickly, and it is better to change them in a timely manner, without waiting for problems. Now let’s talk about how to change the mesh from the pump yourself.
We recommend: Removing the driver's door trim
Why might the mesh need to be replaced?
Two grids - dirty and clean
First of all, because of bad gasoline. If you regularly refuel at dubious gas stations, then it’s only a matter of time before the fuel pump fails . Purification of gasoline from impurities in the gasoline pump occurs in several stages, and the mesh of the gasoline pump is the first line of defense, so to speak. It is the first to absorb all large particles of impurities and dirt. After passing through the mesh, gasoline enters the fine fuel filter, then passes through another mesh (which is located near the fuel pressure regulator), and finally goes through the third mesh (located directly in front of the injectors). If problems arise in any of these areas, you won’t be able to go far. The car engine simply will not start. Or it will start, but will work unevenly and jerkily.
recommends changing fine filters every 30,000 kilometers . But he doesn’t give any recommendations about the fuel pump mesh. Therefore, many car owners forget to change this grid, and remember about it only when the engine begins to behave strangely.
The general rule is: if the car has traveled 60,000 kilometers, the mesh should either be cleaned or replaced. It is advisable to clean it only if there is no serious mechanical damage to it. But if the machine has traveled the distance indicated above, then the mesh in the pump is often worn out to such an extent that it is easier to throw it away than to clean it.
We recommend: Permissible tread height for a new summer tire