Installation of 1 din radio in Grantu standard and norm
What is needed to install a radio in a VAZ 2190:
- The radio itself is also the head unit;
- flat screwdriver;
- Straight arms.
Abbreviations and symbols in the text:
- GU – head unit;
- MMS – multimedia system;
- DIN (din) – installation size for acoustics in a car.
Step-by-step instructions for installing the head unit
- a narrow flat screwdriver or plastic spatula for installing acoustics;
- 1-din radio with frame.
The seat in Grant is designed for 1 din.
To work with large 2-din sizes, you will need to cut out the partition and install a decorative frame. Step 1 . Using a flat-head screwdriver, remove the plastic plug for the radio. To do this, carefully pry it around the edges and pull it towards you.
The placeholder for the radio is installed from the factory.
Step 2 . On the back of the plug there is a mount for ISO connectors. There are two connectors: music power and wires for the speakers.
Step 3 . If necessary, connect an adapter for your radio to the ISO. Usually it comes included .
If an adapter is not needed , proceed to step 4.
If an adapter is needed for acoustics, it is included in the kit. Example in the picture.
Step 4 . We remove the glove compartment. Holding the glove compartment clamps in the upper position, forcefully lower the glove compartment down.
Overcoming resistance, we pull the lid towards ourselves - the glove compartment is removed.
Removing the glove box on a Grant is easy when you know where its latches are located.
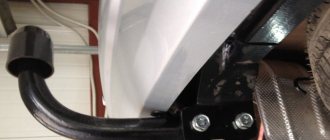
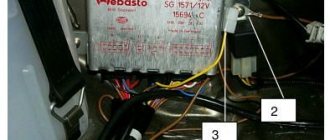
Step 5 . We climb under the panel in the area of the front right passenger's feet with a flashlight. Behind the felt on top we find a thick black wire - at its end there is a plug for the factory antenna.
We extend the plug to the installation location of the radio.
Here we are looking for the antenna wire.
Step 6 . We install metal slides for the radio. a screwdriver to bend the fastenings of the slide at the top and bottom to ensure secure fastening.
These fasteners secure the slide into the panel opening.
Step 7 . We connect the power connectors, speakers, antennas to the radio. We insert it into the slide all the way. We attach a decorative plastic frame.
What to do if the length of the wires and antenna is not enough
To get by without extending the wires , you will have to suffer:
- We put our hand under the panel in the glove compartment area;
- We put the radio in the slide and connect it to the plugs;
- We blindly connect the power, the connector for the speakers, the wires for the amplifier, and the antenna.
Disadvantages of the method : we spend a lot of time, the process is dreary and inconvenient. We'll probably rip off your wrist.
Plus : there is no need to build up wires, which will then interfere with the installation of the PG, resting against the back wall.
If the radio tape recorder dangles in the slide and rattles
It happens that the acoustics hold weakly in the sled , although they sit firmly. Solving the problem:
- Using the keys for dismantling (included with the control unit), remove the radio;
- We take a small piece of vibroplast (resin-based foil) and glue it onto the slide from the inside, top or bottom - this way we will ensure that the tape recorder is completely pressed against the slide without unnecessary vibrations;
- Once again, use a screwdriver to press down all the fastenings of the slide: some might have been under-tightened;
- We put the acoustics back and check - all unnecessary vibrations during shaking should disappear.
Vibroplast helps not only with soundproofing a car.
How to install
Installation of the radio on the Grant should be done in the standard socket provided by the manufacturer. After this, the speakers and additional parts are installed. The presence of a factory communication harness ensures the fastest and easiest connection.
Car radio
If a standard-sized head unit is selected, the process of installing a radio in the Lada Granta consists of the following steps.
To remove the latches from the front frame, you need to hook the plug pocket by its edges. The electrical wiring plugs are carefully disconnected. The glove box housing needs to be folded down. The travel stops, mounted at the top of the rear wall, are disengaged from the instrument panel. The cover is dismantled - to do this, you need to carefully pull it towards you. To route the cable to the player, lift up the car's floor covering, which is located next to the passenger seat. The standard slides required for installing the head unit are installed using bendable elements.
Acoustics
After you have managed to install the radio in the standard connector, you need to install speakers. Lada Granta liftback cars with basic equipment are equipped with standard wiring for acoustics. It is laid under the decorative door trim.
The speakers should be placed in the doors. For this purpose, the metal frame of the doors on the Lada Granta already has holes with a diameter of 16 cm. However, there are no holes provided for this in the trim - the car owner will need to make them himself. In this case, the diameter of the hole in the casing must be equal to the size of the diffuser.
After installation, the speaker ring should be secured to the trim using screws. The top is covered with a decorative mesh.
Some difficulties may arise during installation. When the car owner decides to install speakers whose diameter does not exceed 13 cm, he will need to “build up” the missing plane. When choosing front speakers for the Lada granta liftback, experts advise giving preference to those models in which the metal grille and plastic frame have a minimal protrusion above the door surface. Otherwise, it may be difficult to open the glove compartment.
The car enthusiast can choose compact or enlarged rear speakers. In the latter case, they are built into the luggage compartment shelf. The diffusers in this arrangement are protected by original meshes - they are offered by the car plant.
Removing the standard radio in Grant Lux
The difference between grants of the luxury configuration: the MMS (multimedia system) installed from the factory. This is a 2 din device.
To remove standard acoustic grants :
- take a knife or plastic spatula to dismantle the acoustics and disconnect the decorative trims to the right and left of the radio. It is not necessary to take pictures;
- in the gap between the cover and the panel we find the head unit lock. There are two of them on both sides. Press it out with a screwdriver;
- we take out the GU on ourselves.
Everything is described in detail in the video:
Replacing the standard MMC in Grant
The process - after removing the acoustics, we install a new system.
Difficulties : you may have to finish the fastenings of the new system for VAZ ones. Plus you need the right frame. The factory MMC frame may not fit.
Have you bought a new 2 din radio, but there is no frame for sale? You can do it yourself .
Example at the link.
How to install 2 din in grant norm or standard
- dismantle the center console trim - unclip the fastenings, move it forward and disconnect the buttons and heater handles;
- cut out a vertical plastic partition that will not allow you to install a 2 din device;
- cut down the plastic casing of the central air duct;
- try on a new acoustic unit, adjust the fastenings if necessary;
- install adapters from the delivery kit on the wiring (if required);
- install the device;
- if we leave the old center console trim: we cut out the partition, try it on, put it in place with the buttons and handles connected, adjust the decorative frame of the control unit, install it;
- if we install a new trim on the console under a 2 din device: we transfer the heater control unit and buttons from the old trim, install them in place, and put a decorative frame on the control unit.
What extensions can there be?
If you plan to connect a professional device via the ignition switch or directly to the network, then in order to do everything correctly, you need to take into account the extensions specific to the 220 radio. Thanks to this functionality, the device is equipped with additional functionality that makes using the radio more comfortable.
For example, these could be extensions:
- ANT. This extension will be useful if the car has a retractable antenna. That is, if you need to activate it, you can simply give a command to the device and the antenna will turn on automatically.
- REMOTE. Thanks to this function, you can connect an amplifier to the system and, accordingly, achieve better sound. If your car is basically small, then this function will not be particularly useful, since in any case you will not be able to achieve the desired sound background.
- ILLUMINATION. Using this extension, you can make sure that the brightness of the device is reduced while driving and does not distract the motorist. When the car stops, the system will automatically increase the brightness of the display.
- MUTE. This extension is enabled only when the car owner needs to talk on a mobile phone. When the phone rings, the system automatically turns on this extension and the speakers are turned off.
Instead of a total
- If we install a simple radio, the size should be no more than 178 * 50 mm. Installation requires plastic spatulas or a screwdriver. Adapters and slides are included .
- To install 2 din, you need a new overlay on the console, a decorative frame on the GU itself, wire cutters and a metal blade to adjust the installation location.
- Are we replacing the standard speakers with another of the same size? Still need a new decorative frame . Otherwise, gaps in the panel will be visible.
More articles about Granta here.
source
Lada Granta Pustishka › Logbook › Installing a 2din radio and speakers
Hi all. I decided to install a radio and front speakers to break up the silence when driving, and what news I could find out on the radio.
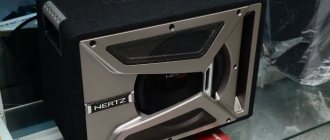
I bought a Prology DVU-750 radio, 2din, with a 7″ screen
I bought speakers (13 cm) Pioneer TS-G1330F
I have a central panel in my car for a 1din radio. I didn't buy a new one (for 2 din), but decided to install it in the existing one. I took it off, it is attached with latches (you can easily find on the Internet how to do this), do not forget to first remove all the switching knobs, as well as the radio cover, because... there are wires there.
For removal and in general, you will always need a set with Ali
Afterwards, in it, using a jigsaw, I cut out an opening for the radio, leaving edges around the perimeter of the cutout, but making cuts in them to impart plasticity, so that the radio could be easily installed.
I decided to install the speakers not on metal, but on the facing panel in the door. I made holes according to the template (it came with the speakers) using a craft knife. Connected using lugs and speaker wire.
The wires were brought to the niche of the central panel
The existing feature with the wires leading out from the “speakers” originates from the connector above the pedal system, the wiring does not go further into the door. Therefore, I did not use them, but used the connector that came with the radio and connected the wires from the speakers to it
This is what the column on the door looks like
Well, I put everything back in place, installing and connecting the radio.
The wire from the radio that goes to the minus of the handbrake, to prohibit viewing the video while moving, was connected to the permanent minus contact. And now you can watch videos in all driving or parking modes)
I read on the Internet that the antenna wire should be under the front passenger carpet, but I didn’t find it there (I don’t even have an antenna, so I’ll install it! (this is the next topic))
But I found such a wire with a connector
Price: 8,000 ₽ Mileage: 3,150 km
Reviews
| № | Positive |
| 1. | Victor, 39 years old: after buying the car, he did not change the radio, despite the push-button control option. The sound quality is good, the radio reception is excellent, that's enough for me. |
| 2. | Konstantin, 41 years old: bought the car second-hand, second owner. I didn’t change anything, I left the original radio. The functionality is good, the build quality is also good, it reads from a flash drive. |
| 3. | Vasily, 44 years old: I listen to the radio more, the reception in the city is good. True, it causes interference near metal structures, but this is natural. |
| 4. | Kirill, 36 years old: I work as a taxi driver, on wheels all day. The standard tape recorder saves the day, it works properly. My friends recommended replacing it with a touchscreen model from the new Granta, but so far the old one hasn’t failed. |
| Negative | |
| 1. | Victor, 38 years old: the standard audio module, although not bad, seemed to me not enough, so I replaced it with a foreign one and supplemented it with an amplifier. Now the volume is good, the quality is high. |
| 2. | Mikhail, 42 years old: I work as a courier, I drive for the entire shift. I expected more from the standard radio, so I had to replace it with a new one. The volume suits me, I plan to connect an amplifier - a crossover. |
| 3. | Ivan, 33 years old: I bought the car second-hand, immediately replaced the audio module, the reviews are not good. New and high-quality equipment from Trinity, no problems. |
| 4. | Vladlen, 40 years old: friends gave me a gift in the form of a radio with touch control for our anniversary. Before this there was a push-button one. Can't compare, quality, sound, control, functionality at a high level. |
Conclusion The opinions of motorists on the functionality and sound quality of the standard radio are divided, which is obvious. Everyone evaluates according to their own criteria. Some people care about sound, others about functionality, and others about control. Regardless of the type of radio: push-button or touch-sensitive, the workmanship is good. No massive breakdowns or defects were recorded. Maintenance is not expensive, parts and components are available both at official representative offices and on the Internet. Now it will not be difficult for the owner to remove the radio on the Granta liftback with his own hands without contacting a service station.
see also
Comments 18
ru.aliexpress.com/item/Hi…p&ws_ab_test=searchweb0_0, searchweb201602_4_10065_10068_319_317_5730215_10696_453_10084_454_10083_10618_10307_10301_538_537_57297 15_536_10059_10884_10889_10887_100031_321_322_10915_5735415_10103_10914_10911_10910, searchweb201603_51, ppcSwitch_0_ppcChannel
She, but under a different name, cool)
As far as I understand, you won’t have to play tricks with the wiring, will the chips fit according to the standard?
Yes, they installed easily, the only thing is that if there are no speakers, you will have to connect them to these connectors)
Monster. Lesha, why did you saw up the car?
Times are hard, we have to turn around))
Install a normal console and a frame for 2 Din. So that the mafon sits behind the face. It looks like a collective farm.
I agree, but will it definitely fit into the standard console? In general, you can tinker and make this one so that it looks like your own
It seems like you can’t see any flare, or did the frame come with the mafon? There are also plans to install 2din, they advise it’s better to take a deluxe console, I see yours looks ok, sawn
It's like saying, we need to finish it. The frame is included, but it is not needed, at least for now. I'm thinking of making the frame by cold welding. But ideally, you need to buy a panel for 2din, but I just don’t know how everything will fit together, whether the purchase will be in vain.
Acoustics for the front doors of Lada Granta
Installing speakers in Granta doors allows you to be independent of the body type - speakers in the doors do not require an acoustic shelf. This means that you can install speakers in a sedan and a hatchback according to the same principle.
Preparatory work
Before we begin the installation itself, let's figure out how to prepare the car. For this:
- We disassemble the door : dismantle the handle (pry up and remove the trim, unscrew 2 screws), the tip of the limit switch, two screws from the bottom of the door, overcoming the resistance of the retaining pins, pull the door card toward you and remove it from the door;
- We soundproof the door: in the warm season or in a heated garage, we cover all accessible parts of the door with vibroplast. Vibroplast StP M2 is suitable; when applying it to the door, be sure to heat it with a construction hairdryer and roll it with a pressure roller;
- If you have Spleen thermal insulation material, we cover the inside of the door card with it. This will further hide noise from the door when assembled;
- We are preparing spacers , if any are required for installing 16 cm speakers - more about them later in the text;
- We replace the factory terminals on the speaker wire in the door with normal ones (usually good terminals are included with the speakers) - to do this, we simply cut off the unnecessary connectors and attach the terminals we need to the wiring. A high-quality twist with heat shrink is enough;
- If the door panels do not have holes for speakers , we prepare them. It would be optimal to supply factory acoustic grids, which are installed on luxury versions of Granta and Datsun OnDo.
Installing speakers in Granta front doors
The standard acoustics in Grant are 13 cm speakers. They do not produce good sound, but they are easily installed in the factory holes for the speakers without unnecessary manipulation. The procedure for dealing with them is simple:
- connect the speaker cables, observing the polarity;
- fix with screws in regular places in the metal of the door or directly on the door card;
- install grids (in common parlance - grills).
An important disadvantage is that the center of the mounting hole and the place under the grill do not coincide. This means that when installed with complete grills, they will look asymmetrical and clumsy.
Standard acoustics most often do not produce a rich sound and, when installed with their own grids, look poor.
How to install 16cm speakers with spacers
In pursuit of sound, it is logical to install 16 cm speakers. This is where all the disadvantages of the AvtoVAZ design appear - the speakers either are not centered, or do not allow the window to roll down, or interfere with the glove compartment lid.
Why are spacers needed ? In order not to cut the door, if you do not put the acoustics in the spacer rings, you will have to attach it to the metal of the door. This may result in the need to cut the door itself in order for the speaker to fit in, and is dangerous for the glass.
For this reason, speaker rings made of plywood are attached to the metal of the door, and the speaker itself is attached to them.
The procedure is as follows:
- we make or buy spacers for speakers - thickness 10 mm, material plywood;
- cut a hole for the speaker in the card and mark the installation location along it;
- put the spacer on 4 self-tapping screws;
- We install a column in it - observe the polarity!;
- install the map + install the standard mesh so that it doesn’t interfere with the glove compartment.
If the spacer bursts during installation, this may result in a rattling noise coming from the door while driving.
What speakers are better to put in the front doors instead of standard speakers?
We recommend the Pioneer TS-G1733I model. At a price of about 2 thousand rubles, they are freely installed through spacers in Granta doors without cutting metal and do not interfere with the glass. Easy installation will save you nerves and time.
How to connect a car radio in a car with your own hands
How to connect a car radio in a car - when installing the head unit in a car, always remember that the positive voltage power wire must be laid directly to the battery terminal with the obligatory inclusion of a special fuse block in its circuit, be characterized by high quality insulation and have a large cross-sectional area. It is most advantageous to install this fuse block in close proximity to the battery.
There are cases when inexperienced car owners make a serious mistake in the process of connecting the device, namely: - they take the positive power supply voltage of the radio from the cigarette lighter, this installation option is completely unacceptable. Consequently, due to such incorrect connection, the output power of the device is reduced, this is especially noticeable at maximum volume, when the backlight begins to blink. In addition, with a clear drop in power, distortion begins to occur at an earlier stage of melody playback.
The circuitry of the radio provides a pair of positive voltage wires, one of which is red and is the power wire, and the other yellow is the function of transmitting the control signal. The negative voltage wire is black. It is connected according to the standard scheme - to the car body or directly to the battery terminal with the “-” sign. It is considered preferable to use the second connection option, since it minimizes the likelihood of electrical interference.
The built-in audio power amplifier or active antenna is turned on via a blue “REM” wire.
Dynamic emitters are connected using separate pairs of wires, which have their own colors for each spatially located speaker.
For clarity, the connection diagram is shown below:
This diagram shows that one wire has a clearly defined color, and the other has a duplicate dark stripe; this wire is the conductor of negative voltage, that is, “minus”.
One of the important points during installation is the correct connection of speaker wires. Indeed, if the assembly is incorrect in relation to the color scheme, problems in establishing balance may arise in the future. If the speakers were connected without observing polarity, then the speakers installed at the rear will be out of phase, which will ultimately lead to a lack of low frequencies.
In addition to the usual schemes for connecting a radio to a car, there are several other possible options. For example, they connect directly to the ignition switch terminals. But this method is ineffective, to say the least, the fact is that such a scheme will not work if there is no key in the ignition. There is another option - connect to the alarm connector, but this solution also did not find wide support among car enthusiasts.
Sometimes during the operation of the device there is a need for preventive maintenance, repair or replacement of equipment, so to make this convenient, when installing the car radio, you do not need to shorten the wires, but it will be more effective to use ISO connectors and special adapters.
Here is another solution for connecting the device. The yellow wire goes to the 12v power terminal, and the red wire goes to the parking light connector. The contact point of 12v dimensions is located at some distance from the radio, for this reason it would be advisable to use an electromagnetic relay. Power for the relay can be obtained from the contacts of the ashtray light bulb.
Positive nuances of this scheme:
- The head unit itself starts working the moment the lights are turned on and at the same time retains memory.
- When the side lights are turned off, the head unit stops working. This is a significantly positive moment for those who, out of forgetfulness, do not turn off the light.
- The head unit can work even if the ignition is not turned on.
- If the side light circuit is implemented using LEDs, the electricity consumption is quite insignificant.
The video below shows the process of connecting a car radio in a production VAZ car:
Video:
Music in a car is considered one of the main indicators of driving comfort. Therefore, many car enthusiasts today are interested in the question - how to connect a radio in a car on their own and what is needed for this? In this article we will talk about all the connectors and their markings, as well as the procedure for installing a car radio with your own hands.
Installing speakers in Granta rear doors
The procedure for working with the rear doors is identical to the front ones. Important difference : homemade spacers are not required here. The plant produces a set of special mounts for installing 13 cm speakers in the rear doors.
Articles for ordering online:
| Speaker Mount - Rear Left | 21907901033 |
| Speaker Mount - Rear Right | 21907901032 |
| Rear left column trim | 21906202095 |
| Rear right column trim | 21906202094 |
| Trim for front left door | 21906102097 |
| Trim for front right door | 21906102096 |
Installation sequence:
- Disassemble the door;
- Cut a hole in the door card for the lining;
- Install the speaker mount on the door;
- Replace the standard audio terminals with normal ones;
- Connect the wires to the column, secure it;
- Install the trim and assemble the door.
You can replace the fastening with improvised materials, but factory production takes into account all bends.
General information about music in Grant
In this section, we will consider general non-professional points about music in the Lada Granta.
Installing music
If you have a VAZ 2190 in the basic configuration (or Norma) with audio preparation, then installing music will entail the following steps:
- Removing the radio cover - on the back side there are ISO connectors for power and speaker wires. You will have to run the wires to the rear speakers yourself if you plan to install an acoustic shelf, since from the factory the wires are routed only to the doors;
- Installation of a 1- DIN radio (for 2-DIN you will have to farm, cutting out a jumper in the panel and looking for a suitable frame);
- Finding and connecting the plug of the pre-installed antenna - often the antenna wire on the roof is lost under the ceiling trim and it turns out to be easier to install the antenna separately than to find the factory cable;
- Pulling wires into the trunk to connect an amplifier, subwoofer and speakers installed in an acoustic shelf.
- To install the amplifier, you will also need a separate power cable from the engine compartment directly from the battery terminal through a fuse.
Removing the jumper in the panel cladding is mandatory when installing a 2-DIN GU.
If your car does not have audio preparation , you will have to separate the power wires for the radio and the speaker wires in the door.
What kind of acoustics to put in Granta
Common budget music option :
- radio tape recorder within 5000 rubles with the ability to adjust the equalizer;
- 16 cm component speakers with tweeters at the front;
- acoustic shelf with speakers 6*9;
- amplifier with subwoofer in trunk.
Let's look at an example of such a configuration with a price tag in the table (the calculation is for ordinary people, not audiophiles) based on Pioneer devices:
| Example of a Pioneer | Average price tag in rubles | |
| Head unit (radio) | DEH-S101UB | 4000 |
| Front 16cm acoustics | TS-G1733i | 2000 |
| Acoustic shelf | 1500 | |
| 6*9 “pancakes” | TS-R6951S | 2200 |
| Amplifier 2-channel | GM-A3702 | 4300 |
| Passive subwoofer in a box | TS-WX305B | 5200 |
| Subwoofer installation kit | 1500 |
As a result, we get budget sound in the region of 20 thousand. If we consider professional head units, premium-segment speakers, installation of custom podiums and other delights, the price tag can easily jump over a hundred thousand, amounting to a third of the cost of the car itself.
The choice of podium depends on the type of windows, budget and number of speakers.
Podiums in the front doors
We will not describe the technology for making podiums with our own hands. Next is a selection from various resources for ready-made podiums and manuals for self-production.
- Here is a link to a store with ready-made options and prices. It's not advertising that's a source of inspiration.
- Here is a photo report on self-production with comments.
- This link is just a photo report without comments.
Professional acoustics
For car audio fans who are ready to invest large sums in Granta, we have chosen a couple of bright videos. Look what you can build on the Lada base and look decent in the area and at local car audio competitions. Enjoy.
Audio preparation Grants of different configurations
In the “standard” configuration, the Lada Granta has pre-installed power wiring harnesses, which are located in the console opening. Electrical wires are connected only to the radio, so don’t be surprised if you don’t find them in the doorways. To wire to the doors, you will need to pull power wires, which are located under the console panel. In this configuration of the Lada Granta, the stereo system can be installed independently if due attention is paid to it.
In the Lada Granta Norma, the power wires coming from the console are already routed to the doorways. You only need to connect the audio system in accordance with the assembly diagram. It's not uncommon for the stock door wiring to not match up with some speaker connectors. To solve this problem, you need to purchase suitable wires and replace them in the doorway. Lada Granta Norma has a trim with a special pattern for the speakers. Based on it, you can cut the opening yourself.
During assembly at the factory, the Lada Granta luxury version is equipped with a touchscreen multimedia system and speakers. The improved radio tape recorder is complemented by Bluetooth function and a 5-inch display with line output. In addition, the built-in radio allows you to connect a USB 2.0 flash card, through which you can listen to recorded music.
The design of the Lada Granta Lux allows for replacement of the audio system, including speakers. It may be necessary to adjust the opening for the columns in accordance with the instructions.
The standard radio for the Lada Granta model is an improved device, the design basis of which is the “Sirf Atlas” processor, supplied by the well-known. In addition to the presence of a radio receiver, the device is equipped with a large touch screen and has the ability to connect an external source via a video input by replacing the software and performing firmware. However, in the basic configuration of a domestic car there is only a push-button radio. Many owners are not happy with this fact and want to connect a more modern radio. This article will tell you how to install a radio.
Crib
Instead of a conclusion, let's summarize:
- You can plug in budget sound into the Grant for an amount of 20,000 rubles or more.
- Podiums in the front doors = impossible to open the glove compartment.
- 16 cm speakers in the front doors - cut the metal of the door or prepare spacers with the factory facing of the speakers.
- The acoustic shelf covers the ISOFIX mounts.
- Audio preparation pulls wires only in the doors.
- Article numbers for ordering speaker covers and mounts are in the “Installing speakers in rear doors” section.
Did you like the article? Write a comment or see what we have about the selection of budget cars for 200 thousand.
source