Replacing the heater motor in Ford Focus 2, photo and video instructions
We have a Ford Focus 2 car under repair, the heater motor of which needs to be removed and replaced. We will show you how to do this operation with your own hands in video photos and video instructions.
Open the glove compartment, unscrew the 4 upper mounting screws on top and 3 screws on the bottom, they are hidden under plastic plugs:
Torx sprocket mounting screws T25. After unscrewing, pull the glove compartment towards you and disconnect the plug with the wires. Use a screwdriver to pry up the shock absorber and disconnect it:
Pull the glove compartment lid towards you and remove it. Remove the bottom trim. Unscrew the two screws counterclockwise:
Then we lift the fuse panel a little and pull it towards ourselves, it will come out of the guides. Use your finger or a screwdriver to press the connector clip from the gearmotor and pull it out.
We see two fastening screws, one on top, the other on the side, unscrew them. The third screw is hidden behind the heater motor itself, we managed to show it by sticking the camera at the very end:
We unscrewed the fastening screws, but the heater motor did not fit into the glove compartment, so we had to disconnect the wires from the fuse box. Go to the driver's side, remove the side plastic, disconnect the connector with wires from the motor:
Press this place with your hand (shown on the already removed heater motor):
Turn it counterclockwise. We move to the passenger seat again, grab the engine impeller with our hands and pull it out. In our case, the electric motor jammed and stopped spinning completely; it is necessary to carry out a thorough repair. Often, with minor problems, you can simply clean and lubricate it and it will work as before. We carry out assembly in reverse order.
Auto parts for foreign cars, auto repair
On the motor we disconnect the connector that controls this mechanism. Unscrew the three screws that secure the recirculation device and then remove it.
How to remove and install the heater motor on a Ford C-Max On the driver's side, we also loosen the door seal a little and remove the small plastic cover with a sticker, as on the right side. We unscrew the two screws that secure the plastic base of the diagnostic connector, and then remove it by pulling it slightly up and away.
Now, deep under the panel, it is advisable to use a flashlight to find the stove motor itself, find the connector to which the black-red and green-orange wires go and disconnect it. How to remove and install the heater motor on a Ford C-Max We look for a locking button on the motor not far from the removed connector, press it and turn it counterclockwise and remove the heater motor for the front passenger's Ford Focus 2 and remove the engine outward.
Now you can clean it, remount it or replace it with a new one. We assemble in the reverse order of removal. When preparing material on how to remove and install the heater motor on a Ford C-Max, information from the website Source: What to do?
With the onset of cold weather, two systems are responsible for maintaining a comfortable temperature in the interior of a Ford Focus car: Therefore, if the heater does not work and warm air does not enter the cabin, the cause of the breakdown will have to be looked for in. In the fuse box it can be found on the left side.
The diagram will indicate its more precise location. If everything is in order with the fuse, you should pay attention to the fan relay, which is also located in the fuse compartment. It is more expedient to check its serviceability using a tester, after first removing the relay from the socket. However, a more effective method of checking is using a new, serviceable relay, which is installed in the socket instead of the old one, after which the heater fan starts.
If it works, then the cause of the problem has been identified.
Ford Focus 2 remove the interior heater motor.
How to remove the interior heater motor on a Ford Focus 2. There are many articles on the Internet on how to do this. But yes, this is a troublesome matter, you need to stretch yourself a little.
First you need to open the glove box (glove compartment) there we see 7 screws that hold the box of the glove compartment itself. Having unscrewed them, we take out the glove compartment itself, and not the cover from it, which must then be removed. Next, we move on to the mounting block, which is located under the glove compartment. It needs to be removed from its mounts and moved to the side; there is no need to pull out the connectors. Why do we remove the mounting block to remove the heater motor through the bottom.
Removal and installation of the electric heater motor Ford Focus 2 2005-2008
- Repair manuals
- Ford Focus 2 2005-2008
- Removing and installing the heater motor
You will need: TORX T25 wrench, flat blade screwdriver.
1. Disconnect the wire from the negative terminal of the battery.
| 2. Remove the decorative panel... | 3. ...and the frame of the instrument panel (see “Removing and installing the instrument panel”). |
| 4. Squeeze the latch... | 5. ...and disconnect the wiring harness connector from the heater recirculation damper motor. |
| 6. Remove the three screws securing the damper housing... | 7. ...and remove it. |
| 8. Squeeze the latch... | 9. ...and disconnect the wiring harness block from the heater motor. |
| 10. Press the latch... | 11. ...turn the heater motor counterclockwise... |
| 12. ...push it into the heater housing... | 13. ...and remove from the opposite side. |
14. Install the parts in the reverse order of removal.
↓ Comments ↓
Section 1. Vehicle design
General information about the car Passport data Car keys Controls Heating (air conditioning) and interior ventilation Doors Seat belts Seats Steering wheel adjustment Rear view mirrors Interior lighting Sun visors Interior storage compartments Hood Gearbox control Roof rack
Section 2. Recommendations for use
Safety rules and recommendations What you need to have in your car Running in the car Operating the car during the warranty period Preparing the car for departure Filling the car with gasoline Using a jack Towing the car
Section 3. Problems along the way
The engine does not start Malfunctions of the fuel injection system Idle has disappeared Interruptions in engine operation Diagnostics of the engine condition by the appearance of the spark plugs The vehicle moves jerkily The vehicle accelerates poorly The engine stalls while driving The oil pressure has dropped Engine overheating The battery does not recharge Starting the engine from external power sources Malfunctions of electrical equipment Extraneous knocking noises appear Problems with the brakes Puncture of a wheel
Section 4. Maintenance
General provisions Daily maintenance (EO) First maintenance (MOT-1) Second maintenance (MOT-2)
Section 5. Engine
Design features Possible engine malfunctions, their causes and solutions Useful tips Checking compression in the cylinders Removing and installing the engine mudguard Replacing the power unit suspension mounts Installing the piston of the first cylinder to the TDC position of the compression stroke Removing, installing and troubleshooting the flywheel Replacing engine seal parts Adjusting clearances in the drive valves Cylinder head Removal and installation of the engine Lubrication system Cooling system Exhaust system Engine power supply system Fuel vapor recovery system
Section 6. Transmission
Clutch Gearbox Front wheel drives
Section 7. Chassis
Front suspension Rear suspension
Section 8. Steering
Design features Possible malfunctions of power steering, their causes and solutions Steering column Steering rods Steering mechanism
Section 9. Brake system
Features of the device Possible malfunctions of the brake system, their causes and solutions Bleeding the hydraulic drive of the brake system Checking the position of the brake pedal Master brake cylinder Vacuum brake booster Replacing hoses and tubes of the hydraulic brake drive Removing and installing the brake pedal Brake mechanisms of the front wheels Brakes of the rear wheels Parking brake Anti-lock brake system
Section 10. Electrical equipment
Design features Diagnostics of malfunctions of on-board electrical equipment Mounting blocks Battery Generator Starter Ignition switch (lock) Engine control system Lighting, light and sound alarms Replacement of the windshield window wiper motor Replacement of the tailgate window wiper motor Removal and installation of the windshield washer Replacement of the front door window regulator motor Removal and installation of the electric motor of the radiator fan of the engine cooling system Replacement of the additional resistance of the radiator fan of the engine cooling system Removal and installation of the electric motor of the heater Replacing the additional resistance of the electric heater fan Electric heating of the glass of the rear window (tailgate) Instrument cluster Instrument panel switches Replacement of the control unit for electric windows and electric mirrors Car audio system Replacement of sensors and switches
Section 11. Body
Design features Possible body malfunctions, their causes and solutions Removal and installation of the radiator lining Removal and installation of wheel mudguards and wheel arch liners Removal and installation of bumpers Removal and installation of the front fender Removal and installation of the engine compartment frame and front bumper beam Removal and installation of the air intake and drainage box grille shield Hood Side doors Tailgate of hatchback cars Fuel tank filler hatch cover Seats Removal and installation of floor tunnel lining Passive safety system (SRS) Rear view mirrors Instrument panel Heater and air conditioner Interior fittings Removal and installation of interior linings Removal and installation of trunk linings Windshield wiper windshield Windshield wiper for tailgate window Replacing fixed glazing of the body Removing and installing the battery mounting shelf Caring for the body
Section 12. Wheels and tires
Technical characteristics Marking of rims Marking of tires Changing wheels Wheel nuts Breaking in tires Storing tires Balancing wheels Snow chains Spare wheel Checking tire pressure Checking tire tread Checking valves Checking radial and lateral runout of rims
Section 13. Purchase of spare parts
Engine oil Lubricants Coolants Brake fluid Fuel filter Air filter Engine oil filter Spark plugs
Section 14. A trip to the service station
Section 15. Winter operation of the vehicle
How to prepare a car for winter Recommendations for starting the engine in severe frost What is useful to buy for winter Useful winter tips
Section 16. Preparation for technical inspection
Recommendations List of malfunctions and conditions under which the operation of vehicles is prohibited Changes to state standards regulating the maximum permissible content of harmful substances in the exhaust gases of motor vehicles
Section 17. Tips for a novice auto mechanic
Safety precautions when carrying out repair work Tools Before starting work Restoring threaded connections Tips for body repair
Applications
Appendix 1. Tightening torques of threaded connections, Nm Appendix 2. Overall dimensions (mm) of Ford Focus II cars with sedan and station wagon bodies Appendix 3. Technical characteristics of engines and performance indicators of cars depending on the type of engine used Appendix 4. Air pressure in cold tires Appendix 5. Filling volumes, l
Electrical circuit diagrams
Diagram 1. Windshield wiper and washer connections Diagram 2. Battery charging system connections Diagram 3. Brake system hydraulic drive system connections Diagram 4. Ventilation, heating and air conditioning system connections Diagram 5. Engine starting system connections Diagram 6a. Speed control system connections Diagram 6b. Speed control system connections Diagram 7a. Engine control system connections Scheme 7b. Engine control system connections Scheme 7c. Engine control system connections Scheme 7d. Engine control system connections Scheme 7d. Engine control system connections Diagram 7e. Engine control system connections Scheme 7g. Engine control system connections Scheme 8a. Air conditioning system connections Diagram 8b. Air conditioning system connections Diagram 9. Power steering system connections Diagram 10a. Anti-lock brake system (ABS) connections Scheme 10b. Anti-lock brake system (ABS) connections Diagram 11. Vehicle Dynamic Stability System connections
Inspection and lubrication of Ford Focus 1 heater motor bushings
At the first speed of the Focus stove motor, squealing sounds began to appear!
It was decided to remove the stove motor , inspect and lubricate the sliding bushings .
For work you will need:
- good lighting,
- a set of bits for a Phillips screwdriver,
- several small flathead screwdrivers,
- knob (to grab a bit you need a shorter one), the feature of a small space for unscrewing between the floor and the space under the torpedo.
Ford Focus 2 1.6 Automatic transmission 2007Gv 2 Zone Climate. The heater fan is silent. (Solved)
#1 biogad
I never thought before that it could be so interesting
- Users
- 171 messages
- City: Zelenograd
- Gender: Man
Good day everyone. Auto Ford Focus 2 2007 1.6 100 hp VIN WF05XXWPD57J80452, two-zone climate control, no alarms installed, no snot detected. I encountered a problem - the fan in the cabin does not work. A common problem, I have rebuilt many Fords and others, and everything is clear where to go and change it, 10-20 minutes of checking and it’s clear that the fan or regulator has fallen off, the rest is manual work with the curse of all Ford super engineers. and then the malfunction made me think.
In order: the fan does not work, the “electronic buttons” switching unit is alive, displays everything, switches everything (positions auto-legs-window circulation from the passenger compartment). With the chip removed from the regulator, I close the two thick wires with the control (lamp H7), turn on the ignition, and the engine turns over. I increase the number of light bulbs - I achieve the minimum speed of the fan, the ignition is off, on - it works, you don’t even need to push. I pull out the regulator and turn on the chip - it’s cold and the fan doesn’t give any signs of life, push it or don’t push it. I throw in another regulator, at first it’s quiet, there’s no work. The client brings a new one - it’s cold and the fan doesn’t turn on again. Hence the question - what control signals should be on the regulator (on 2 thin wires out of 4) and can I use a circuit for a Ford Focus 2 with 2-zone air conditioning? I want to check whether the circuit is alive or not on the regulator. Is it possible to check the regulator itself “on your knees”? I feel like I bought a control unit.
The error message is B2516 - malfunction of the heater fan control circuit. The client has so far left with a thick jumper and a 25A fuse and a fan running at maximum. I foresee a pile of stones in my garden, but for now I’ve hit an invisible wall, please kick me in the right direction.
Regulator block marking bsg 30-846-003.
A BIG THANK YOU to the teachers of the Khimki College of Space Energy and Mechanical Engineering
- Top
- Nickname or quote
#2 ilja172
- City: Moscow
- Gender: Man
The fan receives a constant positive from the fuse. The assembly of power transistors pulses the second wire of the fan to ground. On the power transistor chip, the outer terminals are the plus, passing through the fan winding and the ground from the body. On a thin wire there is a low-current power supply of +12 Volts and on the second thin wire there is a negative pulse, which changes smoothly when you press the “+” or “-” button to control the fan speed.
Removing the heater motor on the Focus
Now the most difficult operation is unscrewing the motor mounting bolts , although they are screwed into plastic, but the inconvenience of bringing the tool creates difficulties. As an option for placing the body, the first one from the driver's seat, lowering the handbrake handle, will have to touch the carpet of the passenger seat with his head, the second, having fully opened the passenger door and laying an old jacket on the threshold, lie down on the floor sideways, with the left side down. In general, this removal and installation operation is akin to an hour of fitness!
Inspection of the heater motor bushings
The reason for the whistling noise is immediately visible ; it is moisture that gets on the lower bushing , and the upper bushing also suffers and wears out no less. I immediately expanded the hole for draining condensate to 3 mm.
Checking the condition of the motor:
As you can see, the commutator is worn out and the brushes are already running out, we need to prepare for the next opening and at least replace the brushes, size 5*5 mm. As the examination showed, the material of the brushes is closer to copper and not graphite, probably graphite is not appropriate in the ventilation system for environmental reasons. Therefore, the selection of replacements should be made from more copper brushes; the excess size can always be ground off before installation.
Lubricating motor bushings
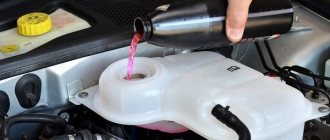
For lubrication, I prepared 1 ml of engine oil and 3-4 ml of CV joint grease; logically, molybdenum disulfide and graphite are more suitable for plain bearings; in the absence of this, anything like lithol will do. Using a syringe and a tube, I evenly distributed the lubricant on the axle near the bushing, rocking and twisting, positioning the motor so that the liquid lubricant could flow into the interface between the shaft and the axle, and also applied lubricant to the upper bushing. The lubricant will stay especially well on the lower bushing due to the structural recess from which the lubricant will flow down into the bushing!
I applied the lubricant three times, moving the shaft along the axis and turning it by hand.
If you are so confident in more major repairs and in your abilities, then I think this review will help you prepare financially for major repairs, such as replacing bushings, grinding the commutator and replacing brushes.
We assemble in reverse order. Let's check and be quiet!
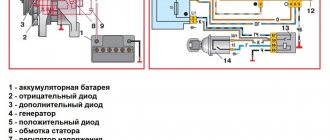
Photo with useful information. Additional speed resistors and motor fuse are here:
Source
Repair of the climate control unit motor in a Ford Focus 2
One fine day I’m driving, listening to music, it’s hot outside, I close the windows and turn the climate control on low. And within half a minute I’m covered in sweat. The music is at a minimum, but the stove fan doesn’t spin! Although the dampers keep moving, the temperature changes. Before this I had not used the climate control for two weeks.
The fuses and switches are intact. I’m on my way to an electrician for service, he looked for about 20 minutes and says: The brushes on your motor have worn out, and to remove the motor, you need to remove the entire panel.
I'm studying the system. By the way, on climate focuses you can run self-diagnosis of the climate control unit. To activate self-diagnosis, you need to turn on the climate, hold down the “OFF” and “LOW” buttons pressed together for 2 seconds, then release and immediately press “AUTO” for 1.5 seconds. The self-test will start. The display will show the progress of the process. Errors detected will be displayed on both sides of the display. Four-digit codes.
So, the principle of operation of the fan is quite simple - there are three devices responsible for fan speed:
1. Climate block, which is on the panel with buttons.
2. Motor speed regulator/amplifier (it is located just above the cabin filter cover). Inside is a board with a pair of transistors. It amplifies the low-current signal from the climate control unit and transmits an amplified signal to the motor. It has very powerful cooling in the form of many two-centimeter legs that extend into the area in front of the motor, that is, this block is cooled by the flow of air taken in by the motor, therefore it is cooled only when the motor is spinning.
Removing the heater motor Ford Focus 2 Ford Focus
Removing the motor on the FF2 is not so much a labor-intensive task as it involves working by touch.
Unscrew the 7 screws and remove the glove compartment.
Pull to the side and remove the glove box cover shock absorber.
Pull towards yourself and remove the cover completely
Removing the fuse box cover
Removing the fuse box
Lower the fuse box as low as possible, as far as the wiring allows
Disconnect the connector from the air recirculation damper
Remove the clip and peel off the insulation
The damper is attached to the body with three self-tapping screws
For clarity, the location of the screws when the torpedo is removed
Unscrew the 3 screws securing the damper
The heater on a Ford Focus 2 car does not work. What should I do?
With the onset of cold weather, two systems are responsible for maintaining a comfortable temperature inside the Ford Focus 2 car:
- cooling of the power unit;
- ventilation and heating.
Therefore, if the stove does not work and warm air does not enter the cabin, the cause of the breakdown will have to be looked for in them.
The most common reason for the lack of heating in a Focus is a blown fuse F10 (30A), which is located in the climate control fan circuit. In the fuse box it can be found on the left side. The diagram will indicate its more precise location.
If everything is in order with the fuse, you should pay attention to the fan relay, which is also located in the fuse compartment. It is more expedient to check its serviceability using a tester, after first removing the relay from the socket. However, a more effective method of checking is using a new, serviceable relay, which is installed in the socket instead of the old one, after which the heater fan starts. If it works, then the cause of the problem has been identified. Otherwise, it is necessary to check the operation of the fan electric motor. In addition, there are a number of malfunctions that should not be overlooked.