How to make door sills with your own hands
Do-it-yourself door sill covers are a topic that interests many car owners. This is explained by various reasons:
- Firstly, homemade tuning looks better, because it is unique and completes the image of the car. The main thing is that it is done with high quality and with love.
- Secondly, homemade pads will cost less than the original ones. Products presented by manufacturers often exceed all possible expectations in cost. Even if you choose plastic, for an inexpensive foreign car it will cost an unreasonable amount.
Anyone can make such a tuning element, the main thing is to choose the right dimensions, take into account the installation technology and other points.
There are many articles on this topic on the Internet. At the same time, we can roughly imagine two ways to create overlays - from cheaper models created by domestic manufacturers, or from scrap materials on our own. Whatever method is chosen, each has its own advantages and is used quite often.
What are overlays for?
The main purpose of these means is to protect the car from the troubles of movement. In addition to the function of saving from mechanical and physical damage, they help improve the aerodynamic features of the vehicle and the exterior design. If a vehicle is driven regularly, over time its body becomes covered with defects and rust, corroding the metal, which is quite unpleasant. The situation is aggravated by poor roads and damaging precipitation. Repairing defective thresholds is very expensive. And if you don’t notice the problem for a long time, then you can be left without them at best. In the worst case scenario, the dirt will begin to corrode the vehicle body elements adjacent to the thresholds.
Wall panel overlays
A minimum of skills and tools are required to create this element from wall panels. And the question of how to make door sills with your own hands will disappear, because the process reveals so many nuances of the work.
Once all the elements for the procedure have been selected, you should proceed with it:
- Self-tapping screws are needed for fixation, so holes are made in the threshold for them. They need to be treated with anti-corrosion material, because in reality the bottom is constantly exposed to chemicals and moisture, which negatively affects its condition.
- Using self-tapping screws to attach the guides, you can get a visually lower car.
- The panel itself is fixed to the installed guides; the same screws are used for fixation.
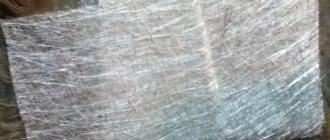
- To make the lining more reliable, it should be wrapped in fiberglass soaked in glue.
- To visually eliminate the resulting transitions and cracks, it is worth using putty and primer, which are then sanded to obtain a smooth surface.
- We select the required color for painting, taking into account the color of the body, and apply the paint coating.
These overlays look beautiful, but they won’t last as long as the next option.
Door sills from ready-made models
Such door sill covers are created with your own hands from models of domestic manufacturers. Before purchasing the required part, it is necessary to take measurements, because this is the only way to choose the best option.
Online spare parts stores offer a wide range of necessary components. But it is not always possible to select linings taking into account all the characteristics, then you have to modify them with your own hands. In this case, the installation will look like this:
- We apply the trim to the threshold, using a marker we mark the excess. Using a grinder, we cut off the excess; all work should be done without haste. After all the procedures, it’s worth trying it on and evaluating what happened. If all the work is done correctly, the part should fall into place.
- To secure the overlay, you should use one of the proposed options - fiberglass or epoxy glue.
- The threshold and overlays are subject to subsequent puttying, priming and painting. The overlay will look like the original one.
It is worth noting that this method of creating an overlay with your own hands is considered a very labor-intensive process that requires effort and time. But you will have to work even more if you have a welding machine and metal.
Types of connections when replacing a car threshold
Repair manuals usually mention two types of connections between the new threshold and the remains of the old one. These are lap joint and butt joint with insert. A simple butt connection can also be used. Let's look at the features of these connections and how they are made.
p, blockquote 12,0,0,0,0 –>
Butt connection with insert
p, blockquote 13,0,0,0,0 –>
The connection between the old and new parts of the thresholds is strengthened by inserts made from the remains of the same threshold. A butt joint with an insert allows you to achieve a smoother surface than an overlap, which does not require a lot of putty to level. The insert makes it easier to join the new threshold, reduces the likelihood of burning through during welding, and also reduces thermal deformation during welding by dissipating heat. The connection is more durable. Depending on the connection location, the insert may not always be used. This connection is usually used at the edges of the threshold. Where the sill joins the B-pillar, a lap or butt joint without an insert is usually used.
p, blockquote 14,0,0,0,0 –>
The size of the inserts can range from 5 to 10 cm. Depending on the configuration of the threshold, the insert is cut into 2–4 parts. The flanges are cut off, with the help of spot welding they hold the parts of the panels together. This way, the inserts will be able to fit inside the thresholds normally. They can be welded through drilled holes (8 mm) or temporarily screwed with self-tapping screws, the holes from which are then welded. The inserts must be treated with welding primer. When joining parts of the thresholds, it is necessary to provide a gap of sufficient size so that the molten metal during welding normally penetrates to the insert, and it is welded together with the two parts of the threshold. The width of the gap depends on the thickness of the metal and should be no less than 1.6 mm and no more than 3.2 mm.
p, blockquote 15,0,0,1,0 –>
Lap joint
p, blockquote 16,0,0,0,0 –>
When joining with an overlap, the old threshold must be marked and cut so that there is a margin of a few centimeters for the overlap. A new threshold is placed on top of the remains of the old threshold. Next, along the edges of the new threshold, a sealed seam is welded. The main advantage of this type of connection is the ease of joining the new threshold with the remains of the old one. There is no need to carefully adjust the edges. This is especially true when you have to join places that are complex in shape, for example, the connection to the middle pillar. When connecting with an overlap, there is less chance of burning through the metal. The disadvantage is the need to use more putty when leveling joints, as well as the predisposition to corrosion on the reverse side of the threshold, due to the complexity of anti-corrosion treatment of such a joint from the inside.
p, blockquote 17,0,0,0,0 –>
Butt connection
p, blockquote 18,0,0,0,0 –>
A butt joint requires careful matching of the new threshold with the remnants of the old one, as well as a certain skill in welding. The gap between the parts being welded should be approximately equal to the thickness of the metal being welded. A butt connection without an insert is less strong, but this is not critical, since the outer part of the threshold does not take the entire load. When implemented correctly, the joined area turns out smooth and requires a minimal amount of putty, and is also normally treated with an anti-corrosion compound on the back of the threshold by spraying special products.
p, blockquote 19,0,0,0,0 –> p, blockquote 20,0,0,0,1 –>
Iron parts
The creation of such an overlay can be considered a whole work of art. On the one hand, this is a big cost savings, and besides, no one will have such an element; on the other hand, this is a labor-intensive process.
If you decide to make the door sills yourself, the video presents the necessary elements to carry out this procedure. The first step is to select a stainless steel sheet that will be amenable to basic manipulation - it will bend:
- Having measured the threshold, it is necessary to cut the required piece of stainless steel according to the obtained dimensions.
- We bend the workpiece to measure and, if necessary, correct its shape, as was done in the previous method.
- The final stage will be puttying, priming and painting the resulting element.
Although the procedure allows you to save money, more time will be spent than in the previous case, and skills in working with a welding machine will be required.
The simplest option is polystyrene foam
This option won’t cost much, and you don’t mind it, you can make such overlays all the time. The only difficulty is cutting out the correct shape. You will have to do this slowly and carefully if you want the overlay to look beautiful. Otherwise, all roughness will be noticeable.
The resulting workpiece is processed with fiberglass several times. Again, epoxy glue is used for fixation. To fix the resulting cracks, putty, primer and painting are used. This is the only way to achieve a beautiful transition. In a similar way, some car owners apply polyurethane foam. Such a decorative element can then be easily dismantled, but the element with self-tapping screws is stronger, but when you get tired of it, it will be more difficult to remove it.
How to make door sill covers with your own hands? Interesting manual
Drivers are often interested in how to make door sill covers with their own hands. The reasons for such interest may be different. Some people make such crafts just like that, because homemade tuning looks much more advantageous. Especially if it is made quite well. But the most common reason for this kind of homemade product is the cost of the original linings. Even on inexpensive foreign cars, the price of plastic will bite, and it will hurt.
These 2 reasons become the driving factor when independently inventing a bicycle (linings). In general, almost anyone can make such a tuning element. This is not too difficult a task. The main thing is to get the right sizes.
Types of overlays
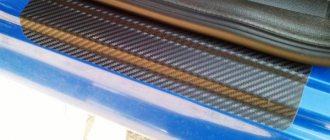
Steel linings are distinguished by their durability and reliability. They are as close as possible to the material from which the car is made. The car owner has the opportunity to choose steel moldings of any color so that they blend with the body. But they are not suitable for everyone. For sports cars, such decorations are an unacceptable luxury - they add additional weight to the iron horse. Another negative point is the cost, which is much higher than its fiberglass counterparts. This material received positive reviews. Fiberglass is elastic, lightweight and much more practical. The price is closer to plastic. Due to its resistance to atmospheric and mechanical damage, designers adopted it when designing the bodies of their new models.
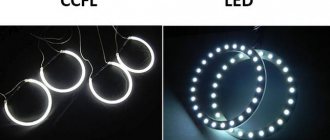
The dirtiest plastic moldings for the environment also remain popular. They are economical and inexpensive. Plastic perfectly absorbs heavy loads and can take a strong blow. A cracked pad can be easily replaced without costly repairs. And the door sill trim itself can be easily disposed of in an appropriate container for household waste. Plastic is not without its drawbacks. Its service in our climate is short-lived. Since the moldings are outdoors all the time, they collapse in the winter. Recently, improved plastic door sill covers have entered the market. But their share is still small, and low-quality Chinese models predominate. New generations of moldings are equipped with lighting. This is an additional benefit for motorists. The vehicle is easier to find in the dark. There is a wide range of lighting types, which automatically uniqueizes the car and makes it easily distinguishable on the site.
Types of homemade pads
How to make door sill covers with your own hands? To answer this question, you need to understand how such a body kit is assembled. In total, there are 2 strategies for producing linings in a single garage:
- Customization of a ready-made version from a cheaper model;
- Completely self-assembled part.
Both options have their pros and cons. In practice, both of these methods are used quite often.
Setting thresholds
Once you have decided on the choice of car door sill moldings, it's time to install them. First of all, prepare a set of tools:
- Wire cutters.
- Pliers.
- Soldering iron.
- Narrow flat screwdriver.
- Powerful Phillips screwdriver.
- The wire is two-core.
- Solder, rosin.
- Connectors.
- Electrical tape or heat shrink tubing.
- White Spirit.
- Water.
- Clean rags.
- Double-sided tape.
- Prayer book.
A prayer book will come in handy if this is your first time doing this procedure.
Carefully read the manufacturer's instructions for the moldings. Pay special attention to this aspect even when purchasing - the manual should be understandable and literary. If the instructions are in an unknown language or contain signs of machine translation, it is better to find another option or watch a training video.
One example:
The main thing is to degrease the threshold with white spirit or its equivalent before starting installation and secure the result with a clean, dry cloth. Comfortable temperature for work from +20 degrees. In summer, such work can be performed in the fresh air, and in the cold season - exclusively in a heated room. Even a schoolchild can handle the installation - the moldings are sold on a self-adhesive basis. The technology is as simple as two and two:
- Open the package
- Degrease the threshold
- Rinse it
- Wipe with a cloth
- Stick on the strip.
- Let it dry.
- Admire the result.
Don't forget to secure the structure with bolts and a screwdriver. Installation of illuminated molding occurs basically according to the same scheme, only with a number of differences. At each stage, it is necessary to check the performance of the structure in order to quickly correct the situation with poor soldering.
Ready option
Usually, for such alterations, thresholds from domestic cars are taken. Most often, these are classics or nines. The choice depends on your car model. Before purchasing a spare part, it is better to measure the sills of your car. And, based on these characteristics, select linings. But, in any case, you will have to modify it. The installation process is as follows:
- First you need to try the trim on the threshold, and use a marker to mark everything that is unnecessary. Next, take a grinder and cut off the marked parts. After that, we try it on the threshold again. If everything is done correctly, then it should fall into place;
- The resulting overlay is installed on the threshold and secured with fiberglass and epoxy glue;
- We putty the threshold and trim;
- We prime and paint.
This completes the work of remaking the finished overlay. The most difficult step is sizing. This is the most time- and effort-consuming work.
Wall panel overlays
The easiest option for self-assembly is wall panels. To make such overlays you will need a minimum of skills and tools. You need to purchase:
- Wall panels; Guides for drywall;
- Self-tapping screws;
- Anti-corrosion;
- Epoxy resin;
- Fiberglass;
- Putty and primer;
- Dye.
After purchasing everything you need, we proceed to assembling the structure:
- We drill holes in the threshold for self-tapping screws. It is imperative to treat them with anti-corrosion;
- The guides are attached to the threshold using self-tapping screws. If you want to get a visually lower car, you can attach another one to the existing guides;
- Plastic panels are attached to the resulting frame of guides. The same self-tapping screws serve as fasteners;
- The fiberglass fabric is impregnated with epoxy glue and wrapped around the resulting overlay. This gives it greater reliability and strength;
- It is necessary to putty the threshold, carefully leveling the cracks. After which you need to prime the surface well;
- Paint the trim in a suitable color.
The only drawback of such a pad is its deterioration during constant travel over potholes. But even taking this into account, they last quite a long time and look just great.
If you have a welding machine at hand and you know how to use it, then the simplest solution would be to make iron plates. This will allow you to save a lot on this process. For this job you will need a stainless steel sheet. It should bend well:
- We carefully measure the threshold, after which the required piece of stainless steel is cut out according to the obtained dimensions;
- The resulting workpiece must be carefully bent;
- We weld the workpiece into place and make final adjustments to the shape during the process;
- The resulting overlay is puttied, primed and painted.
This is the simplest option:
- A foam mold is cut out. This is the most difficult moment. You need to do everything very carefully so that the overlay looks beautiful;
- The resulting workpiece is covered with fiberglass in several layers;
- The finished trim is attached to the threshold using epoxy glue, puttied, primed, and painted;
- Polyurethane foam pads are made in the same way.
Conclusion
. Many craftsmen make various devices for tuning their car. This allows you to make the car original. This is why the question of how to make door sills with your own hands is so popular. After all, this is the easiest and most convenient way to change the appearance of your car. Every car enthusiast can do this kind of tuning at minimal cost.
How to make door sill covers with your own hands? interesting manual
First you will see several photos of a car with an old body kit. This is MR2, everyone is familiar with it.
We disconnect the old aerodynamic body kit from the car and take it to the trash can.)
Corrosion was found under the body kit; we remove it using a grinding machine.
Here! Now the car is ready for a new reincarnation.
The first thing we start with is gluing with tape the places where the styrofoam is applied. Now we cut the styrofoam into the blocks we need. Dimensions depend on your body kit. Having pre-treated the surface adjacent to the car, we glue these pieces to the places of the future body kit using macroflex, applying it in a thin layer. Now this is the basis, one might say the foundation, for a new tuning. I will not describe what kind of glue to glue it with. And we begin to shape the styrofoam. This is one of the most creative processes. You must give shape to the pieces of polystyrene for the future body kit. To do this, you will need an electric knife and a large piece of sandpaper. Using these simple tools, we begin to shape it.
Then the polyurethane foam goes into battle. We use it to blow out the remaining cracks.
After the foam has hardened, cut it off.
Unfortunately it was a mistake, using foam. Foam and styrofoam are two different materials. And they are very difficult to process together. Therefore, the decision was made to do everything again. That is, the styrofoam was torn off from the body and everything was done again.
ADVIСE:
1. Do not use foam to fill cracks. Various materials are difficult to process in the future.
2. Do not glue the blocks together right away! Glue them only on the car.
3. You must shape the styrofoam blocks to ensure a tight fit to the car body. Then you will have many fewer cracks, and therefore problems in the future.
4. Lay out the blocks as if you were laying brickwork, block by block. Carefully adjusting them will take you 30 minutes. more time, but you will thank yourself for it later. DO IT!!
After studying all the errors, everything was started from the very beginning.
Pay attention to how closely the blocks fit together. This time they fit closely. And the whole structure looks much better.
Now we have achieved a fairly good surface. It is much better than what it was at first.
A lot of dirt remains after work.
NEW TIPS:
1. OH SHIT! There is a lot of dirt from this styrofoam. She's everywhere! And it got into the car's air duct; it will need to be vacuumed.
2. Coarse 40-grit sandpaper wrapped around a stick makes an excellent file. An electric knife is great for creating a rough outline.
3. USE 40 SKIN ONLY FOR ROUGH SHAPE. Use the 40 to get within 0.5 cm of the final result, then immediately switch to the 80.
I'm having a little trouble in the rear. Initially, the glued blocks were small. I wouldn't be able to give it a clear shape. That's why I removed them and installed new ones.
Once the desired shape of the diffuser has been achieved.
We proceed to the threshold of the car. We make it from the same material, using technology already familiar to us.
First, as expected, we obtain a rough shape using an electric knife.
Now 40 are going into battle.
Using the same principle, I started working on the front spoiler.
Here is a photo of the almost finished side sill trim.
New tips:
1. If you go to the store and stock your refrigerator with beer, then 100% of your friends will come to visit you.
Installation of fiberglass body kits. Universal instructions
Even if you have a high-quality “original” from Germany, Japan, Korea or any other set made of fiberglass in your hands, try it on your car before painting. Very often there is a need for minor or, rarely, major adjustments. This fact arises due to the manual production of parts, which quite often leads to trimming nuances. The human factor in the manufacture of aerodynamic body kits is an integral part of the installation work.
Of course, not all fiberglass body kits require the use of the recommendations described below, and a significant part of the top-tuning assortment is ideal for the car. However, we will focus on the most complex and difficult cases. We'll talk about this in more detail:
Use high temperature when adjusting fiberglass body kit
Quite often, when making body kits, especially bumpers, the weight of the mold for manufacturing and the conditions of storage or transportation of parts lead to a change in the geometry of the elements and this can be significant. At the first fitting, it turns out that the bumper does not meet the fenders and the gap along the hood turns out to be larger than necessary.
At the same time, when trying to place the part on the mounts, nothing happens, the bumper crackles and straightens back out like a spring. This problem can be solved by simply heating the area requiring positioning to 50-60 degrees Celsius. When heated, fiberglass becomes more elastic and is able to take a new shape without resistance or excess pressure.
It is important to heat evenly the largest possible surface to avoid the formation of creases and uneven planes.
Quite often there is an installation method when not the most even parts are easily fixed to the car directly in the drying chamber, the temperature is turned on at 60 degrees for 10-15 minutes and while all the elements are hot, the craftsmen quickly put the pliable body kit in place and calmly allow the kit to cool on its own. If it is not possible to use a drying chamber for fitting, a regular industrial hair dryer will do. Remember - a body kit that has been made recently or has just been made is easier to adjust. If the body kit was made a month or more ago, the elastic properties decrease and after six months it is quite difficult to do anything with the parts.
Proper use of putty - does not harm the body kit
If there is damage during transportation or if it is necessary to increase the thickness of parts, you can use standard automotive putty.
When preparing the body kit before painting and at the time of fitting, craftsmen may find air voids on the parts between the top, front layer of gelcoat and the bulk of the resin and glass mat - this moment is unpleasant and is a consequence of inattentive installation of the material, but is allowed by the manufacturer and is not a defect, of course with minor number of bubbles. Putty comes to the rescue.
Depending on the task, the putty can be filled with fiberglass or with a chalk base. All modern putties are made, just like body kits, based on polyester resin. Since the binder in the body kit and putty is the same, the adhesion (stickiness) of the components to each other is excellent and the reliability of the design with the correct proportion of hardeners is more than sufficient.