The brake lights on the VAZ 2114 do not light up: reasons and methods for eliminating them
According to current traffic regulations, driving a car that does not have brake lights is prohibited, and this should be clearly remembered.
True, this rule can be taken into account in practice only when leaving the garage. But what to do if the feet on the VAZ 2114 fail during the trip? Why not call a tow truck because of such a problem? In fact, this problem can be solved even on the road. To do this, you only need to have a minimum set of tools:
- multimeter (even the simplest one will do);
- Screwdriver Set;
- sandpaper (for cleaning oxidized surfaces);
- set of wrenches.
In addition, it is good to have a fuse box diagram on hand.
What to pay attention to
The brake light in the bumper must perform its function as correctly as a regular VAZ-2114 brake light. This kind of tuning can attract attention with its unusual animation. Drivers and other road users may pay more attention to this animation than to the actions of the driver himself in terms of actual braking on the highway. Therefore, not everyone has time to immediately assess the situation and may confuse turning with braking. In this case, a traffic accident may occur.
How to troubleshoot?
The most common reasons that the brake light on the VAZ 2114 does not work are the following factors:
- Fuse failure.
- Broken wires in one of the sections of the circuit.
- Limit switch faulty.
- Bulbs burn out.
- Oxidation of contacts in lamp sockets.
- Damage to the contact board.
The most common and at the same time the most easily removable of the above reasons is a blown fuse. To identify such a malfunction, you need to examine the fuse box. A 10-amp fuse F3 is responsible for the brake lights, which also protects the ignition switch, computer and interior lighting.
Malfunctions in the operation of the latter may also indicate a malfunction of the stop fuse (and in this case, troubleshooting should begin with the block). If it turns out that the fuse has blown, then you should replace it with a new, similar one.
A new fuse installed in place of a failed one must be designed for exactly the same maximum current. If it is less, the fuses will blow more often, and if it is more, the protected device itself may burn out.
The problem may also be in the fuse block itself - sometimes the tracks on its printed circuit boards burn out or the contact legs oxidize. In order to check its serviceability, it is enough to measure the voltage at the contacts of the newly installed fuse.
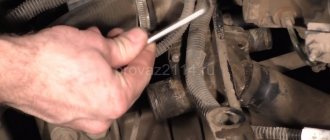
Another common reason why the brakes of the VAZ 2114 do not light up is a malfunction of the limit switch that turns on the signals. It is located on the brake pedal bracket and is always in working order, regardless of whether the car engine is turned on or not.
It works automatically when you press the pedal. In order to check its serviceability, it is enough to see whether the power supply is suitable for its contacts (on one of the contacts the presence of power must be constant). In addition, if you press the pedal and thus turn on the limit switch, you can measure the voltage at its connectors.
If there is no current at the switch contacts, you should check the wire going to the limit switch from the fuse box. If the test shows that the wire is faulty (there is a break), then it should be replaced with a new one and the test repeated.
Otherwise (if everything is in order with the wire), you should disconnect it (as well as the other wire suitable for the second connector) from the switch and connect directly. If after such an operation the brake light works, then the limit switch itself has failed and should be replaced.
You should purchase a new brake light limit switch that is exactly the same model as the failed one. Installing a different type of switch may result in incorrect signal operation.
Main reasons
Almost all problems related to automotive electrical systems can be solved in approximately the same way. You need to look for a potential or probable cause of malfunctions in the problematic object itself, or understand the system responsible for supplying power.
The situation is exactly the same with devices called brake lights. If they stop working, then you should look for the reason in one of the following points:
- There were problems with the fuse. It has oxidized or completely failed;
- There are faults in the lamps themselves or in one lamp, depending on how many stops are not working;
- The reason lies in the mechanism responsible for turning on the warning signal when the brake is applied;
- In the socket where the stop light is installed, the contacts have oxidized;
- More serious problems appeared related to damage to the wiring.
Based on the stated reasons why the feet may stop working, we can draw a completely objective conclusion. A truly serious malfunction concerns only wear or damage to the electrical wiring. Solving such a problem with your own hands is not always correct.
When the rear brake lights (left and right) or the additional central brake light repeater fail, do not rush to look for an auto electrician and offer him money to fix the problem.
There is a high probability that you will be able to do everything on your own. You will only need a standard set of tools for a motorist, as well as an understanding of how the lighting equipment in general works in your vehicle. Start with the most likely and fairly simple to solve possible malfunctions. Only if it turns out that the problem is bad or damaged electrical wiring, then it makes sense to visit a good car service center. It is better to entrust such tasks to experienced craftsmen. The main components for restoring the operation of brake lights on your own, you will need a spare working lamp, a control unit or a multimeter, as well as suitable tools.
It would be a good idea to study the owner's manual and understand how to get to the stops on your car.
Fuse
The first place to start is by searching for the mounting block in which the fuse responsible for the brake light is located.
Moreover, each machine has its own electrical circuit and specific location of fuses.
These can vary significantly depending on the vehicle, such as:
- VAZ 2110;
- VAZ 2107;
- Toyota Rav 4;
- Ford Fusion;
- VAZ 2114;
- VAZ 2115;
- Ford Focus;
- Chevrolet Lacetti;
- Lada Granta;
- Hyundai Accent;
- Renault Logan;
- Hyundai Solaris, etc.
A blown fuse quite often causes the failure of a number of equipment, including lighting devices. Check fuses visually and using a multimeter.
But there is a simple and effective way to check that takes a minimum of time. To do this, start the engine and hold down the horn button. This is not suitable for all car models, but on many vehicles the same fuse is often responsible for the sound signal and brake lights.
If this is not the case, we continue our search further.
Brake lamps and their sockets
Next, you should switch to the brake lights themselves. In most cars, to gain access to the feet, the luggage compartment is opened, the rear light bulb is removed, after which you can get to the feet themselves.
But the dismantling process may differ on different brands and models. Here, start from your car specifically; if necessary, look for hints in the operating manual. There are examples of cars where you can get to the brake light without removing the rear optics at all. You still have one main task ahead of you. It consists of gaining physical access to the faulty device, the lamp and the socket in which it is located. Not everyone can try to determine the problem by eye. Here it is better to take a different route.
The optimal solution would be to use new, similar lamps instead of potentially faulty ones. Therefore, you will have to buy a light bulb in advance and screw it in. If you can't find a lamp of a similar size, use a marker or turn signal repeater. Make sure these conditional controls work first.
Malfunction of the lights themselves
If during the check from the fuse box to the limit switch no problems are found, then you should move on. Now you should test the wiring from the second limit switch connector to the stop connectors with a tester. If it is working, then you need to check the board. The printed circuit board on which the taillights are mounted is not ideal, and is one of the biggest problems of all VAZ cars.
Its tracks often burn out or peel off, causing the lights to stop working. This problem can be solved in two ways - either re-solder the tracks (which can be done with a regular soldering iron, although not in road conditions) or replace the board with a new one (most motorists choose the second option).
Another reason why the VAZ 2114 brake lights do not work may be oxidation of the lamp sockets. In order to eliminate this problem, it is enough to clean all contacts from oxides that have appeared on them.
This is best done in one of the following ways:
- small grit sandpaper;
- WD-40 solution;
- kerosene;
- purified gasoline (“galosh”).
You should absolutely not use gasoline or other solvents to clean contacts.
The last option for faulty stops is the light bulbs themselves. It makes no sense to give any detailed advice here - you just need to replace the burnt out light bulbs with new ones.
By following all the tips listed above, the car enthusiast gets the opportunity to check the entire electrical circuit of the brake lights, starting from the fuse box and ending with the bulbs in the lamps. Thanks to this, the guarantee that the fault will be accurately detected and eliminated is 100%.
Replacing light bulbs
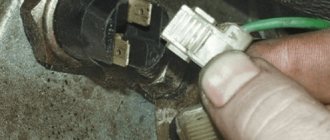
Now let's replace the rear light bulbs. We lift the trunk and look for a valve in the upholstery located opposite this device.
On the trunk side the lamp is covered with a Velcro flap
We open the valve (it is on Velcro) and observe the back of the flashlight with the power supply connected to it.
Rear part of the lamp VAZ 2114
We pull out the block by pulling it towards the central axis of the machine.
Important! The mating part of the block is a metallization applied to a flexible circuit board. We remove the block carefully, since if the pulling is unsuccessful, the entire board will have to be replaced.
We release the latch located on the side of the lamp that is located closer to the center of the machine, and remove the board along with the lamps.
Removing the board with lamps
We unfold the board with the bulbs facing up and observe the picture shown in the photo in the first section of the article. All lamps are removed in the same way - by turning them counterclockwise. We find the burnt out lamp and replace it with a new one.
Replacing the reverse indicator lamp
Search principle
To find a fault in any vehicle on-board network system, you should use the method of sequential elimination of elements. The point is to consistently check electrical appliances and sections of the circuit, excluding elements from the list of reasons that could cause a breakdown. To do this, you need to clearly understand the design and operating principle of the system. When troubleshooting, you need to move from the components that require the least effort to check, to the most difficult to diagnose elements.
Electrical diagram
We immediately emphasize that the pinout of connectors and color markings of wires may differ not only between different models of the same automaker, but also among one model of different years of manufacture. Before you start searching for the cause of the breakdown, you need to find an electrical diagram specifically for your car model.
We will consider the principle of operation of brake lights and the troubleshooting algorithm using the example of the VAZ 2101-2102 circuit. The photo shows the general diagram of the vehicle's lighting and light signaling. We need to isolate the components involved in the operation of brake lights.
- 6 – mounting fuse block;
- 13 – brake light switch. It is a non-locking button (returns to its original position after removing the force). Located directly next to the brake pedal. When the brake pedal is released, the contacts of the limit switch are open, no current passes through it. Accordingly, when pressed, the contacts close, allowing flow through the lamps;
- 19 – lamps that light up when you press the brake pedal.
We do not have a diagram of the mounting block, but we know in advance that the brake lights only work when the ignition is on. There is a wire from the mounting block to the brake light limit switch, on which there is a constant + after the ignition is turned on. As soon as the limit switch contacts close, + goes to the brake light bulbs, which are connected in parallel. The “ground” of the rear lights is common and consists of a wire screwed to the car body.
In the diagram we presented, the elements are depicted as close as possible to how they look in reality. Don’t be alarmed if you only find a schematic diagram for your car with symbolic images of the elements. Schematic diagram of external lighting for VAZ 2114, 2115:
- 3 – mounting block;
- 8 – lamps for side lights and brake lights;
- 11 – brake light limit switch;
- K4 – relay for monitoring the serviceability of brake light lamps and side lights.
Tips for motorists
Traffic rules prohibit the operation of a car with such a malfunction, and the driver is required to check the serviceability of lighting and alarm devices before leaving. It may be that problems appear while driving, but wherever this happens, the driver must navigate the situation and know what to do in this case. Sometimes the problems are very minor and can be easily fixed on your own.
Fault localization
Understanding the operating principle allows you to determine exactly why the brake lights may not light up:
The fuse has blown. In the diagram, the fuses are marked with the letter F (from English - Fuse) and the serial number of the seat in the fuse block, for example, F3;- poor contact at connectors;
- the light bulbs have burned out, but since the lights are connected in parallel, the likelihood that 2 lamps will burn out at once is extremely low;
- poor contact on the negative terminal of the lights. In this case, problems may begin not only with the feet, but also with the lighting of the remaining lamps in the lanterns;
- Damage to the negative track in the lamp board. From the total mass directly to the brake light lamp, the minus goes along a special path on the board. The path may collapse from water or mechanical impact;
- malfunction of the brake light switch, the so-called frog;
- broken wiring, oxidation of contacts.
Troubleshooting algorithm
To detect a fault in the electrical network, you will need a multimeter or a tester, which you can make yourself. Previously, we told you how to use a multimeter, so we won’t focus on that.
The sequence of searching for the cause of the breakdown:
- Check the fuse for the brake light circuit. The location diagram of the fuse links can be found in the repair and operating manual for your car; often the symbol of the protected circuits is located on the back of the cover covering the fuse mounting block. If the installed fuse of the required rating immediately blows, there is a short circuit (short circuit) in the circuit. Please note that the fuse can protect not only the feet, but also other circuits. Installing a fuse with an increased rating is fraught with the risk of a car fire;
- If oxidation is detected on the terminals, clean the contacts mechanically or use an aerosol contact cleaner.
- Having turned on the ignition first and holding the brake pedal depressed, check whether there is power on the positive wire that goes from the limit switch to the rear light connector. If there is power, there is a malfunction in the lights themselves;
- check whether the positive signal is coming from the mounting block to the limit switch. If + comes, but when you press the brake pedal it does not appear on the second terminal of the limit switch, then the problem is in the “frog”;
- If there is no + at the limit switch terminal, examine the circuit up to the mounting block. If the wire is intact and securely fastened in the connectors, then the problem is in the mounting block.
Recommendations
Comments 28
And that’s it., finally)) the mounting block turned out to be working, but still left a new one as a spare, because everything on the old glass heating fuses burned out. I replaced the rear boards and harnesses with wire plugs, all the wiring was rotted in the plugs, and the stop on the spoiler was also replaced with a new one, the old one somehow broke along with all the stops for the company.
Total. Stop in spoiler 250 rub. Boards cost 220 rubles each assembled. Flagella 20 RUR, mounting block from disassembly 1000 RUR.
The new stop spoiler is of much worse quality, the factory one was much brighter. The lamps in the new stop are terrible
We got around to replacing the mounting block with a new one. I rearranged everything and ooooopppppaaaa. The feet still don't work)))
To be honest, I don’t know where to dig anymore...
In the meantime, I’m waiting for my salary, I’ve already gotten used to pressing the rear PTF button when braking))) so that no one will correct my ass))) at least somehow attract attention that I’m braking)))
Still, I decided to disassemble the mounting block and the forecast is disappointing, fuse f4, which seems to be used for heating the rear window, the cigarette lighter and somewhere else, melts the board, everything around it is scorched, the board can’t even be reached, the plastic has already melted to it, next to fuse f3 it is is responsible for the brake lights, perhaps the whole reason is this, how reluctant I am to buy a new unit... but I’ll have to go on a hike. So far I have only treated it with liquid electrical insulation before replacing the unit
That's all we have. all 3 brake lights (spoiler) do not work. The light bulbs are intact, the grounds have been cleaned, the boards are in more or less perfect condition, the tracks are intact, the lamp serviceability relay has been replaced with a new one, the frog is working, the frog is receiving power. for a mystic?))))
In short: in the footsteps, today it was the same, two lamps stupidly burned out at the same time. The spoiler most likely has some wiring cut somewhere. Regarding the turn signal: this is a jamb of the board, either change the lights completely, or just start the car, turn on the lights, turn signal and lightly hit the glass with your palm several times until it is fixed (the contact comes off there). Cleaning doesn't help for long.
stripping does not save for very long. If the weather is rainy or winter, then a month at most (
Check the limit switch (frog) under the brake pedal, it may be damaged. Better yet, buy it and replace it right away, the price is reasonable.
I removed the wires from the frog, shorted it out, nothing lights up, I’ll buy a tester, I’ll have to see if there’s any current flowing to it at all
Check the limit switch (frog) under the brake pedal, it may be damaged. Better yet, buy it and replace it right away, the price is reasonable.
There are 12 V on the wires to the frog, so what?) I shorted the wires, everything is quiet. Let's go to the relay then
And if it burns out, the stops don’t burn? It is also responsible for the fact that if they do not light up, it signals or I do not understand its essence correctly
How can I check the relay? With others, it’s clear they click) should this also be?)))
if it’s burnt, you’ll know by the smell)) and you can open it, there are 2 latches on the sides, you can pry them off and the relay housing will come off
The problem with the blinking of the fog lights along with the turn signals was solved by cleaning the contacts of the headlight. My feet don't still burn. I'm looking at the relay
Are both feet missing? Look at the relay for monitoring lamp malfunctions (the largest in the ChYa) when I paralleled the stops with the PTF, the relay burned out from overload, but yours may have just burned out from a bad ground))
The rear brake lights on the VAZ 2114 do not light up.
#1 Weston
- New
- 8 messages
- Car make: VAZ Samara 2114
- From: Moscow
Hello! For a long time I was looking for an answer on how to check these unfortunate stoparis, since at one moment both of them switched off at the same time. I couldn’t figure out the answers, I don’t understand, explain in simple language, please. The dimensions, turn signals and reverse gear worked flawlessly until I tried to change the board, but more on that later. The stop light on the spoiler lights up dimly when the lights are on, but when you press the brake pedal it lights up as it should, which means, based on the answers, the frog is working. The fuse for the light bulbs is working, I did not try to change the relay, the light bulbs are also all working. Please help a newbie fix this problem by explaining everything completely, as they say, from A to Z.
1. How to properly replace the circuit boards on the taillights? I installed the new one, just like the old one, looked at everything, now nothing lights up at all. If necessary, I can send you a photo.
2. How to check the voltage with a multimeter and make a continuity test? If possible, in detail (we put it in dialing mode, stick one probe there, the other - somewhere that needs to be seen on the display).
3. Someone wrote that instead of a relay for monitoring the health of lamps, you can insert jumpers. Where can I find these jumpers?
#2 111
- Car make: Kalina.
- From: R
Some fuse blocks are initially equipped with jumpers instead of relays. There is a fault control relay. lamps are also “dummy” (there are jumpers inside)
2. How to check the voltage with a multimeter and make a continuity test? If possible, in detail (we put it in dialing mode, stick one probe there, the other - somewhere that needs to be seen on the display).
It is better to use a control lamp rather than a multimeter. Remove the connectors from off. brake light and connect them together with a jumper and check with a lamp for the presence of power (+) at the connectors. Then we move further towards the rear lights. For this it is better to have an electrical diagram. wiring.
#3 Weston
- Car make: VAZ Samara 2114
- From: Moscow
Some fuse blocks are initially equipped with jumpers instead of relays. There is a fault control relay. lamps are also “dummy” (there are jumpers inside)
It is better to use a control lamp rather than a multimeter. Remove the connectors from off. brake light and connect them together with a jumper and check with a lamp for the presence of power (+) at the connectors. Then we move further towards the rear lights. For this it is better to have an electrical diagram. wiring.
Post edited by Wesston: April 29, 2021 – 09:23
#4 111
- Car make: Kalina.
- From: R
So, you just need to buy a new relay
Where exactly are these connectors located?
Above the brake pedal.
And yet, if there is no tester with a light bulb, is it possible to try measuring with a multimeter?
A lamp with wiring is enough. A lamp will more reliably indicate the presence or absence of voltage because it creates a load in the circuit, unlike a multimeter or LED probe.
#5 Weston
- Car make: VAZ Samara 2114
- From: Moscow
Post edited by Wesston: April 29, 2021 – 09:43
#6 111
- Car make: Kalina.
- From: R
If there is no longer voltage there on the chip, then move on and check the frog.
Even if there is a malfunction “frog” there should be voltage on one wire! If there is no voltage on the wires (terminals), then we are moving towards the fuse box.
#7 Weston
- Car make: VAZ Samara 2114
- From: Moscow
Even if there is a malfunction “frog” there should be voltage on one wire! If there is no voltage on the wires (terminals), then we are moving towards the fuse box.