Print this article Font size 16
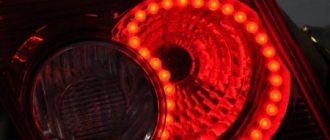
Today we will talk about the most attractive option for tuning headlights on a VAZ 2110 with your own hands in terms of effectiveness - angel eyes . This is an invention of the BMW company, which is actively used by owners of other brands to achieve a similar external result.
To carry out such modifications yourself, you will need ingenuity, some available materials and LEDs.
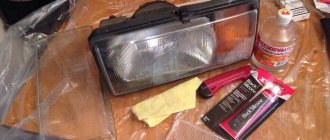
We will consider the option of installing angel eyes on standard Kirzhach headlights. You will see that there is actually nothing complicated in such tuning.
Improved performance and appearance
It is fair to say that such events will require a fairly large amount of money and effort. They improve the engine, chassis, body part, interior, and dashboard. But today we’ll talk about tuning VAZ 2110 headlights with our own hands.
To carry out similar work on the headlights located at the front and rear, you can use the services of a car service. But if you have the appropriate desire and free time, then the work can be completely done on your own.
Procedure for replacing bulbs in Bosch headlights
Drivers often encounter a problem when headlights do not illuminate the road very well at night. This is due to the fact that the manufacturer installs H1 lamps. Experienced craftsmen assure that after replacing the standard lamp with an H 7 analogue, the situation improves significantly.
Such work is performed quite simply:
- all switching is disconnected from the headlights;
- the radiator grille is dismantled, for which you only need to unscrew the mounting bolts;
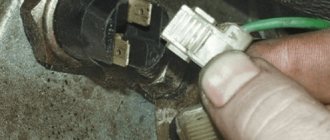
- the wiring blocks are disconnected from the rotating elements;
- the hydraulic correction device is removed. You just need to press on the locking element and turn it ninety degrees;
- the headlight bolts are unscrewed, the headlight moves back, the eyelash moves to the center to free it from the hook with the wing;
- the buffer bolts are released, the eyelash is dismantled;
- Now, by unscrewing one more of the nuts, you can remove the light source;
- After heating the sealant, open the headlight with a knife;
- the hole for the lamp will have to be slightly expanded with a drill, since the diameter of H 7 is slightly larger than that of H 1;
- The terminals are changed for the lamp; four of them will be required;
- a new lamp is inserted and secured with a fastener;
- the reflector will have to be slightly adjusted to better stay in place;
- some drivers install LEDs;
- The headlight is assembled in reverse order and then adjusted.
Now the road will be illuminated better.
Removing headlights
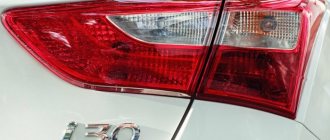
Removing the rear headlights is not always required only for upgrading the VAZ-2110. This operation may also be required if the lighting elements are damaged or the lenses burn out.
Removing headlights
To dismantle the optics, you only need two tools - a screwdriver and 8-mm wrenches (you can use a tool with a wrench). Removal is done like this:
- First, we dismantle the part of the canopy mounted on the wing. To do this, we provide access to the fastening nuts;
- Unscrew the fasteners;
- Carefully push out the equipment;
- After it comes out of the seat, disconnect the block with the wires;
- Let's move on to the second part of the lantern;
- Disconnect the block;
- Unscrew the fastening nuts;
- We remove the lighting element;
And then repair or replacement of the rear lights of the VAZ-2110 is carried out.
Now about modernization. It can be of two types - install lighting elements in which the design of the VAZ-2110 rear lights differs from the standard ones, or slightly alter the “native” headlights.
We install bi-xenon lenses
This is the second way to improve track lighting. With its help, you can achieve better visibility in the dark, not only in the near, but also in the far illumination zone, without creating discomfort for oncoming drivers. It is quite difficult to insert lenses, as they interfere with the design features of the headlight. If you act incorrectly, there is a possibility that an emergency situation may occur on the highway. After disassembling the headlight, you should remove the reflective element. Adapter elements that will hold the lens are made from aluminum or steel material. By installing a magnifying glass with a frame, the internal parts of the headlight are adjusted. For this purpose, slits are made on the sides, and the void areas are covered with pieces of plastic. Space for adjustment is provided between the lens and the substrate. We assemble the headlight, ensuring the tightness in order to avoid fogging in the future. All that remains is to install the lighting element in its place and adjust it.
Tuning the rear lights
Such work will give the car style and elegance. If you want to save money, you can do everything yourself. There are two options for finishing the rear lights:
- varnish composition for tinting;
- tint film.
Having purchased a special varnish, the lanterns should be thoroughly washed and dried. After this, their surface is degreased with an alcohol-containing composition. The varnish is sprayed from a distance of thirty centimeters; after each applied layer, time is allowed for it to dry completely. The tuning effect will depend on the number of layers. At the end, some drivers polish to achieve a matte effect.
But after a certain time, the varnish is washed off, and the work has to be repeated, having first removed the residue with an acetone solution. Film that can be removed at any time is considered more convenient. When using it, the headlight is washed, dried, and degreased. Having cut the material, the surface of the lantern is moistened with water and soap diluted in it. Having removed the film backing, apply the tint to the lamp, press it with a rubber spatula, and smooth it to remove water and air bubbles. When tinting headlights, you should remember that there may be problematic issues with the police. So it is recommended to observe moderation in these actions.
Good day! Let's take a look at our auto industry again. This time the “ten” VAZ 2110
Comments 89
What is this black stuff?
Ah I see, thanks
How many LEDs did you use for the dimensions?
A lot, I didn't count
Okay, okay, I'll figure it out
Listen, what kind of cutter do you use to cut the diffuser and PVC? I tried cutting it with corn, it warms the plastic and winds it up
Of course it will wind, it’s heating up. Through cutter 3 mm
Well, do you need to stop it periodically? It’s just that after 2cm of cutting it already winds up a huge piece and starts to move out) I’m afraid to guess what will happen next if you don’t stop) Corn cutter?
What corn? Passage! You need to set the speed and feed correctly. It is important
Well, do you need to stop it periodically? It’s just that after 2cm of cutting it already winds up a huge piece and starts to move out) I’m afraid to guess what will happen next if you don’t stop) Corn cutter?
Painting the ceiling
Over time, the ceiling of any car gets dirty and changes color. Spots may appear on it. All this looks very unsightly. Some drivers order ceiling reupholstery. It is not so easy to do it in a garage. And specialist services are expensive. This is why many drivers prefer to paint the car ceiling rather than reupholster it. Here's what's required:
- universal paint. Sold in cans (5 pieces are required for the interior of a VAZ 2110). The disadvantage of this paint is that after a few years it begins to crumble. In addition, the interior of the car after such painting has to be ventilated for several days;
- a mixture of water-based and universal paint. This option is used as an alternative to the previous one. This mixture holds up better on the ceiling.
Sequencing
Before painting begins, the ceiling covering will have to be removed from the car.
- Use a Phillips screwdriver to unscrew all the screws that hold the ceiling covering in place. There are several plastic clips around the perimeter; they open manually. The ceiling covering is removed from the interior.
- If the driver has chosen the option with mixed paints, then water-based paint is mixed with universal paint in approximately equal proportions until the consistency of the mixture becomes like water.
- The resulting paint is applied to the ceiling with a regular paint roller. The paint layer should not be too thick so that the material is not soaked through.
- The painted ceiling covering is dried in the open air, then installed back into the interior.
Tuning the interior of the VAZ 2110
The interior of a car offers many options for creativity. Based on this, we will consider the basic and simple ways to refine the internal space of our top ten. Some of them are separated into separate sections of content, and read about the rest below.
Seat for VAZ 2110 from a foreign car
First of all, when you get into the car, you feel the comfort of the seats and their convenience. Many will agree that the standard seats are not very comfortable, and when it comes to long trips, they are simply catastrophic for the back, etc. However, there is a way out, and it lies in installing seats from a foreign car, which are often an order of magnitude or even higher than the standard version in terms of convenience. The most comfortable are the seats found in the BMW E36 . They are incredibly comfortable and pleasant, and most importantly they are made with minimal modifications.
BMW E36 seats
Naturally, you can install other chairs, but you just need to remove the old ones and carefully examine their dimensions, as well as fasteners. It is important that future new seats be as close as possible in design and dimensions to the old ones.
To install, you will need a set of BMW E36 seats, which you can find at any SHROT or order online. You will also need a profile square pipe measuring 3x2 cm and 1.5-2 meters . In addition, a tube with a diameter of 2.5 cm and a length of 1 meter . This entire structure needs to be welded into a single frame, which will be shown in the video. Before installation, you need to use a grinder and cut off part of the body, because the left edge of the frame will not fit tightly into the seat. See all this with comments and the installation process in the video below.
Installation of door trim for VAZ 2110 luxury
The next thing that can be done inside our patient is to replace the old upholstery with new luxury one .
Fortunately, there is no need to redo anything serious, because the automaker itself and other companies took care of this. You need to order new upholstery, which is called luxury. You should also purchase pistons with which this trim will be attached to the door frame.
Available offers
Unfortunately, you cannot find LED rings that are suitable for the VAZ 2110 to create the angel eyes effect in regular auto parts stores. But they are available in numerous online stores. Therefore, there should be no problems with the search.
LED
Although you may well go the other way - make your own rings from LEDs. You will need a transparent rod filled with LEDs. You will find similar components...in a building materials store. Just keep in mind that they need to be bent into a ring. To do this, use a hair dryer. It will soften the rod. The procedure requires precision handling, but it is quite possible to do it yourself.
The third option is to purchase at least 8 LEDs for each headlight and buy a plastic rod separately. This is the most complex approach and will require bending the rod, connecting the LEDs evenly and getting them to work.
The choice is yours. Go for it! And if you don’t want to take risks or waste time making your own LED rings a la angel eyes, then order them online. There are more than enough offers there now.
Tuning the dashboard of VAZ 2110
So, the seats and side panels are modernized and the eye falls on the standard dashboard of your “ten”. The old design doesn't look very good and needs updating. Fortunately, you have many options for tuning a VAZ 2110 torpedo with your own hands. Let's take a closer look at what can be done here.
Craftsmen have repeatedly come to the conclusion through trial and error that the best option, and most importantly simple, would be to install a tidy unit from Priora . The only thing that will need to be done is to change the mounting of the electronic control unit, and also install “Prior” sound insulation.
Dashboard from Priora on VAZ 2110
If such tuning is not enough for you, then you can go much further and replace the entire shield. “Ten” allows you to implement this without unnecessary problems. The thing is that there are three options for instrument panels for this modification of the car.
- Similar to a standard panel, but without a shelf;
Euro 1 instrument panel VAZ 2110
Euro 2 instrument panel VAZ 2110
Euro 3 instrument panel VAZ 2110
Once you have decided on the type of dashboard, you need to carry out a number of dismantling works. Let's give some advice:
- Disconnect the battery terminals and lower the steering wheel to the lower position if provided;
- With little effort, unscrew the screws on which the panel is attached;
- Disconnect all connectors;
- We carefully unbend the instrument bracket, for example, with pliers;
- We remove the panel.
When the new VAZ 2110 dashboard is installed, you should carry out these manipulations in the reverse order. Be careful and try not to forget to turn on any block.
Replacing the instrument panel backlight
You can also change the lighting of the PP to a more interesting and harmonious one. Most often, LED strip or neon glow is used. Of course, such ready-made torpedoes are already on sale, but their prices are incredibly high. However, you can do everything yourself.
Tuning the instrument lighting of the VAZ 2110
First of all, you need to remove the glass, which serves as protection for the devices. Then we place a sheet of cardboard under the arrows and carefully remove them with a screwdriver. The backing of the devices is attached to the sealant, which must be removed. The easiest way to do this is to use a knife. We are now holding a number of events:
- The light filter should be removed with the same knife, and the remaining paint should be removed with acetone;
- We replace the odometer backlight lamp with a multi-color LED;
- We carry out the same actions with the remaining lamps;
- The hands can be decolorized with solvent and painted in any color you like.
The whole process on video:
Illuminated control buttons
In addition to instruments with arrows, various types of backlighting are also installed on control buttons. As an example, we will show how to design a button that turns on the rear fog light. First of all, we dismantle the switch. To do this, remove the moving part of the button from the housing. Then use a screwdriver to pry up the latches and remove the inner part of the switch.
We find a black bracket and, taking it out, disassemble the entire button mechanism. Using tweezers, take out the backlight lamp. Let's move on to removing the filter. We just drill it out.
After this, you need to install an LED of a certain color instead of the standard factory lamp. It is important here not to confuse the polarity, otherwise this will lead to certain problems. As soon as the button is connected, you must check its functionality, and only then assemble the entire structure. Using this approach, you can replace all other buttons with more beautiful and tuned ones.
“Angel Eyes” - a new type of tuning
Installing “angel eyes” on a car yourself is not at all difficult. There are several options for this procedure:
- buy finished products;
- make them yourself using LED strip;
- make it yourself using a transparent tube.
As practice shows, it is much better to make “angel eyes” yourself, since stores sell very low-quality and short-lived products. You can buy a ready-made LED strip and glue it to the inside of the optics with special glue or sealant. But it will still be more effective and brighter if you use an LED ring made of a plastic tube.
The work in this case consists of the following stages:
- To begin with, the plastic tube is heated using a hair dryer. This must be done so that it bends well. However, you also need to understand that if the product is overheated, it will become deformed.
- After this, use pliers to bend the tube around the can, so you get an even circle.
- When the part has cooled, the edges are sawed off.
- Resistors and LEDs are assembled using the same scheme. It is important to sand the ends thoroughly.
- Then, using a hacksaw, notches are made around the perimeter at approximately a distance of 2-2.5 mm. The ends are covered with foil and a special tube.
- Next, the made ring is attached with glue around the optic lens. It is important that the notches are on the inside.
If you clearly follow the instructions and correctly carry out all stages of the work, the updated headlight will have a very presentable appearance and will be able to last about 7 years without replacement.
Sources
- ladaautos.ru/vaz-2110/kak-razobrat-i-uluchshit-fary-na-vaz-2110-tyuning.html
- infokuzov.ru/tuning/tyuning-fary-vaz-2110
- drive2.ru/l/458665674647048737/
Tuning headlights VAZ 2110
Now let's look at options and ways to improve the headlight design of our top ten. The optics of a car are a fairly important element and must be treated with due respect, especially since the headlights are the first thing that catches your eye and give a special charm to your tuning.
How to remove headlights on a VAZ 2110
First of all, you need to know the technique and features of removing optics from the “ten”. It is this point that we will now consider. The tenth VAZ family is equipped with two headlight designs:
1. “Kirzhach” is optics produced on the territory of the Russian Federation. 2. “Bosch” - these headlights are manufactured abroad.