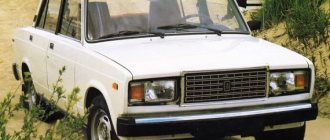
Problems with the speedometer are common to almost all VAZ cars, from the classic 2105, -07 and the first generation of front-wheel drive Samara-1 cars to the modern Lada-Kalina and Priora. The VAZ 2114 is no exception here, and the problems of this car are in many ways identical to the troubles of other models produced by the Volga concern. Several types of dashboards from different manufacturers were installed on cars of the Samara-2 generation: AvtoPribor (AP) and Schetmash (Russia), VDO (Germany). The design of cars with German panels is much better. Firstly, there is a difference in the quality of soldering, due to which problems associated with burnout of tracks occur less often. Secondly, the speed sensor drive shank is metal, whereas on cars with AP instruments a plastic one was installed. The difference in their wear rate can be tens of times.
VDO instrument panel
Also on cars of the Samara-2 family you can find Gamma or Pro-Sport styling panels. The wiring diagrams for cars with different types of dashboards are different, but most of the causes of malfunctions are the same.
The device of the speedometer sensor on the VAZ 2114
The speedometer sensor in Samara works on the principle of a Hall sensor. It consists of a rod with a gear, closed with a dirt-proof housing. It is located in the technical hole of the gearbox.
On VAZ 2114 cars of the first years of production, a scheme similar to the Samara-1 family was used. The sensor drive is connected to a cable, the rotation of which is transmitted to the controller, where it is converted into a pulse signal. Later, they began to install a new generation sensing element with its own converter, to which the line chip is connected to the ECU.
From the ECU the signal is sent to the dashboard. The position angle of the speedometer needle depends on its current value. If an on-board computer (BC) is installed, the electronic signal is sent to it in parallel.
Identifying the cause
Unlike older AvtoVAZ models, the VAZ 2114 speedometer is not mechanical, but electronic, whose readings depend on the sensor installed on the car’s gearbox.
It is this electronic device that most often fails, which can be caused by various factors:
- lack of contact on the connector block (for example, due to water getting there);
- break in the wire supplying the sensor;
- lack of current in the supply contact.
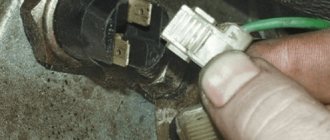
Speed sensor VAZ 2114
Since the VAZ 2114 is equipped with an on-board computer, the first thing you can do is try to detect a breakdown with its help: having turned on the self-diagnosis process, you need to wait until it ends. If the result of the test is the displayed error P0500, it means that the on-board computer does not receive the corresponding signal from the speed sensor.
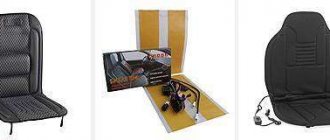
The speed sensor on the VAZ 2114 partly consists of plastic parts that can fail relatively easily, so experts recommend proactively solving the problem before it breaks down, replacing them with metal analogues available in stores.
Why might the speedometer not work?
First on the list of reasons for speedometer failure is drive malfunction. Most often, it “licks” the edges of the shank gear in contact with the moving elements of the gearbox, which is why the drive stops rotating. On cars with a new type of sensor, this problem can be identified by diagnosing the ECU: there will be no signal. With this malfunction, neither the speedometer nor the BC work. The check engine light usually comes on as well.
On older cars, the needle often does not rise from zero due to wear or blockage of the drive cable inside the winding. In any case, the problem is solved by replacing the speed sensor.
The lack of a signal from the sensor on the VAZ 2114 may be due to other problems: for example, oxidation of the contacts on the sensor chip or a rupture of the boot and the ingress of moisture or dirt. Therefore, first of all, you need to remove the chip, assess the condition of the contacts and spray them with WD-40 or any other rust converter. If this does not help, you need to replace the drive.
Other answers to the question why the speedometer stopped working lie in the electrical circuit. Owners of cars with VDO instrumentation have access to factory diagnostics of the system. The odometer button is pressed, the ignition key is switched to mode 1 (power supply to the instrument panel), after which the button is released. The appearance of error 24 indicates that there is no signal from the speed sensor.
If self-diagnosis or ECU diagnostics at a service show that there is a signal, but the speedometer does not work, you need to remove the dashboard.
Arrow jumps on a VAZ 2114 are often associated with burnout of tracks. This is caused by increased voltage on the on-board network due to malfunctions of the stabilizer and time. In domestic instrument panels for Samara, low-quality solder was used, which gradually deteriorates due to thermal expansion. An unstable signal may appear as a jumping arrow.
There may be a discrepancy between the speedometer and BC readings: most often the BC shows correctly, but the arrow does not work. This is due to the failure of the drive on the speedometer itself. To repair, you will have to disassemble the tidy and remove the speedometer. Not all auto electricians, not to mention the car owners themselves, undertake such work, so it is easier and cheaper to replace the dashboard.
Reason 1. Broken wiring
In fact, a non-working speedometer does not affect the operation of the car in any way. However, when driving within the city, where dozens of control cameras are installed, it is difficult to track the speed without this device. Experienced drivers can easily determine speed “by feel” and by engine speed (via the tachometer). In any case, driving with a faulty device is unpleasant, given that it is always in front of the driver's eyes. One of the reasons why the speedometer on a VAZ 2114 does not work may be a broken wiring. To check for a possible malfunction, perform the steps described in detail in the video below.
Useful video:
Briefly, the process of dialing plus and minus looks like this:
- With the speed sensor connector removed, use a test lamp (connecting it to the battery negative) to check the outermost outputs of the connector one by one. During testing, one of them should provide power to the tester light bulb. This means that there is a plus on the speedometer;
- Checking for negative power is done in the same way. The only difference is that you need to switch the power cable of the control lamp from minus to plus of the battery. Next, check the remaining plug.
The verification process does not take much time, but it gives a more detailed picture of the breakdown. If there are no results during the check and the lamp does not light up, the problem is a broken wiring. In this case, the malfunction can be eliminated by replacing the wiring leading to the speedometer or restoring it.
Replacing a car speed sensor
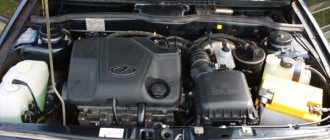
As for its location, look for the DS in the engine compartment in close proximity to the exhaust manifold. To be honest, the place where it is installed cannot be called ideal. While the car is running, the manifold heats up. The sensor wires rub against it, which over time leads to malfunctions and short circuits. Therefore, experts recommend that the first step is to properly insulate the wiring, and also use some kind of clamps so that the wires do not come into contact with the collector. This significantly extends its service life.
It doesn’t matter whether you have an injection car or a carburetor with a Europanel - the connection of the speed sensor to the instrument cluster is identical.
Replacing the VAZ speed sensor: step-by-step instructions:
- Drive into the pit - it will be more convenient to work from below - and wait until the engine cools down.
- Turn off the vehicle's power by removing the cable from the negative terminal of the battery. Do not close the hood after this, this will provide you with lighting.
- Locate the speed sensor on the transmission. Clean it and everything near it with a rag to remove any dirt.
- By pressing the spring clip, disconnect the wire block from the sensor.
- Dismantle the sensor itself by unscrewing it counterclockwise - with your fingers or an open-end wrench to “22”.
- Carefully, so as not to break anything, install a new part in place of the removed part. Connect the wire block to it and the procedure for replacing the speed sensor can be considered complete.
How to properly connect a new DS? It is important here that the device rod fits correctly into the fixing sleeve, otherwise rotation will not be transmitted to the sensor. If the sensor fits into the socket the first time, then everything is in its place, and if something prevents it from moving, then the rod did not get into the bushing
Operating principle of DS
Since the DS on the VAZ 2114 is electronic, its operating principle is to generate constant pulses supplied and read by the control unit at each revolution of the car’s crankshaft.
Analyzing the frequency of the received pulses, the controller outputs the resulting speed to the speedometer while driving, and in addition, it is responsible for the operation of the engine at idle speed and the frequency of air flow bypassing the throttle valve.
Location of DS VAZ 2114
To understand why the speedometer on the VAZ 2114 does not work, you need to get to the speed sensor located in the engine compartment. To do this, you need to open the hood, remove the interfering adsorber and find the wire feeding the sensor next to the right CV joint.
The device itself will be located under the choke assembly in the direction of the supply wire, and the first step is to visually assess its condition. If the DS is still factory, with a high degree of probability its plastic rod or gear, which is responsible for driving the VAZ 2114 speedometer, will be broken (bent, missing teeth, and so on).
DS extraction
Examination
Checking the speed calculation system must begin with its most important component, the speed sensor. Further along the chain you need to go through the entire chain until the problem is completely identified.
EMF
On 8 valve injection models of the VAZ-2114, the installation of a metal speed sensor is not provided. To check the device you need to:
- Remove the “+” terminal from the battery.
- Remove the air purification filter with the pipe connected to it.
- Disconnect the plug and the EMF voltage supply socket.
- Wash the place where it is installed on the manual transmission.
- Using the “22” key, turn the part counterclockwise. Caution must be exercised. The sensor is made of plastic. Using a key can damage the edges or break the device itself.
After dismantling, inspection and cleaning must be carried out.
- Clean and rinse the socket with contact terminals with solvent.
- Inspect the rod tip. The gears are also made of plastic. If abrasion or breakage of the teeth is detected, the entire part requires urgent replacement.
If there is no visual damage, you need to check the device using a multimeter.
- Set the multimeter to DC voltage measurement mode.
- The test probe “+” is connected to the “2” contact of the detachable socket.
- Connect the control probe “−” to the vehicle ground (to the body).
- Turn the rod as quickly as possible.
During rotation, the EMF should produce from 0.5 to 12 volts of direct voltage. If there is no data at all, the part is considered faulty. The rotation test can be carried out using a hand-held electric drill. You need to clamp the rod into the carabiner of the device and turn on the rotation. Diagnostics can be carried out without dismantling. To do this, the car is jacked up and the EMF readings are measured at first speed.
If the test does not give a negative result, you need to look for the cause in other elements.
Wiring
The wiring is checked by a simple test. To do this, you must first check all 3 wires coming from the EMF connector to the ECU. The tester is set to diagnostic mode with a sound alert. The wires are checked at both ends at once. A sound signal will confirm the integrity of the circuit.
Next, you need to ring the cable from the ECU to the speedometer. To do this, you need to dismantle the speedometer and disconnect its electrical connector. The wiring is checked in a similar way from 2 sides of one wire. An audible warning indicates the integrity of the cable. If the circuit does not ring, the reason may lie in the fuse, which also needs to be checked.
Fuse
The fuse responsible for protecting the speedometer from electrical overloads is located in the block under serial number “9”. This element is marked with the corresponding icon on the block cover. It's very easy to find. He is responsible for the operation of the heating system and speedometer. Checking the node is not difficult; to do this you need to:
- Set the multimeter to dialing mode with a sound signal.
- Remove the fuse from its socket.
- Connect each multimeter probe to the contacts of the part.
No sound will indicate a faulty fuse element. It will have to be replaced. The operating current of the factory fuse is 7.5 A. It is imperative to replace the damaged element with exactly the same marking. It is prohibited to insert metal objects or thick wire into the connector. Such jumpers will not protect the speedometer during a short circuit or voltage drop. The fuse socket itself may burn out, the insulation of the wires may melt, and a fire may occur.
If the fuse is in a transparent case, then you will not need a tester for checking. You only need to visually assess the condition of the part. Both contacts must have a whole jumper between them.
After installing a new fuse, you need to test it for a short to ground. You just need to connect one tester probe to the car body, and the other to the fuse contact. The presence of an audible signal will indicate a short circuit to the housing. You will need to disconnect all the speedometer plug sockets and repeat the test. If the short circuit does not disappear, the problem must be looked for in the electrical circuit of the heating system.
Speedometer
If all previous checks have shown that the speedometer elements are in good condition, this device must be checked. To do this you will need a wire up to 2 meters long. Further:
- Connect one end of the wire to the “+” of the battery.
- Use the other end to touch contact “2” on the speed meter plug. You cannot keep the wire in contact for a long time. If the speedometer needle does not respond to the voltage supply, then the problem lies under the device body.
If, after applying voltage, the needle drops or trembles, the problem may be poor contact.
Domestic speedometers suffer from poor contact soldering. To check, you need to disassemble the device and check the integrity of all current-carrying paths. If melts or breaks are detected, they need to be soldered. After soldering, the speedometer needle still does not work, the problem is in the impulse relay. This part cannot be repaired, so it will have to be replaced.
Signs of a faulty meter
- Rough idling or stalls when idling.
- The speedometer does not work well or does not work at all.
- Increased gasoline consumption.
- Engine thrust decreases.
For your information: The catalog number of the sensor for Samara (samaru) 6-pulse speed meter is number 2111-3843010.
Speed meter errors
If the meter is faulty or the circuit is faulty, an error appears on the on-board computer during diagnostics:
- P0500 - No signal from the vehicle speed meter.
- P0503 - intermittent speed meter signal.
The reason most often lies in the meter wiring; they simply dangle and are not secured. Therefore, cases of broken wires are common; before replacing, be sure to check the meter circuit.
Which one is better to choose?
The standard factory sensor No. 2111-3843010 has a weak plastic rod, so it often breaks . It would be more advisable to replace it with a sensor that has a metal rod, but then you will be faced with replacing the connector.
How to check functionality
- The sensor has a three-contact group: the first contact is grounding, the second is a pulse signal, the third is current voltage.
- We start checking with the presence of ground on the first contact, then the presence of voltage on the third contact (12 volts).
- We check the impulse of the second contact when the drive wheels are twisting at least 5 km/h.
- The first and third contacts “call”
A faulty sensor must be replaced.
Sensor location
Speed sensor location
Finding this device in a VAZ 2114 yourself is not difficult at all: it is located on the gearbox. To do this, you need to open the hood of the car and find the wire that leads to this very box. This wire also leads to the speed meter.
It happens that the cause of the breakdown lies in loose or poorly fixed wiring, so this needs to be checked before replacement occurs. To do this you will need the following tools:
- Screwdriver (flat and Phillips).
- Ordinary pliers.
If the wires are in order, then the reason lies in the breakdown of the sensor itself.
Diagnostics and troubleshooting
VAZ 2114 cars were produced in various configurations. It is advisable to consider all possible modifications of the car and testing options.
Diagnostic tests include:
Conventionally, the process of finding the location of a breakdown is divided into three stages:
- inspection, testing of the unit connected to the gearbox (speed sensor, cable, gears);
- connecting elements (cable, wires);
- dashboard in the cabin (speedometer).
To carry out inspections and repairs, you will need the following tools, devices, and materials:
It is more convenient to carry out work in the garage by placing the car in a viewing hole. An electrical outlet may be needed. For the first time, it is advisable to see the connection points of connectors and cables. Repeated repair measures (disconnecting the connector, unscrewing the casing fastening) can be carried out blindly, by touch.