Adjustment - nozzle
Adjustment of nozzles must be done while wearing safety glasses.
The nozzle is adjusted using adjusting washers installed under the spring, with the nozzle nut, nozzle, spacer and rod removed. When the total thickness of the adjusting washers increases (increasing spring compression), the pressure increases, and when it decreases, it decreases.
The KamAZ-740 engine injectors are adjusted to the pressure at which the spray needle begins to rise, equal to 180 MPa. The pressure test is performed using a KP-1609 device or another of a similar design. The pressure is changed by placing washers under the spring when removing the sprayer nut.
The injection pressure of the injector is adjusted with the cap removed by rotating the adjusting screw with a screwdriver, which must first be unlocked, or by changing the number of shims.
To adjust the nozzle, you need to unscrew the cap nut 4 (see Fig.
To adjust the nozzle, you need to unscrew the cap 6 and release the nut 8; By screwing in or unscrewing adjusting screw 7, set the required injection pressure, then tighten nut 8 and check the injection pressure again.
In addition to the usual adjustment of the nozzle to the injection pressure and determining the quality of atomization by the appearance of the jet, this stand allows you to determine the angle of the atomization cone by the diameter of the imprint of the atomized fuel obtained on a sheet of paper, as shown in Fig.
Checking and adjusting the nozzles using special equipment makes it possible to determine whether the tightness of the nozzles is broken, as well as the pressure at which the nozzle needle begins to rise, the quality of fuel cutting, and the angle of the jet cone. The main testing devices of the stand are two instruments, one of them is designed to check the technical condition of the injectors, the other is designed to check the plunger pair of the high-pressure pump for hydraulic density.
Checking and adjusting the nozzle for injection pressure and the quality of fuel cutting is carried out on stands of the KP 1600 A type.
Checking and adjusting the injectors and fuel pump must be performed by specially trained workers in workshops equipped with stands for monitoring and adjusting fuel equipment.
Injectors are checked and adjusted directly on the car engine or on special equipment in the workshop.
Then check the adjustment of the nozzles, determining the amount of sand supplied under the wheel in 1 minute. The nozzles of the sandboxes must be adjusted so that 0.9 liters of sand per minute are supplied to the first wheel along the travel, and 0.6 liters per minute to each wheel of the remaining wheel sets with sand pipes.
If, as a result of checking and adjusting the injector using the KP-1609A device, it is not possible to obtain the required indicators for tightness, supply start pressure or the quality of the sprayed fuel, then the injector is repaired.
During periodic repairs, it is necessary to check the quality of fuel atomization and adjust the injectors.
Sand consumption varies depending on the track profile, train weight, weather conditions, nozzle adjustment, and the individual skills of the drivers. Sand consumption rates take into account differences in path profiles and air temperatures.
Checking diesel engine injectors yourself
To determine the faulty one, it is necessary, with the engine running, to bring the crankshaft speed to such a frequency when malfunctions in the diesel engine are most clearly noticeable. Next, each of the injectors is sequentially turned off by loosening the union nut at the point where the high-pressure lines are attached to the corresponding pump fittings. If the “working” part is turned off, then the operation of the engine changes. When a fuel injector that is known to be faulty is turned off, no obvious changes in engine operation will occur.
A clogged injector can be identified by probing the fuel line for shocks that arise as a result of pulsation of the fuel pumped by the injection pump when it is completely impossible or only partially pumped through the nozzle. You should pay attention to the fitting of the suspicious section. The temperature of the element will be higher compared to the others.
The efficiency of a diesel engine and its operating efficiency greatly depend on the type of nozzles installed, which are periodically changed during the process of cleaning, adjusting or repairing the fuel system of a diesel engine. Before installing a diesel injector on the engine, you need to make sure that the nozzle is properly marked. The nozzles on all injectors should be the same, the throughput should not differ.
Checking the injectors for pressure at the time of injection, as well as analyzing the spray efficiency, is carried out using a special device called a maximeter. The maximeter is a control sample in the form of a special nozzle. Such an element has a calibration spring and a scale, which is printed on the body and cap. Using this scale, it becomes possible to set the pressure for the start of diesel injection.
The second method is to have a control model working injector with which the others are compared. These checks are carried out with the diesel engine running. To check the spray quality and injection pressure, you will need to dismantle the injector and fuel line from the diesel engine. Next, a special tee is mounted on the free fitting of the high-pressure fuel pump, to which the tested part is connected in parallel with a known-good control one.
The control injector is preliminarily adjusted to the optimal pressure for the start of fuel injection and checked for atomization quality. It is also necessary to loosen the union nuts on the remaining injection pump fittings. This will interrupt the fuel supply to other diesel injectors. The last step is to activate the decompression mechanism and set the maximum fuel supply. After this, you can begin to rotate the engine crankshaft.
Both injectors (control and test) should demonstrate the simultaneous start of fuel injection. If the tested injector deviates from the norm compared to the control sample, then adjustment of the diesel injector will be required. The spring pressure of the part being tested needs to be adjusted.
To adjust, you will need to unscrew the nozzle cap and loosen the lock nut. Next, using the adjusting screw, you need to set the spring tension to such a degree that both injectors ultimately inject at the same time. To determine the spray efficiency and quality of the part being tested, it is necessary to compare the result with the performance of the control sample.
Checking diesel injectors for injection pressure and spray quality using a control sample will take more time compared to using a pre-prepared maximeter. In addition to checking on the engine using a fuel injection pump, the efficiency of the injector can be tested using a special testing (adjustment) stand.
Diagnostics
Repairing a COMMON RAIL diesel injector
can only be done professionally and with great precision at a good service station. Self-diagnosis may cause errors. For example, faulty injectors can be confused with other ailments that Russian roads can cause to a car.
Technologically, the process itself is completely simple. The main thing is to have a puller for diesel injectors 34. First, the injector is cleaned; if a malfunction is suspected, this is done using ultrasound. This is necessary to visually assess the condition of the part and, if possible, identify the cause of the malfunction.
If there are no visual faults, an adjustment stand will be needed for further diagnostics. So, the injectors are checked for leaks under pressure. The pressure gradually decreases from the maximum to a level of 20 bar, within 10 seconds, only one drop of liquid may appear on the nozzle; if more, it means that the adjustment is still broken. By the way, the adjustment stand also allows you to measure the pressure at which the nozzle opens. True, the method is only suitable for injectors with one spring. If the springs have two dimensions, this can only be done with the help of modern electronic diagnostic devices.
Diesel injector malfunctions
It happens that based on these studies it turns out that there is no need to repair the injector. Often the device can simply be cleaned and it will work correctly again. To clean, the nozzle through which the fuel flows is disassembled and cleaned of debris and contaminants using a stream of air, or in rare cases, ultrasound.
Types of faults
If the methods described above do not help, most likely the mechanism will require repair. We are most likely talking about the following malfunctions:
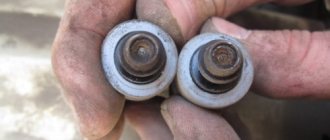
- Wear of the intermediate washer - the one between the nozzle and the spring. Most likely, it is skewed and this leads to the fact that the needle does not rise high enough and does not fire in a timely manner, as a result of which the fuel flows unstably.
- Spring failure. It happens very rarely. The reason is most likely a loss of rigidity. You can simply add a few washers to the device and thus compensate for the height of the spring.
- Damage to the nozzle body itself. Only replacement helps.
Fault prevention
Any experienced driver understands that the most important thing is to notice an impending malfunction in time, or even protect yourself from most of them using preventative measures. In the case of injectors, this is also possible. Today, fools, as well as the Russian road, are not all the troubles that await drivers.
The only way out is to refuel only at reliable, proven gas stations, and use exactly the fuel recommended by the car manufacturer.
How does fuel dosing work? High pressure solenoid valve
The solenoid valve (valve for setting the injection start timing) consists of the following elements:
- valve seat;
- valve closing direction;
- valve needle;
- electromagnet armature;
- coil;
- electromagnet;
The specified solenoid valve is responsible for the cyclic supply and dosing of fuel. The specified high pressure valve is built into the high pressure circuit of the injection pump. At the very beginning of injection, voltage is applied to the electromagnet coil (5) according to a signal from the control unit. The anchor (4) moves the needle (3) by pressing the latter against the seat (1).
When the needle is pressed tightly against the seat, then no fuel flows. For this reason, the fuel pressure in the circuit increases rapidly. This allows the corresponding injector to be opened. When the required amount of fuel is in the combustion chamber of the engine, then the voltage on the electromagnet coil (5) disappears. The high pressure solenoid valve opens, which entails a decrease in pressure in the circuit. The decrease in pressure causes the fuel injector to close and injection to stop.
All the accuracy with which this process is carried out directly depends on the solenoid valve. If we try to explain in even more detail, then from the moment the valve ends. This moment is solely determined by the absence or presence of voltage on the solenoid valve coil.
Excess injected fuel, which continues to be injected until the plunger roller passes the top point of the cam profile, moves through a special channel. The end of the path for fuel is the space behind the accumulating membrane. In the low-pressure circuit, surges from high pressure occur, which are damped by the accumulating membrane. An additional feature is that this space stores (accumulates) the accumulated fuel for filling before the next injection.
The engine is stopped using a solenoid valve. The fact is that the valve completely blocks the injection of fuel under high pressure. This solution completely eliminates the need for an additional stop valve, which is used in distribution injection pumps where the control edge is controlled.
Injectors break Probable causes.
Restoring the performance of diesel injector nozzles in ship conditions
The answer to this question is very simple - they do not withstand the operating conditions in which they are used. Injectors have gone through such a long evolution and even a revolution that they are simply reaching the limit of their capabilities. If we look back, in the mid-90s, injectors installed on diesel engines had an injection pressure of 1350 bar. Today the norm is pressure of 2000 bar or more. The design of the injectors themselves has also changed, but still does not save them from damage.
Why did the injection pressure increase so much? Today we demand high performance from modern diesel engines. Engines must be dynamic while maintaining reasonable displacement. And also consume little fuel. The norm is the production of a 2-liter power unit, which has a power of 150 horsepower and a torque of more than 300 Nm and, of course, does not consume more than 7 liters of diesel fuel per 100 km.
Pre-check
For initial diagnostics of the operation of injectors without removing them from the power unit, a specialized device is used - a maximeter. The design of this type of equipment replicates the design of the nozzle itself. The device is equipped with a micrometric regulator with a scale, the division value of which is 5 MPa, which allows you to adjust the moment when the spray needle begins to rise at levels up to 50 MPa. To carry out the test, the nozzle is connected through a maximeter to the fitting of the discharge section of the pump. Using a micrometer head, the required pressure of the lifting moment of the nozzle needle is adjusted. After this, all other fuel line nuts are loosened and the crankshaft is turned using the starter. In the event that fuel is injected through the diagnosed injector and the maximeter simultaneously, then its setting is recognized as meeting the technical requirements. If fuel flows through the nozzle but does not enter the maximeter, or vice versa, this means that the lift torque pressure is lower or higher than the required value. To adjust the required pressure in the engine injectors, change the degree of spring tightening using the settings screw.
How can you check a pump injector?
MESTO Nozzle 1302 d-1.1mm stainless steel Nozzles for sprayers. Saint Petersburg
In a good way, diagnostics and testing of the pump injector should be carried out in the same way as the common rail on a professional stand, where operation will be simulated in different modes (idling, nominal and accelerated operation mode). But at home, checking pump injectors will be limited
The most basic method to find out one of the reasons when there is unstable and rough operation of the engine at full load with such fuel injectors is to carefully pinch the return hose on the fuel filter; if the operation levels out, this indicates that air bubbles are most likely forming in the injector. In turn, this phenomenon occurs if the tandem pump does not develop the required pressure or does not reach the design capacity
If an increase in pressure occurs when squeezing, it means that most likely the rubber connection between the incoming channel and the return channel in the pump injector is leaking. If there are no changes, the tandem pump is faulty. This check will be more accurate if you also connect a pressure gauge to check the fuel pressure. Confirmation of this diagnosis can also be obtained using VAG-com by observing the dynamics in blocks 13 (idle stabilization) and 23 (pump injector switching time) on a cold and warm engine. An increased spread of parameters with increasing load and temperature will indicate the formation of air locks.
Diagnostics of the main performance indicators of pump injectors installed on VAG vehicles can be made using the VCDS software by taking readings on channels 13 and 14 in the “Engine control unit” section. The spray correction numbers should approach zero. By the way the correction indicates underfilling or overfilling, you can more or less accurately say whether the injector is clogged or there are problems in the operation of the valve assembly. When the engine is unstable at idle, and after warming up its operation is restored, and the balance on some cylinder is more than 2.5 mg, then its pump injector is definitely in need of repair.
Connecting the injector pump connector
You can also check the resistance of the solenoid valve coil when it is suspected of failure. If it does not work, the plunger will supply diesel fuel to the return line. The valve coil resistance should be about 0.5 ohms. Or perform another test by applying 5V to the valve (it will click, which means it’s ok). On the injector block at the end of the cylinder head, the 7th contact is the general “minus”, and the positive ones: the 5th of the first cylinder, the 3rd goes to the second, contact No. 2 is the “+” of the third cylinder, the 6th pin to the fourth. When a knocking sound emanating from the injectors appears in the engine, you can connect the connector to the gap with wires and remove the impulse from them at the moment when the knocking is clearly heard, such a test will help determine the knocking pump injector. It would also be a good idea to check the injector breakdown for ground. But still, the most effective method of checking pump injectors at home and without removal is software
So we’ll go into more detail about the values of which groups in the “Vasya Diagnostician” program we should pay attention to.
Injector settings
Data on setting up injectors are indicated in the technical documentation of the tractor in the section “setting parameters for fuel equipment” and depend on the technical data of the components included in the fuel system and the diesel engine itself. For tractors of early versions of MTZ 80 (82) with a D-240 engine and a UTN 5 pump, in accordance with the technical documentation of the fuel equipment settings, the injection pressure should be 17.5 MPa (175 kgf/cmᶾ). The start of injection on the stand is set more by 0.5-1 mPa (5-10 kgf/cmᶾ) to a value of 18.5 mPa (185 kgf/cmᶾ) taking into account compensation for the drop in injection pressure when parts expand due to diesel heating.
For later versions of tractors in the MTZ 80.1, 80.2, 82.1, 82.2 modifications with D-240, D-243, D-245 diesel engines and a 4UTNI pump, the injection pressure is adjusted to 21.6 MPa (216 kgf/cmᶾ). At the stand, the adjustment is carried out adjusted for heating of the parts plus 0.6-1.2 mPa (6-12 kgf/cmᶾ) to a value of 22.8 mPa (228 kgf/cmᶾ) .
Disassembling a diesel injector
Once a defective injector has been identified, it may need to be disassembled. It is recommended to follow the sequence below:
- Insert the nozzle into the spanner. Carob use is prohibited due to the risk of licking off the edges;
- Secure the key in a vice;
- Move the nut a little. Further unscrewing should preferably be done by hand;
- The nut may come out together with the stuck sprayer. To separate them, it is necessary to use a penetrating lubricant;
- If there is a strong connection to the sprayer, you will need to knock one element out of the other. The nut rests on the plate with the hole. A rod made of soft metal, such as aluminum or copper, is inserted into the end of the nozzle. By lightly tapping, the stuck part is pushed out.
Disassembled injectors
Upon completion of disassembly, all elements must be cleaned of dirt. You can wash it in acetone or kerosene. Also, if possible, it is advisable to blow out all elements with compressed air.
Cleaning diesel engine injectors
If you need to wash the diesel injectors yourself, the faulty part is removed for inspection and adjustment. Before answering the question of how to clean diesel engine injectors, it should be noted that disassembling the injector must be carried out in conditions of maximum cleanliness and light.
You can wash the diesel injector yourself with kerosene or high-quality diesel fuel without impurities. Next, the parts are carefully blown with compressed air, after which you can reassemble in the reverse order.
In order to avoid possible mixing of components from different injectors, it is better to disassemble and reassemble each injector separately or disassemble and reassemble the parts in order. The components are wiped exclusively with clean cambric napkins, as well as calico napkins.
If the design provides for the possibility of adjusting the needle lift, then the adjusting screw is tightened until it stops. Next, the specified screw is loosened slightly, thereby ensuring the desired needle lift. Parameters regarding lift height are usually indicated in the operating manual for the specific engine.
Removing the injectors
All manipulations with the injectors must be carried out in complete cleanliness; debris entering the combustion chamber can damage the engine, so before dismantling the power system, it is recommended to clean the engine with compressed air or simply wash the cylinder head
It is important to remove contamination before starting the dismantling process. If abrasive gets into the threads, it will have a detrimental effect on the service life of the car.
The nozzle must be disassembled on a clean table covered with a white sheet of paper.
To simplify subsequent assembly, it is necessary to mark all dismantled tubes and cables. Otherwise, installation may be performed incorrectly. If photo or video recording is possible, it is recommended to take advantage of this.
Dirt and ring residues adhering to the grease must be removed with a cotton swab. You can turn the crankshaft several times. Air flows will blow out all excess from the seat.
Cleaning the diesel intake system
Files:
The diesel intake system includes an air filter, the cold part of the turbine, an intercooler, an intake manifold, an EGR valve and its cooler, and intake valves.
We will consider the impact on engine operation of the condition of the intake manifold and EGR valve, as systems that most strongly influence engine operation.
Increased resistance of the air intake system and crankcase ventilation (contamination of the EGR valve and manifold) on a diesel engine leads to the following problems:
the engine does not start in warm and cold weather the engine is difficult to start the engine starts but immediately stalls unstable idling lack of power excessive fuel consumption black exhaust blue or white exhaust excessive oil consumption overheating of the diesel engine increased pressure in the crankcase unstable operation of the diesel engine
The service life of various EGR systems ranges from 70 to 100 thousand kilometers (in domestic conditions about 50 thousand). After this, its components must be replaced. This is ideal. However, there are few people willing to pay a lot of money, so many car repair companies include in the list of routine maintenance measures to clean and, accordingly, extend the life of system components. In the EGR pneumatic valve, it is necessary to periodically clean the seat and rod from carbon deposits. In systems with a control solenoid valve, it usually has a filter that protects the vacuum system from contamination. It needs to be cleaned periodically.
When EGR starts to malfunction, many car owners prefer to turn it off. As a rule, this is done using a gasket cut from thin sheet metal and installed under the valve. However, as a result, the temperature in the combustion chamber increases, and this increases the risk of cracks in the cylinder head.
Typical contamination of the intake tract of Opel, Volkswagen and the intake manifold cleaning field:
EGR valve and intake manifold cleaning technology:
Warm up the engine to operating temperature. Stop the engine and provide access to the intake tract by removing, for example, the pipe supplying air from the turbine. Start the engine (Attention: injection of the drug is carried out only with the engine running!) and spray Pro-Line Ansaug-System-R einiger Diesel onto the dirt deep into the intake manifold at short intervals of 2-3 seconds. Maintain engine speed around 2000 rpm
If the speed increases spontaneously by more than 1000 rpm, stop spraying immediately! Use up the contents of the cylinder and control the cleaning visually. Turn off the engine and restore previously disassembled connections. If necessary, erase accumulated errors in the ECU (engine control unit).
It is recommended to include cleaning of the intake tract in routine maintenance of a vehicle, especially with a mileage of more than 100,000 km.
liquimoly.ru
Checking and adjusting diesel fuel injectors
To check the fuel injector you will need a certain number of tools and equipment. To set a certain pressure, you must have a special stand for crimping. To be able to adjust, you will also need keys and various internal hexagons (as a rule, this is a 6 and 8 hex). The number of tools required will directly depend on the diesel model and the model of the injector itself. Let's talk in more detail about adjusting the injectors on a particular engine.
Removing the injector from the car
This operation must be done very carefully so that during the dismantling process you do not damage the fuel return pipe, which allows excess diesel fuel to return to the tank. And pulling the nozzle out of the head is not so easy.
There are cases when the injectors become terribly coked inside the head of a diesel engine and pulling them out for adjustment is sometimes very problematic.
Experienced “Let’s Fix Auto” technicians encounter similar problems every day; for this purpose, they have special pullers that can be used to remove the injector without damaging the base of the engine head.
Cleaning the injectors
You can wash the nozzle in an alkali solution or in simple diesel fuel. Coked parts are thoroughly washed and wiped dry. At the same time, one should not forget about protecting hands and face from exposure to fuel or alkali. These two components may not have a beneficial effect on the skin and the body as a whole. Next we need a stand to test the injectors.
Checking the injector
The injector must be disassembled and its parts inspected for defects or visible damage.
- The used atomizer is replaced with a new one.
- We check the rod - pusher for concavities or cracks.
- We check the return spring for cracked coils, as it significantly loses its properties and does not work as required.
- You should also check the adjusting screw.
There are situations when, during the installation process or due to age, the thread on the screw fails. This moment leads to constant interruptions in the adjustment of the injectors. The pressure will constantly drop and the vehicle will perform very poorly.
Do not forget about such a malfunction as the injector body. Often, after prolonged use, the casting may burst in the most inappropriate place and the density of the nozzle will be compromised. And if the injector is pouring, it means that in the future there may be burnout of the piston and improper operation of the engine as a whole. Therefore, this malfunction must be approached intelligently and not ignored.
Nozzle adjustment
Well, now it’s time to adjust the injectors and install them on the engine. To do this, it is necessary to assemble the injectors in the reverse order of disassembly. After which the injector is installed on the stand and the adjusting screw clamps the spring until a certain fuel pressure is created inside the injector.
After reaching a certain pressure, you should check the nozzles for spray. At the moment of spraying, you need to bring thick paper under the sprayer and look at the quality of the spray. The spray should be clearly in a circle. If you are sure that the injector is working properly, you can tighten the lock nut on the adjusting screw and install the injector directly on the car.
That’s the whole technique, the only point is to do all the above operations correctly and have with you the necessary equipment for repairing fuel injectors and adjusting them. The article is for informational purposes only; you do everything described above at your own peril and risk.
Fuel atomization quality
Checking the quality of torch formation is carried out on an adjusted nozzle, for which the valve is closed and a portion of fuel is pumped up using a lever. After filling, control injections are made. A satisfactory result is the formation of torches of a mixture of fog-like consistency, which are evenly distributed over the cross section of the nozzle cone without obvious concentrations, drops or jets. In this case, the beginning and end of the injection phase should have clear boundaries without subsequent leakage of fuel from the nozzle and be accompanied by a characteristic ringing cutoff sound. As an option for additional testing, slow injection of fuel by the stand pump is used. In this case, it should be injected in small portions with a clearly audible fractional tapping.
To determine the cone angle, filter paper is installed in front of the nozzle, and calculations are made based on the jet imprints.
In the event that the adjustment of the nozzle on the stand did not allow the specified indicators of the quality of mixture atomization, delivery pressure, tightness, etc. to be achieved. This unit is assessed as faulty and the question of the possibility of its repair is raised.
Wear of fuel equipment, or its partial failure, is not critical, but a very serious problem, since interruptions in the supply of the mixture over time cause breakdowns of other components of the power unit. Despite the fact that if the injectors are clogged or unadjusted, it is still possible to operate the vehicle, all manufacturers recommend repairs as quickly as possible, which will preserve engine performance and avoid subsequent financial costs. Thus, at the first sign of unstable fuel supply, you should contact a service center.
has diagnostic stands and specialized equipment for checking and adjusting the fuel equipment of various types of diesel engines.
How to adjust unit injectors - Blog TAM.BY
Many car enthusiasts fall into hysterics when they hear the word pump-injector, although this technical device is not very difficult to repair. Some tools and special equipment will be required, but the most common and most common hex keys will be useful. Adjusting pump injectors requires a stand that can create fuel pressure for pressure testing. The selection of keys will be based on the diesel model and injector design.
It is also necessary to take care of clean rags, which will definitely be needed at all stages of the work. Preference is given to light-colored fabric, on which all elements will be clearly visible.
Removing the pump injector from the engine
When removing the injector, everything must be done consistently and carefully so as not to damage the fuel pipes. Thanks to low-quality fuel, they sometimes become so coked that it is simply impossible to remove them from the engine head without special tools and profanity.
But in most cases, the injectors can be removed without problems. To do this, you need to unscrew the rocker arm system and unscrew the fixing bolt. After shaking and twisting the body a little, you need to pull it up.
Service center technicians have special pullers. If you want to remove the pump injector yourself to adjust it, you can copy such a puller. Pullers make life much easier and reduce the risk of damage to the base of the head.
How to clean the nozzle?
When you finally have it in your hands, you can start washing it with an alkali solution or clean diesel fuel. It is necessary to wash thoroughly and wipe dry. It will not be superfluous to observe personal safety precautions. Alkali and diesel fuel do not bring anything good to the skin and mucous surfaces. After cleaning, we move on to the stand to check and adjust the pump injector.
Checking the removed injector
During disassembly, you must carefully inspect the condition of the sprayer, the pusher rod, the integrity of the return spring and the adjusting screw. The spring should not have broken coils, because then the force will be insufficient and the nozzle will not close tightly.
If the adjusting screw is torn off, then adjustment is out of the question. The pressure will be unstable and the car will not drive confidently. If the seal of the cast injector body is damaged, it must be changed, otherwise fuel will flood the cylinder.
Adjusting the pump injector
Adjusting the nozzle is the most crucial moment. First you need to assemble it and install it on the stand. Then, using the adjusting screw, it is necessary to achieve the position of the spring at which excess fuel pressure is created inside the nozzle. The first test is to inspect the spray quality. To do this, you can take a sheet of paper and place it under the nozzle at the moment of opening. A normal circle should be imprinted on the paper.
If the pressure parameters and spray quality are normal, then you can lock the adjusting screw and put the nozzle in place.
Sometimes engine performance deteriorates after self-adjustment of pump injectors. The reason may be not so much the quality of the adjustment as the attitude towards replacing all the gaskets. If this is not noticeable on a cold engine, then on a warm engine the defect will immediately appear. Another problem with this could be a defect in the adjusting screw or fixing bolt.
Less prepared car enthusiasts can be advised to perform all operations with the old injector, and only then begin adjusting the pump injectors from the car.
It’s easy to find car services where pump injector adjustments are carried out with the TAM.BY catalog.
How to clean the fuel supply device yourself
The same stand has a nozzle cleaning function. But if desired, this can be done in a garage. A standard cleaning liquid and a simple device assembled from improvised materials are used.
The homemade installation is a car electric fuel pump placed in a vessel with injector cleaner. The hose from the pump is connected to the injector inlet fitting, and power from the battery is supplied to its supply connector through a push-button microswitch.
This is interesting: How to properly tow a car with automatic and manual transmission
By repeatedly driving a liquid containing powerful deposit solvents through a sprayer, you can achieve a significant restoration of the spraying properties of the device, which will become clear from the change in the shape of the torch.
An injector that cannot be cleaned will have to be replaced; its defect is not always associated with contamination; corrosion or mechanical wear is possible.
Distinctive signs of injector malfunction
The principle of operation of injectors is clear to everyone. They are responsible for the dosage and supply of fuel. The injectors are controlled by a computer that knows what dose of fuel they should inject into the engine. It all depends on your driving style. This system works great, providing excellent performance. The problem appears when the system loses its integrity. The most common cause of injector failure is poor fuel quality. If you fail to regularly replace the fuel filter or refuel with fuel of dubious origin, you can undoubtedly expect trouble.
Injectors are very sensitive to the quality of diesel fuel. Over time, they begin to become dirty until they are completely clogged. Removing deposits from low-quality fuel is impossible without mechanical cleaning. Injector malfunctions usually occur at high mileage, most often far beyond 150,000 km. Of course this is not the rule. Often, cars with original injectors overcome the 300,000 km mark, subject to timely maintenance and refueling with good fuel.
The driver should quickly notice that the injectors are starting to work incorrectly. The first sign is that the ride becomes more enjoyable. This is a paradox, but faulty injectors can significantly overflow fuel (the electronics do not correctly determine the dosage), which gives the car increased agility. But this does not last long and soon this process has the opposite effect. If the injectors malfunction, the smoke of the car increases greatly, especially when you press the gas sharply. The engine oil level increases noticeably as fuel begins to seep into it. Uneven idle speed of the engine appears. In the morning, the car starts to start worse and smokes when warming up.
When replacing injectors, you must carefully determine the manufacturer. It is best to start from the one that was installed on the car as the original. Car manufacturers do not use their own brand of injectors. As a rule, they use components provided by leading companies in their field. In modern diesel engines you can find injectors of the following brands:
— Delphi — Ford engines with a Common Rail system, 1.4 HDi for Citroen C3, 1.5 dCI engines for Renault;
- Bosch - by far the most popular, injectors are installed on most cars, including JTD, CDI, CDTI, HDI, D5, 1.9 and 2.0 dCI engines;
- Denso - mainly Japanese brands, 2.0 CD engines for Mazda 6, 2.0, 2.2 and 3.0 D-4D for Toyota.
— Siemens — some models of French cars with 1.4 and 2.0 HDi engines, Volvo D4 engine in the S40 model, 2.0 TDCi PSA, Audi and Volkswagen 2.0 TDI CR engines;
- Correct replacement of VAZ 2109 engine mounts
- DIY car windshield repair >
Fuel leaks from the fuel injector
Also, diesel injectors can leak both minor and severely. In the first case, repairs will be required, in the second, you can get by by grinding the needle to the seat. Injectors leak due to a broken seal at the end of the needle, which is also called the sealing cone.
If leakage of the diesel injector is noticed, then carefully grind the needle to the seat. For this, thin GOI grinding paste is used, which is additionally diluted with kerosene. During the grinding process, it is necessary to avoid getting the paste into the gap that is present between the needle and the guide sleeve. Upon completion, all elements are washed in kerosene or clean diesel fuel, then wiped with appropriate napkins. Next, you need to blow off all parts with compressed air and re-check for leaks.
Signs of malfunction and checking injection nozzles without dismantling. Diagnostics of injector power supply, performance analysis. Tips and tricks.
Features of operation and causes of malfunctions of diesel injectors. How to independently remove, troubleshoot, disassemble and repair diesel engine injectors.
When to clean the injectors on a car, signs and symptoms. Self-cleaning of injection nozzles: available methods for cleaning the injector.
Why and when you need to flush the engine power system. How to flush the engine fuel system yourself: gasoline and diesel engines.
When and why you need to remove fuel injectors from the engine. Removing injectors on gasoline and diesel engines: features of the dismantling process.
Adjusting idle speed on carburetor and injection engines. Features of adjusting the XX carburetor, adjusting the idle speed on the injector.
Source
Spray check
In normal condition, the injector produces a short injection, accompanied by a characteristic sharp sound. During operation, the nozzle becomes clogged and wears out. Depending on its condition, a decision is made on the advisability of repair or replacement.
Type of jet depending on the condition of the nozzle
For diagnostics, the nozzle is fixed on a special stand. The nozzle is aimed at a clean sheet of paper. After this the injection is carried out. By the marks left on the paper you can judge the condition of the nozzle. The number of marks on the sheet should be equal to the number of holes that the sprayer has. If there are fewer traces, the nozzle must be cleaned from contamination.
A story about H-shaped injectors
Until 1988, Ford Transit diesel engines used “finger” collapsible injectors, and their design was determined by the type of engine (2.4 or 2.5). At the same time, only the nozzles were subject to replacement.
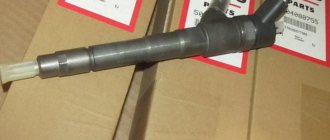
On models from October 1988 to 2000, “H-shaped” injectors are used, which are technologically considered non-separable and can be replaced entirely. Such injectors are designed for 100 thousand kilometers when using imported high-quality fuel, as well as timely replacement of the fuel filter (after 10-20 thousand km). All types of such nozzles are very similar, and also operate in the same pressure range (240-280 bar). However, they have design differences that affect the opening mode, injection volume and the shape of the spray cloud. Therefore, it is recommended to install only the appropriate types of injectors. All types of Ford Transit car engines use injectors from the American company Stanadyne.
All Standine injectors for transit engines were marked with different color marks. This was done for better identification. One engine must have 4 identical injectors with the same color mark. Otherwise, the injection will be incorrect, and stable engine operation will not be achieved. For example, on Transit from 1988 to 1994, on non-turbocharged engines with a capacity of 70 or 80 horsepower, injectors with a white mark on the Lucas pump were installed, with an orange mark on the Bosch pump, and there was also a version of ejectors with a green mark. All three types could be installed in the same period of time. For correct selection, you need to know not only the year and power, but also the color mark. This cannot be determined by the VIN number, so you will have to get them. The total number of injector options for the 2.5 engine is 12. It is advisable that those installed from the factory be installed, but the most important rule: that they all have the same color mark and from the same time period, since the color of the marks can be repeated until 1997 and after .