How to connect Webasto to a stove fan
Modern engines are not efficient enough to produce enough heat to quickly warm up the cabin. Therefore, vehicles are often equipped with an auxiliary heater to ensure a comfortable temperature in the cabin during the trip and make it easier to start the engine. Remote starting or starting the heater at a specified time warms up the car engine without human intervention. A motor heated in this way is easier to start at any temperature. And some engine models cannot be started at temperatures below minus 20° C without pre-warming. Even when the engine is warm, the interior remains cold, since in order to warm it up, heat must be transferred from the heater to the interior.
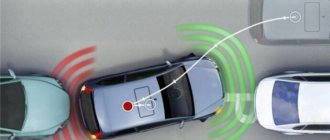
To do this, you need to pass air through the stove radiator. And this is only possible if you supply power to the heater fan, but the car’s power supply is designed in such a way that power is supplied to the motor only when the ignition is on. Since all heaters operate via a separate network (which does not require the ignition to be turned on), it is not possible to do this without additional upgrades. The main function of Webasto is to quickly warm up without human intervention, and by heating only the engine, it will not be possible to start driving safely, since in cold weather the car windows are covered with a layer of frost, which significantly impairs visibility. To combine the process of warming up the engine with warming up the interior, you need to connect climate control and pre-heating. This will allow you to warm up the car interior when the engine is turned off. And when the heater starts, not only the engine, but also the interior warms up remotely, which allows you to start driving immediately. It is both safe and comfortable.
Launching webasto without a timer
Launch webasto without a timer.
Do I understand correctly that if you apply +12 to a certain wire of the webasto TTop C connector, the heater will start and operate according to the standard algorithm until the fuel runs out or the +12 signal is removed from this contact? If so, then a combination of this relay-timer and a gsm module will allow you to launch Webasta remotely, and will it turn off when +12 is removed by the above-mentioned relay-timer after the time specified on it? In this situation, a Webast timer will not be needed.
Connecting Webasto to a car alarm via a GSM unit.
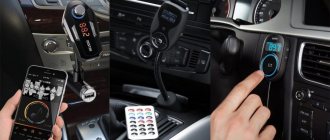
There is a way to make life easier and maintain your timer warranty. To do this, you can install a GSM Bilink unit - its cost is 7,500 rubles. And it has a separate wire for connecting an additional car alarm channel. All you need to do is connect these two wires and program the alarm. Photo of the Bilink GSM module kit below:
This module is deservedly popular when installing heaters. You can run the car heater at any distance. The main condition is the availability of cellular communication. And for those places where it is not available, this device has a start button. And you can also independently diagnose the heater and identify errors in its operation.
Starting the Webasto boiler from the alarm remote control - logbook of the 2008 Volkswagen Transporter on DRIVE2
Having installed the Webasto boiler on the car, I realized how much I missed it last winter, I set the boiler operating time on the mini-timer to 30 minutes, but I had to start it at a specific time (which is not entirely convenient, because the travel schedule is very flexible), or by opening car and pressing the power button, which is also not very convenient, because you need to go outside, especially in cold weather. I decided to set up a remote launch of Webast, I didn’t want to install a GSM module because the price for it is high, and I don’t need its distances. Having surfed the Internet I have already seen many articles on how to connect everything yourself. What we need for this: Having an installed alarm system on the car, a 1533 mini-timer remote control, 1.5 m of wiring and a soldering iron. First, remove the remote control and disassemble it
disassembled mini timer remote control
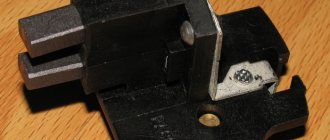
On the lower left mic, which is responsible for starting/switching off the boiler, solder a thin wire to the leg
The photo is not mine, I forgot to take a photo myself, in it we can see where the wire needs to be soldered
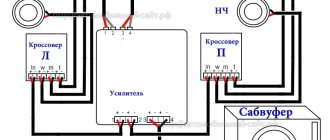
Next, we install the remote control in place, and pull the wire to the place where the car alarm is installed. Having found the alarm unit, look at the exact name on it, and on the Internet we look for a connection diagram for your specific alarm system. I have a Panther installed, the connection diagram is as follows:
According to the diagram, we look at the free additional negative channel, I have it dark blue to control the trunk opening
to a free channel and connect our wire taken out of the minitimer remote control.
In my case, we press the trunk open button and the boiler starts, you can also turn it off. Now if I know that in at least half an hour I need to go somewhere, I sit at home, first start the boiler, and after 20 minutes the engine itself starts from autostart, leaving I’m already getting into a warm car.
Connecting the alarm and mini-timer
For the scheme discussed here to start working, you will need:
- Installed and properly functioning engine heating system.
- Car alarm controlled by key fobs. Wires from additional outputs can go to standard car alarm connection points. However, one of these wires must remain free.
- You will need to know how to work with a soldering iron. You will need to solder exactly one cord with your own hands. True, soldering will need to be done on the minitimer board.
The main signal connector is equipped with several control outputs.
You will connect the reverse side (cathode) of the diode to any of them. But the selected contact should not be associated with alarm connection points already used in reality.
By breaking the last rule, by your actions you will make changes to the well-functioning operation of the signaling system. Therefore you need to be careful. The connection card provided during installation is usually included with the instructions.
Improvement of the timer that controls heating
For example, you can take the timer of the following model - Webasto 1533. Its circuit contains 4 microbuttons. You, in turn, need one of them.
To carry out modifications, do the following:
- The device is turned off, its body is completely disassembled;
- Remove the display module by hand (the printed circuit board should remain);
- The wire is brought to the desired site and soldering is performed.
When soldering, the main thing is not to touch the traces going to the display contacts with your hands.
Not everyone can carry out such modifications on their own. You can get a good result if you contact a repair shop.
The photo above shows how experienced repairmen carry out installation. The timer itself after modification looks like this.
Connection to the signaling system, programming
It would seem simpler: buy a 1N4001 diode, connect its anode to the wire from the timer, and the cathode to the signal output. This is exactly what needs to be done in practice.
The connection diagram does not raise any questions, but you will have to tinker with programming. For example, consider the equipment of the following model: Starline B94.
Perhaps the easiest way is with the programmable output “1”.
In general, you will not be able to complete the setup without a standard manual. And in order not to configure anything, use the first channel (pin “5”).
Site about off-road vehicles, SUVs, off-road vehicles
The Webasto Thermo Top Evo liquid pre-heater ensures the repayment of heat deficit in fuel-balanced automobile engines. Models are available that run on both gasoline and diesel fuel.
Liquid pre-heater Webasto Thermo Top Evo, purpose, device, principle of operation, electrical circuit and connection diagram.
The Webasto Thermo Top Evo liquid heater is designed for:
— Heating the car interior. — Defrosting glass. — Preheating a liquid-cooled automobile engine.
The Thermo Top Evo can be upgraded to a conventional heater using a conversion kit. Additional designation of the heater and reheater is not provided, since outwardly they look the same, and the nameplate indicates “Gasoline” or “Diesel”. Webasto Thermo Top Evo heaters and reheaters may only be operated with the prescribed fuel and only with the prescribed type of power supply.
How to enable Webasto manually?
With the GSM module it is possible to control the Webasto heater from a mobile phone.
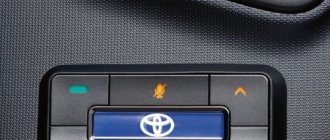
The interior control panel is usually mounted on the instrument panel - so that it is convenient to configure Webasto from the driver’s seat. First, familiarize yourself with the control panel by studying the symbols on its buttons. To launch Webasto, find a button with an image of either a flame or a similar symbol. In any case, the image will be clear - it may be similar to the symbols of the glass heating buttons or the icons located at the standard heater control buttons (handles). Webasto is turned on by pressing this button, and the operation indicator will appear on the display. Pressing it again will turn off the heater.
It must be remembered that after three unsuccessful startup attempts, Webasto may become blocked.
It is also necessary to take into account that the device may become blocked after three unsuccessful start attempts. Try unlocking Webasto by removing the fuse from the power circuit. It is also possible that the heater has already been blocked before. If the attempt to turn on Webasto from the remote control still fails, then, most likely, you will still have to turn to specialists for help. They will also tell you how to turn on Webasto correctly. The first start-up after a long period of “idleness” of the heater may take some time for the fuel system of the device to bleed. In addition, before starting, you need to make sure that there are no air pockets in the pipes - overheating of the temperature sensors will lead to an emergency shutdown. You can also turn on Webasto while the engine is running, using it as an additional interior heater, or rather, to increase the air temperature. This is especially important if you have a car with a diesel engine - the “stoves” of diesel engines do not warm up well, and when idling in severe frosts, the heaters of gasoline cars stop efficiently “heating” the interior. In order to turn on Webasto without a remote control (if it is broken or missing for some reason), you will have to find a way to “bypass” the control electronics. But at the same time, you risk damaging the device, for example, by overheating it.
How to use Webasto
You can appreciate the benefits of a preheater only if you use it, but before that you need to learn how to use it. Operating the device is quite simple, but to master it you need to know some features.
How to launch Webasto
By default, the device is set to winter mode. If you plan to use it, the standard heater is set to the “warm” position. With a three-stage fan, select the first division, and with a four-stage fan, select the second. If a malfunction occurs, the system is locked by the electronic locking function. the Telestart remote system or using a timer. You should not turn on Webasto several times with a total usage time of more than 1 hour, as this will drain the battery .
Launch Webasto from your phone
The best option for controlling the device is to start from your phone . To do this, you use a separately connected ThermoCall GPS unit (module with antenna), which costs about 14 thousand rubles, and allows you to control Webasto functions from your mobile phone by sending an SMS message to the number assigned to the device. The module allows you to control it from five independent phone numbers - this is convenient if the car is used by several family members. Webasto applications have also been developed for control from a smartphone and tablet, which receive feedback with temperature data and alarm activation.
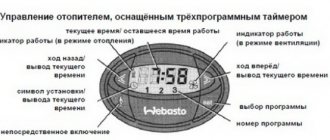
How to set the time on Webasto
Setting the time is done by holding the “set” button while simultaneously pressing the “forward” or “backward” button, after which “set” must be released. The current time will be displayed with the corresponding symbol flashing. The setting itself is carried out using the “forward” or “backward” buttons, and the set time will be saved by pressing “set” or after the screen goes out.
Webasto control panel
The purpose of the device is to turn the device on and off while being up to 1 km away from it, and to set the duration of its operation. The remote control will be convenient for those drivers who store their car near their place of residence. Its use is more convenient than regular programming of a mini-timer, especially since many people forget to do this, and the remote control turns on the heating by simply pressing a button. The weakness of this control method is that obstacles, radio interference and power lines reduce the range of the remote control, which is indicated by an indicator showing the signal strength.
Re: Smoking room (gazebo)
Are you really sure he's an electrician? If you replace the switch and screw in the light bulb, it doesn't mean anything. I've never heard of people going to an electrician with diagrams. Kick him in the neck!
Do you need a diagram or an electrician? A question with a message, then I’ll ask more questions. It’s better to write the truth right away!
Unlocking Webasto (Webasto),
Unblocking Webasto “wet” and “dry”. can be unlocked manually using sequential de-energization, unlike the Ebespecher autonomous heater, which after 10 emergency shutdowns is completely blocked and the possibility of manual unlocking is not possible and is only possible with a program or a special scanner. Webasto shutdown in an emergency occurs as if the fuel supply is stopped, - in the first case, if the flame does not appear after 180 seconds, - in the second case, if the flame dies out during operation after 85 seconds, - in the third case, if the Webasto autonomous heater overheats, then If the temperature limiter (thermostat) is triggered, the Webasto heater turns off immediately.
In all cases, except for a breakdown of the Webasto supercharger motor, after shutting down in emergency mode, the system is forced to purge for 2 minutes. If the supply voltage of the control unit is below 21 volts for 20 seconds, or the supply voltage is above 32 volts for 6 seconds, the heater is also switched off in emergency mode, followed by purge for 2 minutes.
A Webasto heater that is self-switched off in emergency mode can be restarted by turning it off and then turning it back on, but first the cause of the emergency shutdown must be eliminated.
In the event of three consecutive Webasto shutdowns or an emergency shutdown due to overheating, the autonomous heater is blocked and cannot be started from the control panel in the usual way.
Pre-heaters and auxiliary heaters are unlocked by removing the fuses. - press the button on the remote control to turn on the autonomy, - remove fuse F1 for 15 amperes or disconnect the power wire from the control unit, - after 3 seconds, connect the Webasto autonomy to power.
Good day everyone, webasto termotop E is available
when starting from the key fob 0 reaction, the light on the timer lights up and that’s it
when starting from the computer, the FZG and UP fan turns on, there is some kind of humming, etc., there seem to be no errors when pressing test, from the entire list that is there, only when testing the burner, an error appears during the test there was a 31% glow pin and a flame sensor slowly crawled from 0.1 ohm to 0.200
error "Short circuit of glow pin / flame sensor" error code 9822/00
I'm interested in the question, is it possible to replace this very filament pin and in which direction should you dig? I didn't measure the pin itself with a multimeter, I just removed the control unit?
in the info window after connecting in the field, the temperature shows 135 degrees, what does this mean, although the car stood for about 12 hours, everything cooled down, the ambient temperature was around 20 degrees,
How Webasto works
The heater is started by a program timer located in the cabin, or by a remote control with which the device is equipped. The device operates as follows:
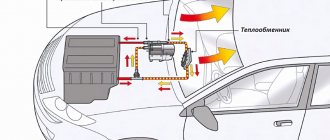
- Fuel from the tank enters the combustion chamber of the heater and heats the coolant of the heat exchanger.
- The circulation pump pumps heated liquid through the engine cooling circuit, due to which the engine itself and the interior heating radiator warm up.
The Webasto operation process is fully automated - its start and stop is subject to timer commands, engine and environmental temperature sensors. This solution made it possible to minimize fuel consumption to 0.5 l/h , and reduce the warm-up speed in a passenger car to 15 minutes at an outside temperature of -20 o C.
In the event of a breakdown, it is necessary to check all fuses and plug connectors of the heater and eliminate any defects found.
During operation, the flame breaks off or after two starts there is no combustion.
Turn off the heater (at least two seconds), then start it again.
Heater overheating, operation indicator blinking.
Check the air duct for permeability. It is necessary to allow the heater to cool, turn it off and turn it on again after 2-3 seconds.
On-board voltage too low.
Recharge the battery. Turn off the heater (at least two seconds) and turn it on again.
The combustion air pipe and/or exhaust pipe is clogged.
Check the exhaust pipe for permeability and the combustion air pipe.
If the above methods do not resolve the problems, then the heater must be provided to specialists from a Webasto service station to troubleshoot the problem.
What is Webasto
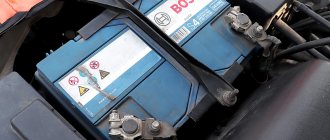
The Webasto pre-heater is used to warm up a cold engine and warm up the car interior. The device makes it easier to start the engine at low temperatures and pre-heats the cabin, melting ice and snow that has adhered to the cabin before driving, and in the presence of difficult weather conditions.
The product is a small device installed in the engine compartment, the power system of which communicates with the car, and the cooling circuit is embedded in the engine cooling circuit. It is controlled using an electronic module connected to the machine’s on-board network.
Non-remote ways to turn on the Webasto preheater
Timer MultiControl
The most budget-friendly and accessible way to remotely activate engine preheating is a small timer installed in the interior of your car. The driver independently programs the required time for turning on the system and the duration of the heater’s operation. Depending on the required conditions, the duration of the timer can be from 10 minutes to 1 hour. At the same time, the motorist, while in the car, can start Webasto by pressing one button.
When activating the timer, it is worth considering time zones. The manufacturer categorically does not recommend using the heater in the following places:
- At gas stations and oil depots;
- In areas where flammable gases or dust may accumulate;
- In closed garages and other premises.
When entering the menu, the user controls the watch in settings mode while the symbols are flashing. All installations are simple and easy to use. It is possible to determine the schedule for a week in advance.
The advantages of installing a mini-timer include:
- Low cost of purchasing the device;
- Ease of use.
Among the minuses it is worth highlighting:
- The need to enter the exact travel time in advance to start the heater;
- Possible violation of the aesthetic appearance of the interior when installing the device.