How to remove and replace the CV joint yourself - technology for removing the internal and external
Hello, dear car enthusiasts!
Front drive wheels provide car owners with many bonuses in the form of: more responsive steering, increased maneuverability, stability on slippery roads and other delights. In return, the machine, namely its chassis coupled with the drive, will require additional attention. The front wheels are able to pull the car only thanks to the presence of a shaft connecting the hub to the variable gearbox.
However, that's not all. It would be impossible to transmit rotation from the transmission to the wheels without special devices installed at the ends of the shaft - CV joints.
A constant velocity joint is, today, the only way to transmit rotational motion between axle shafts located at an angle to each other.
In this regard, any self-respecting car enthusiast should know how to remove and disassemble the CV joint, diagnose, maintain and repair it.
How to remove a CV joint yourself without the help of a car service
Despite the apparent complexity of the front-wheel drive design of a car, regardless of its make and model, the design of this unit is quite simple and similar in all cars.
In order to remove and replace the CV joint, it is enough to have a garage with an inspection hole or an overpass to facilitate access to the lower part of the car, as well as a set of standard tools.
As a rule, experienced car enthusiasts manage their work without any special devices, but if there is a desire to speed up repair work, you can purchase a CV joint puller.
Considering that each drive wheel has two hinges, repair work can be carried out depending on the following types of failure:
- removal of the internal CV joint and its repair;
- removing the outer CV joint;
- Removal and repair includes a shaft and two joints.
How to remove the inner CV joint in the garage
Repairing an internal CV joint is an event that is quite rare, but you must have the skills to handle this mechanism, because for its long life it is necessary to carry out preventive measures, replacing the boot and lubricant.
Before describing the technology that includes removing the internal CV joint, it should be noted that in this case, an inspection hole will be simply necessary, because the joint cage is bolted (6-8 pieces) directly to the differential gears, and this is the lowest point of the transmission.
After all the fastening bolts have been unscrewed, the steering wheel should be turned to free the spline joints from moving freely. Using a pry bar, the CV joint is very easily removed from the mounting socket. Removing it from the shaft is also easy; to do this, you just need to unfasten the retaining ring and the boot clamps.
A strong recommendation to all car enthusiasts: you should not remove the CV joint from the shaft under the car and, especially, do not disassemble it. It is much more convenient and rational to remove the shaft with two CV joints at the same time, and then perform all the manipulations on the workbench with a vice.
How to remove the outer CV joint yourself
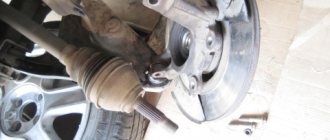
The outer CV joint, which is installed directly at the hub, although more accessible, will require more time and effort to remove. Here you will have to almost completely disassemble the front suspension.
The wheel is removed, the hub nut is unscrewed and the lock washer is removed. After unscrewing the lower ball joint, the moving strut allows you to remove the CV joint axle shaft.
Repairing CV joints can be associated with certain difficulties. The first is the inability to remove the axle shafts or shaft from the splined joint. There are several options for getting out of the situation. First you need to take a wooden or brass spacer and try to knock out the axle shaft.
If nothing could be done at this stage, you will need a CV joint puller. One of the most common and simple pullers is made in the form of a horseshoe, which is attached to the axle shaft, and the thrust bolts remove the CV joint when rotating.
It is not difficult to disassemble the CV joint itself; for this you need:
- apply marks on the holder and body for reassembly in the same position;
- tilt the shaft with the holder at the end as much as possible to one side;
- Remove the ball from the holder on the opposite side and perform the procedure with all the balls in turn.
There is an opinion among some experts that it is enough to simply wash the CV joint with diesel fuel and “fill it in” with lubricant again without disassembling it.
In this case, there is a high probability that fragments of old retaining rings or other debris will remain inside. If the CV joint has already been removed, then it is better to disassemble it, wash it, reassemble it and lubricate it.
Installation of the CV joint after replacement or maintenance is carried out in the reverse order of removal.
Signs of failure of the outer grenade (CV joint).
There are two options here:
- signs that your grenade has already broken
- signs that the grenade will soon come out and break .
How to understand that a grenade will soon break.
Of course, the first sign of a malfunction of the external grenade is a crackling sound . If you hear a crackling noise while driving with the steering wheel turned, it is definitely a CV joint. The greater the angle of rotation of the wheel and the harder you press on the gas, the louder the clicks. Another sign that does not always appear is vibration on the steering wheel at speeds greater than 80 km/h. The vibration is only slightly similar to the vibration from an unbalanced wheel. It usually manifests itself as a slight twitching of the steering wheel.
How to understand that the outer CV joint has broken.
If the CV joint breaks, the car will stop moving. In any gear engaged, press the gas, the speed increases, but the car does not move.
How to understand that it is the outer CV joint that has broken, and not the internal one or the clutch in general (the first signs of failure are similar to the signs of a clutch failure)? First of all, start the car and put it in any gear. Next, open the hood and look in turn at each of the shafts going from the box to the wheels (one short, the other long). If any shaft is spinning, it means that the CV joint has broken on this side.
I recommend not just visually looking at the shaft, but touching it with some long, hard object, such as a stick. The main thing is that there is nothing on it that could wrap around the shaft . When you touch the shaft with a stick, if it is spinning, you will feel a slight vibration. This is usually done in the dark, because it is difficult to understand whether a cylindrical object is spinning, especially in the dark.
Checking the condition of the CV joint
- External (external) CV joints - two pieces, located on the hubs, transmit torque to the wheels. The steering angle is significantly higher than that of an internal CV joint. They also take on more load. Accordingly, they break down more often and require regular inspection and replacement if necessary. They have a smaller size.
- There are two internal CV joints that make the axle shaft move; they are located in the gearbox, one on each side. They are larger in size. They are less subject to stress and, accordingly, can work longer.
You can assess the condition of the CV joint yourself. The easiest way to inspect the external one is to turn the steering wheel all the way (to the right or left) and quietly move away. If there is a problem, a cracking or crunching sound will appear. The more damage is done to the CV joint parts, the louder the sound will be.
If problems with the external grenade are accompanied by a crash when turning, then problems with the internal grenade are accompanied by a crack when moving straight. The sound will intensify if you drive off-road - every bump, hole or ditch will clearly remind you of the problem. If you notice a crunching sound, carry out repairs immediately - problems with the internal CV joint are very dangerous. It's a little more difficult to inspect:
- We put the car on the lift.
- We turn on first gear, the wheels should rotate slowly (the car should be slightly raised).
- The presence of a distinct crunching sound is evidence of problems.
If you hear a cracking sound while driving - when turning, when overcoming off-road obstacles, or sudden acceleration - immediately fix the problem. Timely inspection and repair will help the car owner remain a driver and not a pedestrian. In addition, a problem detected in time will help to avoid critical situations on the road.
How to remove a vaz shruz
Having determined that it is the external grenade that is broken, we begin to remove it.
How to unscrew the hub nut on a VAZ?
First of all, unscrew the hub nut. To do this, take a 30mm head and a lever, the larger the better. We put bricks under the wheels to prevent the car from rolling (simply putting it in gear is not an option, the wheel will spin) and begin to unscrew the hub nut.
In this matter, the more you weigh, the better, since I very often lacked my weight and leverage of about one and a half meters. I got out of the situation in the following way: I stood completely on the lever, as close to the edge as possible, thereby giving maximum tension to the nut, and hit the lever with a hammer. Usually this method helped me unscrew even the most soured wheel nuts.
One more nuance: if the outer walls of the head come into contact with the walls of the hub, it is better to lubricate the head with mining or lithol, or, in extreme cases, with silicone grease. Thanks to this trick, the head will not bite in the hub.
How to install a new CV joint on a VAZ.
Be sure to follow this sequence for installing new parts:
- Small clamp.
- Grenade boot.
- Large clamp.
- Retaining ring.
- The CV joint itself.
First, we clean the drive shaft from dust, dirt and old grease. Most CV joints come with lubricant, a boot, two clamps and sometimes a new hub nut. If suddenly there is no lubricant in the kit, it is better to use graphite lubricant, and if it is not available, then simple lithol. First of all, we put on a small collar. Then the boot (it should go behind the limiting washer) and a large clamp. Then we put a retaining ring on the drive shaft. Now open the tube of lubricant and completely squeeze it into the grenade. Now it's time to put the CV joint on the drive. Because of the locking ring, it will be difficult to insert the drive into the grenade, so we take a hammer and lightly, trying not to damage the thread, press the grenade into place. Now you need to put the boot on the CV joint and tighten the clamps. Assembly occurs in reverse disassembly sequence, but there is one nuance! Do not overtighten the hub nut! This may cause the bearing to hum. The hub nut must be tightened with a force of 225.0–250.0 N*m. Of course, few people have a torque wrench. So, tighten the nut tightly, but not with all your might. In theory, a force of a maximum of 25 kg will need to be applied to a meter-long knob. But, the extension pipe will spring back under such force, so how can you describe it exactly? But obviously there is no need to jump with weight.
I hope I helped you. If you have any questions, ask them in the comments.
Tags: problems with gearbox
Comments 72
guys, help me, I bought a new wheel drive shaft, installed everything on the VAZ2109 as the book says. But when I left and drove a couple of kilometers, at a small jump, the inner CV joint fell out. And I can’t turn it on. not a single transmission. What could be the reason... Thanks in advance
Thank you guys everyone, I'm very tired, I'm going to bed. I'll try again tomorrow
the main thing is not to lose heart =) everything will be fixed!
where can it get away from us! It’s just that today was my last day off (I was on sick leave) and the car is in a friend’s garage! and he needs it too!
Tomorrow I’ll take a look at my place and write back to you =) don’t stress yourself out too much - everything is fine there. Tomorrow let me know what you can do with the measurements and samples that I wrote to you =)
Thanks again everyone! Today I bought a new retaining ring, washed the flange on the grenade, sharpened it with a file and imagine it sat down! hooray! WE ALL WON! What would I do without you all!
The main task during assembly is to ensure that the holes inside these same gears are opposite the holes in the gearbox housing. this will be immediately clear - the slots will be visible upon inspection, or by touch with your hand.
in general: picture - www.mkad86.ru/acat/data/vaz/2109/v410.gif on it there is an axis drawn in the center, there are two gears on it (one is drawn at the bottom). they will not go anywhere, they will remain there. You insert the axle shafts into the gears (part number -2108-2303050) - so they can turn over, but they won’t fall apart.
I split my body like that...
I don’t even understand... in general, you can’t take out two drives, this is how you do it: take one out, put a chopper in its place... and then remove the other drive. Reassemble in the reverse order... If you don’t do this, then screw it... the differential simply falls apart
tough! well you're scary
there is a closed system of gears that are not supported by anything except the grenade shafts, you take out both grenades and it all falls apart...
How to change the CV joint (grenade) on a VAZ, Lada + video
Step-by-step plan for replacing CV joints (grenade)
So, the grenade (both internal and external) on front-wheel drive models of domestic “cars” (God forgive me) starting from the VAZ 2108 and ending with at least 2115 is the same (well, maybe from different manufacturers and different service life of the final ). The same principle applies to Priora, Kalina and Grant.
Greetings, dear visitors! I want to devote this article to replacing the external grenade. If you follow the sometimes unclear terminology (which I don’t always like) - replacing the constant velocity joint, i.e. CV joint. I try to write my articles in everyday language, in which people ask for information.
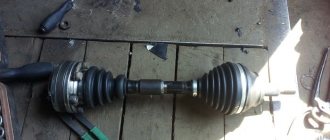
The photo above shows a damaged Lada 2114, already repaired. The front right side, which we are repairing, was collected in a heap by a frontal impact along with the entire front end (look at the gaps between the parts after the repair, in my opinion, the repair was done perfectly). Looking under the front right wheel I noticed that the drive was bent. I jacked up the car slightly (after making sure the car wouldn't roll), loosened the wheel bolts and immediately removed the cap and loosened the CV joint nut.
If you don't loosen it while the wheel is on the ground, it will be very difficult to unscrew it later. After which, I jacked up the car completely and removed the wheel and unscrewed the grenade nut. There is a washer under the nut (don't lose it, as the new CV joint doesn't come with one).
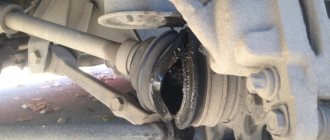
Next, you need to unscrew the ball. This can be done by unscrewing two 13mm bolts, or you can unscrew the bottom nut of the pin by 17mm and knock it down by pressing it down with a pry bar, while simultaneously tapping it with a hammer (not on the pin or ball), which is what I actually did. Additionally, release the brake caliper hose. This action is shown in two photographs below.
By moving the hub to the side (having previously pushed the grenade inward with the mounting tool and pulling the hub towards us), we release the outer grenade, which we would simply replace without pulling out the entire drive along with the inner CV joint,
...if it weren't for the drive that was bent into a ram's horn. And you see the fate of the outer grenade in the photo - it crumbled.
So, let's replace the drive too. The photo below shows a CV joint from an Italian manufacturer called TRIALLI (Trialli) for 900 rubles. Quite a cheap product of very good quality.
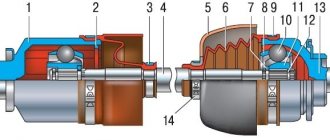
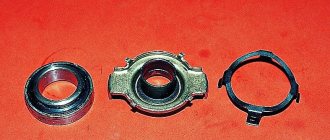
And the photo below illustrates the components of the CV joint:
- The grenade itself.
- Two clamps.
- Protective cover (boot).
- Retaining ring.
- A tube of special lubricant (calculated for the entire service life of the hinge, if the case remains intact all this time). There is another cheap but excellent CV joint - 4 for lubricating a grenade for 50 rubles in any auto store
- Hinge nut.
Since we were changing the drive, we had to knock off the support washer from it and replace it with the new drive, which should fit clearly into the lower groove (photo below). In theory, they should be installed on the new drive anyway. After that, put on the boot and lower it into its seat.
And install the retaining ring. If it is too stretched, first squeeze it and place it in the upper groove. The easiest way to do this is with cone-shaped pliers, inserting them inside the ring and stretching the ring to fit it into the groove. And then, using a special wrench or simple pliers, tighten the lower clamp, but do not tear it off.
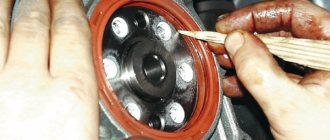
Next, you need to inspect the inside of the hinge for any flaws or debris. Then fill it with lubricant. Insert the neck of the tube into the separator, press it firmly and press the lubricant until it comes out through all the cracks. Usually almost the entire tube fits there.
After this, you need to plant the grenade, forcing it to slip down through the locking ring. And for this, you can use an ordinary piece of wood (so as not to damage the thread) and a hammer (see photo below). A light tap on the board will do the job.
Squeeze the remaining lubricant into the boot and put the cover on the CV joint. But, before tightening the clamp, pry the edge of the boot with a screwdriver and release the air from it.
After that, you can install the clamp (strictly in the groove), tighten it as much as possible by hand and engage the teeth, and then tighten it with pliers.
In this case, we took out the drive, and to avoid oil leaking out of the box, we prepared the old inner CV joint in advance (you can also hammer in a wooden plug covered with a clean rag) and after removing the drive together with the grenade, we immediately inserted the old joint. We worked together, so we made it, losing only a few grams of oil.
And just like that, having taken out the “plug”, we quickly inserted the drive into place, straightened it on the grenades and, with a moderate blow, seated the inner CV joint.
Replace the CV joint or beware of the car - a grenade crunches
Replacing the grenade CV joint - the order of work...
Hello dear reader of the RtiIvaz.ru blog. Today we will talk to you about how to replace a CV joint with your own hands. We will consider the operation of independently replacing the grenade CV joint using the example of the most common model of the VAZ Samara car.
The “GRANATE” CV joint (constant velocity joint) is apparently familiar to every car owner of front-wheel drive cars, and the first sign of its malfunction is a crunching or crackling sound when starting or turning the wheels of a front-wheel drive car. If such a sign of wear on the “grenade” appears, you should not delay replacing it and wait until it completely falls apart and the car is unable to get to the repair site on its own. In such cases, operating the vehicle will simply become impossible.
By the way: you can make sure that there is play in the connection by shaking the axle shaft by hand.
So, doing our own repairs to a VAZ car, we will change the CV joint on the ninety-ninth VAZ model...
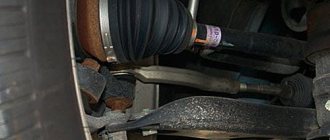
Despite the fact that the diagnostics did not reveal any play in the wheel assembly, the presence of a crunch is quite enough to inspect the CV joint or replace it. An examination of the protective boot of the hinge showed that it has deep cracks, although they are not yet through, but it is not worth the risk, since this in itself is dangerous for the operation of the unit. The cover should not have any signs of damage and should definitely be replaced with a new grenade boot.
If you do not replace the CV joint boot immediately, then sand, dirt, water and a similar abrasive mixture will begin to get into its cracks, which will quickly render the “grenade” hinge itself unusable, the cost of which is incomparably higher than the cost of the protective cover.
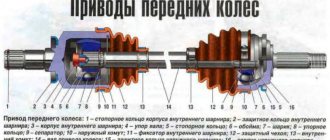
1-outer joint cover: VAZ 2108-2215030; 2-internal hinge cover: VAZ 2108-2215068; 3-internal CV joint “grenade”; 4-outer CV joint "grenade"
First of all, it is necessary to place wheel chocks under the wheels of the car if the work is performed in an inspection hole, for the safety of the work. Then, having removed the wheel from the side where the CV joint is being replaced, the hub nut is unscrewed. Since the nuts are locked during assembly, having a decent tightening torque (about 22.5-25.0 kgf*m), it is not always possible to move it. In such cases, it is better to use outside help; the assistant presses the brake pedal, and you release the hub nut.
In general, it is better to start this operation immediately by “breaking off” the wheel nut, and only then remove the wheel itself. In any case, the tightening is really strong, so you need to use a long wrench and head, or, as a last resort, lengthen the wrench using a piece of pipe. The hub nut is unscrewed and the thrust washer of the nut is removed.
Next, the bolts securing the ball joint to the steering knuckle are given. Then the wheel is turned to its extreme position, the hub assembly is pulled back and the outer CV joint itself is removed for replacement. Although in this case only the outer CV joint needs to be replaced, for the convenience of further work in a vice, the entire axle shaft is removed.
Before removing the axle shaft from the gearbox, it is necessary to drain some of the transmission oil from it, otherwise it will leak out during operation. The oil is drained in an amount of one third of the total volume poured into the gearbox. To do this, you need to prepare some clean container. The drain plug of the box is unscrewed and a third of the oil is drained.
Then you need to apply some force with a pry bar to the inner CV joint and push it out of the gearbox.
Next, it is most convenient to remove the outer hinge using a vice. The axle shaft is clamped in a vice, and we begin to dismantle the “grenade”. First, remove the clamp of the protective cover of the hinge, then the cover is moved back along the axle axis for easy access to the hinge itself.
Then, through a spacer made of soft metal (copper, aluminum), a blow is applied to the end part of the “grenade” and it “comes off” the axle shaft. In this case, if the “grenade” is no longer subject to further use, then it can be knocked down using just a hammer or a light sledgehammer.
Next comes the choice of the manufacturer of spare parts; products from various foreign manufacturers are on sale today, headed by our native VAZ Inter Service, as they say, choose to taste. In this case, the choice was made on a repeatedly tested product from GKN, although the right of choice always remains with the car owner. By the way, there are good grenades from KRONER (price plus quality).
CV joints from GKN or KRONER are installed on many cars during the process of replacing them and have never been disappointed in them. When purchasing, it is better to immediately look at the complete set of the product on site. The kit from GKN or KRONER completely includes all the necessary components for replacing the CV joint . This is the CV joint itself, the joint cover, clamps, a hub nut, a new retaining ring and the required amount of special lubricant (molybdenum-based) to put into the joint when installing it.
When a new grenade has been purchased, you can begin the reverse operation, i.e. axle shaft assembly...
At the same time, I would like to draw your attention to putting the protective cover of the grenade on the axle shaft. As you can see, there is a retaining ring and a limiting ledge on the axis; if you put on the cover without protecting it, then there is a possibility of damaging its inner surface (with a small diameter), which in the future will significantly shorten its service life.
To protect the inside of the boot when installing it on the axle, you need to make a protective cone, which will also help you put it on the axle shaft easily and without damaging the boot. A cone can be easily made from an old plastic bottle, from which a strip of the required width is cut out and placed in the form of a cone on the axle, the smaller part of it to the cover, and the cover will easily pass through the cone without “damaging” the inner surface. By pulling the boot, the cone is removed from the axis.
Next, the lubricant included in the kit is added to the new hinge, and it is “seated” on the axle shaft through a spacer. Then add the remaining lubricant to the case. The CV joint protective boot is put on, first the small and then the large clamp are installed and the axle shaft is ready for installation.
The axle is installed in place by a gentle blow from the side of the outer hinge through a wooden block, the hub is put on, the ball joint is screwed on, oil is poured into the gearbox, and the wheel is put in place. Don't forget to install the new hub nut from the kit and unscrew it after tightening it onto the wheel hub.
I’ll add this fact: replacing the outer CV joint when servicing a car can be done without removing the axle shaft, thereby eliminating several complex operations at once.
To do this, after releasing the ball joint and removing the hub from the splines of the grenade, the axle cover is removed (if it is subject to subsequent use, it is simply cut on the spot) and the axle shaft is moved to the side. Next, you need to hold the axle with one hand and with the other make a sharp blow with a hammer on the end of the grenade and it, as a rule, immediately comes off the axle. If necessary, the blow must be repeated. When there is an assistant nearby, the work is simplified, since the assistant holds the axis, and you can use the adjustment to make a more accurate blow to the end of the grenade.
Then everything is done in the same way as on the removed axle. It is also worth adding that if there are problems with the protective cover of the internal hinge, then it is removed through the axle shaft until the external hinge is installed. A boot is also installed on it, using the cone described above from an old plastic bottle. That's all, watch the video of replacing the hinges. Video of replacing the CV joint: Here in the video you will find out what makes the “grenade” crunch:
Write comments. Good luck to you and see you soon on the pages of the RtiIvaz.ru blog!
You may also be interested to know:
How to change oil seals
Boots for CV joints
How to change the CV joint (grenade) on a VAZ, Lada + video: 32 comments
Thanks for the article, it helped me a lot.
I’m glad if I could clearly explain the repair process, thank you for visiting!
Everything is very clearly and competently described! Thank you for wasting your time on clearing up) there is one more question, I was told that when replacing external grenades, the internal ones fly after 2 weeks, is this true?
No that's not true. They will only fly if they are already damaged... Thank you
Thank you very much for the article. Everything is simple, clear and intelligible.
Thanks for the article, only a fool wouldn’t understand it clearly
Glad I could help
I was repairing a friend's chassis and while replacing the ball joint, I pulled out the internal grenade. Since there was little time, I simply hammered the grenade back and put everything back in place. Right now I’m afraid that the CV joint is not completely in place. Is this possible? Is it even possible to put it back like that? And why did she fly out so easily?
Yes, it's possible. But, if the box seal is intact and there is no oil leakage around the internal grenade, then it is in place
If in doubt, check whether the CV joint is in place, as described in this article https://arbi-idirisov.ru/kak-pomenyat-granatu/
Thanks for the help. Everything is clear and most importantly understandable to beginners like me
Tell me why the internal CV joint fell out while driving
So he fell apart...
Or, if the drive was removed before, but during installation the grenade was not hammered in by seating the locking ring...
Hello. The essence of the problem is this: when the engine is running in neutral, you hear a knocking noise on the left side, you squeeze the clutch - and there is silence in the cabin. Plus the drive (shaft) spins and the car does not move. What could be the problem? External grenade or internal? Or even a box...
If there is a noise, but when you press the clutch it goes away, then it is the release bearing 100%
If you mean that the car does not move when the speed is turned on, but the drive is spinning, then the external grenade has broken off. Take the drive with your hand closer to the outer grenade and shake it; if there is play, it means it’s broken... Check the inner grenade in the same way
If the problem is in the grenade, then first replace it, and then listen to the release bearing, if it doesn’t make noise when it’s pressed out, but makes noise when it’s released, then it’s the end of it
The drive needs to be rocked transversely, not longitudinally. It may also be that the clutch disc is worn out, then the car won’t move either, the engine speed will rise, but the car won’t move.
Thanks for the article, everything is very clear!
Excellent article, very detailed and clearly written and photographed. Thank you.
Well done author! Everything is very intelligible and understandable. Thank you and good luck! I'll change it today)
Thank you! Arman, if the article helped, then I’m very glad, it means it’s not in vain, any questions you may have regarding chassis or bodywork, repairs, I’ll be happy to help
I have a question - there is a ring on the grenade, and a similar one on the hub (quite soft). Jammed on the hub This is a ring. Is this scary, or is this just nonsense? I jammed it tightly, bent it with a screwdriver, it turned out, of course, not evenly, very much.
I'm afraid that it won't sit straight, the wheel will start to spin, etc.
I figured it out on my own. Everything fits well, doesn’t interfere with anything, doesn’t scrape.
My outer grenade broke during transportation on the strap, at first there was a crunch, then the check light came on and the ABS disappeared and how to fix it
Hello dear author, please help. This is the problem I have, I decided to change the right front strut, during dismantling the drive flew out of the internal grenade along with the bearings, please tell me if it is possible to assemble them and put the drive in place, or buy a new one.
Replacing the outer grenade for Kia Sorento. How to remove the CV joint from the drive shaft yourself. renovation from start to finish
Don't forget to subscribe to our channel) Not many car owners know how to properly remove the CV joint from the wheel drive. ZR will tell you and show you a simple method.
Vili
Thanks guys, you helped! I couldn’t catch up that the “reverse switch” in the Chinese instructions means the orange wire (in my case it was pink) on the back of the radio. I was racking my brain for half a day.
Gann
Tanya X... I saw such a collar, some kind of horseradish, and a mouth and what an eye!
Bilan
Did I understand correctly that the CV joint is not removable? Or is it possible to remove the outer grenades separately?
Bushchev Mukhamad
7 minutes of some crap! Why so long!??? Dislike.
Zaytuna
Cool presentation of the material! Keep up the good work, it will be interesting to watch.
Biza Tovuz
Well done, fast and efficient!!
Harrell
As salamu amleikum! You do your job well, well, if it’s not difficult, write the price right away
Evdokashkin Durban
Why do we remove the hubs and shock absorber nuts? And then the wheel alignment will have to be done...
Ferenc
Plastic For warm countries, in Russia in the north at -30... it will be fine.
In what cases is it necessary to replace the inner CV joint?
Replacing the internal CV joint on front-wheel drive VAZ vehicles is required if the following symptoms are present:
- Crunching and knocking noises when driving and accelerating in a straight line;
- Vibration and shock when changing gears;
- Significant play when testing by hand;
- If the “grenade” fails completely, the vehicle cannot move further.
” alt=””> The main reason for the malfunction of the VAZ “grenade” is the entry of water and dirt through the hole in the torn boot. The second possible cause of failure is a sharp press on the gas with the wheels fully turned, although in this case you risk killing the external rather than the internal grenade.
In addition to the above, replacing the internal CV joint on VAZ-2110 and other models may be necessary if the quality of the previously installed joint is poor.
Is it possible to do without replacement?
It is known that CV joints usually last a long time. However, contamination can quickly disable them. Therefore, sometimes discussions arise about the advisability of their restoration. There is no need to do this. In order for the machine to work reliably, a broken CV joint must be replaced with a new one. People who know the structure of the car and have the necessary plumbing skills do this work independently.
It is best to inspect the closing covers regularly. Tears, cracks and other damage may occur there. Using this method, you can detect defects in a timely manner and promptly replace the boots on the inner and outer CV joints. It also makes sense to install screw clamps when replacing the hinge and cover. They more reliably isolate from dust and dirt.
There are recommendations to replace CV joints as damage is detected. It’s better not to wait for the next case to become unusable. Ideally, when the drive is completely removed, it is advisable to install a new cover at the same time. It does not require a lot of money and time to replace the CV joint along with it.
Replacing the inner CV joint with your own hands
” alt=””> The procedure for replacing a “grenade” is the same for the entire front-wheel drive VAZ line, starting with 2108 and ending with VAZ-2115, “Kalina”, “Priora”, “Grant”. Before removing the inner CV joint, the oil is drained from the gearbox. Then proceed according to the following algorithm:
- Unlock and unscrew the hub nut. To make the work easier, a piece of pipe about 1 meter long should be put on the key.
- The desired side of the car is hung on a jack or lift.
- Remove the wheel.
- Remove the washer located under the hub nut installation site.
- Disconnect the steering tip.
- The CV joint is removed from the hub.
- Using a pry bar, remove the drive and internal joint from the gearbox.
Note: when removing both drives at the same time, a suitable mandrel should be installed in their place.
How to change the “grenade” with the drive removed? To do this, clamp the shaft in a vice, loosen the clamps and remove the boot. After this, the hinge is knocked off the splines with hammer blows.
The new CV joint should be hammered by applying light blows to its end with a hammer. For this it is better to use a wooden mallet. The “grenade” is first filled with a special lubricant.
Features of repairing the internal CV joint
To replace the inner CV joint, it is necessary to completely remove the drive, for which the outer joint is first disconnected without subsequent dismantling. Next, using a pry bar, remove the hinge end from the gearbox. To do this, we insert the flat part of the tool between the outer frame and the box, and then move it like a lever.
Further, the procedure for replacing the unit will be similar to the actions when repairing the external hinge. The inner CV joint must be correctly inserted into the transmission. It is recommended to insert the part into the hub, with the help of which the unit is brought into place by pushing movements. But it is also possible to drive the already assembled shaft with a mallet or a wooden pointer and a hammer. The hinge must be secured with a locking ring.
At the final stage, all removed parts are installed back. At this point, the replacement of CV joints is considered completed.
If you find an error, please select a piece of text and press Ctrl+Enter.
Source: www.vazz.ru
Boot replacement and repair
The boot can be changed without removing the grenade if you have special equipment. His work is demonstrated on video. ” alt=””> If you do not have such a device, to remove and replace it, you must perform the above-described procedure for removing the drive and dismantling the hinge. The procedure is necessary if there is even minor through damage on the boot.
Temporary repairs to the CV joint boot can be made without removing it from the vehicle. To do this, you need to thoroughly clean and degrease the damage, then seal it with a piece of rubber and cyanoacrylate-based glue (superglue).
An alternative repair method is to seal the holes with silicone caulk. It should be remembered that it takes a day to completely polymerize.
Note: express repair is a temporary measure. Replacing the inner joint boot may be delayed for a short time, but not completely cancelled. Typically, these types of repair methods are used to get to the point of repair.
Replacing the outer CV joint boot without removing it
This option eliminates the separation of the hinge and the shaft (if dismantling is not provided for by the design or there is a risk of destruction of parts). To carry out the procedure, you will need a special device that stretches the anther.
The time spent on repairs in this case is minimal, but be careful - there is a risk of damaging the elastic element.
The most difficult thing in such work is filling the internal cavity with lubricant.
Often car owners are faced with “sticking” to the hinge shaft. If the hub is held in place by a bolt, tighten it as much as possible to separate the parts. When the part rests against the axial end, make 3 additional turns (use a wrench). When fastening with nuts, you need to remove the axle shaft and clamp the drive in a vice. This fixation allows you to knock down the part with a chisel. If this fails, the not most convenient “home” option remains - cutting the ring with a grinder.
CV joint repair
As mentioned above, the hinge cannot be repaired. Conventionally, one of the repair measures includes washing the “grenade” after driving with a damaged boot.
Washing is carried out at the same time when the damaged boot on the pomegranate is replaced. The hinge is carefully knocked off the shaft, inspected for damage and thoroughly washed to remove any dirt and grease in gasoline or kerosene.
After washing, the assembly is filled with lubricant and mounted in place, having previously installed the boot. The procedure makes sense only if there are no obvious signs of a joint malfunction.
A crunchy or knocking part definitely needs to be replaced, since wear forms on the working surfaces of the inner race, and it is no longer possible to stop the destruction. Continued operation of the vehicle may be dangerous for the driver and other road users.
When to change the CV joint, signs of malfunction
As was said, the external grenade fails after about 40 thousand mileage. This is evidenced by crunching, creaking and knocking sounds in the area of the drive shafts. To determine which side of the CV joint requires replacement, you need to turn the steering wheel all the way and drive off. In 90% of cases, a worn drive will manifest itself as a crunching sound. For control, you can turn it first in one direction, and then in the other direction, and turn it back. If the CV joint is worn out, a crunching sound will be heard immediately.
New and worn CV joint
This is the case when there are no visual signs of wear:
- Lubricant leaks near the outer joint.
- Cracks, tears on the boot.
- Lost or misaligned clamps.
- There is obvious play when turning the suspended wheel.
If there are visual signs of wear, we replace the CV joint on the Grant as soon as possible.
How to replace a CV joint with your own hands and tips for prevention
A car is not only not a luxury, but sometimes it ceases to be a means of transportation for a long time. The most common cause of malfunction of parts and assemblies is the friction process, which occurs as a result of the contact of various mechanisms during operation. Despite the fact that modern technologies for the manufacture of metals and their processing can significantly increase the service life of car parts operating in harsh conditions, and the use of high-quality lubricants significantly reduces the coefficient of friction, various breakdowns will always haunt vehicle owners. Among the most common causes of failure of front-wheel drive iron horses is CV joint failure. In most cases, this failure cannot be repaired and the constant velocity joints will need to be completely replaced. How to replace the CV joint will be discussed later, but before you begin this operation, you need to learn how to correctly determine the malfunction of this part.
Fault diagnosis
How can a novice car enthusiast who has never encountered a similar problem check the CV joint on his own? It is not at all difficult to determine the malfunction and replace the CV joint with your own hands, but you will first need to determine which part is faulty.
With significant wear of the inner race, significant play in the CV joint is formed, which makes itself felt with various sound effects. The CV joint most often crunches when turning. This defect, with significant wear, can also be manifested by small jolts on the steering wheel. This effect is especially noticeable on cars not equipped with hydraulic or electric power steering.
Significant wear of the CV joint can also be determined by shocks when starting the car, as well as by a sudden change in engine operating mode, especially at low speed. This technical problem can also be caused by other transmission malfunctions, which, under certain conditions, can produce similar sounds, so before passing a final verdict on the old CV joint, you need to make sure that the diagnosis is correct. To determine the radial clearance, you will need to hang the front suspension of the car one by one and, having fixed the main drive shaft, turn the wheel in different directions; if the free rolling of the wheel is significant, and a knock is observed, the CV joint can be considered faulty, and it must be replaced immediately. In some cases, the cause of this phenomenon may be a weakening of the CV joint to the vehicle shaft. This problem is solved by tightening the bolts holding the CV joint. In this case, the conditions for tightening this part with the necessary force must be met. If the tightening torque is less than that set by the manufacturer, then this malfunction will make itself felt again after a short period of time.
If the cause of a CV joint failure is excessive wear on the race, the CV joint must be replaced using original spare parts.
CV joint replacement
Replacing a CV joint depends on which part needs to be replaced, internal or external. Replacing the outer joint or the inner one, in any case, will require removing the axle shaft from the car. Disassembling this part will not take much time, and is usually carried out in the following sequence:
- The front wheel of the car is removed from the side where the repair work will be carried out;
- The wheel hub nut is unscrewed;
- The bolts that secure the outer CV joint to the main drive shaft are unscrewed;
- The axle shaft, together with the inner and outer CV joints, is removed from the car.
After removing the axle shaft, we disassemble it and replace the CV joint.
How to disassemble the axle shaft can be found in the technical manual for the car, but usually the hinges are fixed to the shaft using retaining rings, which must be removed with a special puller.
In place of the dismantled parts, new spare parts are installed, which must be properly fixed on the shaft. Neglecting this rule can lead to rapid wear of the new part, as well as the possible occurrence of an emergency, because a faulty transmission element, when the car is moving, is always subjected to excessive loads that a faulty CV joint may not be able to handle.
Many motorists are interested in the question: how to remove the inner CV joint so as not to damage the axle shaft splines. If it is necessary to replace the internal hinge, then its removal from the shaft must be carried out using a wooden spacer, through which, by lightly tapping with a hammer, this part is knocked out of the retainer.
When the installation of the CV joint on the axle shaft is completed, it must be installed on the vehicle in the reverse order of removal. Be sure to thoroughly tighten the hub nut and the outer CV joint bolts that secure this part to the main drive shaft. If necessary, a similar operation is carried out with the CV joint of the other wheel.
Replacing the outer CV joint
- We tear off the mounting bolts from the wheel and the hub nut, and place wheel chocks under the rear wheels. (To make it easier to tear off the nuts, it is better to use an extension for the wrench).
- We jack up the car and put it on a stand (under no circumstances do we work on a jack) and hang the wheel.
- We remove the wheel.
- We unscrew the 2 bolts that secure the ball joint to the steering knuckle.
- If it doesn’t work, use a wrench extension and WD-40.
- We turn the steering wheel to the side and slightly pull back the steering knuckle with the stand and remove the outer part of the hub along with the CV joint (For convenience, you can make several gentle blows with a hammer).
The installed hinge, together with the outer CV joint boot, is fixed in the hub. All that remains is to add the oil drained before dismantling into the gearbox. Such a replacement of the outer CV joint does not present any great difficulties, and can easily be done independently. The partially disassembled front suspension is restored after installing a new outer joint.
Malfunction prevention
In order for this part to last as long as possible, it is necessary to completely eliminate the possibility of dirt and water getting under the rubber cuffs of the CV joint. If there is the slightest damage, this part must be replaced with a new one.
For this purpose, it is better to use original spare parts that are made from high-quality rubber. If you purchase counterfeit cuffs, the procedure for replacing this part will have to be carried out too often.
Another reason why the CV joint often fails is its insufficient fastening to the main gear shaft. If the bolts are not tightened well enough, then over time they begin to unscrew randomly. In this case, the outer CV joint moves significantly away from the shaft, and with a significant gap, knocking noises will be observed in the transmission. If this malfunction is not detected in time and the fastening bolts are not tightened, then in a short time the CV joint will be completely “broken.”
How to change the CV joint and how to determine the malfunction of this part is described in detail in the article. The operation of replacing the CV joint will not take much time, but if you do not want to fix this problem yourself, you can always turn to a car repair shop for help.