Replacing the CV joint of the outer “grenade” of a Renault Logan...
Hello, dear readers of the blog AAuhadullin.ru! Today we will look at a video from RepairRenault specialists, where they tell in detail and also show how the Renault Logan CV joint is replaced. The outer “grenade” on the wheel side is replaced, and not the inner one on the box side. CV joints are also removed on non-original drives and Sandero cars.
Renault Logan CV joint replacement
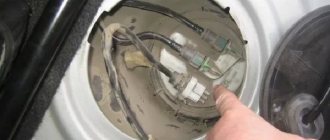
So, we have already removed the drive of the car, then we remove two clamps from the outer CV joint, which press the boot and prevent dirt and water from getting inside the part. Next, we pull off the rubber boot and move it a little to the side so that it does not interfere with our work.
Here the stopper system is internal, made of a metal ring that holds the CV joint; we can’t see the stopper and therefore will have to knock it down with a hammer. The blows must be applied through a wooden block or through a brass chisel.
You need to know that when knocking out with a hammer, we install a wooden block into the inner part of the body of the part, and not into the outer part. We install the equipment so as not to spoil the “grenade” balls and their recesses, then we hit the inner stationary part of the CV joint. When struck several times with a hammer, the CV joint flies off the retaining ring and the shaft splines. The metal retaining ring sometimes breaks and therefore must be replaced.
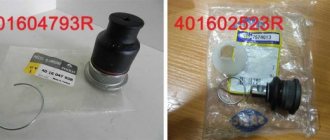
By the way, you know, you can buy external and internal CV joints assembled with the drive shaft for replacement and thereby make it easier for yourself to replace them.
The outer grenade comes with two rings, and you need to choose the one that matches the thickness of the removed metal ring. Before installing the ring, be sure to measure it along the landing groove on the drive shaft.
Removing, replacing, installing CV joints Renault Logan
Tools:
- Driver for socket attachment
- Knob attachment 30 mm
- Knob attachment 10 mm
- Curved box spanner 21 mm
- Hex key 6 mm
- Wheel key
- Torque wrench
- Medium flat screwdriver
- Ball joint remover
- Mounting blade
- Hammer
- Shoes
- Jack
- Support posts
- Soft metal drift
Parts and consumables:
- Right-hand drive
- Left drive
- MOLYKOTE BR2 grease
- Transmission oil
- Hub nuts (2 pcs.)
Front left drive:
1. Remove the engine crankcase protection as described here.
2. Drain the gearbox oil following the instructions described here.
3. Remove the decorative cap of the front left wheel. Using a 30mm wrench, lightly unscrew the hub nut and wheel mounting bolts.
Warning:
When loosening/tightening the hub nut and wheel mounting bolts, the vehicle must be placed on the ground.
4. Brake the vehicle by lifting the parking brake lever and placing wheel chocks under the rear wheels.
5. Raise the front of the car and place it on strong and secure supports.
6. Disconnect the wiring harness connector from the wheel speed sensor (for vehicles equipped with an anti-lock braking system).
7. Disconnect the left tie rod from the steering knuckle as described here.
8. Using a 21mm spanner and a 6mm hex, loosen the shock absorber upper mounting nut.
9. Remove the ball joint from the steering knuckle; to do this, press the lower arm down and overcome the elastic resistance of the car's anti-roll bar.
10. Move the shock absorber strut to the side while simultaneously removing the outer CV joint shank from the hub.
Note:
If removing the shank causes complications, it is allowed to knock it out of the hub by applying light blows with a hammer through a spacer made of wood or soft metal.
Warning:
Do not allow the drive shaft to come out of the axle gear, otherwise the hinge rollers may fall into the gearbox housing!
11. Unscrew and remove the three bolts securing the drive inner joint boot holder to the gearbox housing.
12. Remove the inner joint from the grooves of the axle gear, and then remove the front left wheel drive.
Notes:
When removing the hinge from the axle gear, it is necessary to check the tightness of the rollers in the journals of the three-pin hinged hub. If the rollers are loose in their seats, the drive should be removed with extreme care.
Also be careful when installing the drive.
13. Install the front left drive and all removed parts in the reverse order of dismantling.
14. Add oil to the gearbox as described here.
15. Install the wheel, then screw in the wheel mounting bolts until they stop, but do not overtighten them.
16. Place the vehicle on the wheels, removing them from the mounts, and then tighten the wheel nut.
Note:
The tightening torque of the hub nut is 280 Nm. It is strictly prohibited to move the vehicle with the hub nut loose, otherwise the wheel bearing cage may be damaged.
Warning:
Never reuse hub nuts! Only new ones should be used!
17. Tighten the front left wheel mounting bolts.
18. Install a decorative cap on the wheel.
Front right drive:
1. Perform the steps described in points No. 1-11 for left-hand drive on the right side of the vehicle.
2. Move the inner joint housing from the axle gear spline shank, and then remove the front right wheel drive.
3. Reinstall the drive and all removed parts in reverse order.
Note:
Before installing the drive, it is necessary to apply MOLYKOTE BR2 lubricant to the splines of the axle gear shank.
4. Fill the gearbox with oil as described here.
5. Repeat the operations described in points No. 16-19 for left-hand drive on the right side of the vehicle.
The article is missing:
- Photo of the instrument
- Photos of parts and consumables
- High-quality photos of repairs.
What to consider during the replacement process?
To ensure that the external and internal angular velocity distribution device (CV joint) of a Renault car lasts longer, consider the following:
- If the right boot is damaged, check and replace (if there are problems) the outer protective cover on the left side. The algorithm of actions in this case is identical. The only difference is that the protection on the left side is two centimeters shorter, and the diameter is 15 mm larger. This means that the left and right casing are products that are not classified as interchangeable (this point must be taken into account during the work process).
- When knocking down the inner race of the hinge with a chisel, be careful, because this unit is considered very fragile. The best way is to make several strikes at different points. If the clip refuses to be removed, then make three more strikes in the same places.
- Please note that the process of fitting a new protective cover onto the shaft is not an easy task. For this reason, applying lubricant to the Renault shaft is a must (nothing will work without it).
- Replace the outer device and the plastic boot at the same time. Carry out the work taking into account the replacement of the bearing and oil seal.
As can be seen from the article, changing the external boot of a Renault is a task that can be done even for a novice car enthusiast. The main thing is to prepare the tool in advance, understand the technical part of the work and prepare high-quality parts for replacement. If some points remain unclear, you can always watch a training video.
Renault Logan left and right CV joint
Today it is impossible to imagine the suspension of a modern car without constant velocity joints. Like any other manufacturer, Renault uses CV joints in the drive designs of its models. The car has a left CV joint and, accordingly, a right CV joint.
The length of time the hinge maintains its own operating conditions is directly affected by the quality of domestic road surfaces. Due to this factor, many Renault Logan owners, after a certain mileage, have a need to replace this unit. The question immediately arises, how to change it?
The element considered here should not be subjected to any repair and restoration measures, therefore, if it fails, there is only one correct algorithm of action - replacement. Moreover, both the outer CV joint and the inner CV joint are replaced.
Location and functions of the outer CV joint boot
Constant velocity joints (CV joints) are located behind the wheel, next to the hub. They are both external and internal. The function of the outer CV joint is to ensure angular movements of the suspension shafts. The internal CV joint provides not only angular, but also axial movements of the suspension shafts, for example, when the front wheels turn.
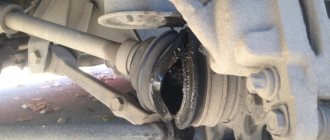
The outer CV joints are protected by boots made of dense corrugated rubber. You can see them by looking under the car (for example, from the inspection hole). If the boot is damaged, dirt gets into the CV joint, which begins to act as an abrasive material (although a working CV joint can last a very long time, almost as long as the car itself).
About the design features and applicability of the unit
The use of a constant velocity joint design is very common on vehicles with various types of drive:
- on the front wheels;
- on the rear axle;
- all-wheel drive versions.
The main design task of the hinge is to transmit torque from the transmission to the hubs of the drive wheels. The peculiarity of the part for front-wheel drive is the need to ensure that the wheels turn at different angles, which complicates the design aspects.
What are the causes of the malfunction and how to diagnose it?
There are several ways to identify a fault in the constant velocity joints on a Renault Logan in advance.
- First, you should turn the steering wheel all the way in one direction and try to accelerate. It is advisable to carry out the verification procedure by turning the steering wheel alternately in both directions. If during this action a characteristic crunch or noise effect is heard, then the part requires a more thorough diagnosis. Probably, the separator in the hinge has undergone increased wear.
- A more significant criterion for determining unsuitability is the appearance of increased play in the drive axle. It will not be difficult to verify this fact. You should stop the car, turn the steering wheel all the way to one side, lock the rear wheels (activate the parking brake) and diagnose the malfunction by rocking the drive. Worn internal joints on a Renault Logan usually perform quite well during such manipulations, both the left CV joint and the right CV joint.
My account
The design of the external Renault Logan grenade is not collapsible, so it will not be possible to pull the shaft out of the CV joint, although this is possible on other models of other brands. As soon as the grenade reaches approximately the middle of the seat, then hammer it in with a hammer or hand until it clicks.
Replacing the external grenade on Renault Logan (from 2011)
The stopper expands inside the grenade, releasing like a spring as we hear the click of the metal ring. Useful video from Renault Repair technicians: Experienced Renault Repair technicians noted an important thing about the spare part, which not everyone knows about and I didn’t know either.
The situation is this: there are 28 splines on the drive shaft, and on the shaft of the external grenade, if the 8-valve engine has 21 splines, and the valve engine has 23 splines. Well, here's the thing: external grenades with a 21 spline shaft and a 28 spline drive shaft are rarely found and supplied to the market.
- Replacing the ball joint of the front arm for Renault in Samara
- Production and assembly of Renault Logan, price from the Renault plant in Moscow.
- Checking the oil level on Renault Logan. Video on how to check Logan before a trip
How to replace a worn element?
How to change CV joint? Replacement of the outer CV joint, as well as replacement of the inner CV joint, is carried out with a new and original product. In this case, repairing the unit is impractical.
Here is an example: replacing an outer CV joint on a Renault Logan.
- We hang the car with a lift to the required height.
- We remove the wheel and unscrew the nut securing the splined part of the joint to the hub (the tightening torque of this nut is large, so we use a pneumatic gun or other device).
- We unscrew the fastening of the ball joint pin to the steering knuckle and remove the support pin from the seat.
- We disengage the CV joint from the hub and remove the boot fixing clamps.
- We remove the hinge from the axle using a hammer, lightly tapping along the perimeter of the rim of the assembly body.
- After removal, remove the old part. We apply special lubricant to the new hinge in such a volume that it will tend to be squeezed out when the boot is on.
- We install a new retaining ring in the groove of the drive shaft, after wiping it with a rag. This is necessary to avoid spontaneous opening of the hinge with the axle.
- We hammer the new joint onto the axle. Landing it in place is accompanied by a characteristic click. We install new clamps on the boot, tightening them with pliers to the required force.
- We insert the hinge into the wheel hub, screw on the nut securing it and connect the ball joint to the steering axle by tightening the corresponding bolt.
After mounting the wheel and installing the Renault Logan car on a flat plane, tighten the CV joint nut with a torque of 90 Nm. This is how the inner CV joint is replaced.
At this point, the procedure for replacing the angular velocity joint is considered complete. It is identical for both sides of the car, that is, according to this scheme, both the right CV joint and the left CV joint are changed. If the internal hinge requires replacement, then the work is performed according to a similar algorithm.
Replacing the drive with Renault
We recommend acquiring a sufficient amount of rags, since the repair process involves contact with the internal cavities of the CV joint (that is, with lubricant). So, we change the left drive and the right drive.
- Loosen the central hub nut and wheel fasteners.
- We hang up the Renault Logan car and remove the wheel.
- To improve the convenience of operation, we disconnect the transverse arm from the steering axle.
- Now, by pulling the fist towards you, we remove the CV joint assembly with the axle shaft from its seat in the hub.
- We proceed to draining the oil from the transmission unit. This is an excellent opportunity to replace the lubricant in the box, which we recommend taking advantage of.
- By unfastening the corresponding latch on the internal hinge, we completely release the drive shaft, after which it can be removed out.
- Now we install the axle shaft in a vice and dismantle the clamps that hold the anthers on the outer and inner hinges.
- To dismantle the outer CV joint, we perform several gentle blows on the hinge body. We avoid hitting the separator so as not to destroy it.
- In order to remove the inner hinge, you will need a snap ring remover. We remove the ring and make similar blows using the same hammer.
- Having prepared the new hinges for replacement, fill them with lubricant in sufficient quantity.
- We install the internal CV joint, having first put the boot on the axle shaft. Install the retaining ring.
- The installation of the outer hinge is carried out by hammer blows, which should be applied to the end part of the CV joint. We carry out the procedure until the locking ring is fixed.
- The anthers must be secured using new clamps.
- Once the installation of the clamps is complete, you can begin installing the assembled axle shaft.
- Next, we fill the lubricant into the transmission unit.
Replacing the right drive and replacing the left drive shaft on the other side of the Renault Logan car are practically no different from the procedure discussed here.
Replacing the right CV joint on a Renault Logan with your own hands - we explain in detail
Sometimes the reason for the breakdown of a certain component in a car can be that it is heavily soiled. This statement applies to a greater extent to constant velocity joints. They are always protected with anthers. When the protective elements wear out completely, it means that the hinges will have to be changed very soon, unless, of course, the driver pays attention to this in time. To understand exactly how to replace the outer CV joint boot on a Renault Logan, you should carefully read this article.
Replacement without removing CV joint
In order to perform this procedure, you will need certain skills and knowledge. In fact, the process is notorious for being inconvenient. You will have to use open-end wrenches, pullers and other tools again. You may need the help of a second person.
Don't forget about the role of clamps. Considering that the hinge itself will not be removed, the boot will have to be thoroughly coated with oil in order for it to slide properly. This will help to avoid difficulties at the final stage of work. As for removing the old boot, it is very easy to do, because you can simply cut it with a knife.
Many people are interested in the question of price. You can buy anther for different prices. If the issue of quality is not in the first place, then spending 500 rubles will be enough. When you need a really high-quality product, then you will have to shell out up to 2,000 rubles.
Articles and cost of grenades (CV joints)
Non-removable drive mechanisms were used both in phase 1 and partially in phase 2. They stopped being installed only after 2010. If the shaft diameter is 30 mm, then the CV joint is non-removable. A sign of a removable CV joint is that the shaft diameter is 25 mm.
TORQUE brand products
As for repair kits, any kit with one of the article numbers is suitable:
- TORQUE VN-5426 right
- ASVA RN-LOGL left
- ASVA RN-LOGR right
Don't look for a TORQUE kit for the left side - there simply isn't one.
Renault does not produce repair kits, but only produces assembled drives.
How to choose a new part and what tools to stock up on?
The original oil seal is difficult to buy separately. Usually the element is sold with anther included. In addition, it is expensive - about 600 rubles. But you can buy a similar cuff that is installed on the compressor of a GAZ-66 car or a KAMAZ fuel injection pump. Dimensions: 28.5x46.5 (Pazovsky, with one side) and 28x45 (KAMAZ, two sides). Components of different sizes are needed for car modifications 1.4 or 1.6 with a number of valves 8 or 16. To check, before installation, try to insert the oil seal into the inner and outer races of the drive. You can pre-lubricate the rubber with oil to make the outer edges fit easier.
As for the tools, you need to prepare:
- a puller for removing the tripoid, which is a device with threads and grips;
- set of screwdrivers and keys;
- pliers, mandrels, hammer;
- a chisel, or better yet, a drift made of soft metal;
- mount;
- heads of different sizes and knobs for twisting the hinge;
- container for draining transmission fluid.
When should a replacement be made?
There are a number of reasons indicating that the time has come to replace the CV joint. Now they will be given:
- A visual inspection showed that there were numerous cracks on the protection that would soon turn into holes.
- When the driver turns the steering wheel, a cracking or rather loud howl is heard.
- While driving, the car constantly pulls to one side.
- The driver observes oil streaks under his vehicle. It may not be a torn boot, but you definitely need to look at it.
- There is a strong vibration felt in the steering wheel, coming directly from one of the front wheels.
Damage to the hinge boot and consequences of the malfunction
CV joint is a device located in close proximity to the wheel hub on the left and right sides. In this case, there are two types of parts, each of which has an individual function:
- The external hinge of Renault Logan provides angular movements.
- The internal hinge is more functional - its task is to provide two types of movements (angular and axial).
The outer “grenade” has a special casing (boot) made of thick rubber. Damage to the corrugated protection, as mentioned above, leads to dirt getting inside, destroying an expensive vehicle component. Foreign substances act as an abrasive, reducing the service life of the device.
The condition of the boot can be easily determined by external inspection. Replacement is recommended in the following cases:
- The appearance of damage in the form of cracks or tears.
- Traces of lubricant on the surface.
- Extraneous noises during movement (crackling, howling, hum, etc.).
- Deterioration in controllability (the car pulls to the left or right).
- Strong vibration of the steering wheel occurs due to increased shaft runout.
- The wheel slips when it starts to move (often this indicates damage to the internal CV joint).
The first thing to do is inspect the left and right boot of the Renault, and then make a decision about the condition of the device and the need to replace it.
It is easy to determine whether the boot is faulty based on a number of indirect signs, including:
“When servicing old Renault Logan (before 2010), remember the design feature of the outer hinge. The latter is made in the form of a solid mechanism, so if the boot is damaged, replace it as a whole.”
The boot is checked every 15,000 km, which can be seen from the table below.
Preparing to replace the grenade
In short, all the steps look like this: you need to remove the steering knuckle assembly with the hub and brake disc. To do this, disconnect the ABS connector from the fist, remove the brake caliper, etc. These actions can be called preparatory.
The result of all efforts
First try unscrewing the front hub nut (30mm wrench). If possible, you need to hang the car on a jack. Then, after removing the wheel, disconnect the ABS sensor.
Two-wire electrical connector
Squeeze the connector tabs and disconnect it from the fist.
Down with the caliper
Using a regular 18-mm open-end wrench, you need to unscrew the two caliper mounting screws. There is no need to remove the pads.
Temporarily got rid of the support
The brake mechanism can be suspended from a spring by attaching it to a wire.
There is one trick: when installing the mechanism back, the brake pads will need to be released. To do this, use a regular screwdriver.
Separate the fist and the suspension arm
Using two 16mm socket wrenches, you need to unscrew the nut from the screw that tightens the knuckle cheeks (see photo). Then they try to open the cheeks using a slotted screwdriver.
The fist is secured from below with one screw
Now try to press the suspension arm from above - the support pin should come out of the fist. If this does not happen, use a hammer and a plank. But it’s important not to overdo it!
Unscrew the steering knuckle
Read more about replacing the steering tip on a Renault Logan here, and about which tip is better to choose here.
You need to unscrew two nuts: one on the tip stud, the second on the steering rod. The nut on the rod is only loosened (see photo).
Two separate fastening elements
In the first case, you need a key “for 16”, in the second - “for 22”. And then, using a puller, the pin is squeezed out of the hole in the lever.
The tip is almost removed
Instead of a puller, a hammer and a wooden board are often used. It is not recommended to do this. Read more about choosing and replacing tie rod ends in this material.
To replace the CV joint on a Renault Logan with our own hands, we needed one universal puller.
Replacing CV joint Renault Logan
If one of the wheel drives begins to crunch, it must be replaced. Replacing a Renault Logan CV joint is not very difficult, and if desired, any driver can do it themselves.
The work can be done directly on the ground, only a level area is required, and it is advisable to carry out the replacement in dry, warm weather. We replace the left drive shaft as follows:
- turn off the engine, put the car on the handbrake;
- First of all, we loosen the front wheel hub nut; after that, with the wheel removed, it will be difficult to pull it out of place;
- jack up the car and remove the left wheel;
- unscrew the steering tip nut, pull off the tip and move it to the side;
- disconnect the ball joint from the steering knuckle;
The right wheel drive changes in the same way as the left one, but there are slight differences - the boot of the inner CV joint is not secured through a plate with three nuts to the gearbox housing, the hinge is installed on splines and secured with a stopper. In order for the shaft to come out of the gearbox, you need to tap it with a hammer through a pry bar or drift.
Inner CV joint
The left element is removable. Each spike of its tripod has a cage, and in the space between them there are needle bearings. The right CV joint is also a tripod, but is located in the body and is pressed by a spring. The right and left hinges are not interchangeable.
Parts of internal grenades are also subject to wear:
- Worn needle bearings;
- Erasing clips;
- Wear of the internal parts of the case.
Malfunctions of the internal grenade manifest themselves in the appearance of clicks in the area of the drives during sharp acceleration in a straight line and at the moment of starting to move, and the car hums at high speed. This indicates that it is time to replace the inner CV joint.
Most often, Logans are characterized by a leak on the driver’s side, the culprit of which is the left inner boot. Replacing the boot of the inner CV joint on the left is performed in a certain sequence.
With the drive removed, the retaining ring is removed from the rear end of the shaft.
They hit the tripod with gentle blows so that it falls out. The clamp is bitten off and the old rubber boot is removed. Next, you should change the clamp if necessary and install a new boot.
On the Internet you can find many photos and videos in which the axle shaft is disassembled, its teeth are restored, CV joints, anthers are replaced, etc. With their help, it will be easier to carry out repair work.
Do-it-yourself CV joint replacement for Renault Logan (Sandero)
Replacing CV joint Renault Logan
may be required when constant velocity joints have become unusable. But it’s worth saying right away that there is an outer CV joint (outer CV joint) and an inner one. The outer one is located in the wheel hub, and the inner one is stuck into the gearbox. In most cases, it is the outer CV joint of the Renault Logan that fails first, since it is not only more loaded with mechanical stress, but also gets quite hot due to the active operation of the brake pads.
At the same time, the boot of Logan’s external grenade is in a more vulnerable place and also wears out faster, cracks and tears. And you won’t be able to go far with a torn CV boot; as soon as dirt and sand gets inside the CV joint, you can say goodbye to this drive element.
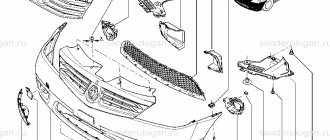
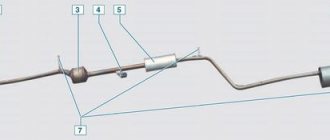
Structurally, the left and right wheel drives of Renault Logan are different. After all, the length of the drives is different due to the non-seventh arrangement of the gearbox. Below is a photo that will clearly show the difference between Logan’s left and right axle shafts.
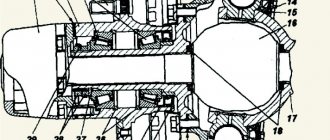
Drives of the right “A” and left “B” wheels of Renault Logan
.
1 - outer joint housing 2 - large clamp for securing the outer joint boot 3 - outer hinge boot 4 - small clamp for securing the outer joint boot 5 - damper 6 - right wheel drive shaft 7 - small clamp for securing the inner joint boot for the right wheel drive 8 - inner boot right wheel drive hinge 9 - large clamp for securing the right wheel drive internal joint cover 10 - right wheel drive internal joint housing 11 - left wheel drive internal joint three-pin 12 - left wheel drive internal joint cover holder 13 - left wheel drive internal joint cover 14 - clamp for securing the cover of the left wheel drive internal joint 15 - left wheel drive shaft
Now we remove the wheel drives to replace the CV joints or their boots. First you need to drain the oil from the gearbox. Then we unscrew the hub nut (the nut itself is disposable, so it will have to be replaced with a new one later), hang up the front of the car and remove the wheel. Next, we need to remove the ball joint, after which we can move the steering knuckle to the side, while simultaneously pushing the outer CV joint out of the hub. Photo attached.
Once the outer part of the drive is freed, we need to remove the grenade from the box. To do this, use a 13mm head to unscrew the three bolts securing the inner joint cover holder to the gearbox housing. And we easily remove the shorter left drive.
In order to pull out the right drive of the axle shaft with CV joints, we carry out the following operation. We release the outer CV joint by unscrewing the hub nut and ball joint (as in the case of left-hand drive), and the inner part is released even easier. Simply move the tip of the right wheel drive inner joint housing from the spline shaft of the differential side gear and remove the right wheel drive. Let's look at the photo.
The outer CV joints of Renault Logan drive both wheels are the same, are non-separable and cannot be removed from the shafts. You can only disassemble the internal grenades, which are located closer to the gearbox. Therefore, to replace the outer CV joint, you will have to buy a grenade assembled with a shaft, but the internal grenade can be purchased separately. The manufacturer claims that replacing the lubricant in the Renault Logan constant velocity joints is not required, unless, of course, the boot is torn. CV joints use MOBIL CVJ 825 BLACK STAR lubricant designed for the entire service life of the joints. By the way, internal CV joints for Logan are suitable for Renault models: Megan, Scenic, Clio, Twingo, Kangoo; Citroën Saxo; Peugeot 106; Volvo: 440, 460, 480... True, the Renault Logan has its original boot.
Scheme for replacing the outer CV joint:
- The first step is to remove the car drive.
- The boot bends to the side where it will not interfere.
- The stopper should be hit with a hammer, as the internal metal ring locking system holds the hinge firmly.
- After the CV joint has fallen out, the ring should be inspected and, if broken, replaced.
The external grenade kit includes two rings: you should choose the one that matches the diameter you removed. A new grenade is put on after installing the ring on the shaft.
Part breakdowns and malfunctions may occur due to impacts. This applies to both the internal cavity and the cage itself. In addition, common causes of failure of the outer CV joint can be:
- Separator fracture;
- Rust and dust on the balls.
The presence of damage can be suspected by such signs as clicks and crunching sounds while driving when turning the steering wheel. When driving in a straight line there is no problem.
Replacing the outer CV joint boot is done as follows:
- The car is placed on a lift, the drive nuts are slightly loosened.
- The front wheels are placed on a jack and should be removed.
- The crankcase protection is removed.
- A plastic container for oil from the gearbox is installed under the drain hole, the liquid is completely drained.
- The steering rod is removed from the hub.
- The ball joint fasteners are unscrewed.
- The hub is removed from its regular place.
- The bolts that secure the boot are removed.
- The drive and CV joint are removed.
- The inner race of the CV joint is removed from the shaft.
- The clamp on the rubber inner boot is loosened and removed.
- The plastic boot next to the oil seal and bearing is also removed.
- The outer boot is cut after removing the clamps and removed.
After this, new elements are installed, and if there is a lot of wear, the oil seal is also replaced. Collection is performed in reverse order.
Attention! Replacing the outer boot of the outer CV joint on the right and left sides is carried out identically, with the only difference being that their sizes are slightly different: the right one is 2 cm longer in length and 1.5 cm larger in diameter.
Replacing a CV joint on a Renault Logan with your own hands: grenade article number and replacement video
On Logan family I cars, the design of the front wheel drives has a peculiarity: the outer CV joint can only be replaced as an assembly with the shaft. That is, you will have to remove the entire structure called the “drive”. And then a surprise awaits the owner: the inner CV joint on the left shaft is located in the “box” housing. It turns out that replacing the CV joint on a Renault Logan will be very difficult. But in the second generation of cars there are no “special features” - there, replacing the CV joint is a standard operation. Let's look at how to do it.
Here the video explains why it is not the CV joint that needs to be replaced, but the shaft (drive) assembly. This advice applies to cars from generation I.
Logan wheel drive device
The Renault Logan car has two drive shafts - right and left, at the ends of each of them there are external and internal CV joints (they are also called “grenades”). The external hinges have the same design, the internal hinges differ:
- the left three-pin is located directly in the gearbox housing;
- The balls of the right inner CV joint are located in the housing (clip).
The right drive shaft is significantly longer than the left; it has a rubber-metal damper, which is designed to dampen resonant vibrations while the car is moving. Anthers are installed between the shafts and constant velocity joints; they prevent dirt, dust and moisture from entering the joints; for tightness, clamps are attached to each side of the anther.
Preparing to replace the grenade
In short, all the steps look like this: you need to remove the steering knuckle assembly with the hub and brake disc. To do this, disconnect the ABS connector from the fist, remove the brake caliper, etc. These actions can be called preparatory.
The result of all efforts
First try unscrewing the front hub nut (30mm wrench). If possible, you need to hang the car on a jack. Then, after removing the wheel, disconnect the ABS sensor.
Two-wire electrical connector
Squeeze the connector tabs and disconnect it from the fist.
Down with the caliper
Using a regular 18-mm open-end wrench, you need to unscrew the two caliper mounting screws. There is no need to remove the pads.
Temporarily got rid of the support
The brake mechanism can be suspended from a spring by attaching it to a wire.
There is one trick: when installing the mechanism back, the brake pads will need to be released. To do this, use a regular screwdriver.
Separate the fist and the suspension arm
Using two 16mm socket wrenches, you need to unscrew the nut from the screw that tightens the knuckle cheeks (see photo). Then they try to open the cheeks using a slotted screwdriver.
The fist is secured from below with one screw
Now try to press the suspension arm from above - the support pin should come out of the fist. If this does not happen, use a hammer and a plank. But it’s important not to overdo it!
Unscrew the steering knuckle
You need to unscrew two nuts: one on the tip stud, the second on the steering rod. The nut on the rod is only loosened (see photo).
Two separate fastening elements
In the first case, you need a key “for 16”, in the second - “for 22”. And then, using a puller, the pin is squeezed out of the hole in the lever.
The tip is almost removed
Instead of a puller, a hammer and a wooden board are often used. It is not recommended to do this. Read more about choosing and replacing tie rod ends in this material.
To replace the CV joint on a Renault Logan with our own hands, we needed one universal puller.
Left drive oil seal replacement procedure
The oil seal is located on the outside of the boot, at the location of the bearing on the axle shaft. The cuff is covered with a plastic casing to protect it from dirt. If the plastic interferes when removing the rubber seal, it is broken, then a new protection is installed. But, if you try, you can knock out the oil seal and the elements in contact with it without touching this protective washer.
On the Renault Logan, there is no classic internal grenade on the left side; instead, it is simply a tripod that goes inside the gearbox housing. The left drive of the Logan is significantly shorter than the right.
To get to the rubber seal, you have to dismantle the entire drive shaft, along with the outer hinge. You need to do the following:
- place the container and drain the oil from the transmission by unscrewing the plug;
- pull out the left wheel by lifting the car on a jack;
- separate the hub knuckle from the ball joint using a pry bar;
- disconnect the ABS system sensor, remove the brake caliper;
- remove the end of the axle shaft with the outer grenade from the hub splines;
- crawl under the car, unscrew the fastening bolts of the retaining tee from the other end of the drive shaft;
- remove the shaft from the gearbox.
unscrew the hub nut;
All steps from start to finish
If the steering knuckle is free of all hoses and wires, and it is held only by the shock absorber strut, then it remains to remove it from this strut. You need two 18" wrenches, which are used to unscrew the nuts on the screws. Then the fun begins. The wheel hub must be pulled off the splined shaft.
Separate the splined shaft and hub
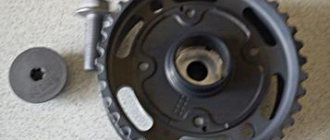
Access to the "grenade" is now open. The anther can be cut immediately. Try knocking the CV joint off the shaft and then removing the retaining ring.
As you can see, we managed to remove the CV joint
The internal element of the CV joint is struck through a block with a hammer. There is no other way to disconnect it from the axle.
Installation of a new grenade and boot
When installing a new CV joint, first put on the boot. Don't forget about the retaining ring - it's better if it's new. The CV joint cavity is filled with a special lubricant before installation.
Preparation for installation
Installation cannot be completed without using a hammer and a block. This is the reality.
If the CV joint is already secured, you need to compress the clamp onto the boot. But first you can add a little more lubricant.
Here the boot is installed and secured
It turns out that not only the CV joint should be present in the repair kit.
Lubricant containing molybdenum is suitable for any external CV joint.
Replacing the inner left boot
On a Renault Logan, the left inner boot, which is located on the driver’s side and is attached to the gearbox housing, often leaks. On a removed drive, replacing it is quite simple; we carry out the work as follows:
- Remove the retaining ring from the rear end of the drive shaft using spreaders;
- With light blows through a drift (preferably made of soft metal), we knock down the tripoid;
- we bite the clamp on the old boot, remove the used rubber cover;
- install new parts - clamp and boot, tighten the clamp.
The boot of the right inner CV joint is changed in the same way as the left one, the only difference is that you first need to remove the cage (housing) of the three-stud. For this:
- dismantle the large clamp, it can be cut with a hacksaw, since you will still need to install a new part;
- pull off the rubber cover from the holder;
- We also remove the stopper from the shaft, knock down the tripod, change the boot;
- Please note that there is a spring in the housing; it must be installed correctly during assembly.
Related articles:
- Technical characteristics and equipment of Renault Logan: reviews from car owners In this article we will look at the design features of the model, equipment, technical characteristics, we will also find out how much the new Logan can cost in car dealerships, get acquainted with reviews […]
- Renault Logan timing belt: price, do-it-yourself replacement. 1.6, 1.4, 8 valves On all RENAULT engines, the gas distribution mechanism has a belt drive; according to factory conditions, it is recommended to change the timing belt every 60 thousand kilometers […]
- The procedure for replacing the front shock absorbers of a Renault Logan with your own hands The suspension of the Renault Logan car is specially designed for Russian roads, it is soft and impenetrable, its parts last a long time. But over time, still [...]