If a Renault Logan ball joint malfunctions, there are several options for troubleshooting. You can, as the manufacturer recommends, replace the entire front lower suspension arm assembly. From a security point of view, this is the best option, but not the cheapest. It is cheaper to replace the ball joint separately, but in this case there are several nuances when replacing.
- 2 Diagnostics of supports: repair or replace?
- 3 What preparatory work needs to be done
- 4 How to change it yourself: step-by-step instructions
4.1 How to remove and replace ball joints on a Renault Logan: video
Which ball joint should I install?
Since June 2013, the French manufacturer has been using a new type of ball joints, in which the pins are mounted on the side and do not have a circular groove. The article numbers for the old and new parts are different.
The previous sample has catalog number 401604793R (circular groove for the bolt), and the new one has 401602523R (groove on one side). It is not necessary that Renault Logan manufactured after 2013 have a new type of ball joints installed.
To find out this question, you need to knock the support out of your fist.
At the factory, as a rule, two brands of ball joints are installed - Lemforder and TRW. Parts for both brands are made in Germany, but some Lemforder factories are based in Romania.
Ball joints for Renault Logan cars of the 1st and 2nd generation, as a rule, are not much different, therefore they are interchangeable.
If you cannot find the original part, you can install an analogue - TRW JBJ721 (for first generation cars), as well as Lemforder 37809 01 or 29469 01.
Products of the Teknorot R-585 brand have proven themselves well.
The importance of the front suspension arm, as well as the Renault Logan ball joint, cannot be underestimated. The destruction of these elements while driving can cause unpredictable consequences and accidents.
That is why, when identifying symptoms of a breakdown, it is important to immediately diagnose the breakdown, perform an inspection, and, if necessary, replace the failed part. https://www.youtube.com/embed/ya3ueDB3jUo
If there is a video in the article and it does not play, select any word with the mouse, press Ctrl+Enter, enter any word in the window that appears and click “SEND”. Thank you.
What nuances should be taken into account when replacing it yourself?
First of all, you need to choose the manufacturers of spare parts that you will use in your work. Everything here is far from so simple, and much can only be achieved through experimentation.
What is most in demand among car enthusiasts:
- FEBI is the worst option out there. Lots of complaints.
- TRW is considered the original for these cars.
- Lemforder is a traditional German quality, many car enthusiasts are delighted with them, although many fakes have already appeared on the market.
Step-by-step instruction
1. Jack up and remove the wheel.
2. To make it easier to replace the ball, you need to remove the entire brake caliper. Unscrew the two mounting bolts from the back. Eighteen bolts.
If the bolts are unscrewed for the first time, they may be difficult to move. From the factory they are mounted on a thread locker. When installing, it is advisable to clean them, apply a fixative and tighten them.
3. After unscrewing the caliper bolts, use a flat-head screwdriver to separate the brake pads. The emphasis should be placed on the block on the side where there is no friction material.
After spreading the pads, remove the caliper and tie it with a wire to the strut spring.
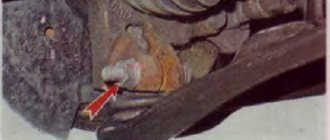
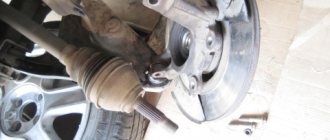
4. Now we need to unscrew the bolt securing the ball pin. Spray the bolt with penetrating lubricant and unscrew the bolt. Use a wrench with a 16mm head to turn the nut, and use a 16mm wrench to hold the head of the bolt.
If the bolt cannot be removed by hand, then knock it out with a hammer and a drift to size.
5. Spray penetrating lubricant into the wedge where the ball pin enters.
6. Lightly drive a flathead screwdriver into the slot where the ball pin fits. Next, hit the lever down with a hammer. In the photo below, I think everything is clear.
After the ball comes out, remove the plastic stop from your finger, which prevents the rubber boot of the ball from rubbing against your fist. This is a very important part, do not forget to put it on the new ball.
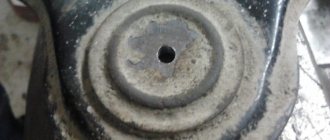
7. The ball joint is pressed into the lever using splines. Before pressing out, you need to check the presence of a retaining ring in the groove, which you can see in the photo below. If there is a stopper, remove it.
Marked place where there may be a locking ring
8. Remove the boot and clean everything around the ball with a wire brush.
9. We select a mandrel so that it fits underneath the ball and is slightly larger than its diameter. In general, you need the mandrel to rest against the lever.
10. We place a stop under the mandrel, for example a pipe, and press it slightly by lowering the car from the jack.
11. With several blows of a hammer, knock the ball into the mandrel.
12. Raise the jack a little and remove the mandrel with the stop.
13. Now we need to press in the ball. We select a mandrel so that it fits the diameter of the ball from below. A 36 or 34 head will do.
14. Place the frame and stop under it. We lower the car a little from the jack. After lowering, make sure that the edge of the lever where the ball goes in is horizontal to the ball body. This is necessary so that the ball is pressed evenly.
Until you press the ball in, do not remove the shipping cap from it.
15. Take the mandrel into which we pressed the ball and place it on top. We hit the mandrel and drive the ball into place.
16. After pressing, remove the shipping cap and place the plastic stop on the finger.
Also, if your new ball joint comes with a retaining ring, install it.
17. Insert the ball pin into the fist. Make sure that the plastic stop fits into the groove.
The finger must be inserted to such a depth that the bolt will fit.
If your finger doesn't fit well, you can tap the bottom of the lever a little with a hammer.
18. Check the pin fastening bolt; it should not be pulled. If the bolt is damaged, replace it with a new original one.
19. Insert the bolt and tighten it. Tightening torque 60 Nm.
20. Install the caliper and wheel.
Adviсe
The factory repair documentation recommends replacing the lever assembly. There is no information about replacing the ball. When performing such work, all responsibility lies with you.
I recommend that immediately after replacing the ball, you drive over bumps and look at it. It happens that the seat in the lever is loose and it can jump out.
Luk VS Valeo: service life
The uninterrupted operation life of any high-quality clutch should be approximately 100,000 kilometers of standard (average) driving. Luk and Valeo “fit” into this framework without any problems thanks to excellent materials that withstand mechanical wear, friction and temperature “attacks” with honor. In addition, we can note that Valeo clutch discs are not only made of durable alloys, but also heat-treated, which prevents overheating, deformation and premature destruction.
And again, returning to the statistics: Valeo clutch parts on average “live” up to 150,000 kilometers, and the flywheel, with careful driving, can last forever.
Recommendations
Regardless of the method of replacing the ball (with or without dismantling the lever), immediately after the replacement you need to go to the wheel alignment. At the same time, during the first trip and in the next few hundred kilometers, you need to avoid aggressive driving and driving over bumps at speed.
The fact is that:
- the ball joint must be given time to completely “shrink”; also, if the silent blocks of the levers are replaced, this rule applies to them;
- if during installation the ball is not pressed into the lever properly, even the support flying out of the lever will not lead to serious consequences at low speed;
Note that it is always better to change the ball assembly with the lever than separately. The reason is that the support is pressed into the hole of the lever using splines on the edges of the ball joint.
It is quite obvious that during operation the splines gradually break up the hole in the lever, and the diameter of the mounting hole increases. Of course, the ball itself may not tear out with slight wear, but the knocking in the front suspension intensifies.
When choosing a ball joint for Logan, it is important to consider that there are new types of ball joints on sale, as well as old ones. The new supports have pins on the side and also lack a circular groove
The article number of the Renault Logan ball is different between the new and old models
For this reason, it is important to immediately determine what type of support is on the car so that the Renault Logan ball joint fits completely. To figure it out, you'll need to knock the support out of your fist.
Finally, let’s add that as a replacement you can use both the original (Lemforder, TRW) and high-quality analogues. In any case, it should be remembered that the ball and arm of the front suspension are important and quite heavily loaded parts.
Critical failures of these elements can lead not only to knocking in the suspension and deterioration in handling, but also to the wheel turning out while driving. For this reason, the appearance of any signs of malfunction of the ball joints or problems with the levers are a good reason for conducting a comprehensive diagnosis of the chassis and immediately replacing failed elements.
What to look for when replacing ball joints
In general, changing the ball joint on a Logan is relatively simple. It must be remembered that the main disadvantage of replacing only the support without the lever is that the hole for the ball in the lever will inevitably wear out.
This means that even if it is properly pressed into the lever, the ball may pop out in the future with all the ensuing consequences and risks. For this reason, for replacement it is better to choose Logan ball joints, which have a retaining ring.
- Also, if possible, you can try spot welding the ball and lever in some places. However, only an experienced specialist should do this, as you can quickly “burn” the boot.
- At the same time, it is important to understand that if you change only the silent blocks and balls, the cost of such a replacement is not much lower than purchasing new levers and ball assemblies. The scope of work is also substantial (it is necessary to press out silent blocks, install new ones, etc.).
Replacing the ball joint Renault Logan
If during the diagnosis it was definitely determined that the supports are faulty, then a complete replacement of the Logan ball is necessary.
Please note that these items are officially beyond repair!
By design, the ball joint and the suspension arm are interconnected and form a single piece.
However, you can change both the lever and ball joint assembly, or replace these elements separately. Also, replacing the Renault Logan ball can be done both on the removed lever and on the car (without removing the lever).
How to replace only the ball joint by removing the lever
To perform the operation of replacing the ball joint, you will need to remove the lever, after which the ball joint will need to be knocked out. Replacing Renault Logan ball joints will require a certain set of tools:
- socket wrench “30”;
- flat screwdriver;
- hammer;
- chisel;
- open-end wrenches “16” and “18”;
- heads “13”, “16”, “18”.
The ball joint itself on Renault Logan changes as follows:
Replacing the ball joint without removing the lever
On the Logan model, replacing the ball joint can also be done without removing the suspension arm. At the same time, the main disadvantage of this replacement method is that when pressing a ball joint, it is difficult to determine the force with which the support enters the corresponding hole in the lever.
The replacement itself looks like this:
first the wheel is hung up and removed, then 30 ml should be pumped out from the tank
brake fluid, use a screwdriver to spread the brake pads; then the caliper is dismantled, which then needs to be suspended so as not to unscrew the brake hose; Next, using a 16mm wrench you will need to unscrew the support nut on the hub; then the finger should be pressed out of the socket or try to unscrew it; now use a chisel to wedge the steering knuckle and knock out the lever with the ball support, moving them down; the next step is to press out the ball without removing the lever; The retaining ring is removed first, after which the ball is knocked out using a pipe and a stop; to press in a new ball, you need heads “36” or “34”, a thrust pipe; the lever is placed parallel to the floor, a pipe with a large diameter is placed on top so that it rests against the lever, without touching the ball itself; the ball joint is clogged by hitting the upper pipe until the element seats normally; further assembly is carried out in the reverse order, and it is important to make sure that there is a plastic washer (protection against rubbing of the boot);
Replacement without removing the front suspension arm
To replace the ball joint on a Renault Logan without removing the lever, take the following steps:
- Jack up the car and remove the wheel.
- Remove the caliper. To do this, turn the wheel and unscrew the two bolts by 18. At this stage, problems may arise, since the caliper bolts are seated on the paint.
- Unscrew the brake reservoir cap and pump out 20 - 30 ml of brake fluid.
- Separate the pads, use a screwdriver to do this. You need to rest against the disc, but between the caliper and the pad.
- Remove the caliper and hang it up. This is done so as not to unscrew the brake hose from the latter.
- Take a 16mm wrench and use it to unscrew the nut that holds the support to the hub.
- Using a stop, press the finger out of the socket. You can also unscrew it.
- Using a chisel, wedge the steering knuckle and knock out the lever with the ball joint, moving them down.
- Now there is access to pressing out the ball without removing the lever.
- Before pressing out, check for the presence of a retaining ring; it must be removed.
- Just as in the first case, a pipe and a stop are used to knock out the ball from the reverse side.
- Using a hammer or small sledgehammer, knock out the part. The removed caliper will not interfere at this stage of work.
- To press in a new ball joint, just as in the first case, we use 36 or 34 heads. You will also need a thrust pipe of a suitable diameter. The lever hole should be parallel to the ground.
- Place another pipe of larger diameter on top so that it rests against the lever without touching the ball joint.
- By hitting the top tube with a hammer, we press the ball into the arm until it snaps into place. The disadvantage of this method is that when we hammer, we do not feel the force with which the ball enters the lever.
- Next, installing the ball joint in its original place occurs in the reverse order. Pay attention to the presence of a plastic washer; it protects the boot from rubbing, thereby increasing the service life of the ball.
After replacement, at first operate the car very carefully and try to drive over uneven roads at the lowest possible speed. This is necessary to ensure that the ball is pressed into the lever correctly.
How to understand that the time for replacement has come: diagnostics
Firstly, subjectively:
- if, while driving on an uneven road at low speed, a knocking sound is heard in the area of the front wheels;
- if you hear a creaking sound from the front of the car when turning the steering wheel;
- if the car moves unstably along a straight path.
Secondly, objectively:
- When inspecting the front wheels, uneven tire wear was discovered;
- if you grab the suspended front wheel from above and below, and then swing it in a vertical plane, you will feel a play, confirming the presence of a gap in the hinge;
- During an external inspection of the ball joint itself, cracks or ruptures of the boot were found, which means the service life has expired.
Indirect signs indicating possible wear of the ball are detected mechanical damage, deformation or failure of other components of the Renault Logan front suspension. This is especially true for checking levers, steering tips, stabilizer bars, as well as silent blocks, rubber seals, bushings, and anthers.
If the part is damaged, the balls must be replaced
On the one hand, if you lose sight of this, you will only speed up the “death” of the joint, and on the other hand, the presence of extraneous noise in the front suspension that is not related to the ball joint may push you to replace a still quite “healthy” part.
Another indirect indicator of the degree of ball wear is the total mileage of the car. Despite the fact that its declared safety margin is always more than 100 thousand km, we need to make allowances for our reality and boldly divide this figure by two. Thus, the answer to the question of how long the part lasts is: around 50 thousand mileage you need to be ready to change the ball joints.
Replacement nuances
- The main disadvantage of replacing the ball joint separately from the arm is the possibility that it may “pop out” of its seat. In this case, the steering wheel turns 30–40 degrees to the side and the ball joint is guaranteed to fail (at least the boot). If this happens, then in most cases the entire lever needs to be replaced. Some mechanics “tighten” the support to the lever by spot welding in several places. With this method, there is a high probability of damaging the boot (it will burn out), and no one will give a guarantee against “crash”. “Analogues” with a locking ring will prevent possible falling out.
- For Renault Logan, the levers are supplied together with two silent blocks. If they are damaged on your car, then it is easier and cheaper to buy the part assembled, since the difference in the cost of the ball and silent blocks separately will be insignificant. Especially when you consider that the silent blocks also need to be pressed out.
- If you changed the ball joint by removing the entire lever or replaced it as an assembly, then you definitely need to do a wheel alignment of the suspension.
The procedure for replacing a ball joint on a Renault Logan is quite simple. Even a novice car enthusiast can handle this if desired. Although for more accurate work you may need a press. But from the point of view of road safety, it is better to change the entire lever assembly.
- Author: Vladimir
Sources:
- autotopik.ru
- i-love-mycar.com
- carnovato.ru
Installing a new ball joint
Before installing a new ball, thoroughly clean all surfaces. The installation procedure for the element is much simpler than dismantling it. In order to assemble the entire assembly, you will need to perform the following steps:
- Place the ball joint housing and hammer it carefully into the seat. Be careful not to damage the element. And make sure that the slots on the body and in the hole of the lever match.
- Install the rubber boot and secure the position of the ball joint housing using the locking ring.
- Install the lever at the attachment points to the body. Secure it with nuts.
- Since it is very easy to remove the ball joint without a puller on a Logan, it must also be installed without a special tool. Simply place your finger in the hole of the steering knuckle and fix the position by screwing in the bolt.
- Install the anti-roll bar.
After all this work, you can install the front wheel and check the operation of the new hinge. This completes the procedure for replacing the ball joint on the Renault Logan. There should not be any problems during the work.
Briefly about the purpose and structure of the structure
The spherical bearing is a unit that actually serves to connect the swing arm and the wheel hub. Their mutual rotation is carried out precisely with its help. The SHO design consists of two elements:
- A cone-shaped finger with a thread on one side and a sphere on the other.
- Housings with a seat for a finger.
Taking into account the increased loads, the case is made of special steel using an anodizing process. To prevent moisture and dirt from entering, the unit is equipped with a rubber casing made of highly elastic rubber. The suspension arm is attached to the hinge through a threaded connection.
How to replace ball joints on Renault Logan?
If the car, in this case Renault Logan, is in constant use, the replacement of ball joints must be carried out in a timely manner, no matter whether you carry out these repairs yourself or trust the specialists. By the way, replacing the ball joint is not so difficult, the main thing is to follow a consistent course of work and, for convenience, remove the front suspension arm
But first things first.
Why is the ball joint given so much attention?
The thing is that the operating conditions of the car directly affect the condition of this unit, and since the condition of the road surface in our country is often not the best, the ball joints fail faster than we and the manufacturer expect.
Front suspension arm.
Diagnostics of ball joints on Renault Logan.
Ball diagnostics (it must be carried out on a lift so that the wheels of the car are suspended) on Renault Logan should begin with checking the condition of not only the ball joints themselves, but also the entire suspension as a whole
In this case, special attention should be paid to:
- those elements that may experience mechanical damage, for example, levers;
- rubber products (rubber-metal joints, suspension ball joints, rubber cushions, front strut upper support), if these elements have ruptures, cracks, twists, etc. defects, these parts should be replaced;
- all the tips, and, of course, the ball joints themselves.
Next, check the front suspension as follows.
- The stabilizer bushings are checked at the points of attachment to the subframe and suspension arms.
- The ball boots are inspected for wear (if there are tears, the ball assembly is replaced).
- When the brake pedal is depressed, the wheel rocks vertically. The presence of play also indicates that the ball needs to be replaced.
Step-by-step instructions for replacing Renault Logan ball joints.
Necessary tools.
Suppose, as a result of diagnostics, it was revealed that you need to replace the ball joint, then to be able to carry out further work you will need to prepare the following tools: a hammer, a “13” wrench, a flat screwdriver, “16” and “18” open-end wrenches, and also a socket wrench “30”.
The replacement process itself.
- The car is put on the handbrake, the rear wheels are blocked. The front part of the car is lifted with a jack and installed on trestles. Now you need to remove the wheels.
- The nuts are unscrewed from the upper and lower bolts, which are located on the fastening of the connecting rod (it is also dismantled). Then the nut holding the lateral stability bar mounting bolt is unscrewed. The bolt is pulled out.
- Then the bolt of the ball itself is unscrewed. Her finger extends from the steering knuckle. The bolt from the front and rear silent blocks is also removed.
- The front suspension arm is removed, now you can replace the ball itself.
- The ball boot and the metal fixation ring are dismantled. Using a hammer, the ball is knocked out. A new part is installed in its place so that the grooves of the spline and the teeth of the ball coincide.
All other steps are carried out in the reverse order, taking into account the fact that ideally replacing Renault Logan ball joints should be carried out together with replacing the lever.
Checking the Logan ball joint with your own hands
The easiest way is to strongly rock the car: one swings the car by the wing, the second evaluates the ball play by placing his fingers on the lever and on the steering knuckle. If there is even the slightest play, the support needs to be replaced.
A more accurate way to check the support on Logan is to take a mounting blade and rest it on the lower arm, and with the other end against the rack. While shaking the blade (as if trying to pull the ball pin out of the body), with the other hand we take the support body and the steering knuckle by the body. In this case, the backlash will be immediately visible.
Checking the ball joint Another way. One presses the brake pedal all the way to eliminate wheel bearing play. The car is standing on the ground. The second one rocks the wheel first in a vertical plane (by holding the right and left sides of the tire), then in a horizontal plane. The slightest knock or play in this case will indicate wear of either the support or the tie rod end, which is easier to check.
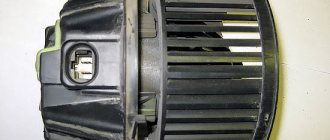
Interesting on the topic: Renault Logan stove does not heat. We look for and eliminate the reasons.
Dismantling
To work you need to prepare the following tool:
- Hammer
- Open-end wrench for 18 and 16
- Socket wrench 30
- Key for 13
- Chisel
- Flat head screwdriver
- Depressing device
The Renault Sandero ball joint is changed after the suspension arm is completely removed. It is also advisable to remove the caliper by turning the wheel and unscrewing a couple of bolts. Then we do the following:
- Use a screwdriver to separate the pads
- Removing the caliper
- The threaded part is lubricated and the bolt that secures the support is unscrewed
- Pour lubricant into the hole that appears and hammer in a small wedge.
- We take out the ball from the fist
If there is no plastic washer that protects the boot, it should be installed, since the absence of this element reduces the work of the support several times.
When the part we need is dismantled from the fist, it needs to be pressed out, this is done in several stages:
- The retaining ring is removed
- A support is installed on a metal tube
- The ball is knocked out
During all work, you need to ensure that the boot there is preserved, since it is needed for the new part. But if it wears out, it needs to be replaced.
Can I install it myself?
Contrary to popular belief, installing an air suspension with your own hands (including on domestic cars) is a real undertaking. The main components during the conversion are pneumatic cushions.
Additionally, solenoid valves, nipples, tees, fittings, oxygen hose and other elements are purchased.
A Berkut R20 or Viair 400P device is often used as a compressor, and an air cylinder from a KAMAZ brake system is often used as a receiver (subject to minor design modifications).
To control the air cushion, a wired remote control is installed.
For example, consider the costs of installing air suspension on a VAZ:
- Racks are used from SAAZ (oil) - 7-8 thousand rubles.
- Pillows are from Scania 4th generation. Price - 3-4 thousand rubles/piece.
- Take the receiver for the air suspension from the “nine”. The advantages of the device are the presence of a check valve, resistance to high pressure, and capacity. Costs - 2-2.5 thousand rubles.
- The valves hold up to 25 atmospheres. Cost - 300-400 rubles per piece.
- Compressor. The Berkut P20 model is suitable here. Its advantages are reliability and fast inflation. The total price is about 5 thousand rubles.
- Other equipment - pressure gauge, fittings and tubes.
Total costs are 25-27 thousand rubles. In this case, the work algorithm is as follows:
- Installation of racks;
- Pulling and securing oxygen tubes;
- Installation of valve and front circuit;
- Installation of tubes from the pillows and the pillows themselves;
- Connecting relays, fuses and toggle switches;
- Checking the work.
For more information on how to install air suspension with your own hands, see here.
Purpose of ball joints + design
The ball joint is a necessary part of the car to connect the wheel hub and the swing arm.
With its help, their mutual rotation occurs. It has a rubber boot, the purpose of which is to protect against the negative influence of the environment. While the machine is moving, the ball joint is subjected to alternating loads, so in practice the production of parts with a double safety margin is used. This is not at all surprising, because possible consequences due to a rupture of the housing can lead to both human casualties and deterioration of the company’s image. But it is still not recommended to risk driving in them after the end of guaranteed technical stability.
The design of the ball joint looks like a separate unit made up of two elements. The first element is a rod, one side of which ends in a rounded cap, and on the other, a thread connects the ball joint to the lever and, with its help, influences the rotating mechanism. The other part represents the girth of the first part. For additional safety of the rod, it is made in the form of a round and oblong bubble. It has the following properties:
- The body is made in one piece, which allows it to withstand loads several times higher than the standard ones. But this characteristic should not be abused, since in the event of a failure, further movement will be a big question;
- To manufacture the part, special grades of steel are used, which are processed using the method of volumetric cold stamping;
- To protect the housing from possible corrosion due to water entering during movement or during condensation of particles in the morning through dew, the ball joint undergoes an anodizing process;
- Original factory spare parts are tested using ultrasound;
- The protective casing is made of special frost-resistant rubber with increased elasticity, which provides it with excellent protective characteristics.
What is a ball joint
The element is a hinge that connects the wheel hub with the levers.
Comprises:
- monolithic steel pin: on one side there is a conical part and thread, on the other there is a spherical part;
- rubber boot - prevents dirt from getting inside the ball joint housing;
- a metal body that holds the finger sphere;
- bushings made of polymer materials - softens the friction forces between the finger and the body;
- press nut with rolling - presses the main elements to the body.
There is one ball joint installed on each side of the Renault Logan front suspension. It’s easier to see them by lifting the car on a lift or driving it into a viewing hole.
If the ball joint is not replaced in time, problems will arise with the car's handling and increased wear of other suspension elements, as well as tires. It will be impossible to do a wheel alignment. If during this procedure the service technician points out problems, then the ball joints will probably have to be replaced.
How do you know if ball joints need to be replaced?
There are three reasons on which a replacement decision may be made:
- The technical life of the part is ending. Typically, the ball joint should be replaced every 50 thousand kilometers of the car;
- With rapid wear, damage to the boot may occur, through which dirt and water will enter the surface of the support, causing accelerated wear of the support itself.
- Obvious signs of wear, requiring replacement of a part earlier than scheduled, which are detected by ear. It is necessary to drive at low speed on a dirt road; if there is a suspicious knock, then there is a high probability of play or wear.
Logan ball joint malfunction
It is this boot that often becomes the culprit for the rapid wear of ball joints. The slightest crack in the rubber protection allows water and dirt to get inside the support. But it is not only the boot that is to blame for the failure of supports. It carries the bulk of the car, while taking impacts from the slightest bumps.
Unpleasant situation….
... when the ball joint falls apart on the road The main reasons for the malfunction of ball joints in Renault Logan, and not only, are naturally considered to be:
- old age, natural aging of materials and natural wear and tear;
- high dynamic loads when we quickly drive over uneven surfaces;
- mechanical damage to the boot;
- poor quality assembly, lack of lubrication, incorrect installation.
Step-by-step instructions for replacing Renault Logan ball joints.
Necessary tools.
Suppose, as a result of diagnostics, it was revealed that you need to replace the ball joint, then to be able to carry out further work you will need to prepare the following tools: a hammer, a “13” wrench, a flat screwdriver, “16” and “18” open-end wrenches, and also a socket wrench “30”.
The replacement process itself.
- The car is put on the handbrake, the rear wheels are blocked. The front part of the car is lifted with a jack and installed on trestles. Now you need to remove the wheels.
- The nuts are unscrewed from the upper and lower bolts, which are located on the fastening of the connecting rod (it is also dismantled). Then the nut holding the lateral stability bar mounting bolt is unscrewed. The bolt is pulled out.
- Then the bolt of the ball itself is unscrewed. Her finger extends from the steering knuckle. The bolt from the front and rear silent blocks is also removed.
- The front suspension arm is removed, now you can replace the ball itself.
- The ball boot and the metal fixation ring are dismantled. Using a hammer, the ball is knocked out. A new part is installed in its place so that the grooves of the spline and the teeth of the ball coincide.
All other steps are carried out in the reverse order, taking into account the fact that ideally replacing Renault Logan ball joints should be carried out together with replacing the lever.
How to check and change the ball joint on a Renault Logan: video and photo
Operating the vehicle on bad roads can damage this unit. Meanwhile, the ball joint plays a vital role in the chassis of the car and there is no way to delay its repair.
The video of replacing the ball is published below!
What is a ball joint?
A ball joint is a chassis element that connects the hub and the front suspension arm. It is a component of the steering knuckle and ensures its mobility, and the knuckle, in turn, interacts with the steering.
Thus, the ball joint is involved in turning the wheel and without it, maneuvers are not possible.
Renault Logan lever. Ball number 2
Additionally, the unit ensures correct fixation of the hub and wheel in the horizontal plane during vertical movements.
How many ball joints are there for Renault Logan?
Renault Logan is equipped with a MacPherson-type front suspension. This means that in its design there is only one ball at the bottom - on each side of the front axle. The part is located on the lower arm, under the hub. It is clearly visible when the car is suspended or in a viewing hole.
Typical faults
Signs of a failed unit include:
- A dull knock when driving over bumps.
- Creaks emitted as the car moves in the cold season. They may appear due to a torn boot, through which moisture penetrates and the lubricant freezes.
- Increased effort and the appearance of squeaking and knocking noises when turning the steering wheel.
- Poor directional stability of the car even when driving in a straight line. Steering wheel course correction required.
- Accelerated and uneven tire wear.
What threatens
If you do not monitor the condition of the ball joint, it may ultimately result in major repairs. The basis of the unit is the body and the so-called finger.
Excessive shock loads create strong friction between these two parts and the gap between them gradually increases (the finger “dangles” inside the housing).
At a critical moment, the finger is simply pulled out of the body and the wheel separates at the bottom of the hub. Further operation of a vehicle with such a malfunction is impossible - only with the help of a tow truck.
How can you check the ball joint on a Renault Logan (video)?
Modern diagnostic equipment for suspension in the form of stands is not always able to determine the condition of the supports. Therefore, you can resort to simple but effective methods. Their essence boils down to auditory and tactile diagnostics (by touch):
- To test the balls by ear, you need an assistant. One person should rock the car, and the other should listen for possible knocks.
- The assistant presses the brake pedal all the way, and at this moment the inspector must grab the top and bottom of the wheel, rocking it. If there is play, we can talk about the formation of a gap in the ball joint. The unit needs to be replaced with a new one.
- The examiner places his palm against the body of the unit in such a way as to simultaneously grasp the body and finger. At this moment, the assistant begins to rock the wheel - if play is felt, then the support needs to be replaced. Standard wheel radius for Renault Logan 15!
- Place the car on a lift or jack and inspect the ball joint from below.
If the boot (protective rubber cover) of the assembly is damaged, the ball must be replaced. Also, do not forget to inspect the CV boot; if it is damaged, it will need to be replaced. If dirt has managed to get into the “grenade” mechanism, then the CV joint will also need to be replaced. The boot is torn - this is clearly visible
What preparatory work needs to be done
If you decide to change the ball joint separately, then in addition to the spare part itself, you will need additional tools. Since you will have to press the old ball out of the lever with your own hands, ideally you will need a special press (puller). With its help, it is possible to dismantle the support more accurately, and therefore the new one will be installed more reliably.
You can find a press at most service stations, but if you don’t have access to such a tool, you can make do with improvised means. For pressing out, you can use a piece of pipe slightly larger in diameter than the ball. And for pressing, a head size 34 or 36 is suitable.
- remove the wheel;
- remove the caliper;
- unscrew and knock out the ball joint;
- remove the lever (with the first method);
- press out the old support;
- press in a new one;
- assemble in reverse order.
Let's take a closer look at each point.
- There shouldn't be any problems removing the wheel.
But when removing the caliper, you need to unscrew the two 18mm mounting bolts, and then release the brake pads. This can be done using a screwdriver or a small pry bar. To decompress, rest not against the disc, but against the pad. After dismantling, hang the caliper higher on the suspension spring using wire or rope. Remove the caliper. - Now we have access to the ball joint.
It is secured with a bolt and nut. Immediately unscrew the nut and knock out the bolt or gradually unscrew it, pressing from the reverse side. At the mounting point on the steering knuckle there is a special slot into which you need to drive a large screwdriver (like a wedge). After which you can pull out the ball. Drive a screwdriver into the slot of the steering knuckle and remove the ball joint. - The next step depends on the replacement method you choose.
If you decide to try to pull out the support without removing the lever, then you need to select a suitable piece of pipe or other spacer. The main conditions are that the length allows one end of the device to rest against the ground, and the other end against the suspension arm. And the diameter should be slightly larger than the bottom of the ball, so that when knocked out it will fall inward. If the boot remains intact, it is better to remove it. It may come in handy in the future, since the anthers are not supplied separately (some install them from the Gazelle, but you will have to struggle with installation). If the old boot is intact, it is better to keep it. - Next, knock out the old part with a hammer. Be sure to check for the presence of a retaining ring on the ball housing. The original supports do not have them, but some “analogs” are included. If any are found, remove the ring and then knock it out.
- To install a new spare part, a 34 or 36 head is suitable. Use it as a spacer, resting it on the lower part of the support.
The splines of the ball must match the splines of the lever. There is no need to rush at this stage. If the new support enters the lever at an angle, you will not be able to press it in correctly. What’s worse is that in this case the seat in the lever is deformed, and you will have to buy the lever assembly. Therefore, proceed carefully. Be careful when working with the ball seat. - The replacement procedure is much more convenient to do with the lever removed. To do this, you will have to unscrew the nut and pull out the bolt securing the lever to the subframe, front and rear silent block. And also unscrew and pull out the connecting rod and stabilizer link.
- We reassemble in reverse order, not forgetting to check the condition of the fastening bolts. If they are damaged (mechanically or by corrosion), be sure to replace them with new ones.
- Don't forget to put the plastic washer that is installed on top of the boot. Without it, the service life of the ball joint is reduced by a third.
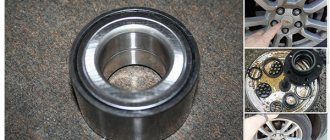
Replacement Tools and Accessories
To remove the ball joint you will need a puller.
Puller
The same tool will help remove the tie rods. To install a new support, you will need a mandrel bushing or a head of the appropriate diameter from the kit. You also need a jack (if there is no access to a lift), a hammer, a small crowbar or a pry bar.
Replacing the ball joint for Renault Logan and Sandero
Depending on which method of replacing the support was chosen (with a lever or separately), the complexity of the work will be different. The fact is that when replacing only a support without a lever, you will have to press out the old one and press in the new one. Of course, this can be done with spacers and a sledgehammer, however, it is much safer to use a press for leverage.
Theoretically, replacing the ball joint is possible without dismantling the lever, but only if the owner intends to sell the car. We understand that any unnatural shock load on the lever will still affect its geometry. The consequences can be very different and in the worst case, buying a new lever will seem like manna from heaven to us. So it's still worth thinking about.
Nevertheless, they change the support using the following method:
- The front part of the car is hung up, the front wheels are removed.
- Unscrew the dirt guard in the wheel arch.
- Unscrew the nuts securing the lever.
- Unscrew the nut of the bolt securing the ball pin pinch bolt on the steering knuckle.
- We remove the bolt from the fist.
- Press the ball pin out of the fist.
- Remove the lever assembly with the ball joint.
- Using a spacer that is larger in diameter than the support at the bottom, we press the support out of the lever using a press.
- We clean the lever from dust and dirt. We take a new ball and, having installed the cut of the support body parallel to the outward movement of the machine, insert the new support into the lever.
- Using the same mandrel and press, we press the new support into the lever.
- We check the boot and its retaining ring, if necessary, fill the boot with grease.
We carry out assembly in reverse order.
If a Renault Logan ball joint malfunctions, there are several options for troubleshooting. You can, as the manufacturer recommends, replace the entire front lower suspension arm assembly. From a security point of view, this is the best option, but not the cheapest. It is cheaper to replace the ball joint separately, but in this case there are several nuances when replacing.
The ball joint is an important component of the chassis of almost any modern car. Logan's is non-separable, maintenance-free and is officially supplied only with a lever. It consists of a ball pin, which is pressed into a metal body along with a plastic bushing.
Designed to connect the steering wheel hub to the main front suspension arm. If you “run” this unit to a critical state, then the front wheel may spontaneously turn to the side, separately from the other. This situation is dangerous, especially at speeds over 30 km/h.
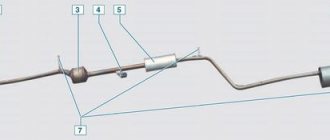
General view of the front suspension structure: 1 — suspension subframe; 2 — suspension arm with silent blocks and ball joint; 3 — steering knuckle with hub and bearing; 4 — shock-absorbing strut; 5 — anti-roll bar.
Ball Renault Logan: device and purpose
Renault Logan has a MacPherson type front suspension. This means that the design provides for one Renault Logan ball joint (left and right on the front axle). The support is attached to the lower arm under the hub.
As on many other cars, on Logan the ball joint provides the connection between the main arm of the front suspension and the hub. At the same time, the Logan ball is not officially dismountable, that is, it comes complete with a lever.
The design of the ball joint includes:
- frame;
- ball pin;
- plastic sleeve.
The ball pin is pressed into a metal body, and a bushing is separately pressed between the pin and the body.
Results
During the course of the article, it turned out that antifreeze is practically no different from the G11 antifreeze class. When comparing antifreeze with G12/13, the domestic product loses, since inorganic additives are used in antifreeze, and even the base has been changed in the most advanced product. Owners of foreign cars from recent years of production need to use only antifreeze. For owners of domestic cars with a year of manufacture before 1996, you can fill in both antifreeze and G11 antifreeze. Here, only you will have to decide what is better antifreeze or antifreeze.