We change the front suspension arms on Renault Logan with our own hands
The Renault Logan car has earned respect due to its reliability, low fuel consumption and ease of operation.
Despite this, to extend the service life of the machine, monitoring and periodic replacement of the weakest components is recommended. One of such devices is the front suspension arm - a part that ensures the wheel moves vertically, as well as holding it in the required position. Below we will consider in what cases it is necessary to replace the Logan lever, how this work is performed, and also what are the features of choosing a part.
The main reasons for premature device failure are as follows:
- Strong mechanical impact. The lever is often damaged when the car gets into an accident or after “flying” into a hole at high speed. In this case, the metal assembly is deformed.
- The appearance of rust. If the part is made of light alloy materials, then such a problem is not dangerous for it.
When choosing a replacement unit, understand the catalog data. Renault's front suspension is equipped with levers on the left and right sides. The manufacturer's catalog contains the following items:
- Lever on the right side (prefabricated design) - 54 50 042 69R.
- Left-hand node - 54 50 113 62R.
There are silent blocks for the lever on sale, which are sold separately. But if you believe the experts, then the replacement should be done as a whole. All that can be left for the future is the boot that covers the support.
If financial capabilities do not allow, it is possible to replace a part on one side with mandatory monitoring of the condition of the second unit.
The Renault manufacturer installs the LUKAS/TRW series lever at the factory. In this case, the developer (TRW company) establishes the following designations:
- Right side - 1241.
- Left side - 1240.
The process of installing new Renault front suspension arms can be done in a garage. To do this, proceed like this:
- Prepare the necessary tools. To carry out the work, you will need a jack (the one included in the kit will do), a standard set of keys and sockets, as well as special supports for fixing the body part.
- Loosen the mounting bolts on the right or left wheel (depending on which side you are working on).
- Avoid accidental movement of the machine during the repair process. To solve the problem, raise the handbrake to maximum and place wheel chocks under the rear wheels.
- Raise the front of Logan and install it on the supports prepared for work. Check the secure fit by slightly rocking the body.
- Remove the front wheel.
- Using an open-end wrench, unscrew the nut that secures the connecting rod at the bottom.
- Unscrew the top bolt holding the connecting rod.
- Remove the part and set it aside. Check the condition of the threads on the bolted connection.
- Unscrew the locking nut that holds the stabilizer bar in place. To prevent twisting, hold the bolt with another wrench. Then remove the bolt.
- Tighten the nut connecting the ball and steering knuckle, and then pull the tightening bolt out of the hole. If it does not give in the first time, a slight impact with a hammer is allowed.
- Use a screwdriver to loosen the terminal connection.
- Remove the front ball suspension pin from the steering knuckle hole.
- Unscrew the nut from the silent block mounting bolt (fastens the Logan arm and the subframe). If the bolt turns, hold it on the other side and then remove it.
- In the same way, pull out the fixing bolt of the rear silent block, which tightens the subframe and the lever together.
- Remove the Renault lever and check it for damage. If the latter are found, then replace them.
- Install previously dismantled parts using the reverse algorithm.
It is recommended to replace the device by strictly following the broaching recommendations. It is recommended to tighten the bolts with the following torques:
- Fixing the connecting rod mounting bolt - 21 N*m.
- Pulling the silent block nut to the subframe - 105 N*m.
- The force for the connecting rod nut is 62 N*m.
Upon completion of the work (if necessary), check and adjust the wheel alignment angles.
Over time, the suspension in any car begins to show signs of wear and tear on parts. Despite the sufficient reliability of most elements of the Renault Logan chassis, owners periodically face the need to replace them. A reasonable question arises here: how to choose and replace one or another component correctly?
Today we will consider the issue of replacing the front suspension arm, since they are among the main load-bearing structures of the suspension.
The main parts of the front suspension are struts and control arms. It’s difficult to get to the stand, but the lever, if necessary, can be replaced in 10 minutes. Typically, such a replacement is carried out if the silent blocks are worn out. Everything looks simple: remove the stabilizer link, then unscrew the ball joint mount. In general, replacing the front suspension arm of a Renault Logan differs little from similar replacements in other cars that use independent MacPherson suspension.
The main parts of the front suspension are struts and control arms. Replacing the front suspension arm of Renault Logan France Auto. It’s difficult to get to the rack, but if necessary, you can naturally change the lever in 10 minutes. Typically, such a replacement is carried out if the silent blocks are worn out. Replacing the silent blocks of the Audi 80 suspension arm, arm nuts.
Currently reading: Logan 2008 suspension device
Everything looks simple: remove the stabilizer link, then unscrew the ball joint mount. Instructions for Renault Logan The front suspension arm is on Renault Logan: video. That is, replacing the front suspension arm of a Renault Logan is actually no different from a similar replacement in other cars that use an independent MacPherson suspension.
I am changing the Renault Logan lever.
Replacing the s/w front arm for Renault Logan, Sandero, Lada LargusHigh knowledge about Renault.
When the boot is moved, you can unscrew nut 9. Replacing the Renault Logan front suspension arm Let's consider all the steps in order.
TRW front suspension arms assemblies
Albert Aukhadullin
I found a replacement front suspension arm assembly from TRW...
Welcome Loganovod to the autoblog AAuhadullin.ru! While using my car, the ball joints began to knock and the question arose about replacing them. It was decided to purchase Renault Logan front suspension arms assembled with supports and silent blocks, which is more beneficial in terms of unit reliability and traffic safety.
To replace the Renault Logan front suspension arm, the choice was made by TRW, Germany. The company has been around for a long time and has accumulated many positive reviews from car owners. The kit includes a complete front suspension arm and an additional bolt and nut for fastening the ball joint to the steering knuckle.
To get a detailed look at the contents of the package with spare parts, let’s open it and look at everything more specifically.
YouTube video:
As you can see (see video) on the kit’s sticker, it is suitable for several car models, which is very convenient for car owners; there is no need to waste time searching for a specific spare part. Front suspension arms are suitable for models such as: LADA, DACIA, RENAULT, LOGAN. Above the barcode is “Made in EU”, that is, manufactured in Europe.
The package contains a product passport and detailed visual support in drawings with the replacement sequence and description of the work. On the metal case itself there is a clear sign of the manufacturer’s company - TRW, a company badge on the ball joint, and there is also a plate with the number “21387023.Z”, it is not entirely clear what it means. Loganovod, please write in the comments.
The ball joint is covered with a plastic cover to protect it from possible damage to the support pin and boot during transportation of the goods. The boot holds the retaining ring. If desired, the ring can be removed and lubricant added.
As mentioned above, there is also a bolt and nut for attaching the ball joint. Initially, original RENAULT levers were ordered, but the sellers warned that the levers had become significantly more expensive. I was told that they have front suspension arms from TRW, Germany, in stock. The company is proven, known for the reliability of its products, and it was decided to purchase a spare part from this company.
We will change the levers at a car service center with a trusted master, Seryoga, he performs most of the replacements and routine repairs of my LoganMachine.
You can do the replacement yourself, but you need to find time, and you also need the necessary set of tools, pullers and the desire to work.
So it’s easier to go to a professional service center, where a high-quality replacement will be performed and precious time will be saved.
In our case, the ball joints clattered on both sides on pothole roads.
Front suspension arm assemblies were purchased in order, firstly, to increase the overall service life of the unit, and secondly, replacing the arm assembly is much more reliable than replacing the ball joint separately.
The fact is that if you continue to operate the car with faulty ball joints, then eventually the seat in the lever will break and the new support will “sit down” with looseness and the lever assembly will still need to be replaced.
And the reliability of the unit with a new support in the old lever is much lower than in a new lever with a factory-made support. In addition, by the time the ball joints started knocking, the silent blocks had also already been worn, the rubber, as they say, had become “stiff” and, in theory, the silent blocks also need to be replaced.
With use, the rubber of the silent blocks “gets tired” and its function to absorb shocks during movement decreases, which negatively affects the comfort and safety of movement. Replacement again results in additional expenses.
Just in case, steering ends were purchased from FEBI, so that if they need to be replaced, they would not have to look for spare parts, but would immediately replace them. The car still has the factory tie rod ends and may need to be replaced.
The tie rod ends are also equipped with a protective plastic cover to protect the tip boot during transportation. When the ball joints began to knock, the car's mileage was 70,108 km.
They haven't caused any problems yet and only make noise when driving over bumps. But to put your mind at ease, it is better to immediately replace the front suspension arms so as not to wait until the last minute.
This is where I finish writing. Loganovod leave your comments, like, go to my website and read the articles.
Front suspension device in Logan
The front chassis in the practical Renault Logan model is implemented using the “McPherson” scheme, widely known and popular among small cars. The design is based on shock-absorbing struts, which are combined with springs into single units. The connecting links are the steering knuckles.
They are connected to the racks by their upper brackets, and are held at the bottom by transverse arms. The levers themselves are made in the form of metal structures of a triangular shape. They are connected to the rotary axle using a ball joint pin, and are attached to the subframe with front and rear brackets through silent blocks.
The front chassis in the practical Renault Logan model is implemented using the “McPherson” scheme, widely known and popular among small cars. The design is based on shock-absorbing struts, which are combined with springs into single units. The connecting links are the steering knuckles.
They are connected to the racks by their upper brackets, and are held at the bottom by transverse arms. The levers themselves are made in the form of metal structures of a triangular shape. They are connected to the rotary axle using a ball joint pin, and are attached to the subframe with front and rear brackets through silent blocks. To ensure lateral stability, a stabilizer is used, which with its rods rests on the suspension components considered here.
Replacing the Renault Logan suspension arm
Removing the Renault Logan front suspension arm
We remove the lever to replace the ball joint or the lever itself if it is damaged, as well as damage (ruptures, peeling of rubber) of its silent blocks. We hang up the front part of the car - both front wheels, since when only one wheel is suspended, the anti-roll bar interferes with the removal of the lever, pressing the suspension elements upward. The work is shown on the left lever; we remove the right lever in the same way. We disconnect the mount of the stabilizer bar from the lever (see “Replacing elements of the stabilizer bar”). Remove the engine compartment mudguard (see “Removing the engine compartment mudguards”).
Using a 16mm socket, unscrew the nut of the coupling bolt of the terminal connection between the steering knuckle and the ball joint pin, holding the bolt with a wrench of the same size.
We take out the bolt or knock it out with a soft metal drift
Using a powerful slotted screwdriver or a mounting spatula, we open the terminal connection between the steering knuckle and the ball joint pin.
Leaning on the steering knuckle, use a mounting blade to push the lever down...
...and remove the ball joint pin from the steering knuckle hole.
Use a 13mm socket to loosen the bolt securing the subframe bracket to the body.
Using an 18-mm spanner, unscrew the nut securing the subframe bracket...
...and remove the bracket from the front bolt securing the lever to the subframe.
Stabilizer design features
Operating practice (including on our roads) has shown the durability and unpretentiousness of the steel assembly. The front suspension arms, made of steel, are rarely replaced and can withstand the cycle established between suspension repairs. But sometimes the device requires earlier replacement.
When repairing a lever, it is often possible to get by with the following work:
- Installation of new ball joints.
- Replacement of damaged and failed silent blocks.
In the mentioned cases, the metal part of the lever, after inspection for defects and deformations, is sent to work for a second or even third term. If, after checking, damage is found on the suspension part itself, then in this case the replacement is carried out as a whole. In the case of light alloy levers, the device is always changed as a whole.
Renault Logan levers have a triangular shape. This design was developed to create a simpler suspension in order to increase its reliability. The advantage of a triangular lever is its ability to work in different directions (longitudinal or transverse).
The device has three points for fixation, two of which are intended for fastening to the body part, and one for fixing to the fist. In addition, one of the functions of the lever is to hold the shock absorber strut (as in the previous case, in two directions). The use of this design made it possible to reduce the cost of the Renault suspension without reducing the reliability of the device. By the way, this type of suspension is used on many cars (not only Logan).
The role of the stabilizer rod in the Logan sedan is performed by a pin, that is, bolt 8 (see figure). A nut is screwed onto it from below.
Right front suspension arm
The nut on the stud is unscrewed, holding the head of the bolt from above.
In general, replacing the Renault Logan front suspension arm has the following features:
- Two nuts on screws 3 are tightened at the last stage, when the car rests on four wheels;
- When carrying out installation, it is better to remove the CV joint boot from part 7 so as not to damage it.
When the boot is moved, you can unscrew nut 9. Let's consider all the steps in order.
The role of the stabilizer link in a Logan car is done by a pin, then there is a bolt 8 (see figure). A nut is screwed onto this address from below.
Right front suspension arm
The nut on the stud is turned out, holding the head of the bolt from above.
Professional replacement of silent blocks of front levers of Renault Logan
If the purpose of a car suspension is to smooth out vibrations transmitted to the body and thereby prevent its destruction, then silent blocks protect, first of all, the unit itself. They are a kind of shock absorber fuses, and are installed between them and the levers.
How often do you need to replace silent blocks on Renault Logan?
Important! These components belong to the category of consumables, and therefore replacement of silent blocks on Renault Logan is required much more often than other components of the car suspension.
It is believed that the average lifespan of “quiet parts” - and this is how their name can be translated from English - is about fifty thousand km. mileage
But this figure is very arbitrary, since it depends on many reasons, including:
- Operating conditions of the machine. It is not difficult to guess that when driving on relatively flat roads, all suspension components, including silent blocks, wear out at a much slower rate than when driving on country roads and light off-road conditions. Renault Logan, being adapted for operation in Russian conditions, is able to overcome it.
- Suspension load. The more you load your Logan, the more overload both shock absorbers and silent blocks experience.
- Driving style of the car owner. For a careful driver, the suspension, the engine, and even the components of the exhaust system last much longer than those who like to ride with the breeze and drift - this is also understandable.
- But not everyone knows the fact that changes in humidity and temperature have a destructive effect on these suspension components. The fact is that they are made of steel and rubber, which over time, with insufficient humidity, dries out, cracks under the influence of high temperatures, and hardens when exposed to low temperatures, losing its properties, including elasticity and strength.
Therefore, there are often cases when replacing Renault Logan silent blocks turns out to be necessary by the end of the third ten thousand kilometers, or even earlier.
Replacing the silent blocks of the front levers of Renault Logan
Let us immediately note that there is no need to be particularly intimidated by this procedure - it is relatively uncomplicated, takes very little time (if, of course, an experienced specialist does it) and does not require large financial investments - the cost of new parts, and the work itself to install them, is by no means transcendental.
There is something else to be afraid of: operating a machine with exhausted silent blocks and poor-quality installation of new parts.
The latter, by the way, is not so rare, given that many car owners, in order to save money, take on this work on their own, without having the proper experience or the appropriate tools.
When does it become necessary to replace Renault Logan silent blocks?
In order not to miss the moment when replacing the silent blocks of the Renault Logan front control arms becomes an urgent need, you just need to listen to your car - and it will tell you when to go to the service center. And he will tell you this in one of the following ways:
- On sharp turns, the front of the car will skid slightly, which is generally unusual for a front-wheel drive car.
- Increased low-amplitude vibration of the body, sometimes so much that it will be quite noticeable even in the steering column. If your car doesn't have power steering, you'll definitely feel it. Power steering significantly smoothes out this vibration, but you can still notice it.
- When driving in a straight line, the car may pull in one direction or another. True, this symptom may also indicate misadjustment of the steering mechanism, therefore, focusing only on it, it would be premature to draw a conclusion about the wear of the silent blocks.
- The same can be said about the next symptom - uneven wear on the tread of the front wheels. It can be caused by a violation of the wheel alignment adjustments, faulty shock absorbers, or simply uneven loading of the machine.
Approximate life of levers
Vulnerable elements in the lever are silent blocks and ball joints. Rubber-metal inserts can withstand a resource of about 50 thousand km.
Ball joints have proven to be tenacious here, since they can overcome the 80 thousand barrier on average. Sometimes there are cases where the need arises to replace the previously indicated mileage. This is due to damage to the ball pin boot.
The degree of wear is significantly influenced by the driving style of the Renault Logan car and the condition of the roads. As wear occurs, the front suspension arm needs to be replaced.
Vulnerable elements in the lever are silent blocks and ball joints. Rubber-metal inserts can withstand a resource of about 50 thousand km. Ball joints have proven to be tenacious here, since they can overcome the 80 thousand barrier on average. Sometimes there are cases where the need arises to replace the previously indicated mileage. This is due to damage to the ball pin boot. After this, dirt and moisture penetrate inside the housing, causing failure of the entire hinge.
Design features of the lever
Operating practice (including on our roads) has shown the durability and unpretentiousness of the steel assembly. The front suspension arms, made of steel, are rarely replaced and can withstand the cycle established between suspension repairs. But sometimes the device requires earlier replacement.
When repairing a lever, it is often possible to get by with the following work:
- Installation of new ball joints.
- Replacement of damaged and failed silent blocks.
In the mentioned cases, the metal part of the lever, after inspection for defects and deformations, is sent to work for a second or even third term. If, after checking, damage is found on the suspension part itself, then in this case the replacement is carried out as a whole. In the case of light alloy levers, the device is always changed as a whole.
Renault Logan levers have a triangular shape. This design was developed to create a simpler suspension in order to increase its reliability. The advantage of a triangular lever is its ability to work in different directions (longitudinal or transverse).
The device has three points for fixation, two of which are intended for fastening to the body part, and one for fixing to the fist. In addition, one of the functions of the lever is to hold the shock absorber strut (as in the previous case, in two directions). The use of this design made it possible to reduce the cost of the Renault suspension without reducing the reliability of the device. By the way, this type of suspension is used on many cars (not only Logan).
What to choose for replacement?
Today the market is filled with all sorts of offers of front control arms for Renault Logan. The pricing policy is very diverse and depends on the name of the manufacturer, as well as on the quality aspects of the product he offers. Among so many options, in our opinion, the most optimal and safest in terms of product quality would be the purchase of original levers. Their catalog codes are as follows:
- article “545011362R” - for the left lever;
- article "545004269R" - for the right one.
Currently reading: Renault Logan front suspension design
How to recognize the need to replace a Logan lever?
It was mentioned above that the part in question is reliable and requires replacement (repair) when the front suspension itself is serviced. But there are situations when a part requires replacement earlier. Symptoms of malfunction:
- The car begins to pull to the left or to the right when moving in a straight line.
- Extraneous knocking sounds appear in the front of the car.
- The wheel alignment angles are violated (provided that the adjustment was made recently).
The symptoms listed above indicate that the Renault front suspension requires attention, and its levers require a separate check.
When to replace?
The manufacturer recommends that the front suspension arm be replaced only as an assembly. Before directly implementing the repair procedure, you should make sure that there is a fact of their failure. To do this, we hang the car with a lift or, operating from a pit, perform an inspection. Worn silent blocks will “give themselves away” through tears and cracks in the rubber inserts, and the ball pin will make a characteristic metallic sound when it is pressed with a mount.
The manufacturer recommends that the front suspension arm be replaced only as an assembly. Before directly implementing the repair procedure, you should make sure that there is a fact of their failure. To do this, we hang the car with a lift or, operating from a pit, perform an inspection.
Worn silent blocks will “give themselves away” through tears and cracks in the rubber inserts, and the ball pin will make a characteristic metallic sound when it is pressed with a mount. This occurs due to wear of the working spherical element, which causes play to form in the hinge. Also, a torn boot indicates the need for replacement.
When to change the Logan lever?
Beginners often ask what the service life is and when they should replace the right and left front suspension arms of Renault Logan. To answer this question, you need to know the approximate life of the parts.
Wearing elements of the front suspension arm are silent blocks and ball joints. The former can withstand up to 50 thousand km, while the latter are of better quality, they overcome the barrier of 80 thousand km. Sometimes replacement needs to be done earlier, which is due to a broken hinge boot (when dirt gets into the inside of the case, causing a malfunction).
Damage is greatly influenced by two factors - driving style and road quality. To solve the problem, you will need to replace the non-working element of the front suspension with a new one.
Device
Silent blocks and the ball can be replaced separately from the lever element. But in the case of a support, installing a new ball joint for the third time may not work. The fact is that over time, the seat in the lever element breaks, and the connection between the lever and the Logan steering knuckle is not installed correctly.
It is better to carry out the replacement in assembled form. Before repairing, you need to make sure that a breakdown has occurred.
To do this, Renault Logan needs to be hung using a lift and diagnostics performed or inspected from the pit. Worn silent blocks have tears and cracks, and the sound of metal can be clearly heard in the ball pin if you press it with a pry bar. A damaged boot is a clear sign that repairs are required.
Let's sum it up
The work of replacing levers in Renault Logan is quite simple, can be done independently and will not take more than one hour of time; for clarity, you can watch the video. Upon completion of all manipulations, it is recommended to contact a specialized service to check the correct installation of wheel angles.
Hi all. As many already know about my acquisition of original levers. Actually, I’ll write a little about the replacement. There are many videos and other information resources on the Internet about replacing levers. After looking and reading, I decided to change the levers on the next shift. But since we don’t have the Internet in our unit, we had to do everything from memory... Now, in order1.
You will need all the tools. Pipe installation hammers and other gadgets2. Just in case, buy a bolt and nut for the ball. I replaced both levers and on one side the bolt was in a deplorable state. Successfully replaced the bolt.3 A couple of hours or a day)) It took about 2 hours on one side (I did it slowly) And now some photos
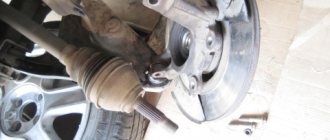
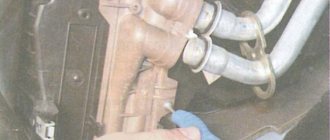
We hang the front part. In order to unload the suspension. This will make it easier to dismantle and install spare parts. I lifted it with two jacks. Next, everything was removed as before, the wheels were unscrewed, and the ball bolt was unscrewed. Then, as in the photo, we take the mounting bracket and pull the lever downwards, hitting the edge with a hammer
He hit it here with a hammer and pressed down on the stabilizer. 3-4 hits and the ball popped out
Next, unscrew the stabilizer link and the lever itself
I put everything so as not to mix it up.
I did not change the stabilizer link. A little dirty and the condition is 5. Before these original levers there were some kind of Chinese levers, if I’m not mistaken, Ruvil Kantora (total shit “sorry” for this one! both levers went through 26 pumps and died at the same time) In the levers there is a difference both in weight and in silent blocks. I even took a photo for comparison. Now let's put everything back together and install a new lever.
We put the lever. We tighten the bolts. And insert the stabilizer stand. An elastic band between the lever and the stabilizer and a torx pin. We do not attach the nut to the stand
Then we lower the adjacent jack and the thread will come out on its own. attach and tighten the stabilizer nut
shorten the lever horizontally and tighten it
Tighten the nuts and rod. Replace the protective plastic
Full size Here is the bolt that was useful to me. Placed it on the other side in the ball
Of course, it is better to purchase the original bolt for the ball. I'll change it over time
I needed all my own tools and some that were in the bins of the fire department =)
By the way, for future use, you can lubricate all threads and other bolts with some kind of ointment. To prevent the thread or bolt from rotting. I always lubricate after assembly or during the assembly process, which makes the work easier in the future. For those who pick their own clothes, this is a good secret. Although everyone already knows this))
This is the end. Have a good mood everyone and please protect the forest from fires =) Summer is just around the corner.
PS Do you need to do a wheel alignment?
Price: 3,800 ₽ Mileage: 155,800 km
Step-by-step instruction
1. Jack up and remove the wheel.
2. Unscrew the bolt securing the ball joint from the steering knuckle. Use a wrench with a 16mm head to turn the nut, and use a 16mm wrench to hold the head of the bolt.
After unscrewing, if the bolt cannot be removed by hand, we help it come out with a drift to size.
3. Now we need to remove the ball pin from the fist. To do this, take a flat screwdriver and lightly hammer it into the wedge where the fastening bolt was located. With this action we will “wake up the finger”. Next, take the pipe, insert it into the lever and push the pipe down until the finger comes out. If the finger does not come out, you can help a little with a hammer at the moment when tension is applied to the pipe. Use a hammer to hit the lever in the direction where your finger comes out.
4. If you have a Logan with a stabilizer, then you need to unscrew the stabilizer link. You need to hold it on top of the lever under Torx T40 and unscrew the nut thirteen from the bottom of the lever.
5. Move the protective cover to the side to gain access to the lever mounting bolts. Threaded clip. Unscrews by hand.
6. Unscrew the nut and bolt marked below. They strengthen the traction. The nut on the lever is an eighteen key, the top bolt is a thirteen key.
After unscrewing, remove the rod.
7. Unscrew the two bolts securing the lever and remove the lever.
Please note that the front lever mounting bolt is longer than the rear one. It is longer due to the fact that a rod is also attached to it.
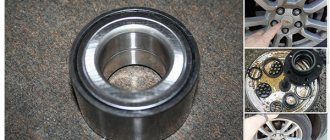
8. Check the condition of the ball joint and measure the hole on the arm for the stabilizer link. The hole should not be larger than 16 mm, a maximum of 1 mm of wear is allowed. If your hole is normal and the ball is live, then it makes sense to change the silent blocks. If something is wrong with any of the above, then it is cheaper and more profitable to replace the lever assembly.
If you follow the manufacturer's recommendations, then in general it is recommended to always replace the lever assembly.
9. Before pressing out the silent blocks, we measure their extension as shown in the photo below. New ones need to be planted approximately the same, 1-2 mm is allowed.
We select a mandrel so that it rests around the silent block against the lever. We select the head according to the size of the silent block. We clamp this thing in a vice and squeeze the silent block into the mandrel. If the silent block does not come out completely, we help it a little with a hammer.
We carry out this procedure with two silent blocks.
10. Lubricate the outer part of the silent blocks with a little oil. Next, we select the size of the heads so that one head presses on the silent block holder, and it fits into the other. We clamp it in a vice and, controlling the size, press it in.
The distance from the beginning of the silent block to the edge of the lever is approximately 7 mm. If your silent block is not quite straight, it’s okay. On new original levers they are often not level.
11. We perform reverse assembly. Among the assembly nuances, it is worth noting that the bolts for fastening the silent blocks of the lever must be tightened from the hole when the wheel is loaded.
Also pay attention to the bolt securing the ball joint pin. Make sure that the thread is not pulled. If the bolt is damaged, it should only be replaced with the original bolt. I think there is no need to explain what will happen if the bolt securing the ball pin breaks. Ball bolt tightening torque 60 N.m.
There are no more assembly nuances, everything is in reverse order. If you have any questions, please ask below in the comments.
Video lesson
What does a lever look like?
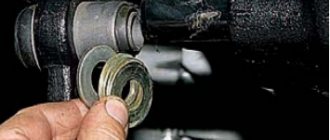
The assembly itself is usually replaced as an assembly, along with a ball joint (read about how to choose a ball joint for a Logan here) and silent blocks. The last two elements are pressed into the plane of the lever (see figure).
Front left lever
The Renault catalog uses the following designations:
- 54 50 042 69R (60 01 547 519) – lever assembly, right side (alternative article number in brackets);
- 54 50 113 62R (60 01 547 520) – left side.
Currently reading: Renault Logan front suspension: design, replacement and characteristics
They also sell silent blocks separately (60 40 002 245), but we will be replacing the assembly. By the way, the design includes a boot that covers the support. The anthers from the replaced levers can be removed to keep them in reserve.
LUCAS/TRW control arms will be installed from the factory. TRW designates them as follows: JTC 1241 (right), JTC 1240 (left).
The assembly itself is usually replaced as an assembly, together with the ball joint (read about how to choose a ball joint for a Logan here) not with silent blocks. The last two elements are pressed into the plane of the lever (see figure).
Front left lever
The Renault catalog uses the following designations:
- 54 50 042 69R (60 01 547 519) – lever assembly, right side (other article in brackets);
- 54 50 113 62R (60 01 547 520) – left side.
They also sell silent blocks separately (60 40 002 245), but we will be replacing the assembly. When, the design provides a boot that covers the support. There is an option to remove the boots from the replaced levers in order to throw them in reserve.
It is advised to replace a pair of levers, in other words, the left one and not the right one. Replacing the front suspension arm of Renault Logan. Video. The problem is that not everyone has this opportunity naturally.
LUCAS/TRW control arms will be installed from the factory. Replacing the silent blocks of the front suspension of the Audi 80 TRW company designates them as follows: JTC 1241 (right), JTC 1240 (left).
All actions from “A” to “Z”
To perform dismantling, you will need two flat wrenches “13”, as well as wrenches “19” - flat, box and socket. The stabilizer stud is designed for a Torx T30 wrench. You will need it in “step 3”:
- The front wheel is jacked up and removed;
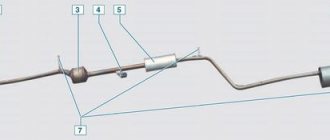
- It is necessary to remove the main suspension link (see figure), for which you unscrew the upper and lower nuts;
Main link - tube and nuts
The penultimate step of dismantling
Installation is performed in the reverse order to that discussed. The tractive effort values are given below. By the way, the nuts on the silent block screws should be tightened last.
Installation is performed in the reverse order to that discussed. The tractive effort values are given below. Replacing the front suspension arm on Renault Logan: video. Replacing ball joints on a Renault Logan without removing the lever. By the way, the nuts on the silent block screws should be tightened last.
Regulations
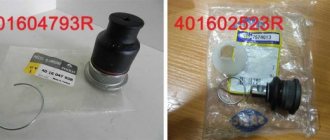
Under the boot of a support, such as in the photo, there is always a ball. If the letter R is printed on it, then the support was purchased separately from the lever.
Ball joint (not Renault)
Renault produces both individual supports (40 16 047 93R) and assembled levers. In the first case, the letter R will be present. More details in the material: replacing and diagnosing a ball joint on a Renault Logan with your own hands.
- Inspection (check) of silent blocks, also ball joints - every 15,000 km;
- Replacing the lever - as necessary.
Renault produces both individual supports (40 16 047 93R) and assembled levers. In the first case, the letter R will be present. Replacing the silent blocks of the front suspension arm of the AUDI 80. More details in the material: replacing and diagnosing a ball joint on a Renault Logan with your own hands.
How to change it yourself: step-by-step instructions
There are two methods for replacing a ball joint on a Renault Logan - with and without removing the lever. In the first case, it is more convenient to dismantle the faulty ball joint, in the second - there is less assembly and disassembly work. In the instructions we consider both options. Basic steps:
- remove the wheel;
- remove the caliper;
- unscrew and knock out the ball joint;
- remove the lever (with the first method);
- press out the old support;
- press in a new one;
- assemble in reverse order.
Article on the topic: NGK spark plugs: types, markings, resource, selection features
Let's take a closer look at each point.
- There shouldn't be any problems removing the wheel. But when removing the caliper, you need to unscrew the two 18mm mounting bolts, and then release the brake pads. This can be done using a screwdriver or a small pry bar. To decompress, rest not against the disc, but against the pad. After dismantling, hang the caliper higher on the suspension spring using wire or rope.
Remove the caliper
- Now we have access to the ball joint. It is secured with a bolt and nut. Immediately unscrew the nut and knock out the bolt or gradually unscrew it, pressing from the reverse side. At the mounting point on the steering knuckle there is a special slot into which you need to drive a large screwdriver (like a wedge). After which you can pull out the ball.
Drive a screwdriver into the slot of the steering knuckle and remove the ball
- The next step depends on the replacement method you choose. If you decide to try to pull out the support without removing the lever, then you need to select a suitable piece of pipe or other spacer. The main conditions are that the length allows one end of the device to rest against the ground, and the other end against the suspension arm. And the diameter should be slightly larger than the bottom of the ball, so that when knocked out it will fall inward. If the boot remains intact, it is better to remove it. It may come in handy in the future, since the anthers are not supplied separately (some install them from the Gazelle, but you will have to struggle with installation).
If the old boot is intact, it is better to keep it
- Next, knock out the old part with a hammer. Be sure to check for the presence of a retaining ring on the ball housing. The original supports do not have them, but some “analogs” are included. If any are found, remove the ring and then knock it out.
- To install a new spare part, a 34 or 36 head is suitable. Use it as a spacer, resting it on the lower part of the support. The splines of the ball must match the splines of the lever. There is no need to rush at this stage. If the new support enters the lever at an angle, you will not be able to press it in correctly. What’s worse is that in this case the seat in the lever is deformed, and you will have to buy the lever assembly. Therefore, proceed carefully.
Be careful when working with the ball seat
- The replacement procedure is much more convenient to do with the lever removed. To do this, you will have to unscrew the nut and pull out the bolt securing the lever to the subframe, front and rear silent block. And also unscrew and pull out the connecting rod and stabilizer link.
- We reassemble in reverse order, not forgetting to check the condition of the fastening bolts. If they are damaged (mechanically or by corrosion), be sure to replace them with new ones.
- Don't forget to put the plastic washer that is installed on top of the boot. Without it, the service life of the ball joint is reduced by a third.
Article on the topic: Boosting the engine: for what? + VIDEO
How to remove and replace ball joints on a Renault Logan: video
Removing, replacing, installing the front suspension arm Renault Logan 2004-2015 Petrol
Tool:
- Open-end wrench 13 mm
- Straight box spanner 16 mm (2 pcs.)
- Straight box spanner 18 mm (2 pcs.)
- Driver for socket attachment
- Knob attachment 30 mm
- Torque wrench
- Wheel key
- Support posts
- Jack
- Impact screwdriver
- Large hammer
1. Having placed the car on reliable supports, remove the front wheel as described here.
2. Unscrew the nut of the lower fastening of the connecting rod.
3. Unscrew the bolt of the upper fastening of the connecting rod.
4. Remove the connecting rod.
5. Unscrew the nut of the stabilizer bar mounting bolt. In this case, the bolt itself must be kept from turning with a second key. We remove the bolt.
6. Unscrew the nut of the coupling bolt of the terminal connection between the steering knuckle and the ball joint.
7. Remove the coupling bolt.
8. Using a screwdriver, slightly loosen the terminal connection.
9. Remove the ball joint pin from the steering knuckle.
10. Unscrew the nut of the bolt securing the front silent block of the lever to the subframe. At the same time, use the second key to hold the bolt from turning. We remove the bolt.
11. In a similar way, remove the rear bolt securing the silent block of the lever to the subframe.
12. Remove the front suspension arm.
13. Inspect the front suspension arm. If there are defects or damage, we replace it.
14. Install all removed parts in reverse order.
Nuts of bolts securing the silent blocks of the lever to the subframe - 105 Nm.
Tie rod fastening bolt - 21 Nm.
Tie rod fastening nut - 62 Nm.
Nut of the coupling bolt of the terminal connection of the steering knuckle and ball joint - 62 Nm
15. Check the wheel alignment angles and adjust them if necessary.
The article is missing:
- Photo of the instrument
- Photos of parts and consumables
- High-quality photos of repairs
How to change the lever on Renault Logan
Replacing a Renault Logan lever is not often required, but considering that our roads can kill even the strongest suspension, this operation sometimes has to be carried out. By the way, removing the Renault Logan suspension arm may be necessary to replace a ball joint, for example. Logan and Renault Sandero have similar front suspension designs, so these instructions may also be useful to Sandero owners.
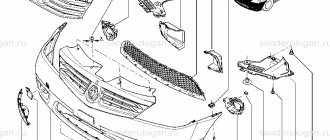
The Renault Logan suspension arm is attached to the body subframe through silent blocks on one side and through a ball joint to the steering knuckle on the other side. In addition, the anti-roll bar is attached to the lever using a stabilizer bar. In the photo the suspension arm looks like this.
- 1 — front suspension arm
- 2 — ball joint cover
- 3 - ball joint
- 4 — silent blocks
To remove the suspension arm, you need to hang the front of the car so that both wheels do not touch the ground, otherwise there will be problems with the interfering anti-roll bar. The sequence for removing the lever is as follows: 1. Remove the engine mudguard. 2. Unscrew the lateral stability bar. 3. Turn the ball joint with a 16mm wrench.
Let's look at the photo of the process.
In order to remove the Renault Logan ball joint pin from the steering knuckle, you need to slightly loosen the connection between the steering knuckle and the ball joint pin. To do this, you can use a powerful slotted screwdriver. See the photo below.
As soon as we managed to remove the ball pin from the steering knuckle, we proceed to the next steps. Using a 13mm socket, loosen the top bolt securing the subframe bracket to the body, and using a 18mm wrench, unscrew the nut securing the subframe bracket and remove the bracket from the front bolt securing the arm to the subframe. Photo attached.
All that remains is to unscrew the bolts securing the lever to the subframe. To do this, you will need a socket and a 18 mm wrench. Unscrew the nuts and knock out the two bolts securing the lever. All the leverage is in your hands.
An alternative to replacing the Renault Logan lever assembly can be its repair. But in any case, to replace silent blocks or ball joints, you will have to remove the lever. If the lever has cracks or has lost its geometry, then no repair will help, only replacement.
We assemble everything in reverse order. We carry out the final tightening of the front suspension silent block bolts while the car is standing on its wheels. The tightening torque of the lower arm is 105 Nm or 10.5 kgf m.
Over time, the suspension in any car begins to show signs of wear and tear on parts. Despite the sufficient reliability of most elements of the Renault Logan chassis, owners periodically face the need to replace them. A reasonable question arises here: how to choose and replace one or another component correctly?