Silent blocks Chevrolet Niva. Device and purpose. Replacement.
Despite the fact that some car suspension repair work is carried out according to regulations, unscheduled interventions cannot be ruled out. Each car service has a price list, which indicates the cost of a particular service without taking into account the cost of spare parts. Among the entire list is the replacement of silent blocks. Not every car owner knows what this unit is and what it serves. Meanwhile, this work is expensive, so most motorists prefer to carry out such manipulations themselves. If, for example, you replace the silent blocks of a Chevrolet Niva yourself, you will be able to save several thousand rubles on repairing the front suspension.
Design and purpose of silent block
When driving a car on the road, and especially when driving it over uneven surfaces, the suspension takes on enormous loads. However, some suspension components must remain movable. We are talking about levers, and it doesn’t matter whether the suspension is multi-link or MacPherson system.
When the lever rotates about its fulcrum, we speak of a hinge joint. But the car's suspension arm experiences axial, radial and angular loads. In this case, all vibrations must be damped and not transmitted to the body. In such cases, the silent block plays the role of a hinge. The design principle of all silent blocks is the same. They differ only in shape or size. It is represented by two concentric bushings, between which there is a rubber (polyurethane) insert. The rubber is fixedly fixed relative to the bushings, and it can only vibrate due to its own elasticity.
Thus, the silent block allows not just a hinged, but an elastic connection between the lever and the axle. They come in several types. Some of them do not have an outer ring. The rubber product is pressed into the eye of the lever (by lever we here mean any rotating body), but the principle of its operation does not change.
Purpose and design of the product
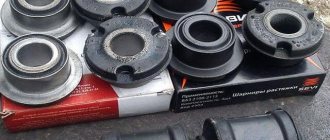
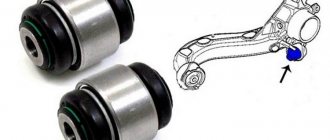
The main purpose of a silent block or, in simple words, a rubber-metal hinge is to connect suspension parts and dampen oscillatory movements due to the rubber filling inside the product. A truly useful product that has the simplest design. It is a silent block, a metal double bushing with rubber or polyurethane filling inside. This filling performs the main role - damping vibrations and vibrations. The photo below shows silent blocks.
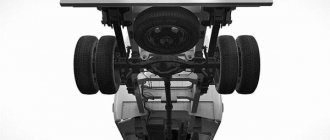
These parts are installed mainly in the front suspension of the Niva Chevrolet vehicle. With their help, the connection between the front suspension arms and the anti-roll bar is ensured. A similar connection is provided in the vehicle's rear suspension, gearbox and engine.
Diagnosis of silent block faults
It is impossible to accurately indicate the service life of silent blocks, because everything depends on the quality of the rubber insert and the operating conditions of the vehicle. But everyone understands that sooner or later they will have to be replaced. There are several methods of self-diagnosis. All these methods can be implemented comprehensively in order to make an accurate verdict regarding repairs.
First of all, I would like to note that a faulty silent block causes a decrease in the car’s handling on the highway, and also causes extraneous noise or knocking in the suspension.
Any driver will immediately feel changes for the worse. But similar symptoms also appear when the ball joints are faulty, so you will have to use the method of elimination.
- For convenience, you should hang the wheel. Giving it variable forces at the top and bottom points, you need to rock the hub in a vertical plane. The presence of play is very easy to determine. It is important to make sure that the source of this play is the silent block and not the ball joint.
- It is necessary to visually inspect the entire lever mounting assembly. Small cracks are allowed on the elastic bands, but there should not be large breaks. A rupture of the rubber rim, which is visible from under the bushing, is not yet a cause for concern, but a sign of imminent failure of the silent block.
- The axis of rotation of the lever and the axis of the silent block must coincide. If they are at an angle to each other, then this indicates that the rubber has begun to deteriorate, and under load the inner bushing has shifted relative to the outer one.
Some craftsmen advise using a mounting tool to open the lever and swing it. But doing this on a loaded suspension is problematic, so the above diagnostic methods are quite sufficient.
How to replace the silent blocks of a Chevrolet Niva
Replacing it yourself is quite a labor-intensive task. Even if everything is so simple in the description, in reality you will have to spend your time. The difficulty is that it is often difficult to remove the lever mounting bolts. In addition, pressing and pressing of silent blocks must be carried out using special devices. The rest of the algorithm can be presented in the form of step-by-step instructions.
One side of the car is placed on a jack and the wheel is removed.
The second jack compresses the spring. To do this, you need to place a jack under the lower cup and begin to lift the car.
Spring ties are installed.
The lower arm is lowered and the stabilizer mount is removed.
The lower ball joint is unscrewed. If the nut does not give in immediately, use a WD nut.
The spring is removed and the lower arm nut is unscrewed.
The lever bolt is removed (you need to remember the number of washers and how they were positioned).
The old silent blocks are pressed out and new silent blocks are pressed in. To do this, you can use a press or a special device.
The place where the outer sleeve will be pressed is treated with sandpaper and lubricated with lithol.
The lower arm is installed.
Removing the upper arm is a continuation of all work, so the spring is not installed. The upper ball joint is unscrewed. Pre-clean the threads with a metal brush and treat with WD-shkoy.
In this case, the hub should be tied with wire, otherwise the brake hose will be damaged.
The nuts of the upper arm are unscrewed.
The lever is removed. Pay attention to the adjusting washers. Do not remove them under any circumstances.
The silent blocks are pressed out and pressed in.
After pressing in the silent blocks, the suspension is assembled
After assembly, you must visit a car repair shop to perform wheel alignment work. Otherwise, you will have to change tires often.
Lifting rules
Increasing clearance is a labor-intensive procedure. It requires special skills and tools. Therefore, lifting is usually performed at a service station. However, if you have the skills, you can install the elevator kit yourself. In this case, it is necessary to pay attention to the following points:
On the right side of the rear of the body there is a gas tank with ventilation pipes. This must be taken into account if, in addition to lifting, you decide to enlarge the wheel arches.
For tuning at home, it is better to use ready-made factory-made lift kits.
Installation of wheels with a large outer radius. In this case, the craftsmen are faced with a limitation - tires that are too large do not fit into the wheel arches. You have to widen them or move the wheel outside the car, installing extended hubs.
Installation of spacers. This method allows you to slightly raise the body and does not require much labor.
Installation of larger springs. This method is more expensive, but allows you to achieve a greater lifting height of the body.
Installation of wheel reducers on the rear axle. These parts allow the hubs to be lowered and increase the distance from the axle to the ground.
Downward displacement of the front beam. To do this, you will have to weld special fasteners onto the side members and install extended arms.
Installation of extended springs and spacers under ball joints. A simple and inexpensive way to greatly increase ground clearance.
Chevrolet Niva Vossnaya › Logbook › Replacing the silent blocks of the upper arms
Hello everyone, I don’t know how long these silent blocks have rolled, they look like the mileage of the car is 147,000. The silent block near the exhaust broke, I drove another 500 km with it and still decided to change it, especially since I already changed it on the first field. In general, here it is:
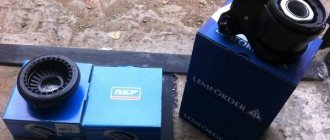
I bought BRT site blocks, we don’t have DAAZ.
I thought I was controlling it quickly, I thought (. I pressed for a long time, about 2 hours for each lever:
The first lever was damaged by the sent washers that were sold to me, I drove another 300 km with it and the silent blocks were squeezed out.
I found the washers and redid everything, now it’s normal! But the silent ones had to be thrown out if they were damaged.
Price tag: 600 ₽ Mileage: 147750 km
Purpose and design
Rubber-metal hinges (silent blocks) are used to connect car suspension parts (levers, axles, rear suspension tie rods).
They dampen vibrations and shock loads that occur while driving. The parts are made in the form of a pair of bushings with an elastic insert between them.
There are two types of front arm silent blocks for Chevy Niva in stores. The first is typical for models released before 2008. Further, the design of the upper rubber-metal hinges has not changed, but the lower front ones have increased internal and external diameters by 2 and 7 mm, respectively. This made it possible to double the service life of parts.
Important: the upper silent blocks of the new and old model on the “Shniva” are interchangeable with the lower ones from the “classic”. When purchasing, you need to pay attention to the diameter of the lower Nivov joints.
Changing the silent blocks of the front levers on a Chevrolet Niva
From time to time situations arise when it is necessary to change the silent blocks on a Chevrolet Niva SUV. But before you find out how this is done, you should find out what kind of product it is and what component in the car it is responsible for? Indeed, most novice drivers have never encountered such a name, but as they say: “if you love to ride, you also love to carry a sled.” So, the time comes when you need to pay attention to your car and replace the silent blocks of the front control arms with your own hands. This is exactly what this material was created for.
The main purpose of a silent block or, in simple words, a rubber-metal hinge is to connect suspension parts and dampen oscillatory movements due to the rubber filling inside the product. A truly useful product that has the simplest design. It is a silent block, a metal double bushing with rubber or polyurethane filling inside. This filling performs the main role - damping vibrations and vibrations. The photo below shows silent blocks.
These parts are installed mainly in the front suspension of the Niva Chevrolet vehicle. With their help, the connection between the front suspension arms and the anti-roll bar is ensured. A similar connection is provided in the vehicle's rear suspension, gearbox and engine.
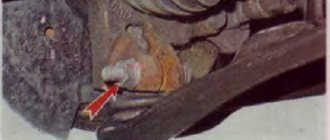
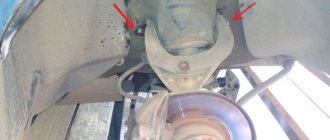
Location of the upper silent block
When is a product replacement necessary?
Each part in a Chevrolet Niva car has its own performance properties. There comes a time when the hinges fail and need to be replaced. But first, it is important to find out when to start such procedures or how to determine whether a silent block is faulty.
For cars that are operated on high-quality road surfaces, the service life of silent blocks is 100,000 km. But for the Chevrolet Niva SUV, these joints will have to be replaced at least 3-4 times before this time. But you shouldn’t rely on mileage; you can determine the need to replace products based on the following factors:
- vehicle control has deteriorated;
- When turning the steering wheel, the movement of the wheels is felt to be slow.
- On bumps, knocking noises appear from the front of the car.
To confirm their malfunction, you can contact a service station, but here you will have to pay for diagnostics, so you will need to remove the hinges and determine their wear, as they say - by touch. To do this, it is not necessary to remove them from the car, but only need to carry out a visual inspection in the inspection hole. Having found out that the front hinges need to be replaced, we will begin to do it ourselves.
Which ones are better to choose?
The larger lower joints will not fit the front suspension arms and axles of vehicles built before 2008. Therefore, you can only choose the type of insert - classic (rubber) or new (polyurethane).
Advantages and disadvantages of polyurethane silent blocks
The use of polyurethane hinges has the following positive aspects:
- polyurethane wears off more slowly;
- the material does not dry out when heated;
- the polymer does not lose its properties under the influence of motor oil and other aggressive chemicals.
However, polyurethane silent blocks on the Chevrolet Niva have noticeable disadvantages:
- torsional loads occurring in the assembly quickly destroy the material (to prevent this from happening, a thicker layer of polyurethane is used in the new type of hinges);
- polyurethane silent blocks are much more expensive than rubber ones (up to 5 times);
- low frost resistance - at temperatures below -20 degrees the material becomes hard and often breaks when twisted.
Replacement
To carry out the work you will need a garage with a pit, as well as a standard set of tools.
Required tools and materials
First of all, you need to stock up on new silent blocks. It is also recommended to buy bolts and nuts for securing the arms so as not to use old ones.
Materials and tools you will need:
- WD-40 product;
- ½" and 1/4" collars;
- open-end wrenches and heads from 13 to 24;
- strong wrench and pipe to increase torque;
- bottle type jack;
- puller;
- chisel;
- hammer.
Replacement procedure
The work is performed sequentially for the right and left front levers in the following order:
1. Raise the car on a jack and remove the wheel. 2. Place a support under the lower arm; 3. Raise the lower arm with a jack or lower the car slightly to load the suspension; 4. Unscrew the nuts of the bolts that secure the ball joint to the upper arm (3 pieces)
5. Unscrew the nuts of the bolts that secure the upper arm axle to the front suspension cross member bracket. 6. Remove the arm, and be sure to pay attention to the adjusting washers installed on the axle mounting bolts, remember their location and quantity;
7. Unscrew the nuts securing the upper arm axle; 8. Next, remove the nuts and washers from the axle;
9. Press out the old silent blocks from the lever lugs using a special puller;
10. Press in new silent blocks
Assembly of the unit is performed in the reverse order of disassembly.
Important! The silent blocks need to be finally tightened after the car is removed from the jack.
Replacing the lower silent blocks
In addition to hanging the car, removing the wheel, disconnecting it from the lower ball joint, remove the shock absorber from the lower mounting to the spring cup.
Disconnect the stabilizer clip from the link.
Lower the lever and pull out the spring.
After securing the lever axis with a 19 mm wrench, unscrew the 24 mm nut and remove the washer.
Carefully knock out the axle using a metal rod.
Remove the thrust washers.
Remove the lower arm; do not remove the spring cup.
Using a puller or a heavy hammer, press out the silent block.
Replacing the silent blocks of the front and rear levers with new ones is carried out in a similar manner to the disassembly process. For pressing, use a puller or tool head.
Perform final tightening and adjustment with the machine on its wheels. At the end of the process, do not forget to visit the stand to adjust the wheel alignment parameters.
Replacing silent blocks of the upper arm of the Chevrolet Niva front suspension
Tools:
- Straight box spanner 22 mm
- Puller for removing and installing silent blocks
- Chisel
- Small hammer
Parts and consumables:
- Upper arm silent block (4 pcs.)
Note:
Replace silent blocks when they are worn or damaged.
1. Remove the upper arm assembly with silent blocks and axle from the vehicle as described here.
2. Using a 22mm wrench, unscrew the two axle nuts.
3. Remove the thrust washer.
4. To press out the silent blocks, install a puller on the lever so that its cup rests on the end of the lever eye, and screw the puller bolt with an internal thread onto the axle.
5. Tighten the nut of the puller bolt (while holding the bolt from turning).
6. Press the silent block out of the lever.
7. Having removed the silent block from the axle, install it in the eyelets of the lever and use a puller to press out the second silent block.
8. If there is no puller, pry the outer bushing of the silent block with a chisel.
9. We press it out.
10. To install new silent blocks, use a cup puller to press one silent block into the eye of the lever.
11. Before pressing the second silent block, we clamp the lever in a vice, insert the axle with thrust washers into the eyes of the lever and screw the nut onto the axle from the side of the pressed silent block. We insert the second silent block into the eyelet.
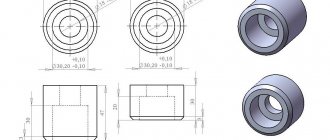
12. Between the eyelets of the lever we insert a mandrel made from a suitable piece of thick-walled pipe (length 160 mm, internal diameter 42 mm, slot width 32 mm).
13. We rest the puller cup against the end of the outer bushing of the silent block.
14. Screw the puller bolt onto the lever axis and press the silent block into place.
Note:
Some pullers for removing and installing silent blocks have a half-cylinder that helps tighten the second silent block of the upper arm. The half-cylinder rests on a bolt that is inserted into the axle. Then the pipe section is not needed, skip steps 12,13,14.
15. If there is no puller, we rest the end of the lever eye on the jaws of the vice. We press in the silent block with a tool head of a suitable size (a piece of pipe).
16. Install the lever in reverse order.
Note:
The upper arm axle nuts are finally tightened in the “car on wheels” position. After replacing the silent blocks, check and, if necessary, adjust the wheel alignment angles. Use the services of workshops with special equipment.
The article is missing:
- Photo of the instrument
- Photos of parts and consumables
- High-quality photos of repairs
Source: Chevrolet niva device, operation, maintenance and repair. Publishing house “Behind the Wheel”.
We change silent blocks on a Niva Chevrolet with our own hands: which ones are better, tips and articles
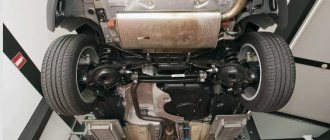
The Chevrolet Niva received an almost complete front suspension from its older relative, and if so, then the design is almost 40 years old. Nobody makes any special demands on the suspension elements of a potential SUV; the main thing is reliability. Over these four decades, the suspension has actually shown itself quite well, except for the quality of consumables, ball joints and silent blocks. Do-it-yourself replacement of Niva Chevrolet silent blocks is on our agenda today.
How to replace silent blocks on a Chevrolet Niva
I prepared for this procedure for a long time, mainly mentally. A replacement had been asking for a long time, but it was scary. I smoked forums and manuals, nothing foreshadowed an easy walk to the garage. I took a ride through the services, replacing the silent blocks (SB) of the upper lever from 1000 rubles, the lower from 1500 rubles, and no one gave a guarantee that they would remove the bolt from the lever axis, they said that there were cases that the entire beam had to be replaced (RUR 13,000), and the work to replace the beam would have been increased accordingly, etc., etc. And the pendant would be gold... Nafik nafik I thought, and went to the garage... Stop stop stop, not to the garage but to the store)))
So what do we need to buy...
Set SB - 630 RUR, Two bolts - 250 RUR, Two nuts for the lower bolts, four nuts for fastening the upper arms, washers. The last items are not expensive, I didn’t remember the price. As you can see... the main elements cost about 1 kilo ruble, quite budget-friendly I must say...
If you contact the service center, the replacement work will cost... very less than 5000 rubles (this is an ideal case) to... it’s difficult to say the amount...
Well, to the Garage... The garage must have a pit - 100%, nowhere without a pit, and with music. How else? You will be there for a long time))) What did I personally need to carry out the execution?
1. Spring ties - 2 pcs. VD403. Driver 1/4 "4. Driver 1/2 "5. Torque wrench (optional, but recommended)6. Open-end wrenches 13, 17, 19, 227. Set of heads 13, 17, 19, 22, 248. Ooooooo strong wrench and pipe)))9. Bottle jack10. Chisel11. Hammer12. A sledgehammer would have been nice (I didn’t have one, which is a pity)13. SB puller - helped a lot14. BULGARIAN! If it’s not there, 99% of the time nothing will work out15. I needed a torch (maybe needed, maybe not, I don’t know)…God…and a VICE! The vice is our everything!
Look like that's it…
I won’t describe the process of removing the installation of the upper arm, everything is quite simple (we unscrew two nuts (like a 17 wrench (socket head with a wrench and an extension)), the upper ball (two 13 wrenches), and then almost the same as with the lower one))
I'll tell you about the bottom one...
And so... let's go. First of all, we jack up the car so that the front wheel hangs out.
And we drive the spring ties between the coils...
The Chevrolet Niva received an almost complete front suspension from its older relative, and if so, then the design is almost 40 years old. Nobody makes any special demands on the suspension elements of a potential SUV; the main thing is reliability. Over these four decades, the suspension has actually shown itself quite well, except for the quality of consumables, ball joints and silent blocks. Do-it-yourself replacement of Niva Chevrolet silent blocks is on our agenda today.
Read also: Do-it-yourself washing for spare parts
: replacing the silent blocks of the upper control arms on the Niva
Below is a video with detailed instructions for removing and installing rubber-metal hinges:
Source: https://skoda-rapid.ru/avtomobili/kak-zamenit-sajlentbloki-na-nive-shevrole/
Old and new silent blocks for Niva Chevrolet
Upper arm and silent blocks.
Rubber-metal articulated bushings (silent blocks) on all Nivas until 2008 had a different design from the modern one, and the design and dimensions changed only for the lower front ones.
The upper ones remained interchangeable with the lower silent blocks of classic VAZs.
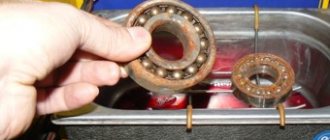
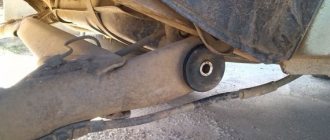
Broken silent blocks of the old design
The service life of silent blocks of the old design ranged from two to three years, depending on the intensity of use and climatic conditions.
After 2008
After 2008, the lower silent blocks received a different design, which made it possible to almost double their service life, but problems with the quality of parts from different manufacturers remained the same.
On the new parts, the diameter of the inner sleeve increased by 2 mm , and the outer diameter by 7 mm, which could not but affect the service life. Old bushings turned out well from Balakovo and Dimitrovgrad silent blocks, they were packed in branded VAZ packaging. The quality of other manufacturers is poor.
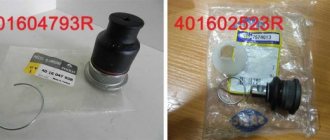
New bushings are supplied to the conveyor. And about the new articles: the upper silent blocks, interchangeable with the old ones, received the number 2101-2904040 , the new lower, reinforced ones - 2121 2904040 .
Why are polyurethane silent blocks better?
Not so long ago, polyurethane bushings, dampers and silent blocks became popular. The thing is good and useful, but you shouldn’t take polyurethane unconditionally enthusiastically and here’s the thing.
Polyurethane works well as a compression damping material.
Classic regular silent block
For example, shock absorber bushings made from it are quite durable. But the silent block mainly works to twist, and the articulation of the SUV’s suspension implies large angles of rotation of the levers. And rubber parts cope better with this; on off-road they work smoother and longer.
Why are they worse?
In addition, polyurethane is afraid of high temperatures, and on the upper arms on the right side the conditions are just such that they can render silent blocks made of polyurethane unusable a thousand kilometers away.
Polyurethane silent blocks in the upper arm
We conclude: for the city, asphalt roads, perhaps installing polyurethane makes sense. If the Chevrolet Niva is used mainly off-road, you should definitely give preference to rubber parts.
Silent blocks Niva Chevrolet. Resolving issues.
There were three problems with old-style silent blocks. Quality, design miscalculation and lack of alternative (polyurethane option). Let's consider these options in order.
- Quality. The situation has changed greatly in a positive direction. The lower silent blocks for conveyor machines are supplied by the joint venture Anvis Group, and the quality of their rubber-metal products is assessed by the services as quite high.
- Design. Because the restyled design has been significantly strengthened. The knot has become much stronger “in terms of time between failures”. Of course, I won’t say that it has become like silent blocks from Mercedes or Isuzu, the size of a tea cup, but it works. And you can feel it that the new suspension is different from the old one. Especially if you change from car to car. The service life of the lower silent blocks has more than doubled. There was more “meat” in the joint and it was able to work at large angles without destroying the rubber mass. Let's remember the analogy with Napoleon cake.
- Alternative material. In this design, it became possible to use silent blocks made of polyurethane. Cars with them have already traveled more than tens of thousands of kilometers and we can draw a very definite conclusion. It works. True, there is still one limitation, but that is in the next chapter.
We change silent blocks on a Chevrolet Niva with our own hands
We sorted out the choice of silent blocks, now on the replacement procedure. The work is troublesome and time-consuming, but by doing it ourselves, we will save at least 4–5 thousand rubles. This is exactly the price for replacing silent blocks from specialists.
Most likely you will need an angle grinder.
If you do everything correctly and follow the recommendations, you can handle it yourself.
To press out and press in silent blocks, it is advisable to have a special puller.
It’s inexpensive and every grower should have such a thing in their arsenal. At service stations, bushings are changed using a press, and some manage to get by with a sledgehammer and a pipe of a suitable diameter. However, to replace the lower silent blocks, two more spring ties and an additional jack will be useful.
Precise algorithm upper lever
The work process goes as follows:
- We install the car on an inspection hole or on an overpass, this will make it easier to get to the suspension parts. We engage first gear and place the chocks under the rear wheels.
- We tear off the wheel nuts and hang the front end on a jack.
Using a jack as a lever
We use spring ties.
A grinder might come in handy here.
Old silent block. Get ready for battle!
If the silent block does not press out, you can burn it out. Standard solution.
We press in new silent blocks.
Removing the upper arm
The upper arm is even easier to remove - you need to unscrew the two bolts securing the axle and the three bolts securing the arm to the ball joint.
In this case, if the lower arm has not yet been assembled, you need to tie the front hub with the caliper to the body so as not to damage the brake hose.
The upper silent blocks are pressed in similarly to the lower ones
The upper silent blocks are pressed out and pressed using the same technology as the lower ones; it is highly advisable to use a puller so as not to look for adventures on your silent blocks.
Video about replacing silent blocks in the front suspension of a Chevrolet Niva
Replacing Niva Chevrolet silent blocks with your own hands: which ones are better
The Chevrolet Niva received an almost complete front suspension from its older relative, and if so, then the design is almost 40 years old. Nobody makes any special demands on the suspension elements of a potential SUV; the main thing is reliability. Over these four decades, the suspension has actually shown itself quite well, except for the quality of consumables, ball joints and silent blocks. Do-it-yourself replacement of Niva Chevrolet silent blocks is on our agenda today.
Old and new silent blocks for Niva Chevrolet
Upper arm and silent blocks.
Rubber-metal articulated bushings (silent blocks) on all Nivas until 2008 had a different design from the modern one, and the design and dimensions changed only for the lower front ones.
Important Note
And one more important note: after assembling the suspension, the final tightening of the silent blocks should only be carried out with the machine standing on the ground. This is an axiom and cannot be ignored.
Otherwise, silent blocks will last no more than a thousand kilometers. In addition, there is a torque rating for the lower axle nut. it is 100–170 N. This is quite a large force and without a long lever it will not be possible to tighten the nut correctly. Good luck with the replacement and as smooth roads as possible!