Second generation of the model (since 2009)
Let's see what the bumper looks like in the second generation. It is shown assembled with the radiator grille.
Single node
The bumper and grille form a single unit. The number of attachment points is 11:
- 4 screws on top (see photo);
- 3 screws from the bottom;
- 2 self-tapping screws on the side edges at the bottom (fastening the fender liner);
- 2 screws in the corners.
The assembly assembly is removed in the same way as the bumper in the first generation. Use the instructions for “generation 1”.
Here we discuss how to remove the front bumper of Renault Logan 2. There is also generation “3”.
Dismantling the rear part
Removing the rear element is very simple. The tool you need is the same screwdriver. The screws that secure the part and the Renault fender liners at the rear are unscrewed. They are located above the wheel. Then the lower fasteners are unscrewed, located on both sides of the Renault Sandero, also on the Stepway version. This is done after the screws have already been removed.
The trunk opens, allowing access to other fasteners. The area below the seal contains other fasteners. Here the number plate illumination should attract attention. She comes out. After which the back part can be easily removed. The new component is installed in the reverse order. Before you begin the installation procedure, you must return the license plate illuminator to its place. Now everything is clear and understandable how to remove the bumper.
Front bumper (renault logan spare parts catalog)
| Code | Number | Substitutions | Name | Additional Information |
| 1 | 6001549793 | FRONT BUMPER (R | Set E1, E2 | |
| 3 | 8200752803 | BUMPER GRILLE (R | ||
| 4 | 8200785081 | HEADLIGHT BRACKET (PL | With fog lights | |
| 5 | 8200752827 | HEADLIGHT BRACKET (PL | With fog lights | |
| 6 | 7703008162 | BOLT M6 | Size (X) = 6 | |
| 7 | 7703046134 | NUT M6 | ||
| 8 | 7703602206 | BOLT M6 | ||
| 9 | 7703008162 | BOLT M6 | Size (X) = 6 | |
| 10 | 7703076118 | HOLDER RETAINER | With fog lights | |
| 11 | 6001549323 | BUMPER DEFLECTOR | ogre series - SAN513 | |
| 11 | 6001547950 | BUMPER DEFLECTOR | ogre series - SAN513 | |
| 12 | 6001547949 | BUMPER DEFLECTOR | ogre series - SAN513 | |
| 12 | 6001549324 | BUMPER DEFLECTOR | Series - SAN513 | |
| 13 | 054000001R | 7703072360 | PISTON 8MM (PLUS) | |
| 14 | 7703077435 | SKIN MOUNTING PISTON | ||
| 15 | 7703017090 | BOLT M8 | ||
| 18 | 8200752748 | RADIATOR GRILLE | ||
| 19 | 8200838547 | BUMPER CAP R | With fog lights | |
| 20 | 8200838548 | BUMPER CAP R | With fog lights and | |
| 21 | 7703002838 | BOLT M6 | ||
| 22 | 7703072419 | RIVET D=4.8MM ( |
Currently reading: Logan manual transmission - Website of Alexander Nechaev
Preparation
Some operations to remove the front buffer of the car will have to be performed from below, so for convenience it is better to drive the car onto a viewing hole, overpass or lift. Fortunately, the Renault Duster design makes it easy to remove the front bumper and install the radiator mesh. Front-wheel drive, CVT - do-it-yourself repair, how to remove the bumper? 1. 4. Next, you should inspect the bottom and fender liners of the car, remove dirt so that it does not fall down your collar while doing work.
Having driven the car onto an overpass or inspection hole, it is much easier to carry out work
- Work should begin from the bottom of the car, that is, by unscrewing the screws that attach the underbody protection element to the bumper (instead of unscrewing three screws, you can pull out two clips, and then the protection will be removed along with the bumper). We perform a similar operation on the other side. We unscrew the three screws and disconnect the protection from the bumper. Removing the clip is a faster and easier way to disconnect the protection from the bottom of the car.
If fog lights are installed on the front bumper of your Renault Logan, then before dismantling it, be sure to remember to disconnect them from the central electrical connector. How to remove the front bumper on a Nissan Tiida. Its location: in front of the left wheel in the lower part of the body.
Related Renault Articles
Arriving home, I looked at all the places where I had missed silicone. Nowhere where mud had previously appeared after even a little rain was clean.
Yesterday it rained in Tula for more than half a day. Bend the fender liner and use a 10mm socket wrench to unscrew one bolt on each side.
Related Posts
With a little effort, we disengage the bumper from the fender guides, and then move on to the next side. The final phase of work on the bottom will be unscrewing three bolts in the central part of the body, for this we use a Torx key - T. Having opened the hood on your Renault Logan, you will see 4 more bolts securing the front buffer from its upper part.
We unscrew these 4 bolts with a Torx key T. After carrying out the above operations, grab the hard places of the part and boldly pull it towards you. Dismantling can be considered complete. If your Renault Logan has fog lights, before removing the bumper you need to disconnect the electrical connector on the left side behind the fender liner.
This work takes about ten minutes, and anyone, even an inexperienced Renault owner, can carry it out. Rear element The rear bumper also provides important protection for the Renault Logan, since most accidents also occur there.
Preparing tools and accessories
To perform the operation, you will need a set of tools that every motorist has in the garage. When replacing the rear and front bumpers of Renault Logan, you will need:
- Flat head screwdriver.
- Open-end and socket wrenches “10”.
- Torx keys (T20-30) have a tip in the form of a six-pointed star.
To change a car body part, you will need to drive the vehicle to an inspection pit, or use a lift. Thanks to this, replacing the element will be more convenient.
Immediately before dismantling, you need to clean the bottom and fender liners. This procedure will prevent dirt from falling off during operation.
How to remove the front body element?
And yet, how to remove the front bumper correctly? Even in a minor accident (except for a side accident), it is the front bumper that absorbs the energy from the collision first. If such a circumstance occurs, then this element is subject to no alternative dismantling for the purpose of its repair. In some cases, removal of the rear bumper is also required.
To successfully implement the disassembly event, we stock up on the following tools:
- medium-sized flat-tip screwdriver;
- wrenches: open-end and socket (identical size - “10”);
- "Torx" (T20-T30);
- universal lubricant "WD-40".
To give the event the desired comfort, we arm ourselves with a lift or pit. This will allow you to quickly dismantle the fasteners located below.
How to remove the front bumper step by step? We begin dismantling work, not forgetting to first lubricate the fasteners with the specified product.
- First, we free the Renault Logan bumper from the plastic protective elements. This is done by unscrewing three screws securing the bumper on each side.
- As soon as the bumper mounts are removed, from the side of the wheel arch niches we unscrew the fender liner fixing bolt. For these purposes we use a Torx T20 wrench.
- Next, unscrew the bolts that secure the front bumper itself. To do this, bend the fender liners on both sides and carry out the indicated action using a socket wrench set to “10”.
- Using a slight force, we release the body element one by one on each side from the clutch with the wing guides, and then lift it.
- Finally, we unscrew the three “lower” bolts, through which the dismantled element is secured to the body. We perform manipulation with a Torx T30 key.
- We open the hood and find additional 4 bolts, which we force to “capitulate” under the influence of the Torx T30 key on them.
- After carrying out the indicated list of actions, we boldly pull ourselves, grabbing onto its more rigid places. This concludes the dismantling procedure.
Attention! If a particular Renault Logan modification has fog lights, then before removing the “culprit” of the event, turn off their power by disconnecting the electrical connector hidden behind the fender liner on the left side of the car.
The “operation” usually takes no more than a third of an hour, and even an inexperienced and insecure “Loganovod” can perform it.
Step-by-step instruction
1. First, you need to unscrew the fasteners from the bottom of the bumper.
Remove two clips (small and large) on the left and right.
To remove the small clip, use a flathead screwdriver to turn it counterclockwise about a quarter of a turn. Next, we pick out the central part with a spatula or a flat screwdriver, and then we pick it up at the base and take it out.
Currently reading: Renault Logan engine - 1.4 or 1.6 and which engine is better, 8 or 16 valve
To remove the large clip, you just need to pick it up.
If you remove the clips, you will remove the bumper along with its protection. If you want to remove without protection, then unscrew three screws on the right and left.
2. Unscrew two screws securing the bumper to the fender liner on the right and left.
3. After unscrewing the screws securing the bumper to the fender liner, bend the liner and unscrew the bolt securing the bumper to the fender. We do this on the right and left.
4. Unscrew the three screws securing the bumper from the bottom center.
5. Open the hood and unscrew the four screws securing the bumper on the Renault Logan on the top bar.
6. We take hold of the grille and remove the bumper towards ourselves.
Attention, if you have PTF installed, then disconnect the power connector before removing the bumper. It is common to two PTFs and is located near the left wheel.
Rear element installation
You need to have a partner to install the rear bumper, just like the front one. To avoid damaging the paintwork, use soft cloth gloves. For additional protection, you can cover the edges of the part with masking tape.
- The initial phase of installing the rear bumper will be to try it on.
- Grab the edges of the part with a partner, and then carefully bring this part to the place where it will be installed.
- Place the element in the guides on the rear fenders, then install the rear license plate light and adjust the gaps.
- At the connection points, tighten the mounting bolts, starting from the top.
- From the bottom of the Renault, tighten three bolts in the center of the body, then install plastic protection on each side.
- After tightening all the mounting bolts, the final phase is to remove the masking tape along the edges of the part.
The procedure for replacing the rear bumper on a Renault Logan can be considered complete.
Bumper Removal Procedure
There are a few important points to keep in mind when going through this process:
- Both elements can be replaced by the car owner himself - it is enough to have a certain amount of time and a minimum set of technical skills;
- Before starting the procedure itself, it is necessary to secure the vehicle well. It is recommended to install your Renault Logan on a standing brake, as well as install special pads for its wheels. This will give a chance to prevent accidents during the planned process, as well as simplify and speed up its implementation.
Naturally, it is advisable to carry out such work in a garage, where all the conveniences for this are created, as well as with all the necessary tools.
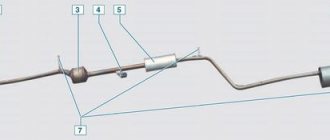
Screws on the bumper
Taking the T30 key, unscrew the three screws from the bottom. They go “in one line” (see photo).
Seven attachment points
Then you can drive the car away from the pit and unscrew the screws on top. The same key is used (T30).
The part called “bumper” can be pulled towards you. At the same time, she is held by the bars of the grate.
We only pull behind bars
We looked at how to remove the front bumper on the first generation Renault Logan.
Down with the shields
Remove the shield installed on the left. It is mounted on self-tapping screws, as well as on two pistons (see photo).
Find five fasteners
For self-tapping screws you need a Torx T20 key. You will also need a flathead screwdriver. It’s better to do the work from a hole, but craftsmen remove the bumper from the curb; Logan’s ground clearance allows you to get to the fastenings without a lift.
The spacer screw is unscrewed from the middle (central) piston, but not completely, but by 2-3 turns. The piston is pulled down by the head of the screw, and nothing else is required. The second piston, located on the edge, is pressed out with a screwdriver (see photo).
Screwdriver – between the shield and the body
The simplest thing left is to unscrew three self-tapping screws. Take a Torx wrench and you'll be fine.
The right shield is removed in the same way as discussed. Let's move on to the question of how to remove the front bumper on a Renault Logan.
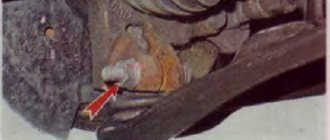
Dealing with the fender liner from the edge of the bumper
Near the bumper on each fender liner there are two self-tapping screws. A Torx T20 key will help solve the problem. And then the most difficult thing begins - you will need to bend the fender liner!
The idea is to place a “10” key in the upper corner of the bumper. This will be a socket wrench, and it is brought in from below. Next, unscrew the fastening screw.
For the left and right fender liner, all actions look the same.
Removing the rear bumper
Removing the rear bumper on a Renault Logan will be as simple as performing a similar procedure for the structure located in the front of the car:
- Initially, the fixing piston is dismantled.
- The next step is to remove the fender liners.
- The structure is detached from the rear fender liners - to do this, you need to unscrew the two fasteners located on them.
- The fasteners located in the wheel arches of the vehicle are dismantled.
- The luggage compartment opens, where the procedure for removing fasteners is repeated.
Replacing the rear bumper
To remove the rear bumper from Renault Logan, you will need:
- Dismantle the light bulb that illuminates the license plate, mud flaps and rear wheel fenders.
- Unscrew the mounting bolt located at the rear in the left wheel arch. The operation is performed with a “10” head. Use a screwdriver to press out the pins.
- Pull the side part of the body element and disengage the latches.
- Remove the five mounting bolts from the bottom. The procedure is performed with a 10mm head.
- Open the trunk lid and use a T30 Torx key to unscrew the three top mounting screws.
- Carefully remove the body kit from the bracket. If it is damaged, it will subsequently be impossible to securely secure the rear bumper.
All removed parts are laid out depending on their purpose. The side bolts are placed in one place, and the front and rear bolts in another. This sorting will greatly facilitate the process of installing the body kit on a vehicle.
How to reinstall the rear bumper
To install the rear bumper, you will need to perform all operations in the reverse order of disassembly. However, the procedure has a number of nuances:
- Before installation, you must thoroughly wash the “landing” area.
- It is necessary to ensure that the clamps located on top fit exactly into the grooves intended for them. This rule also applies to other fasteners.
- If after installation the body part sags, then the caps should be replaced. Bolts are used as a replacement. To do this, you will need to dismantle the bumper again and use pliers to squeeze out the unusable pistons.
There is nothing difficult about removing and installing bumpers on Renault Logan yourself. This part of the car body is held on by bolts, self-tapping screws, which can be easily unscrewed with keys. And also, plastic pistons, clamps and brackets, which can simply be pressed out with a flat screwdriver.
When performing the procedure, it is important to know the sequence of the operation and be especially careful. If the fasteners break, the body part will not adhere tightly to the car, which will require additional time, effort and money.
Removing the front bumper
In order to remove the front bumper of Renault Logan, you will need to complete the following steps:
- Three fasteners are removed, which are presented in the form of screws.
- Two sections of mudguards located in the lower part of the structure are being dismantled.
- The bracket is disconnected by sequentially dismantling special pistons.
- The next three screws are removed, which hold the system in the area of the apron of the car's wings.
- The last four fasteners located on the vehicle radiator are disconnected.
Currently reading: RENAULT LOGAN ELECTRICAL DIAGRAM - ELECTRICAL DIAGRAM
Removing the grille without removing the bumper
If you remove the front bumper of the new Renault Logan, the radiator grill will also be removed. But getting rid of the bars can be easier.
Car without a grille, but with a bumper
We will talk about the second generation of cars. Need a drill:
- Remove the chrome "saber".
Along the edges under the “saber” there are rivets (aluminum). They must be bitten off with tongs; The “saber” can be glued back - Unscrew the 4 screws on top;
- Having folded the grille towards you, you need to drill out the rivet under the emblem;
- The lower edge of the grille is held on by rivet tongues (plastic). They bend by hand and are easily disengaged.
Use our method if you no longer need the old part.
Bumper function for Renault Logan
This element of a modern four-wheeled vehicle has two main functions:
- Protective;
- Aerodynamic.
In the first case, this part of the car protects the vehicle from minor damage, which occurs much more often than serious road accidents. It is much easier to replace the front and rear bumpers of a Renault Logan car with new elements than to correct other, more serious damage to the car, for example, deformation of its body during an unauthorized collision with something.
The second function of this element is no less important - specially created shapes increase downforce, which allows the car to behave better at high speeds, and also prevents the formation of a vortex flow behind the car while it is moving.
Find out more about the new Logan
- Renault Logan: engine oil change
- DIY Renault Logan clutch replacement
- Replacing and adjusting the clutch on a Renault Logan with your own hands – Taxi Bolt | New Logan
- Durability of Renault Logan: engine life
- Replacing the Renault Logan suspension arm
- Exterior colors of Renault Logan 2021 | Photos of the colors of the new Renault Logan
- Crash test of Renault Logan - Crash test of LOGAN, or Poverty is not a vice! — LOGAN — CRASH TESTS — Test drives and Crash tests — Renault atlas / Renault atlas
- Diagram of the Renault Logan brake system