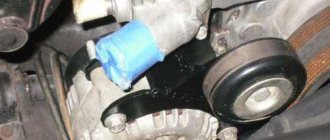
The standard location of the Lada 4×4 generator is at the bottom, which cannot be called a good solution. During off-road driving, water and dirt easily get on it, or antifreeze drips, which significantly reduces its service life. To protect an important part from moisture, owners resort to modifications. Let's look at how to move the generator up to a Lada 4×4.
Device Description
On Niva 21214 cars there is a generator of type 9412.3701, on VAZ 21213 - type 371.3701, on Niva Chevrolet there is a generator 2123. All of them are alternating current electric machines with electromagnetic excitation, having a built-in rectifier unit with silicon diodes and an electronic voltage regulator. The maximum current produced by the generator unit type 9412.3701 is 80 A, voltage - 13.2 - 14.7 V, rotation - right.
Design of unit 21214
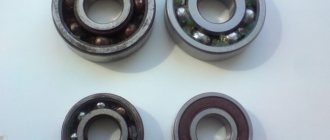
The unit covers are attached to the stator using 4 bolts. The covers have bearings installed. They rotate the rotor shaft. In the front bearing, the inner race is clamped with a nut along with a thrust ring and washer. The 2nd bearing is also pressed into the back cover.
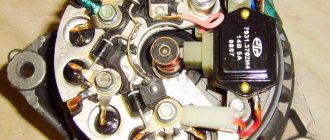
The stator has a 3-phase winding, one of the ends of which is connected to a rectifier unit consisting of 6 diodes. Of these, 3 diodes are negative, 3 are positive. According to the polarity, they are pressed into the plates. The entire structure consists of a rectifier unit, which is located on the back cover of the generator unit covered with a protective casing.
The design of the unit also includes contact rings and brushes. On the back side of the back cover there is a brush holder, which is structurally connected to the voltage regulator. The rectifier contains a capacitor that protects the electrical network from power surges.
The “B” terminal of the generator set must be connected to the positive terminal of the battery, and the negative terminal of the battery to the vehicle ground. If the connection is incorrect, this will lead to breakdown of the diodes.
Generator - device, characteristics, operation check
Start the engine, let it run for a few minutes, then, pressing the gas pedal, bring the crankshaft speed to 3000 rpm. Turn on the high beam headlights, heated rear window, and heater fan.
Measure the voltage at the battery terminals, which should be above 13.2 V for generator 9412.3701 and 13.6 V for generator 371.3701.
If this is not the case, the voltage regulator with the brush assembly, the generator windings are faulty (open or shorted) or the contact rings of the field winding are oxidized.
The removed voltage regulator of the generator 9412.3701 can be checked by connecting a lamp (1–5 W, 12 V) between the brushes, and a power source to the “D” and “ground” terminals (DC only, “minus” to ground!) , initially with a voltage of 12 V, and then 15–16 V.
In the first case, the lamp should be on, in the second - not. If the lamp lights up in both cases, there is a breakdown in the regulator; if it doesn’t light up, there is a break or broken contact between the brushes and the regulator terminals. In both cases the regulator should be replaced. To check the generator regulator 371.3701, the current source should be connected to terminals “B” and “C” (“plus”) and “ground” (“minus”).
Also interesting: Procedure for replacing lamps in the headlights of a Chevrolet Niva car
To check the valves of the rectifier unit, disconnect the wires from the battery, generator and from the voltage regulator terminal(s).
Connect the “plus” of the battery through a lamp (1–5 W, 12 V) to terminal “B” of the generator 9412.3701 (to terminal “30” of the generator 371.3701), and the “minus” to its body.
If the lamp is on, then there is a short circuit in both the block of “positive” and the block of “negative” valves.
To check the short circuit in the “positive” valves, connect the “plus” of the battery through a lamp to the “B” terminal of the generator 9412.3701 (with the “30” terminal of the 371.3701 generator), and the “minus” - to the terminal of one of the phase windings of the stator. If the lamp is on, one or more positive valves are broken.
To check the short circuit in the “negative” valves, connect the “plus” of the battery through a lamp to the terminal of one of the phase windings of the stator, and the “minus” to the generator housing. If the lamp is on, one or more negative valves are broken or the stator windings are shorted to the generator housing.
To prevent short-circuiting of the windings, remove the generator from the car and, having disconnected the windings from the voltage regulator and rectifier unit, check their short circuit to ground with a lamp or ohmmeter. The generator valves can also be checked with an ohmmeter without connecting the battery and test lamp.
The short circuit of additional diodes can be checked by connecting the “plus” of the battery through a lamp to terminal “D” of the generator 9412.3701 (to terminal “61” of the generator 371.3701), and the “minus” - to the terminal of one of the phase windings of the stator (to one of the mounting bolts of the rectifier block ). If the lamp is on, one or more additional diodes are broken.
A break in the main valves is determined by a sharp decrease in the output current (voltage drop under load). However, it can also be caused by an open or shorted circuit in the generator windings.
A break in the additional valves can be determined by the low voltage at plug “D” of generator 9412.3701 or plug “61” of generator 371.
3701 (below 14 V) at low and medium generator rotor speeds.
The serviceability of each diode (main or additional) can only be determined with a removed rectifier unit using an ohmmeter or a test lamp. If the rectifier unit fails, it is recommended to replace it as an assembly.
It is possible to replace individual valves, but the main valves will require repressing them in the holder - an operation that requires care and skill.
Read news about the new Niva
- Niva generator transfer bracket drawing
- Niva Chevrolet front hub repair
- Niva Chevrolet where is the starter relay located?
- Do-it-yourself Niva suspension lift. How to lift the front and rear suspension of a Niva car?
- Generator Niva 2121, 21213, 21214: which one is installed, replacement
- Generator Niva 2121, 21213, 21214: which one is installed, replacement
- Generator Niva 2121, 21213, 21214: which one is installed, replacement
- Generator Niva 2121, 21213, 21214: which one is installed, replacement
Basic malfunctions and ways to eliminate them
Checking the health of the unit is done using a multimeter. After the engine is started, the voltage at the battery terminals should be 13.6 V. If the value is higher or lower, this indicates a break or short circuit of the windings, oxidation of the slip rings, a malfunction in the brush assembly, or voltage regulator.
The generator unit may not work well due to weak belt tension or its breakage. In this case, you need to adjust the tension or replace the belt. Faulty voltage regulator, needs to be replaced. If a breakdown, short circuit, or damage to the rotor windings is detected, it should be replaced. If there is a break or short circuit in the stator windings, it requires replacement. If the diodes are damaged, the rectifier unit is replaced.
Guide to removing and connecting the generator
To remove the unit, you need to prepare a set of tools: keys “10” and “19”, ratchets with heads, a hammer and a small extension.
The process consists of the following steps:
- First of all, remove the negative terminal from the battery.
- Next, you need to remove the engine protection and the right mudguard.
- Then, using a hammer, carefully knock out the mounting bolt and remove it.
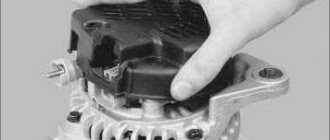
- At the next stage, you need to disconnect all the wires going to the generator: the plug and the wires secured with a nut.
- Then the fastening on which the belt tensioner is located is unscrewed.
- By removing the belt, the assembly can be dismantled through the hole that was formed after removing the protection.
- After replacement or repair, install the unit in reverse order.
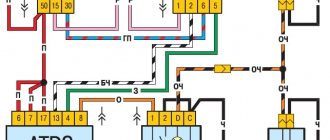
The generator is connected according to the diagram.
Price issue
The VAZ 21214 generator has good repairability, which allows you to significantly save money if worn or broken parts are replaced in a timely manner.
If you change the complete unit, the cost of replacement will be as follows:
- generator 21214 – 3125 rub.;
- lower mount – 133 RUR;
- fastening bolt - 53 rub.;
- tension bar - 55 rub.;
- relay RS-527 – 57 rub.
Video “Step-by-step instructions for replacing the generator on Niva 2121”
The video shows a step-by-step replacement of a generator set on a Niva (video author - Ivan Matieshin).
Niva is an excellent domestic SUV that can compete with modern jeeps. VAZ 21214 received a durable body, a powerful power plant and a reliable suspension. Like any car it has its drawbacks. These include the location of the generator - the unit is installed in the lower part of the body. When testing for strength in forest and mountainous areas, dirt, sand, and water get into it. Another unpleasant point is that coolant constantly drips onto the unit.
The problem can be solved by moving the generator upstairs.
After reading this article, you will learn:
- What is needed to move the generator upstairs. How does the process work for cars with and without power steering? Is it worth buying a new unit for VAZ 21214.
Study this drawing carefully. The author decided to make a bracket for moving the generator with his own hands. The part is made of metal, the thickness of which should be 4 mm, and the width and length should be 80 mm. To assemble the bracket, you will need parts from other domestic cars:
- Belt 6РК1290; Adjustment bar; Crankshaft pulley from tens.
Mounting drawings for injection Lada 4×4 with power steering (VAZ 21214)
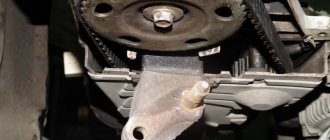
The author of the design proposes to move the generator to the place of the power steering, having previously installed the following bracket in its place:
Belt 1220 mm profile “A” (ZIL157), wedge angle 40 degrees. High pressure pressure hoses have a length at the centers of the fitting holes of 1450 mm. Return sleeve – 1115 mm. You will have to cut a hole for the hoses in the right protective casing. The belt is 710 mm long, other dimensions are the same. The photo on the left shows the hydraulic pump bracket, on the right - the power steering in the new location.
Drawing of its bracket:
Turn the power steering pump upside down. Result of moving the generator to the top:
There are ready-made kits for moving the Lada 4×4 generator upwards on sale, but the price for a piece of iron can be greatly inflated. Thus, by making such a bracket ourselves, we extend the service life of the generator and save money.
Have you ever encountered such a modification? How did you solve a similar problem? Let us remind you that in another article we determine whether the Lada 4×4 needs a more powerful generator.
Keywords: 4x4 generator
Source: xn--80aal0a.xn--80asehdb
Generator bracket diagram for Niva 21213 (carburetor)
The author of the drawing made a bracket from a piece of metal 80x80 mm, 4 mm thick. The upper adjustment bar for the generator is borrowed from the Volga. It was cut in place and a new 8.5 mm mounting hole was drilled.
VAZ 2110 crankshaft pulley, GAZ 3110 pump pulley, 6RK1290 belt. A standard cooling fan is installed on the pump pulley. The location of the generator is top left. The lower mounting point of the fuel pump, at the front we attach it to a standard stud and bolt, and at the top there is an M8 cylinder head bolt. The lower long generator mounting bolt with an engraver and an additional locknut.
Another bracket drawing provides for a belt measuring 1375 mm. You will need to modify the plane on the head in the area of the M8 bolt with an angle grinder, and also change the studs and bolts securing the front cover.
Features of installing the bracket in the video:
Nuances of moving a generator
The disadvantage of domestic Niva SUVs is the location of the generator unit - at the bottom of the engine compartment. It constantly gets contaminated when driving off-road, and coolant constantly drips. The problem is solved by moving the generator upstairs (the author of the video is SARTANETS).
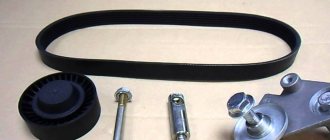
To transfer, you will need a set of keys, a bracket, mounting bolts, and a V-belt. You can make a generator transfer bracket with your own hands according to the drawing below.
Drawing of a homemade bracket
Sequence of actions during transfer:
- We dismantle the propeller, pump and remove the belt.
- By unscrewing the standard bracket, you can remove the generator.
- We cut off the bead around the side of the cylinder head and on the cylinder block.
- Then you should unscrew the two bolts and two studs.
- Next, the assembly is installed on a new bracket and final assembly is performed.
Thus, moving the generator unit upstairs is not difficult.